> ## Documentation Index
> Fetch the complete documentation index at: https://help.kajabi.com/llms.txt
> Use this file to discover all available pages before exploring further.
# Connect Google Analytics with Kajabi
> Integrate Google Analytics with Kajabi to track website traffic, visitor behavior, and conversions.
Kajabi Analytics offers essential data to help you run your online business. Integrate with **Google Analytics** to get even more data, like where your website traffic is coming from, where your page visitors are located, what their online behavior and conversions look like, and more.
**Note:**
If your Google Analytics interface differs in appearance, this guide can still assist you in connecting Google Analytics with Kajabi. However, if you need additional assistance, we recommend that you consult the resources available on [Google's support page](https://support.google.com/analytics/answer/1008015?hl=en) or contact our [support team](/articles/resources/support/how-to-contact-kajabi-support).
## Connect Google Analytics with Kajabi
### Create a universal analytics tracking ID
To connect Google Analytics to Kajabi, you'll first need to set up your Google Analytics account and create a universal analytics (UA) tracking ID:
* Log into your Google Analytics dashboard at [analytics.google.com](https://analytics.google.com/analytics/web/)
* Click the **Start measuring** button
* Enter your desired account name in the **Account name** field
* Adjust your data sharing settings as desired and click **Next**
* Enter your desired analytics property name in the **Property name** field
* Then, select the **Show advanced options** link
* Click the toggle on to **Create a Universal Analytics property**
* Enter your Website URL and click **Next**
* Input your basic business information and click **Create**
* Follow the prompt to accept the Terms of Service
**Note:**
If you've already created a property without enabling the universal analytics tracking ID, you may need to create a new property to properly connect your Google Analytics with Kajabi.
### Copy the Google Analytics UA tracking ID
* Navigate to the top left of your Google Analytics dashboard and click **All accounts**
* Locate your account name in the Analytics Account column
* Then, locate your property in the Properties & Apps column
* Your universal analytics (UA) tracking ID will begin with the letters "UA"
* Copy your UA **Tracking ID**
### Paste the UA tracking ID into Kajabi
* Navigate to your Kajabi Dashboard
* Click **Settings** at the bottom of the left sidebar
* Then, click **Integrations & Webhooks**
* Scroll down to **Google Analytics** and click the toggle **On**
* Paste your universal analytics (UA) tracking ID into the Google Analytics ID field
* Click **Save** to keep and apply your changes
## Understanding the differences between Google Analytics and Kajabi Analytics
### Why are there differences between Google Analytics and Kajabi Analytics?
Most page trackers use cookies, and although they are implemented similarly, the way they track page views may differ.
For example, let's say you refresh a web page multiple times with a few seconds in between each refresh. Depending on how they're configured, one tracker might count each page refresh as a unique page view while another tracker might count the entire event as a single page view.
See below for more information on Google Analytics and Kajabi Analytics.
### Google Analytics
Refer to [Google's documentation](https://support.google.com/analytics/answer/1257084#pageviews_vs_unique_views\&zippy=%2Cin-this-article) for complete information on the functionality of Google Analytics.
### Kajabi Analytics
Unique views are counted per unique person, computer, or mobile device that viewed the page. If the same person/device views the page more than once, it won't be counted as a Unique View.
On Kajabi, Views are the total number of times the page is viewed. This includes multiple visits by the same person, including page refreshes.
## Purchase events in Google Analytics
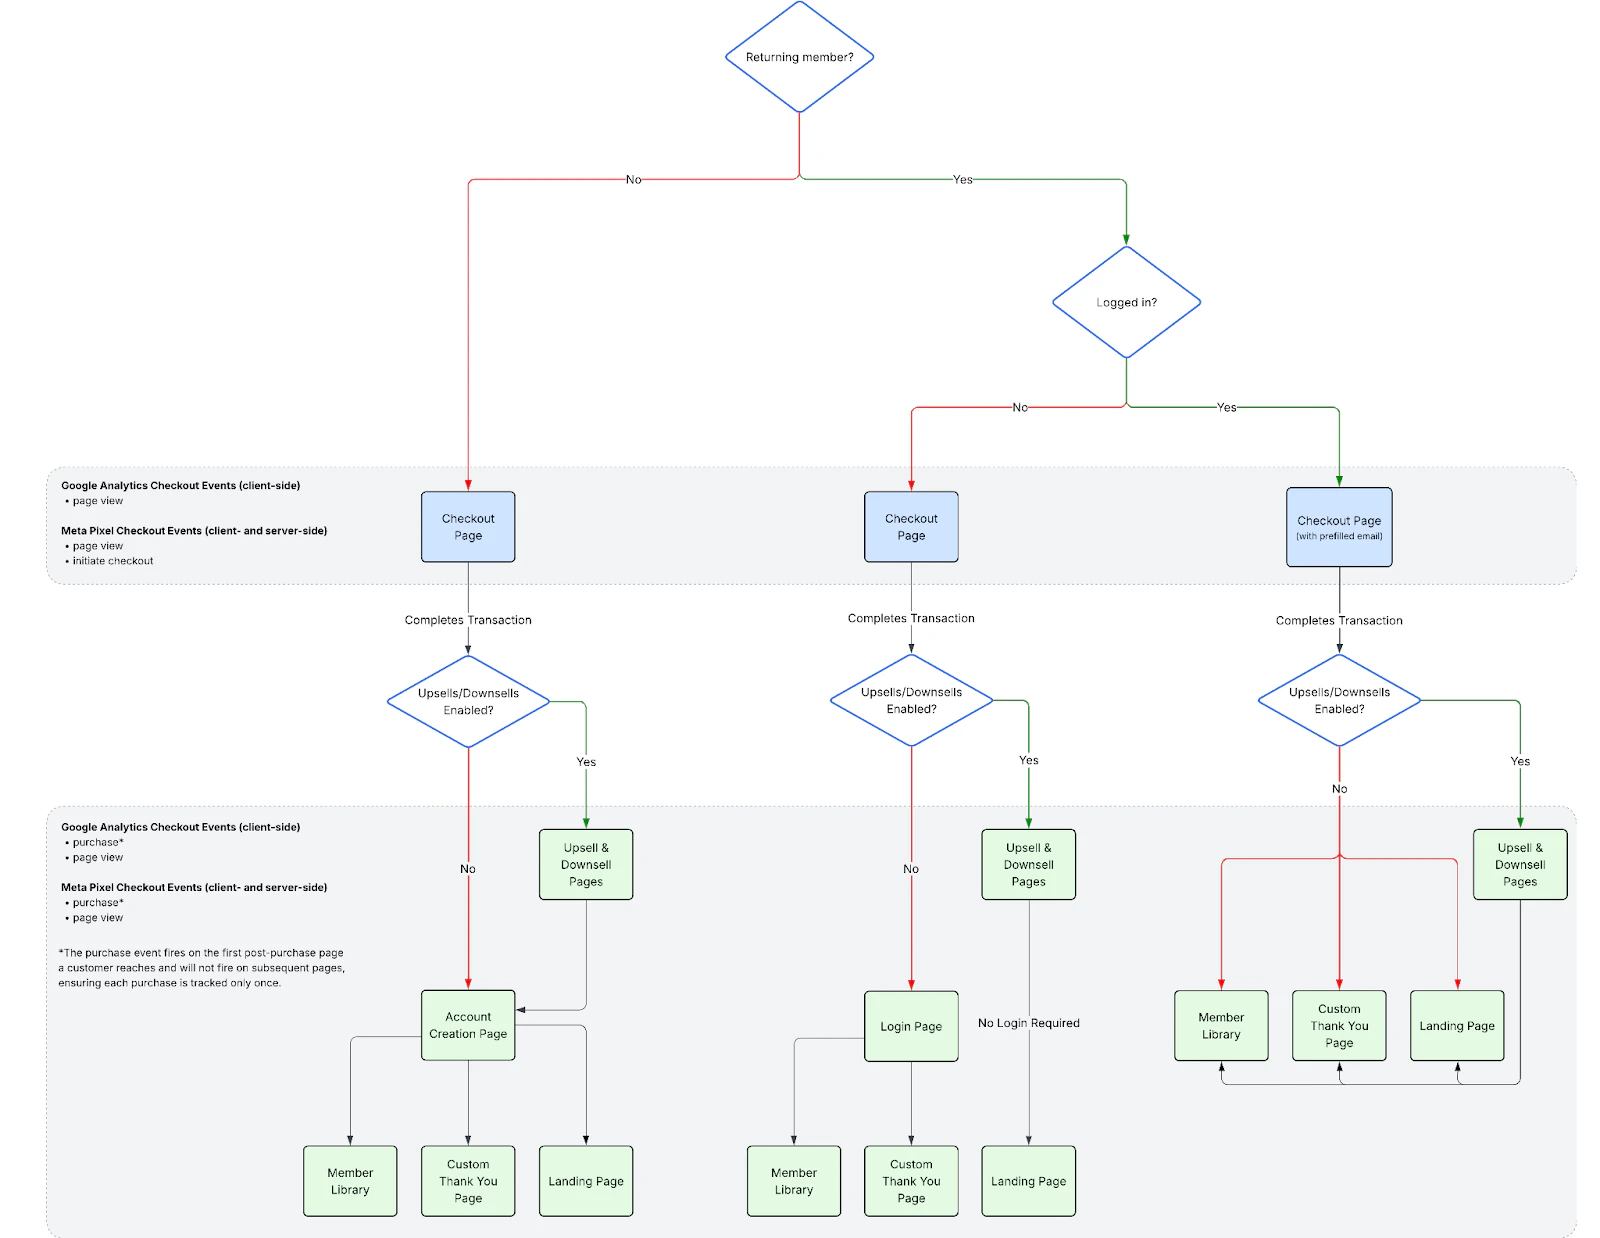
Google Analytics purchase events fire on the first post-purchase page a customer reaches, such as:
* Login page (for new or returning customers)
* Account creation page (for new customers)
* Upsell page
For extra reliability, the purchase event is also configured to fire on post-purchase thank-you pages, landing pages, and the member library. However, once the purchase event has fired on one page, it will not fire again on subsequent pages.
This ensures that:
* Purchases are tracked as early as possible
* Tracking is consistent, even if a customer does not move through every step of the flow
See the flow chart below for a visual breakdown of where the purchase event fires in [Enhanced Checkout](/articles/sales/checkout/enhanced-checkout-overview), depending on whether the customer is new or returning, and whether returning members are already logged in or not:
 If you also use Meta Pixel, see [Meta Pixel with Kajabi](/articles/api-integrations/analytics-integrations/meta-pixel-with-kajabi).
## Additional resources
Additional support for Google Analytics is available for those with advanced knowledge of cross-domain tracking and UTM parameters.
### Cross-domain tracking
* Read [Google's Support Guide](https://support.google.com/analytics/answer/1034342?hl=en\&ref_topic=2772342) for details on using Google Tag Manager for cross-domain tracking
* Read Google's Guide on How to [Deploy Google Analytics with Tag Manager](https://support.google.com/tagmanager/answer/6107124?hl=en) for more details
* After obtaining your Tag Manager code, track purchases by inputting it into the [Checkout Settings](/articles/sales/checkout/how-to-add-a-javascript-tracking-code-to-your-checkout-pages) of your Kajabi account
* Input your Tag Manager code in your site's page scripts
* With the Kajabi Pro plan, [learn to access the code editor](/articles/website/pages/how-to-access-the-code-editor) for your site to add your Tag Manager code to specific pages
### Create UTM Parameters for your links with the Google Analytics URL Builder
* Read [Google's Support Guide](https://support.google.com/analytics/answer/1033867) to learn how to generate custom campaign parameters for your URLs
* Generate your URL with [Google's URL Builder](https://ga-dev-tools.appspot.com/campaign-url-builder/)
If you also use Meta Pixel, see [Meta Pixel with Kajabi](/articles/api-integrations/analytics-integrations/meta-pixel-with-kajabi).
## Additional resources
Additional support for Google Analytics is available for those with advanced knowledge of cross-domain tracking and UTM parameters.
### Cross-domain tracking
* Read [Google's Support Guide](https://support.google.com/analytics/answer/1034342?hl=en\&ref_topic=2772342) for details on using Google Tag Manager for cross-domain tracking
* Read Google's Guide on How to [Deploy Google Analytics with Tag Manager](https://support.google.com/tagmanager/answer/6107124?hl=en) for more details
* After obtaining your Tag Manager code, track purchases by inputting it into the [Checkout Settings](/articles/sales/checkout/how-to-add-a-javascript-tracking-code-to-your-checkout-pages) of your Kajabi account
* Input your Tag Manager code in your site's page scripts
* With the Kajabi Pro plan, [learn to access the code editor](/articles/website/pages/how-to-access-the-code-editor) for your site to add your Tag Manager code to specific pages
### Create UTM Parameters for your links with the Google Analytics URL Builder
* Read [Google's Support Guide](https://support.google.com/analytics/answer/1033867) to learn how to generate custom campaign parameters for your URLs
* Generate your URL with [Google's URL Builder](https://ga-dev-tools.appspot.com/campaign-url-builder/)