> ## Documentation Index
> Fetch the complete documentation index at: https://help.kajabi.com/llms.txt
> Use this file to discover all available pages before exploring further.
# Meta Pixel with Kajabi
> Install and configure Meta Pixel to measure advertising effectiveness on your Kajabi site.
**Meta Pixel** is an analytics tool that allows you to measure the effectiveness of your advertising by understanding the actions people take on your website.
## Install Meta Pixel
### Create a Meta Pixel with Meta Business
* Log in to your [Meta Business](https://business.facebook.com/) account (or create an account).
* Click **Events Manager** in the left sidebar.
* Select **+ Connect Data Sources** from the left sidebar.
* Choose **Web**, and click **Connect**.
* Enter a **Pixel name**, then click **Create Pixel**.
* Input your site URL (i.e., [your custom domain or Kajabi subdomain](../../website/domains/connect-a-custom-domain)) to check your partner integration eligibility, and click **Next**.
* Select the option to connect your website with **Conversions API and Meta Pixel**. [Learn more about Meta's Conversions API](https://www.facebook.com/business/help/2041148702652965?id=818859032317965).
* Click **Next**:
[Learn more about Meta Pixel](https://www.facebook.com/business/learn/lessons/overview-of-how-facebook-pixels-work?course_id=314938442554416\&curriculum_id=726377631115881).
**Tip:**
Verify your Domain in [Business Manager](https://business.facebook.com/) to claim and protect ownership of your website domain name. [Learn more about Meta's domain verification](https://developers.facebook.com/docs/sharing/domain-verification).
### Generate your API Access Token
An **Access Token** is required to send your event data directly from Kajabi to Meta through Meta's Conversions API. [Learn more about Meta's Conversions API](https://www.facebook.com/business/help/2041148702652965?id=818859032317965).
#### Generate an Access Token
* Select **Set up manually** and click **Next**.
* On the Manual Implementation Overview page, click **Continue**.
* Select the [Events](#pixel-events) you want to send through the API, then click **Continue**.
* Next, select the Event Parameters you want to send, and click **Continue**.
* Review your setup details, and click **Continue**.
* On the 'See Instructions' page, click the **Open Implementation Guide** link.
* Navigate to the **Generate an Access Token** section and click **Generate Access Token**.
* Copy your Access Token (note: you'll need your Pixel ID in the next step as well).
* Configure any other settings as desired and click **Finish**:
**Warning:**
Utilizing Meta's Conversions API may require additional review of your compliance obligations under data regulation laws applicable to you and your customers.
### Connect your Meta Pixel to your Kajabi site
After generating your Access Token, complete your Meta Pixel integration by adding your **Pixel ID** and **Access Token** to your Kajabi site.
#### Add Meta Pixel and Access Token to Kajabi
* Click open **Settings** at the lower left of your Kajabi dashboard.
* Select **Integrations & Webhooks**.
* Scroll down to Facebook Pixel and click the toggle to **On**.
* Enter your Pixel ID in the **Pixel Id** field.
* Then, enter your Access Token in the **Access Token** field.
* Click **Save** to complete your integration.
For users who prefer not to use Kajabi's native integration, Meta Pixel can also be added via manual script embedding. Navigate to `Settings > Site Details > Page Scripts`, paste the Meta Pixel code provided by Meta into the `Header Page Script` section, and save your changes. This method ensures site-wide tracking for those who require specific customization.
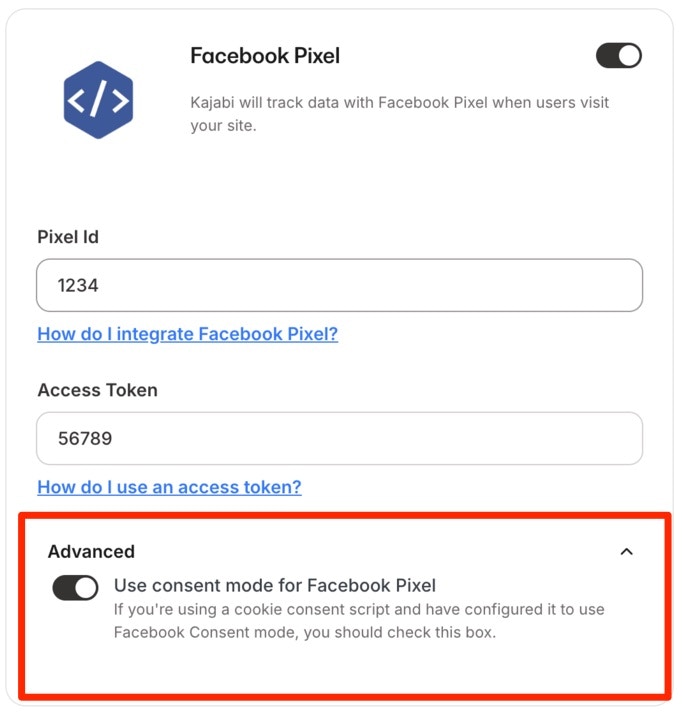
If you are using the Meta Pixel and the [cookie consent script](../../website/pages/cookies-and-cookie-disclaimers), you will need to enable the Meta Pixel consent mode:
 **Tip:**
After connecting your Meta Pixel, test to verify that everything has been set up correctly. Using Chrome? Check out the [Pixel Helper extension from Meta](https://chrome.google.com/webstore/detail/facebook-pixel-helper/fdgfkebogiimcoedlicjlajpkdmockpc?hl=en) to test your Pixel implementation. Testing can also be done using the Meta Ads Test Events tool.
When testing your Meta Pixel, ensure that you have placed the script in the correct location. Avoid inserting it in CSS or unintended script areas. Use only designated headers or page scripts. For advanced needs, check the configuration within Meta Ads to ensure all expected events are being tracked.
## Pixel events
With Meta Pixel, **Events** are the actions visitors take on a website, such as viewing a page, submitting a form, or making a purchase.
In your ads reporting dashboard, the **Events** you can track include:
* **Lead** - When a site visitor submits information with the understanding that your business may contact them at a later date.
* **Initiate Checkout** - When a site visitor begins a checkout process, such as by clicking a Checkout button.
* **Purchase** - When a site visitor completes a purchase and triggers some type of confirmation or transaction receipt.
* **View Content** - When a site visitor views a web page you care about. This event indicates that someone has visited a page URL but provides no data on what they saw or did thereafter.
* And many more. [Learn more about Meta Pixel Events](https://www.facebook.com/business/help/402791146561655?id=1205376682832142).
## Where the purchase event fires
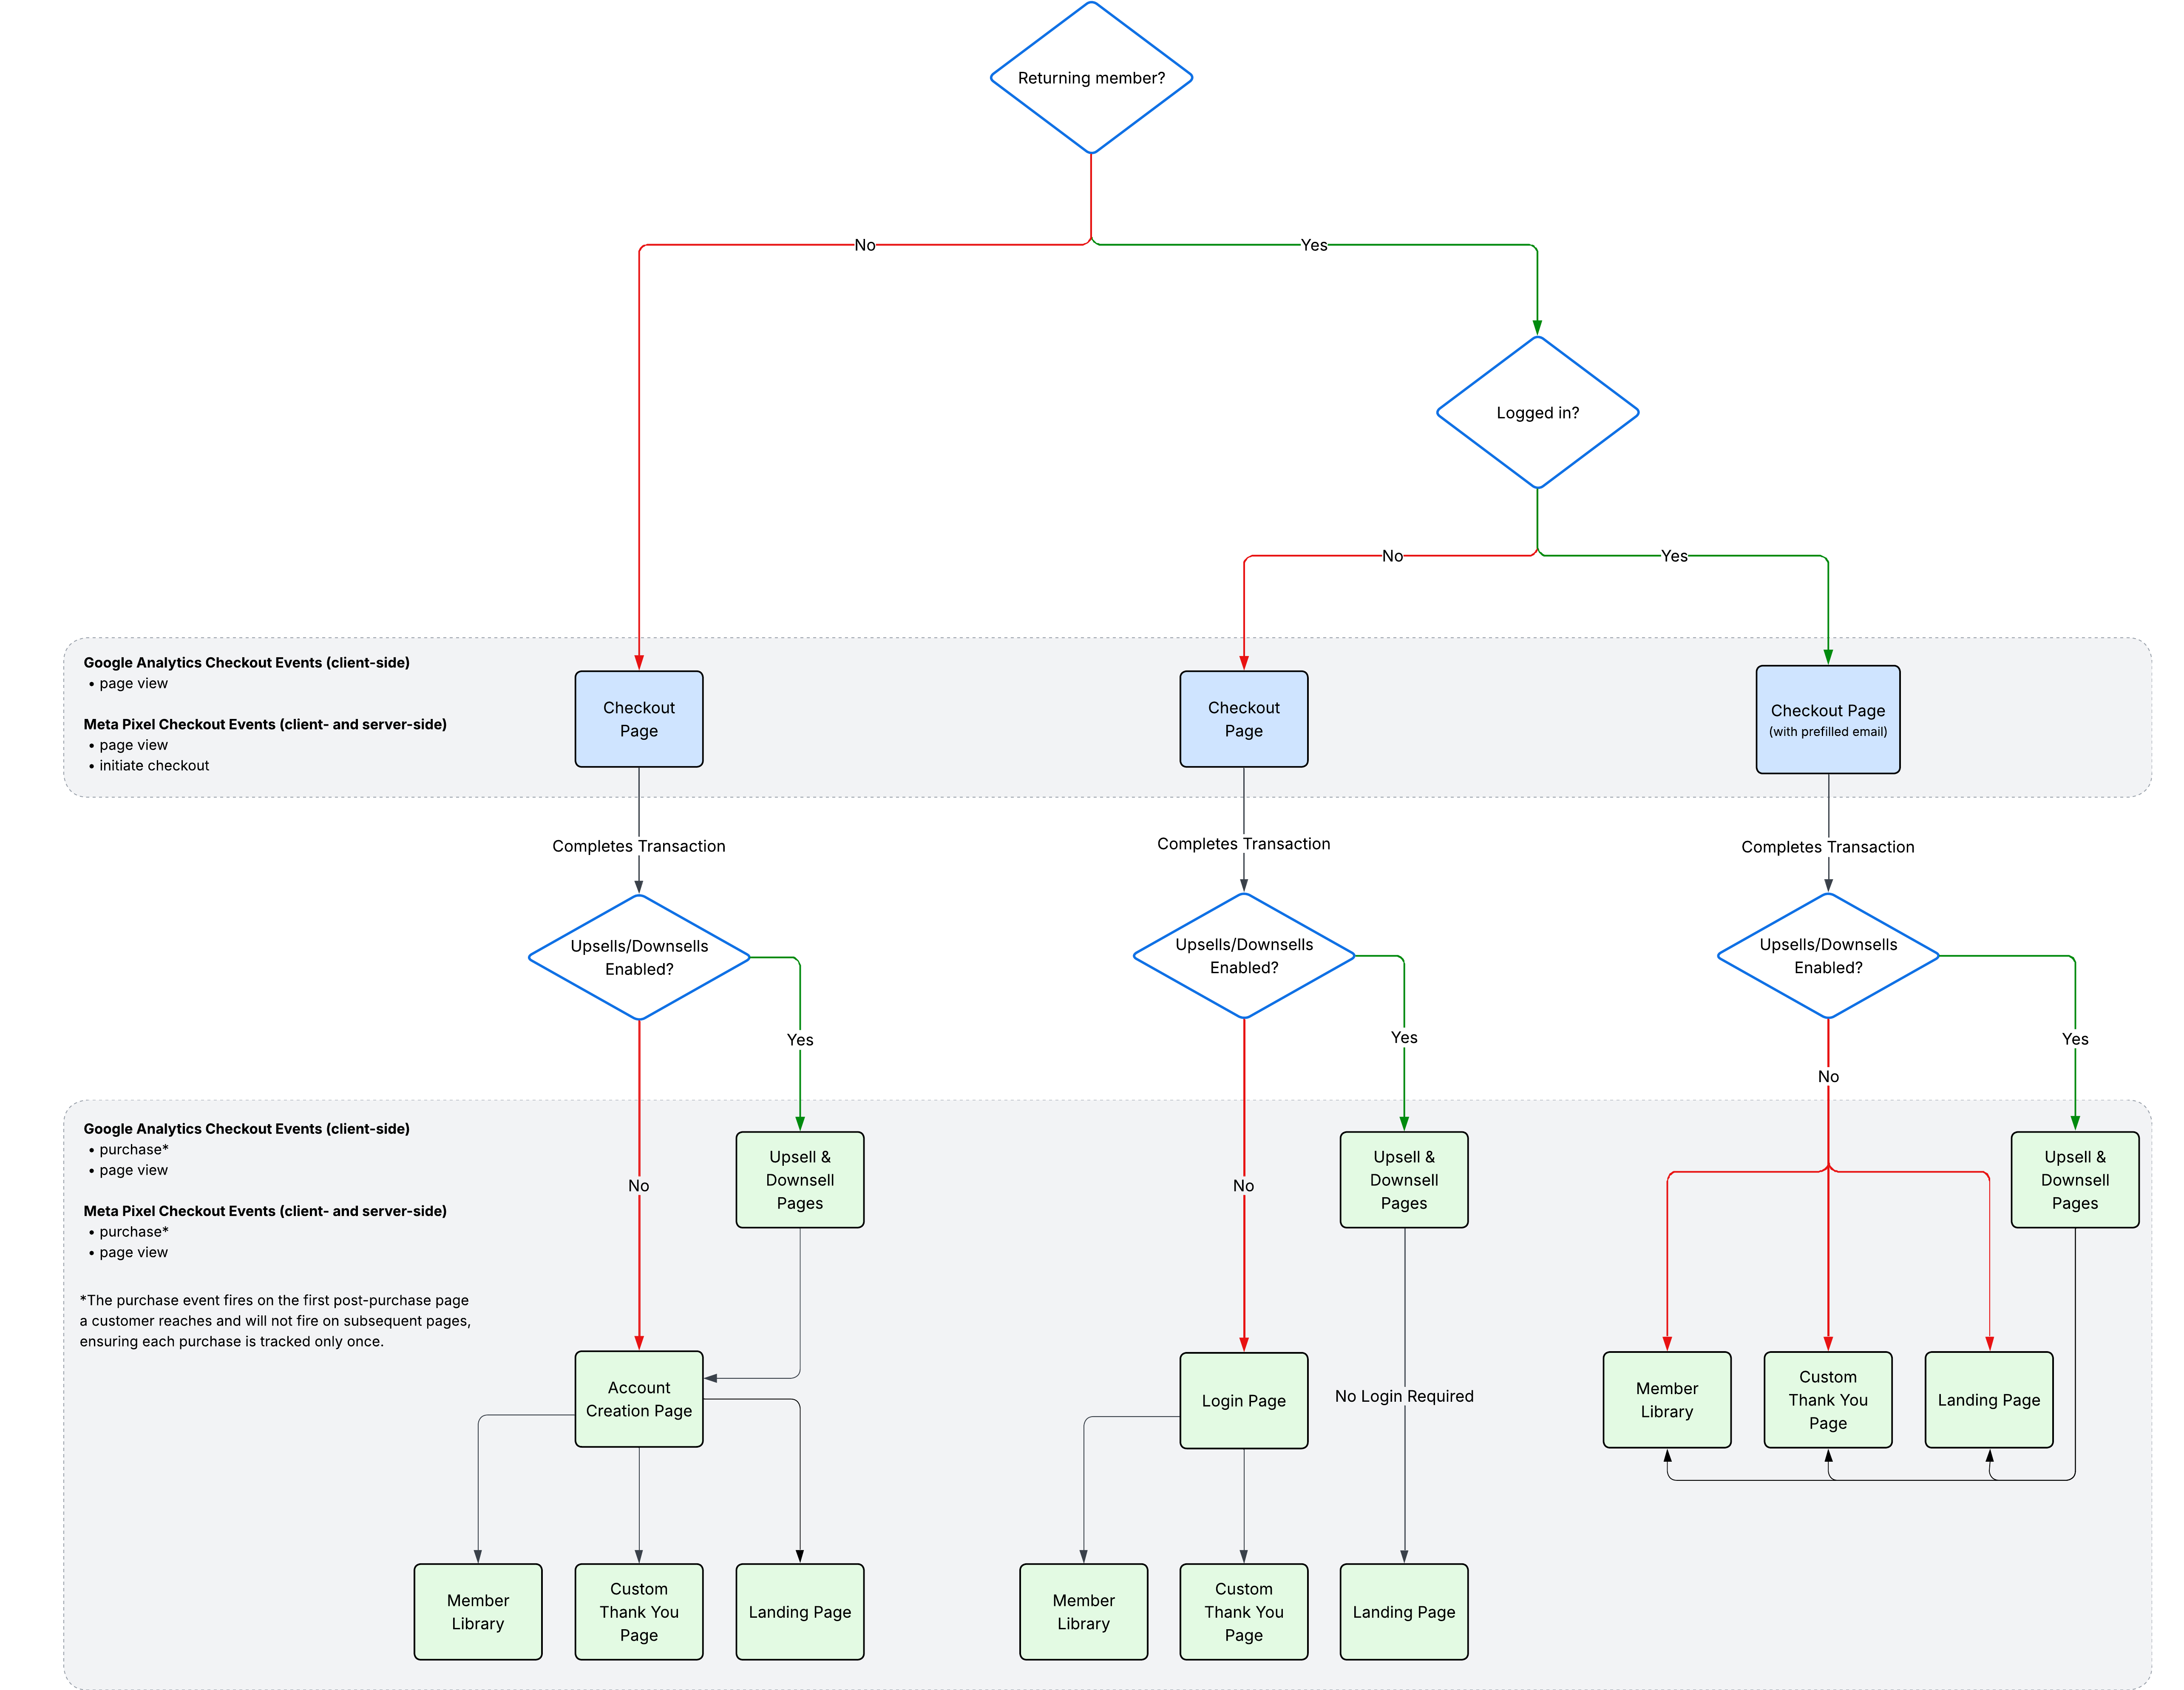
Kajabi sends purchase events to Meta in two ways: through the customer's browser (client-side) and directly from Kajabi's servers (server-side). When both events are sent for the same purchase, Meta automatically deduplicates them using the purchase ID.
Purchase events fire on the first post-purchase page a customer reaches, such as:
* Login page (for new or returning customers)
* Account creation page (for new customers)
* Upsell page
To provide extra reliability, the purchase event is also configured to fire on post-purchase thank-you pages, landing pages, and the member library. However, once the event has fired on one page, it will not fire again on subsequent pages.
This ensures:
* Purchases are captured as early as possible.
* Tracking is consistent, even if a customer does not continue through every step of the flow.
See the flow chart below for a visual breakdown of where the purchase event fires in [Enhanced Checkout](../../sales/checkout/enhanced-checkout-overview), depending on whether the customer is new or returning, and whether returning members are already logged in or not:
**Tip:**
After connecting your Meta Pixel, test to verify that everything has been set up correctly. Using Chrome? Check out the [Pixel Helper extension from Meta](https://chrome.google.com/webstore/detail/facebook-pixel-helper/fdgfkebogiimcoedlicjlajpkdmockpc?hl=en) to test your Pixel implementation. Testing can also be done using the Meta Ads Test Events tool.
When testing your Meta Pixel, ensure that you have placed the script in the correct location. Avoid inserting it in CSS or unintended script areas. Use only designated headers or page scripts. For advanced needs, check the configuration within Meta Ads to ensure all expected events are being tracked.
## Pixel events
With Meta Pixel, **Events** are the actions visitors take on a website, such as viewing a page, submitting a form, or making a purchase.
In your ads reporting dashboard, the **Events** you can track include:
* **Lead** - When a site visitor submits information with the understanding that your business may contact them at a later date.
* **Initiate Checkout** - When a site visitor begins a checkout process, such as by clicking a Checkout button.
* **Purchase** - When a site visitor completes a purchase and triggers some type of confirmation or transaction receipt.
* **View Content** - When a site visitor views a web page you care about. This event indicates that someone has visited a page URL but provides no data on what they saw or did thereafter.
* And many more. [Learn more about Meta Pixel Events](https://www.facebook.com/business/help/402791146561655?id=1205376682832142).
## Where the purchase event fires
Kajabi sends purchase events to Meta in two ways: through the customer's browser (client-side) and directly from Kajabi's servers (server-side). When both events are sent for the same purchase, Meta automatically deduplicates them using the purchase ID.
Purchase events fire on the first post-purchase page a customer reaches, such as:
* Login page (for new or returning customers)
* Account creation page (for new customers)
* Upsell page
To provide extra reliability, the purchase event is also configured to fire on post-purchase thank-you pages, landing pages, and the member library. However, once the event has fired on one page, it will not fire again on subsequent pages.
This ensures:
* Purchases are captured as early as possible.
* Tracking is consistent, even if a customer does not continue through every step of the flow.
See the flow chart below for a visual breakdown of where the purchase event fires in [Enhanced Checkout](../../sales/checkout/enhanced-checkout-overview), depending on whether the customer is new or returning, and whether returning members are already logged in or not:
 ## Additional resources
* [How to Set Up and Install a Meta Pixel](https://www.facebook.com/business/help/952192354843755)
* [Best Practices for Meta Pixel Setup](https://www.facebook.com/business/help/218844828315224?id=1205376682832142)
* [About Meta Pixel Standard and Custom Events](https://www.facebook.com/business/help/964258670337005?id=1205376682832142)
* [How to Capture Events](https://www.facebook.com/business/learn/lessons/how-to-capture-events-with-facebook-pixel)
## Additional resources
* [How to Set Up and Install a Meta Pixel](https://www.facebook.com/business/help/952192354843755)
* [Best Practices for Meta Pixel Setup](https://www.facebook.com/business/help/218844828315224?id=1205376682832142)
* [About Meta Pixel Standard and Custom Events](https://www.facebook.com/business/help/964258670337005?id=1205376682832142)
* [How to Capture Events](https://www.facebook.com/business/learn/lessons/how-to-capture-events-with-facebook-pixel)