> ## Documentation Index
> Fetch the complete documentation index at: https://help.kajabi.com/llms.txt
> Use this file to discover all available pages before exploring further.
# Webhook workflows
> Grant Offer access from a third-party Stripe checkout, revoke it on cancellation, and send Kajabi purchase and Form data to outside tools.
A **webhook** is a message one app sends another the moment something happens. In Kajabi, webhooks run in both directions: an **inbound webhook** lets an outside tool grant or revoke access to an Offer, and an **outbound webhook** pushes purchase or Form data out to the tools you already use.
**Note:** Webhooks are available on the Growth and Pro plans. Learn how to [change your Kajabi subscription plan](/articles/account-settings/billing/manage-your-subscription).
## Before you begin
* Create the [Offer](/articles/sales/offers/offers-overview) that customers should get access to
* Confirm your plan includes webhooks
* Get admin access to the outside tool sending or receiving the webhook
* For Stripe workflows, choose a connector such as Zapier, Make, or your own server
## Copy an Offer's Activation and Deactivation URLs
Every Offer has its own pair of inbound webhook URLs. The Activation URL grants access to every Product in that Offer, and the Deactivation URL revokes it.
1. From the Dashboard, click **Sales**, then **Pricing**.
2. Select your Offer.
3. Click **More**, then select **Webhooks**.
4. Copy the **Activation URL**, the **Deactivation URL**, or both.
Each URL contains a secret token unique to that one Offer, so copy it from this window rather than typing it out.
**Warning:** Anyone who has an Activation URL can grant free access to your Offer. Store it like a password and never publish it in client-side code or a public repository.
### Required parameters
Every request to an Activation or Deactivation URL must include three values:
| Parameter | What to send |
| :----------------- | :-------------------------------------------------------------------- |
| `name` | The customer's full name |
| `email` | The customer's email address |
| `external_user_id` | A stable ID for the customer, most often their email address repeated |
Send them as a POST request, with all three at the top level of the payload:
```json theme={null}
{
"name": "Jordan Lee",
"email": "jordan@example.com",
"external_user_id": "jordan@example.com"
}
```
**Note:** Kajabi reads these three values only at the top level. If your connector nests them inside another object, the request fails with an `email can't be blank` or `name can't be blank` error.
## Grant access after a Stripe purchase on a third-party site
If you sell on your own website — WordPress, Shopify, or a custom checkout — and take payment through Stripe, you can have Kajabi create the customer's account and unlock their Products the moment Stripe confirms the payment.
Stripe cannot call the Activation URL on its own. Stripe wraps the buyer's name and email inside its own event object, and Kajabi reads those values only at the top level of the payload. Put a connector between the two to reshape the data: Zapier, Make, or a small script on your own server.
### Connect Stripe to Kajabi with Zapier
Zapier has a built-in Kajabi action, so this route needs no code.
1. Create a Zap with **Stripe** as the trigger app, and choose the Stripe event that fires when a payment completes.
2. Add **Kajabi** as the action app, then select **Grant Access to an Offer**.
3. Connect your Kajabi account and select the **Site** and **Offer** to grant.
4. Map the buyer's details from Stripe into the **Customer Name**, **Email**, and **External User ID** fields.
5. Run a test payment through Stripe to confirm the grant lands, then turn the Zap on.
For the full connection walkthrough, see [Use Zapier with Kajabi](/articles/api-integrations/zapier/use-zapier-with-kajabi).
### Call the Activation URL from your own server
Use this route if you already run a server that listens to Stripe events.
1. Subscribe your server to the Stripe event that fires when a payment completes.
2. Read the buyer's name and email address out of the Stripe event.
3. Send a POST request to the Offer's **Activation URL** with `name`, `email`, and `external_user_id` at the top level of the payload.
4. Treat a `{"status":"OK"}` response as a successful grant, and log every other response for review.
**Tip:** Use the buyer's email address as the `external_user_id` unless you already have a stable customer ID. Kajabi matches on `external_user_id` first, and reusing the email keeps activation and deactivation pointed at the same person.
## Control the emails Kajabi sends when a webhook grants an Offer
What the customer receives depends on whether they already have an account on your site.
* **New customers** get a welcome email with their sign-in details, because Kajabi creates the account and generates a password for them
* **Existing customers** get nothing by default, because the Offer Grant email is off for webhook grants
To send the Offer Grant email as well, add `?send_offer_grant_email=true` to the end of the Activation URL:
```text theme={null}
https://checkout.newkajabi.com/webhooks/offers/XXXXXXXX/000000/activate?send_offer_grant_email=true
```
## Revoke access when a customer cancels or refunds
Access granted by webhook does not end on its own. If a subscription lapses in Stripe, or you refund an order, send a second request to remove the customer's access.
1. Subscribe your connector to the Stripe event that fires on a cancellation, failed payment, or refund.
2. Send a POST request to the Offer's **Deactivation URL** with the same `name`, `email`, and `external_user_id` you sent when granting the Offer.
3. Confirm the customer lost access to every Product in that Offer.
In Zapier, use the **Revoke Access to an Offer** action instead of building the request yourself.
**Note:** Deactivation finds the customer by `external_user_id` alone. If you send a different value than you sent on activation, or leave it blank, the request returns a `Not found` error and the customer keeps access.
## Send purchase data to another tool when an Offer sells
Use an outbound webhook on a single Offer when only that Offer needs to notify an outside tool — a fulfillment service for a physical bonus, for example, or a spreadsheet tracking one launch.
1. Click **Sales** in your Kajabi Dashboard, then select your Offer.
2. Click **More**, then select **Webhooks**.
3. Paste the receiving URL into the **Purchase Webhook URL** field under **Outbound Webhooks**.
4. Click **Save**.
5. Click **Send Test**, which appears beside the field once a URL is saved, to send sample data to your endpoint.
To see which fields arrive at your endpoint, see the [Outbound webhook data reference](/articles/api-integrations/webhooks/what-information-is-sent-with-outbound-webhooks).
## Send site-wide payment events to another tool
Use a site-wide webhook when an outside system needs every payment, not the sales of one Offer — an accounting tool or an internal dashboard, for example.
1. Go to **Settings** > **Integrations & Webhooks**.
2. Click **Create webhook**.
3. Select **Payment Succeeded** or **Cart Purchase** from the **Event** list.
4. Enter your endpoint in the **Endpoint URL** field.
5. Click **Add webhook**.
Each webhook you create is listed with its event and URL, and you can delete any webhook you no longer need.
**Note:** The endpoint must use HTTPS and support TLS 1.2. Kajabi rejects any other URL when you save the webhook.
## Send Form submissions to another tool
Send opt-ins straight into a CRM or email platform as they come in, without exporting a list.
1. Open the Form you want to send submissions from.
2. Click the more options (...) menu, then select **Webhooks**.
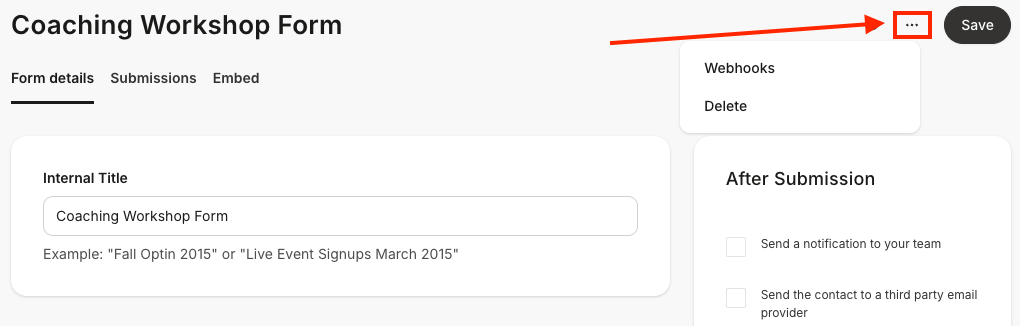 3. Enter the URL that should receive the submission data.
4. Click **Save**.
A **Send Test** link appears beside the field once a URL is saved. Use it to check that your endpoint accepts the data before you rely on live submissions. To build the Form itself, see [Create and build your Form](/articles/marketing/forms/create-and-build-your-form).
## Confirm a webhook worked
Every request to an Activation or Deactivation URL is recorded, whether it succeeded or failed. Check the log first whenever a customer says they did not get access.
1. Click **Sales** in your Kajabi Dashboard, then select your Offer.
2. Click **More**, then select **Webhooks**.
3. Click **View your webhook log entries** beneath the **Deactivation URL**.
4. Filter by status, or search the parameters for a customer's email address.
Entries are marked `pending`, `processing`, `complete`, or `error`. An `error` entry shows the values that arrived and the reason the request was rejected, which is usually enough to spot a missing or misspelled parameter.
## Troubleshooting
* **`invalid webhook token`** — the token in the URL is wrong or was cut off in a copy and paste. Copy the URL again from the Offer's **Webhooks** window.
* **`Not found`** — the Offer is archived, the Offer ID in the URL is wrong, or the request was sent to a deactivation without a matching `external_user_id`.
* **A 404 page in your browser** — Activation and Deactivation URLs accept POST requests only, so opening one in a browser always returns a 404. Test with your connector or a tool that can send a POST request.
* **`can't be blank`** — one of the three required parameters is missing, or the payload nests them inside another object instead of sending them at the top level.
* **The grant fails for a repeat purchase** — a customer who already has active access to an Offer cannot be granted it a second time.
For payload-level errors and a full diagnostic chart, see [Troubleshoot webhooks](/articles/api-integrations/webhooks/troubleshooting-webhooks).
## FAQs
### Can I use webhooks with a payment processor other than Stripe?
Yes. Kajabi's Activation and Deactivation URLs do not know or care which processor took the payment. Any tool that can send a POST request with `name`, `email`, and `external_user_id` at the top level can grant or revoke access, including PayPal, a membership plugin, or your own checkout.
### Will my customer get an email when a webhook grants them an Offer?
A customer who is new to your site gets a welcome email with sign-in details. A customer who already has an account gets nothing unless you add `?send_offer_grant_email=true` to the end of the Activation URL.
### Can one Activation URL grant more than one Offer?
No. Each Offer has its own Activation and Deactivation URLs with its own token. To grant several Offers to the same customer, send a separate request to each Offer's Activation URL.
### Do I need a developer to connect Stripe to Kajabi?
No. Zapier's **Grant Access to an Offer** action handles the connection without code. A developer is only needed if you want your own server to call the Activation URL directly.
### What is the difference between an Offer webhook and a site-wide webhook?
An Offer's **Purchase Webhook URL** fires only when that one Offer sells. A webhook created under **Settings** > **Integrations & Webhooks** fires for the event you chose across your whole site.
3. Enter the URL that should receive the submission data.
4. Click **Save**.
A **Send Test** link appears beside the field once a URL is saved. Use it to check that your endpoint accepts the data before you rely on live submissions. To build the Form itself, see [Create and build your Form](/articles/marketing/forms/create-and-build-your-form).
## Confirm a webhook worked
Every request to an Activation or Deactivation URL is recorded, whether it succeeded or failed. Check the log first whenever a customer says they did not get access.
1. Click **Sales** in your Kajabi Dashboard, then select your Offer.
2. Click **More**, then select **Webhooks**.
3. Click **View your webhook log entries** beneath the **Deactivation URL**.
4. Filter by status, or search the parameters for a customer's email address.
Entries are marked `pending`, `processing`, `complete`, or `error`. An `error` entry shows the values that arrived and the reason the request was rejected, which is usually enough to spot a missing or misspelled parameter.
## Troubleshooting
* **`invalid webhook token`** — the token in the URL is wrong or was cut off in a copy and paste. Copy the URL again from the Offer's **Webhooks** window.
* **`Not found`** — the Offer is archived, the Offer ID in the URL is wrong, or the request was sent to a deactivation without a matching `external_user_id`.
* **A 404 page in your browser** — Activation and Deactivation URLs accept POST requests only, so opening one in a browser always returns a 404. Test with your connector or a tool that can send a POST request.
* **`can't be blank`** — one of the three required parameters is missing, or the payload nests them inside another object instead of sending them at the top level.
* **The grant fails for a repeat purchase** — a customer who already has active access to an Offer cannot be granted it a second time.
For payload-level errors and a full diagnostic chart, see [Troubleshoot webhooks](/articles/api-integrations/webhooks/troubleshooting-webhooks).
## FAQs
### Can I use webhooks with a payment processor other than Stripe?
Yes. Kajabi's Activation and Deactivation URLs do not know or care which processor took the payment. Any tool that can send a POST request with `name`, `email`, and `external_user_id` at the top level can grant or revoke access, including PayPal, a membership plugin, or your own checkout.
### Will my customer get an email when a webhook grants them an Offer?
A customer who is new to your site gets a welcome email with sign-in details. A customer who already has an account gets nothing unless you add `?send_offer_grant_email=true` to the end of the Activation URL.
### Can one Activation URL grant more than one Offer?
No. Each Offer has its own Activation and Deactivation URLs with its own token. To grant several Offers to the same customer, send a separate request to each Offer's Activation URL.
### Do I need a developer to connect Stripe to Kajabi?
No. Zapier's **Grant Access to an Offer** action handles the connection without code. A developer is only needed if you want your own server to call the Activation URL directly.
### What is the difference between an Offer webhook and a site-wide webhook?
An Offer's **Purchase Webhook URL** fires only when that one Offer sells. A webhook created under **Settings** > **Integrations & Webhooks** fires for the event you chose across your whole site.