> ## Documentation Index
> Fetch the complete documentation index at: https://help.kajabi.com/llms.txt
> Use this file to discover all available pages before exploring further.
# Use webhooks with Kajabi
> Learn how to use Inbound and Outbound Webhooks to automate communication between Kajabi and other applications.
**Webhooks** are a means of automatic communication between applications, allowing your online accounts to "communicate" to each other by giving and receiving information triggered by an action. Use Inbound and Outbound Webhooks to connect Kajabi with your favorite third-party tools.
Important: If your account has Multiple Order Bumps available (currently in Beta), the behavior of the **Payment Succeeded** and **Purchase Created** webhooks has changed. One-time primary offers and one-time order bumps are now grouped into a single transaction, which affects how many events fire and what the payloads contain. Review [Webhook Changes with the Introduction of Multiple Order Bumps](https://help.kajabi.com/articles/api-integrations/webhooks/webhook-changes) to understand what's different and confirm your automations continue to work as expected.
**Note:** Webhooks on Kajabi are exclusively accessible for Heroes on our Growth or Pro Plans. Learn how to upgrade your Kajabi subscription plan [here](../../account-settings/billing/manage-your-subscription).
## Access webhook URLs
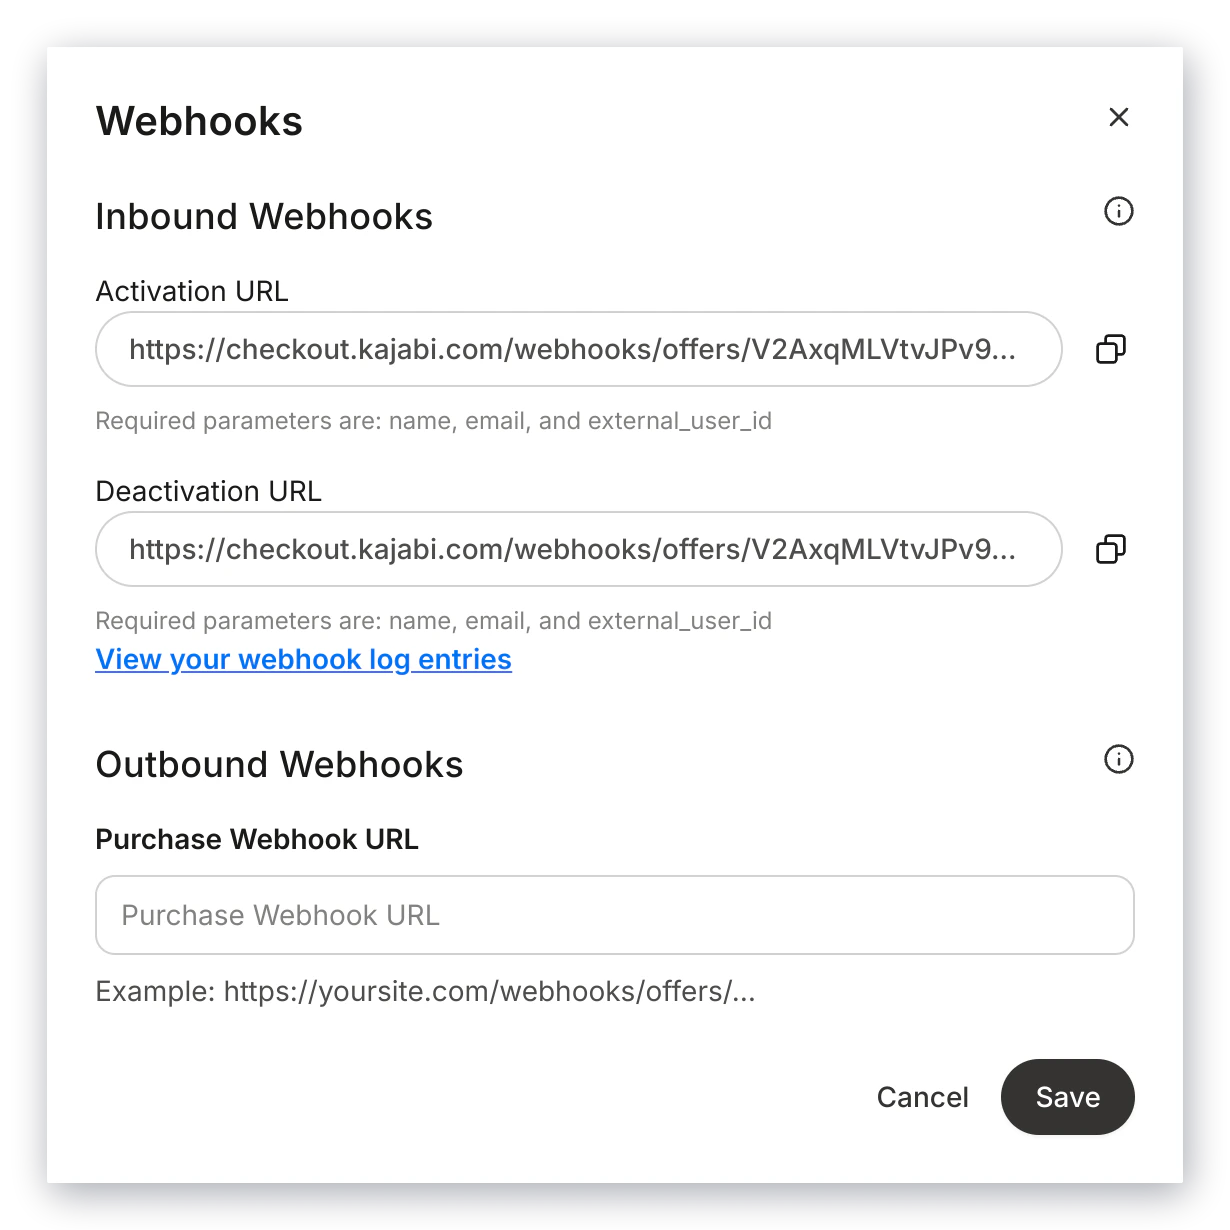
Each [Offer](../../sales/offers/offers-overview) has an Activation and Deactivation Webhook URL.
### Locate Offer Activation and Deactivation webhook URLs
* Open the **Sales** tab from the Dashboard.
* Then, select your **Offer**.
* Click the **More Actions** dropdown.
* Select **Webhooks**:
Enter your Purchase Webhook URL for individual Offers to send information from individual Offers to your third-party application.
### Locate the Purchase webhook URL
* Open the **Settings** tab from the Dashboard.
* Click **Checkout Settings**.
* Navigate to **Webhooks**:
Enter your Purchase webhook URL in your checkout settings to send information from every Offer on your site to your third-party application.
## Inbound webhooks
An **Inbound Webhook** allows your Kajabi site to collect information from an outside application.
On Kajabi, you can choose between an **Activation Webhook** and a **Deactivation Webhook**.
### Activation Webhook URL
The activation webhook will trigger access to Kajabi based on an action made in an outside application.
The most common use for this webhook is granting an Offer to a customer when the offer was purchased through a payment processor other than Stripe or PayPal.
### Deactivation Webhook URL
If the Deactivation Webhook URL of a specific Offer is used, it will revoke access to all Products associated with that Offer.
This Webhook is most commonly used when a customer of a subscription Offer stops making payments through a payment processor other than Stripe or PayPal.
 ### Required parameters
Kajabi requires that the received information from connected third-party apps include these Parameters to trigger Activation or Deactivation: **Name, Email Address, and External\_User\_ID** (in many cases, the external\_user\_id will be the email address repeated).
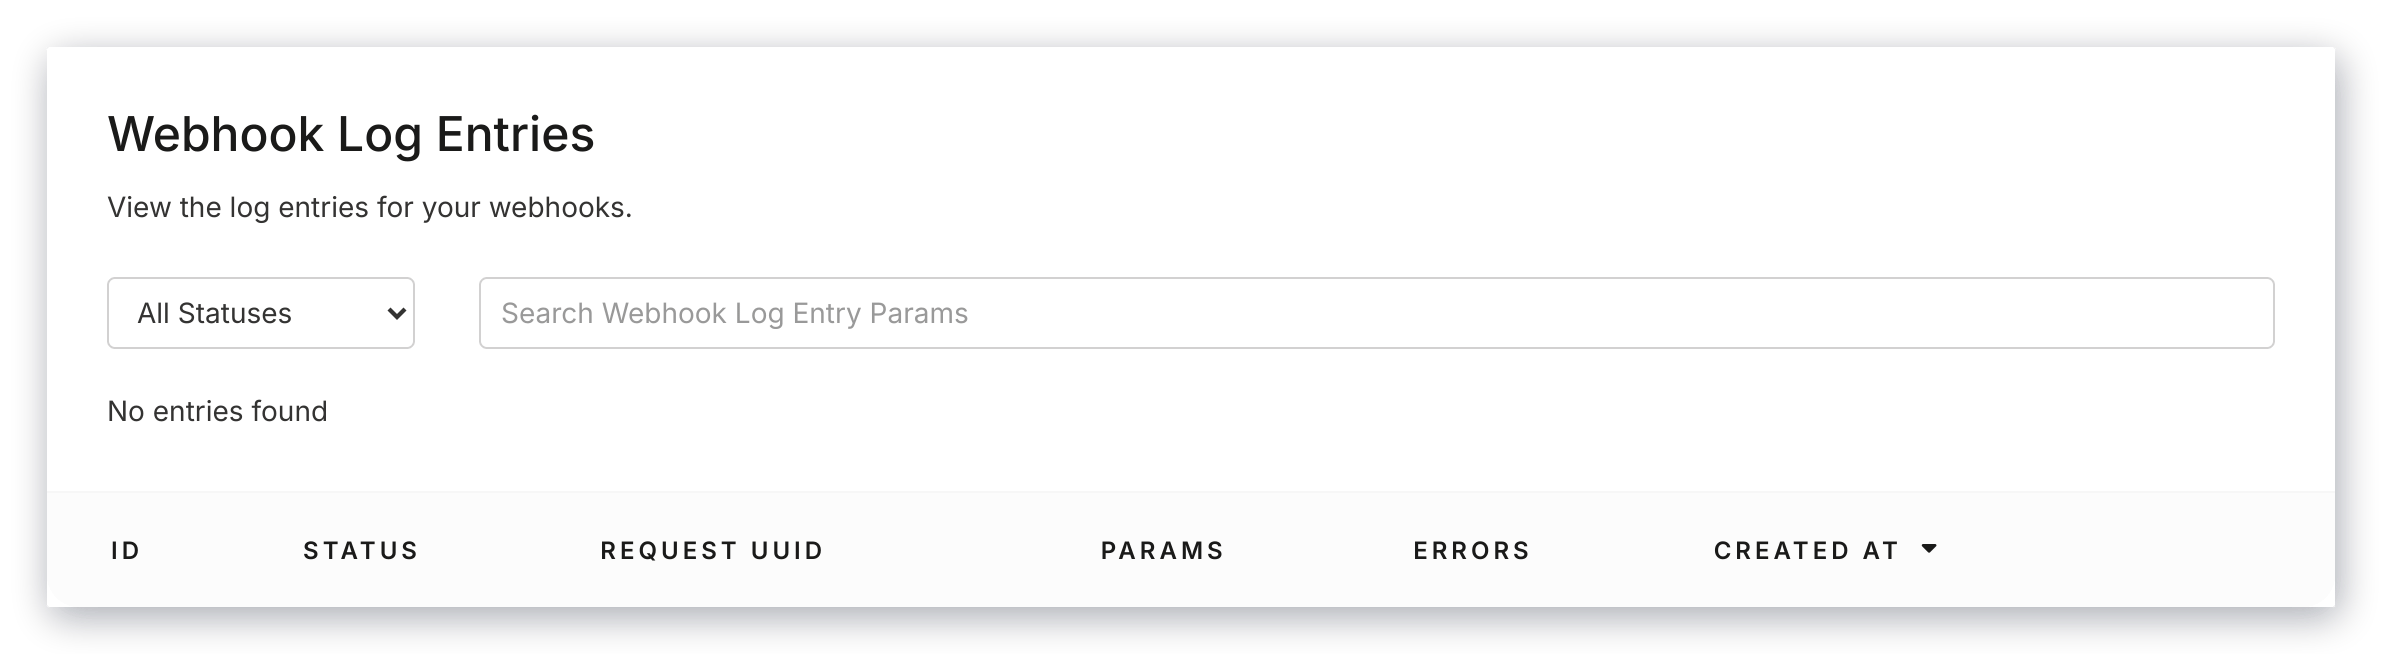
### View webhook log entries
Once you have connected your webhook, you can view your webhook log entries.
To view your webhook log entries, click into the link beneath the Deactivation URL.
There you will find your connected webhooks with data including ID, Status, Request UUID, Params, Errors, and It's created at time and date.
### Required parameters
Kajabi requires that the received information from connected third-party apps include these Parameters to trigger Activation or Deactivation: **Name, Email Address, and External\_User\_ID** (in many cases, the external\_user\_id will be the email address repeated).
### View webhook log entries
Once you have connected your webhook, you can view your webhook log entries.
To view your webhook log entries, click into the link beneath the Deactivation URL.
There you will find your connected webhooks with data including ID, Status, Request UUID, Params, Errors, and It's created at time and date.
 ## Outbound webhooks
An **Outbound Webhook** can be used when you would like to send information to a third-party application. [Learn more](../../api-integrations/webhooks/what-information-is-sent-with-outbound-webhooks).
On Kajabi, you have the option to enable a **Purchase Created** webhook, a **Purchase Succeed** webhook, and a **Cart Purchase** webhook.
## Purchased Created webhook
Purchase Created webhooks are used to keep track of successful purchases on Kajabi.
For this webhook, third-party apps will provide a **Purchase Webhook URL**.
This webhook sends information to connected third-party applications when a customer purchases a one-time offer or for their first payment of a subscription or payment plan offer. Please note that this does not include purchases made through Kajabi Cart.
To set up the Purchase Create webhook:
1. You'll need to obtain the Purchase Webhook URL for the third-party application you would like to connect. Once you've obtained the Purchase Webhook URL from the third-party application, from your Kajabi Dashboard, navigate to the **Sales** tab.
2. Next, click on **Offers**.
3. Select which offer you would like to set up the Purchase Created Webhook on.
4. Now, click on the "**...**" menu, and then select **Webhooks.**
5. Under **Purchase Webhook URL** enter the third-party application URL.
6. Click **Save** to finish setting up the Purchase Created webhook:
## Outbound webhooks
An **Outbound Webhook** can be used when you would like to send information to a third-party application. [Learn more](../../api-integrations/webhooks/what-information-is-sent-with-outbound-webhooks).
On Kajabi, you have the option to enable a **Purchase Created** webhook, a **Purchase Succeed** webhook, and a **Cart Purchase** webhook.
## Purchased Created webhook
Purchase Created webhooks are used to keep track of successful purchases on Kajabi.
For this webhook, third-party apps will provide a **Purchase Webhook URL**.
This webhook sends information to connected third-party applications when a customer purchases a one-time offer or for their first payment of a subscription or payment plan offer. Please note that this does not include purchases made through Kajabi Cart.
To set up the Purchase Create webhook:
1. You'll need to obtain the Purchase Webhook URL for the third-party application you would like to connect. Once you've obtained the Purchase Webhook URL from the third-party application, from your Kajabi Dashboard, navigate to the **Sales** tab.
2. Next, click on **Offers**.
3. Select which offer you would like to set up the Purchase Created Webhook on.
4. Now, click on the "**...**" menu, and then select **Webhooks.**
5. Under **Purchase Webhook URL** enter the third-party application URL.
6. Click **Save** to finish setting up the Purchase Created webhook:
**Note:** The Purchased Created Outbound Webhooks are triggered only upon the purchase of an Offer and will not be triggered if an Offer is [granted](../../sales/offers/how-to-grant-an-offer), or for subsequent transactions related to a payment plan or subscription offer.
## Cart Purchase webhook
Cart Purchase webhooks are used to keep track of the total sales of your Kajabi Cart orders.
This webhook sends information to a connected third-application when a new Cart order is successful.
To set up the Cart Purchase Webhook:
1. From your Kajabi Dashboard, navigate to **Settings**.
2. In Settings, click **Third Party Integrations and Webhooks**.
3. Select the **Webhooks** tab.
4. Click **Create Webhook**.
5. In Create Webhook, select the **Cart Purchase** event.
6. In the **Endpoint URL** tab, enter your third-party application URL.
7. Click **Add Webhook** to finish setting up the Cart Purchase Webhook:
## Payment Succeeded webhook
Payment Succeeded webhooks are used to keep track of total sales on your Kajabi site.
This webhook sends information to a third-party application whenever a sale is made. This includes successful purchase offers, as well as subsequent successful payments for subscription and payment plan offers. Cart orders are also included.
To set up the Payment Succeeded webhook:
1. From your Kajabi Dashboard, navigate to **Settings**.
2. In Settings, click **Third Party Integrations and Webhooks**.
3. Select the **Webhooks** tab.
4. Click **+Create Webhook**.
5. In +Create Webhook, select the **Payment Succeeded** event.
6. In the **Endpoint URL** tab, enter your third-party application URL.
7. Click **Add Webhook** to finish setting up the Payment Succeeded Webhook:
## Form webhooks
A Form Webhook will allow you to gather information and trigger an automation when a [Form](../../website/pages/how-to-add-a-form-to-your-page) is submitted.
Once you have set up a Form Webhook in a third-party application, such as [Zapier](../../api-integrations/zapier/use-zapier-with-kajabi), you will need the webhook URL.
### To find the webhook URL in Zapier
1. Select the **webhook** you want to attach to your Form.
2. Select the **share** button in the upper right corner.
3. Copy this **webhook URL**:
### Add the webhook URL to the Kajabi Form
1. Open the **Marketing** tab from your Dashboard.
2. Select the **Forms** tab.
3. Click into the **Form** you wish to add the Webhook URL to.
4. Select the **More Actions menu** (`…`), and select **Webhooks**.
5. Paste your **Webhook URL** into the field.
6. Remember to press **Save** to keep and apply your changes:
## Offer grant confirmation
Normally, when you grant an Offer to a user it will send them an Offer Grant Confirmation email if the customer is subscribed to your marketing emails.
This is an email automatically sent by Kajabi letting the user know what they have purchased or been granted.
However, this email will not automatically send when the Offer is granted via the Activation Webhook URL.
In order to send the Offer Grant Confirmation email when using the Activation Webhook URL, simply add this text to the end of your Activation Webhook URL: `?send_offer_grant_email=true`.
Here's an example:
`https://checkout.newkajabi.com/webhooks/offers/XXXXXXXXX/00000/activate?send_offer_grant_email=true`
An example payload would look like:
`{ "name": "John Doe", "email": "jdoe@example.com", "external_user_id": "ext_123", }`
## Troubleshooting webhooks
If you are having an issue connecting your webhook, follow along with our troubleshooting webhooks guide: [Troubleshooting Webhooks](../../api-integrations/webhooks/troubleshooting-webhooks).