> ## Documentation Index
> Fetch the complete documentation index at: https://help.kajabi.com/llms.txt
> Use this file to discover all available pages before exploring further.
# Create a certificate with Google Slides
> Send your customers a personalized Certificate of Completion using Google Slides and Zapier when they complete your Course.
Create a seamless experience for your customers with Zapier by automatically sending a customized certificate of completion when a customer completes your Course Product in Kajabi. This guide walks you through designing your certificate in **Google Slides**, building a Zap with Zapier, and creating an Automation to streamline the process.
**Note:**
This guide requires an upgraded Zapier account to build a Multi-Step Zap. If you wish to send a certificate directly from Kajabi read [How to Send a Certificate of Completion with Automations](../../marketing/automations/how-to-send-a-certificate-of-completion-with-automations).
## Prepare the site
First, set up your site in Kajabi by creating an Automation to add a Tag.
When your custom Tag is added to a customer's Profile, Kajabi will notify Zapier that your customer has completed a course and Zapier will send a personalized Certificate of Completion to your customer's email inbox.
Create an Automation to add a Tag when your customer clicks **Mark as Complete** in the Lesson or **Passes an Assessment**:
* Open the **Product** tab from the Dashboard.
* Select the Course your Certificate of Completion will be connected to.
* Click the **Lesson** that will trigger the sending of your certificate.
* Navigate to the bottom of the Editor.
* Click **+ Add Automation**.
* Select **Add a tag** in the Then dropdown.
* Enter your Tag name. We recommend naming your Tag with keywords to help you easily identify the meaning of your Tag.
* Click **Save** to apply your changes:
Read [Automations in Course Lessons](../../marketing/automations/automations-in-course-lessons) to learn more.
**Note:**
The Lesson is considered complete when your customer selects the **Mark as Complete** button located at the bottom of the Lesson.
**Note:**
The Assessment feature inside of Courses has been sunset. This feature may still appear in older accounts. The Quizzes feature is now available inside of Courses and offers advanced functionality. Assessments can still be added to Web Pages. [Customize your Quiz Settings](../../products/courses/course-quizzes#h_01G16CT90ZYCJFKEYEC4BTSTD4) to add an automation when a Quiz is passed or completed.
The next step depends on your Kajabi Plan and your vision for your Certificate. Read [Basic vs. Advanced Automations](../../marketing/automations/basic-vs-advanced-automations) to learn more about Automations in Kajabi.
### If you have a Kajabi Basic Plan
Your Automation will add a Tag when a customer completes the Lesson. Click **Save** to keep your changes and skip to [create the certificate](#create-a-certificate-of-completion-template-in-google-slides).
### If you have a Growth or Pro Plan
You have the option to automatically add a Tag when your customer **completes the Lesson**:
* Click **Save** to keep your changes and skip to [create the certificate](#create-a-certificate-of-completion-template-in-google-slides).
Or automatically add a Tag when your customer **passes** or **completes an Assessment**:
* Click **Add Condition**.
* Open the **Select filter** dropdown menu.
* Select your desired conditional filter: **Completed** or **Passed any of these assessments(s)**.
* In the next field, select your Assessment and click **Apply**.
* Click **Save** to keep your changes:
Learn to [create an Assessment and add it to your Course Lesson](../../contacts/create-manage-and-share-assessments/how-to-add-an-assessment-to-your-course-product).
## Create a certificate of completion template in Google Slides
The first step to creating a Certificate of Completion with Google Slides is to create and design your Certificate Template.
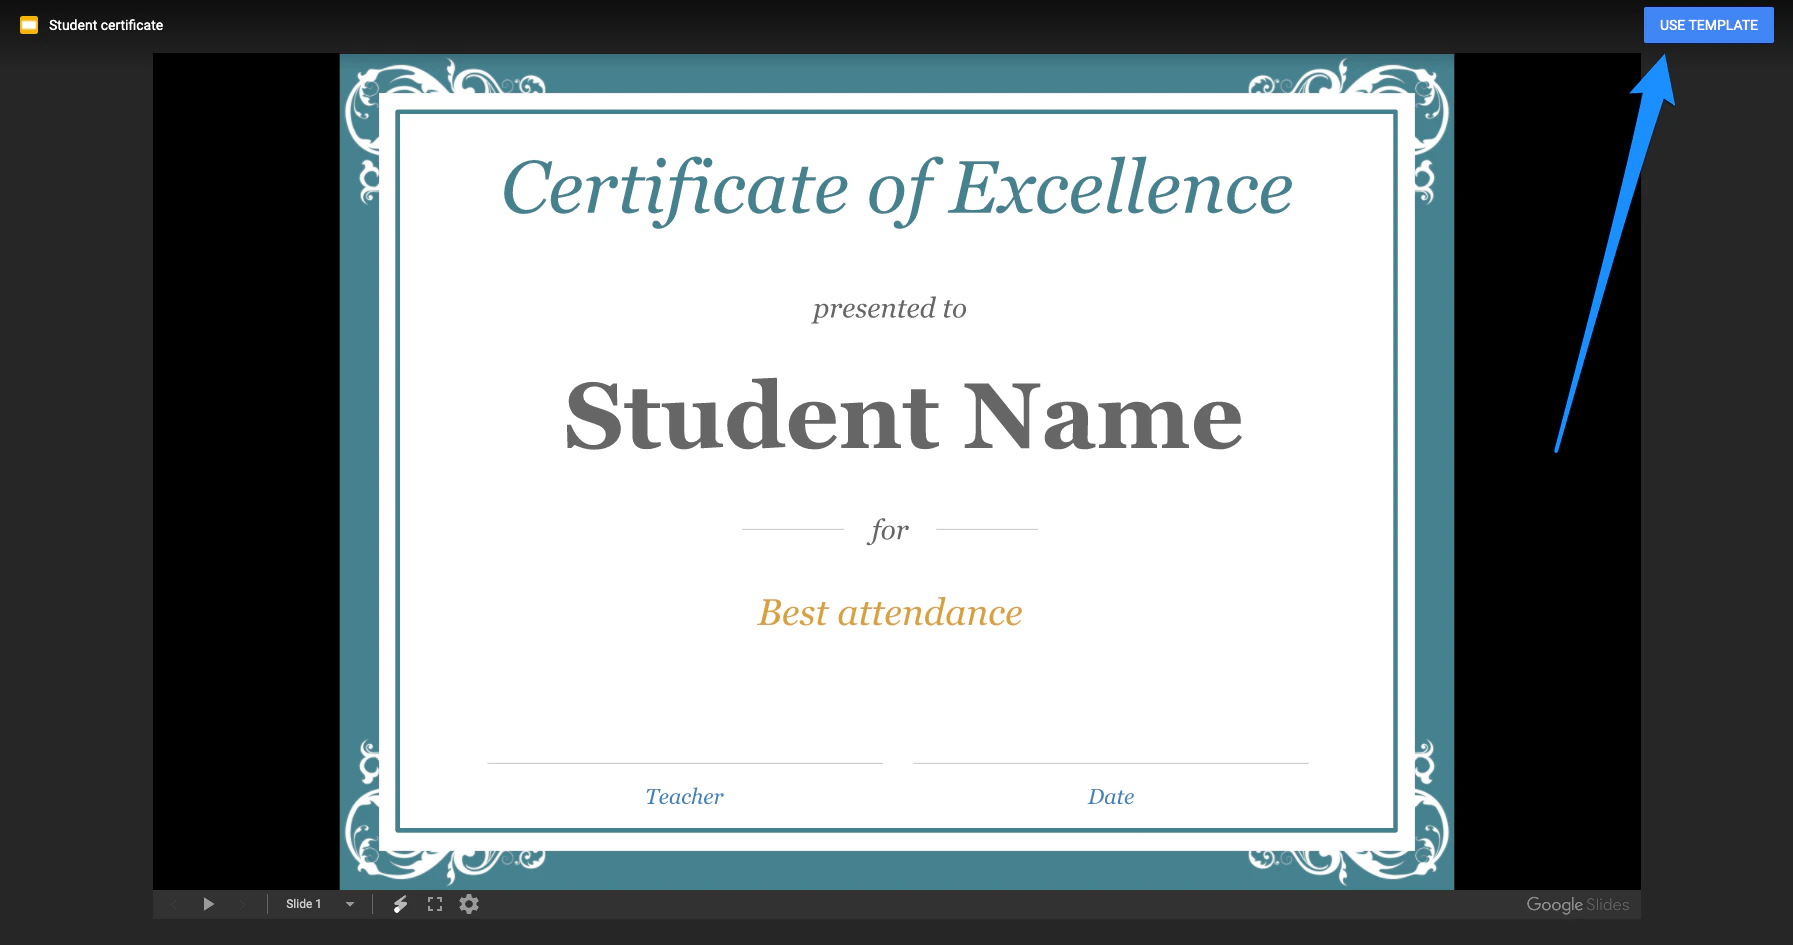
For the purpose of this Guide, we will use a standard template:
* Open the standard template from Google Slides [**here**](https://docs.google.com/presentation/u/1/d/1LdzFssNUfc1yg88ZA9KU9XWAPP5Ws1AY6egA9_DzSlI/template/preview?usp=drive_web#).
* Follow along with this template by clicking **USE TEMPLATE** in the top right corner of the screen:
 ### Edit the template
Next, customize the design of the certificate template to fit your brand and language. Then, specify the information you want added to your certificate. Typically, certificates include:
* Student name
* Course name
* Issuing date
For Google Slides to recognize your specifications as variables and not simply text, wrap each variable name with two curly braces. For example, `{{name}}`.
**Note:**
The variable name specified in your Google Slide Template has nothing to do with the variable name in Kajabi. For example, using `{{name}}` or `{{student_name}}` or `{{user_name}}` will not make a difference.
### Edit the template
Next, customize the design of the certificate template to fit your brand and language. Then, specify the information you want added to your certificate. Typically, certificates include:
* Student name
* Course name
* Issuing date
For Google Slides to recognize your specifications as variables and not simply text, wrap each variable name with two curly braces. For example, `{{name}}`.
**Note:**
The variable name specified in your Google Slide Template has nothing to do with the variable name in Kajabi. For example, using `{{name}}` or `{{student_name}}` or `{{user_name}}` will not make a difference.
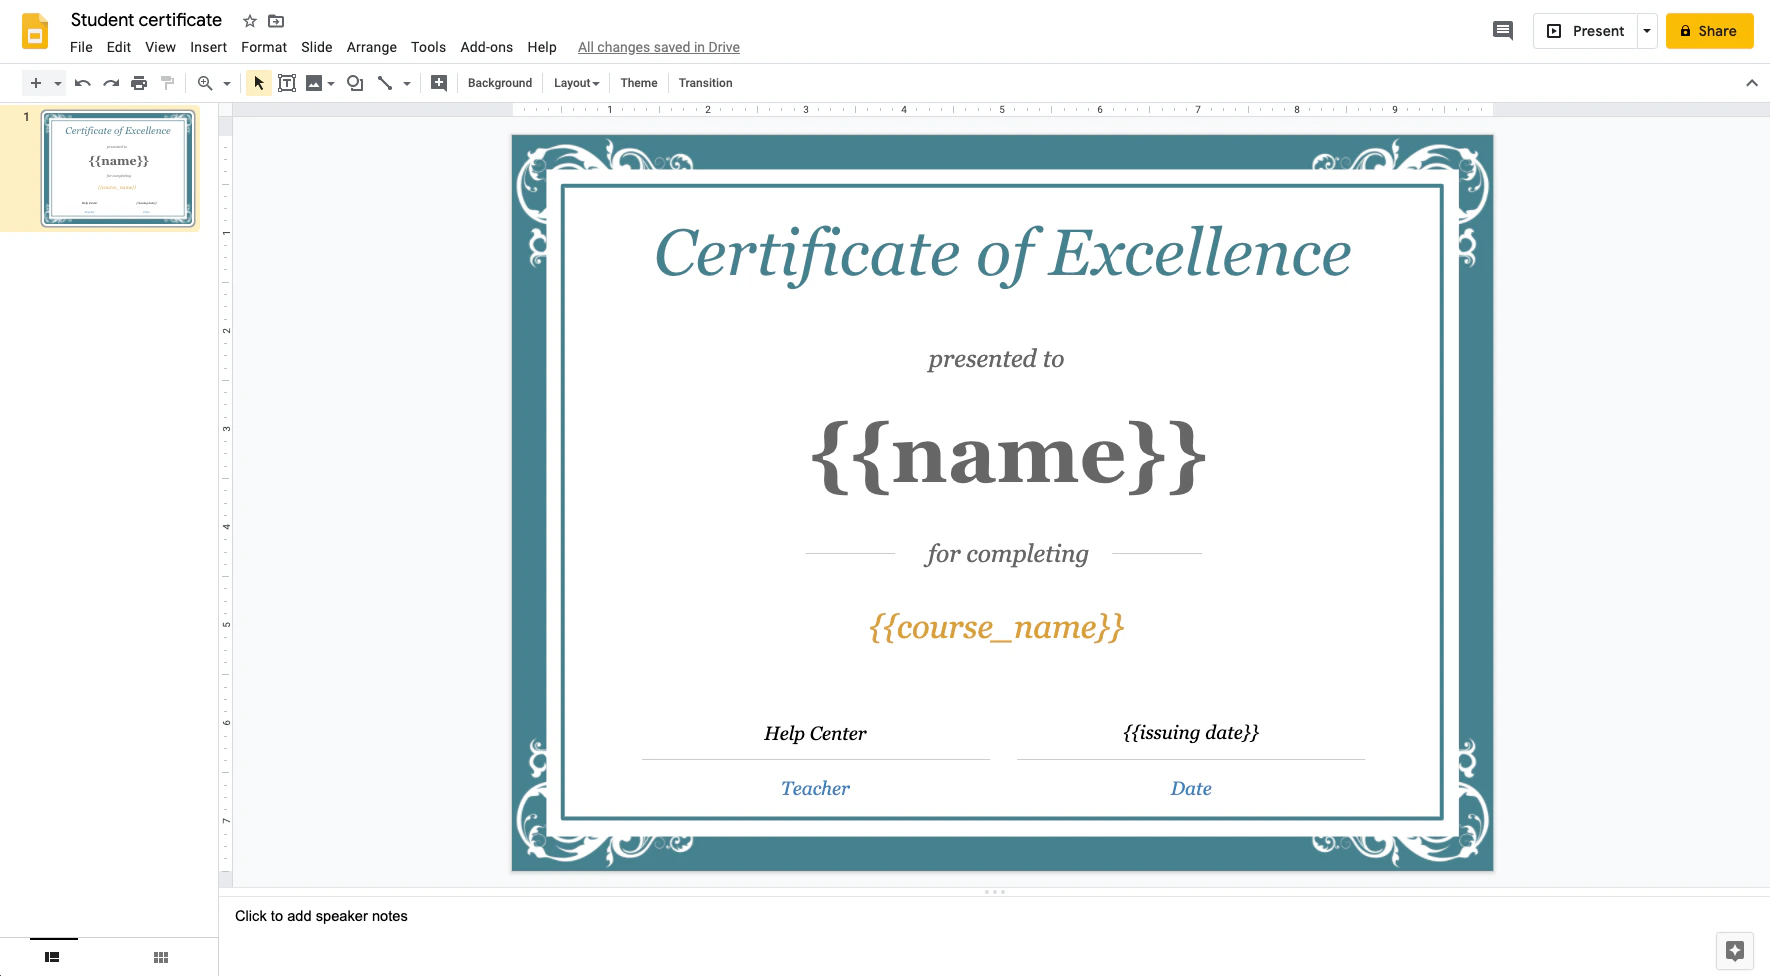 After customizing your certificate, title your Google Slide to easily identify later. Simply click on the title in the top left corner and enter your title.
## Set up a Zap to automatically create certificates
Make a Zap with [Zapier](https://zapier.com/app/dashboard) to automatically create and send certificates of completion based on your students' actions on your site. Read [How to Use Zapier with Kajabi](./use-zapier-with-kajabi) for details.
* Create a new Zap by clicking **Make a Zap**:
After customizing your certificate, title your Google Slide to easily identify later. Simply click on the title in the top left corner and enter your title.
## Set up a Zap to automatically create certificates
Make a Zap with [Zapier](https://zapier.com/app/dashboard) to automatically create and send certificates of completion based on your students' actions on your site. Read [How to Use Zapier with Kajabi](./use-zapier-with-kajabi) for details.
* Create a new Zap by clicking **Make a Zap**:
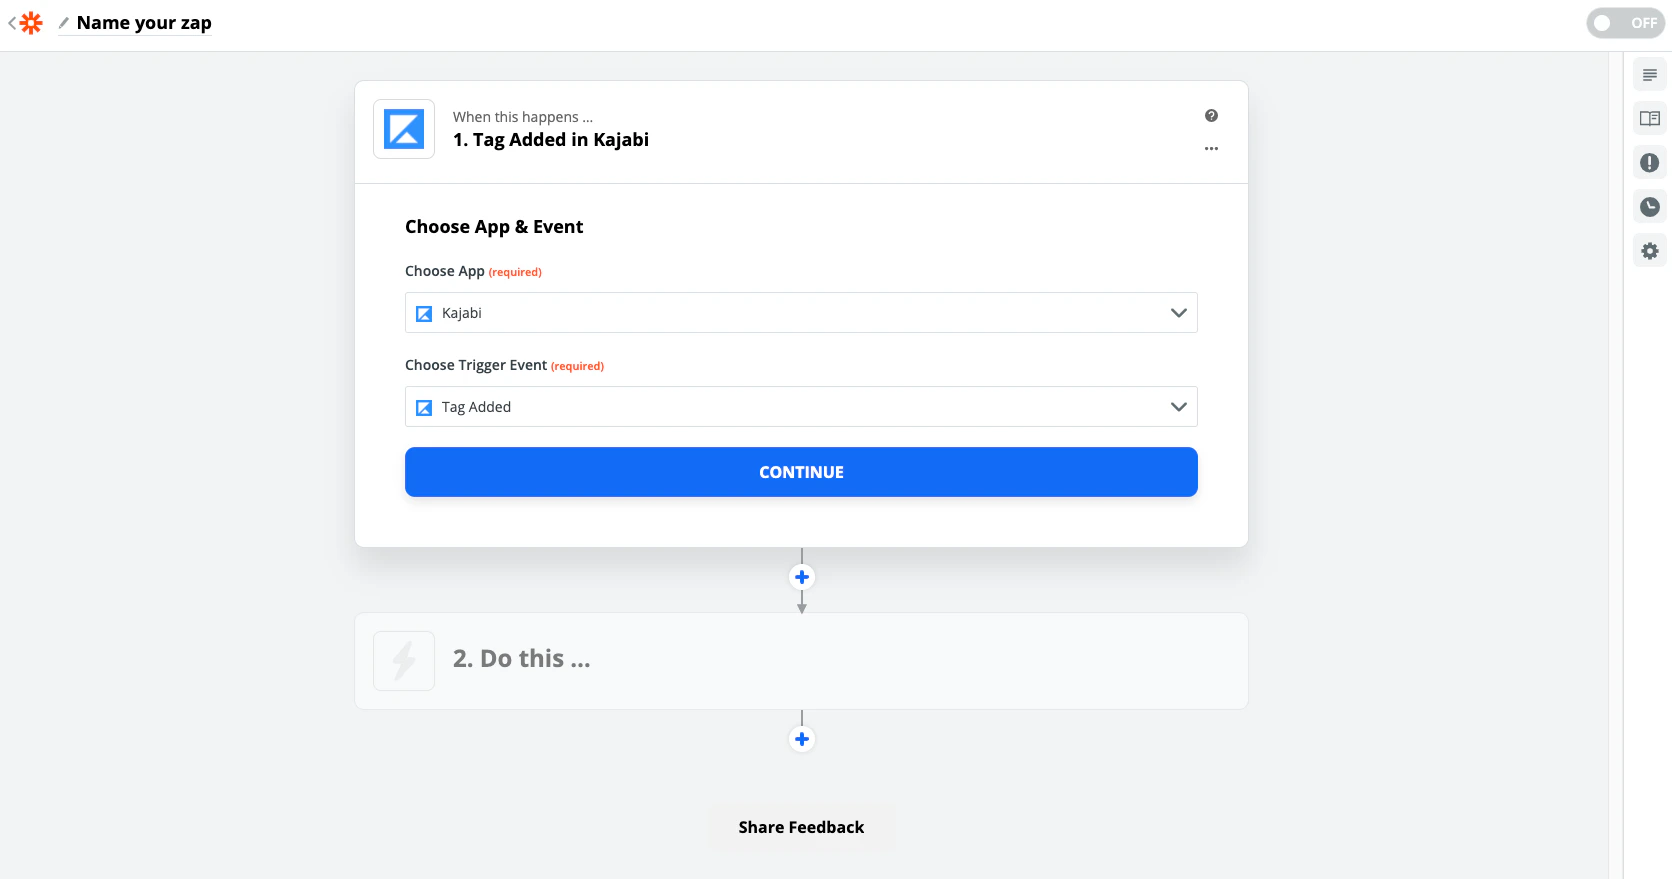
First, select the Trigger App: Kajabi
* Select **Kajabi** for the App.
* Then, select **Tag Added** for the Trigger Event.
* Click **Continue**:
 Zapier will ask you to connect your account in the next step if it isn't already connected. Read [How to Use Zapier with Kajabi](./use-zapier-with-kajabi#step-3-connect-zapier-to-your-kajabi-account) for details.
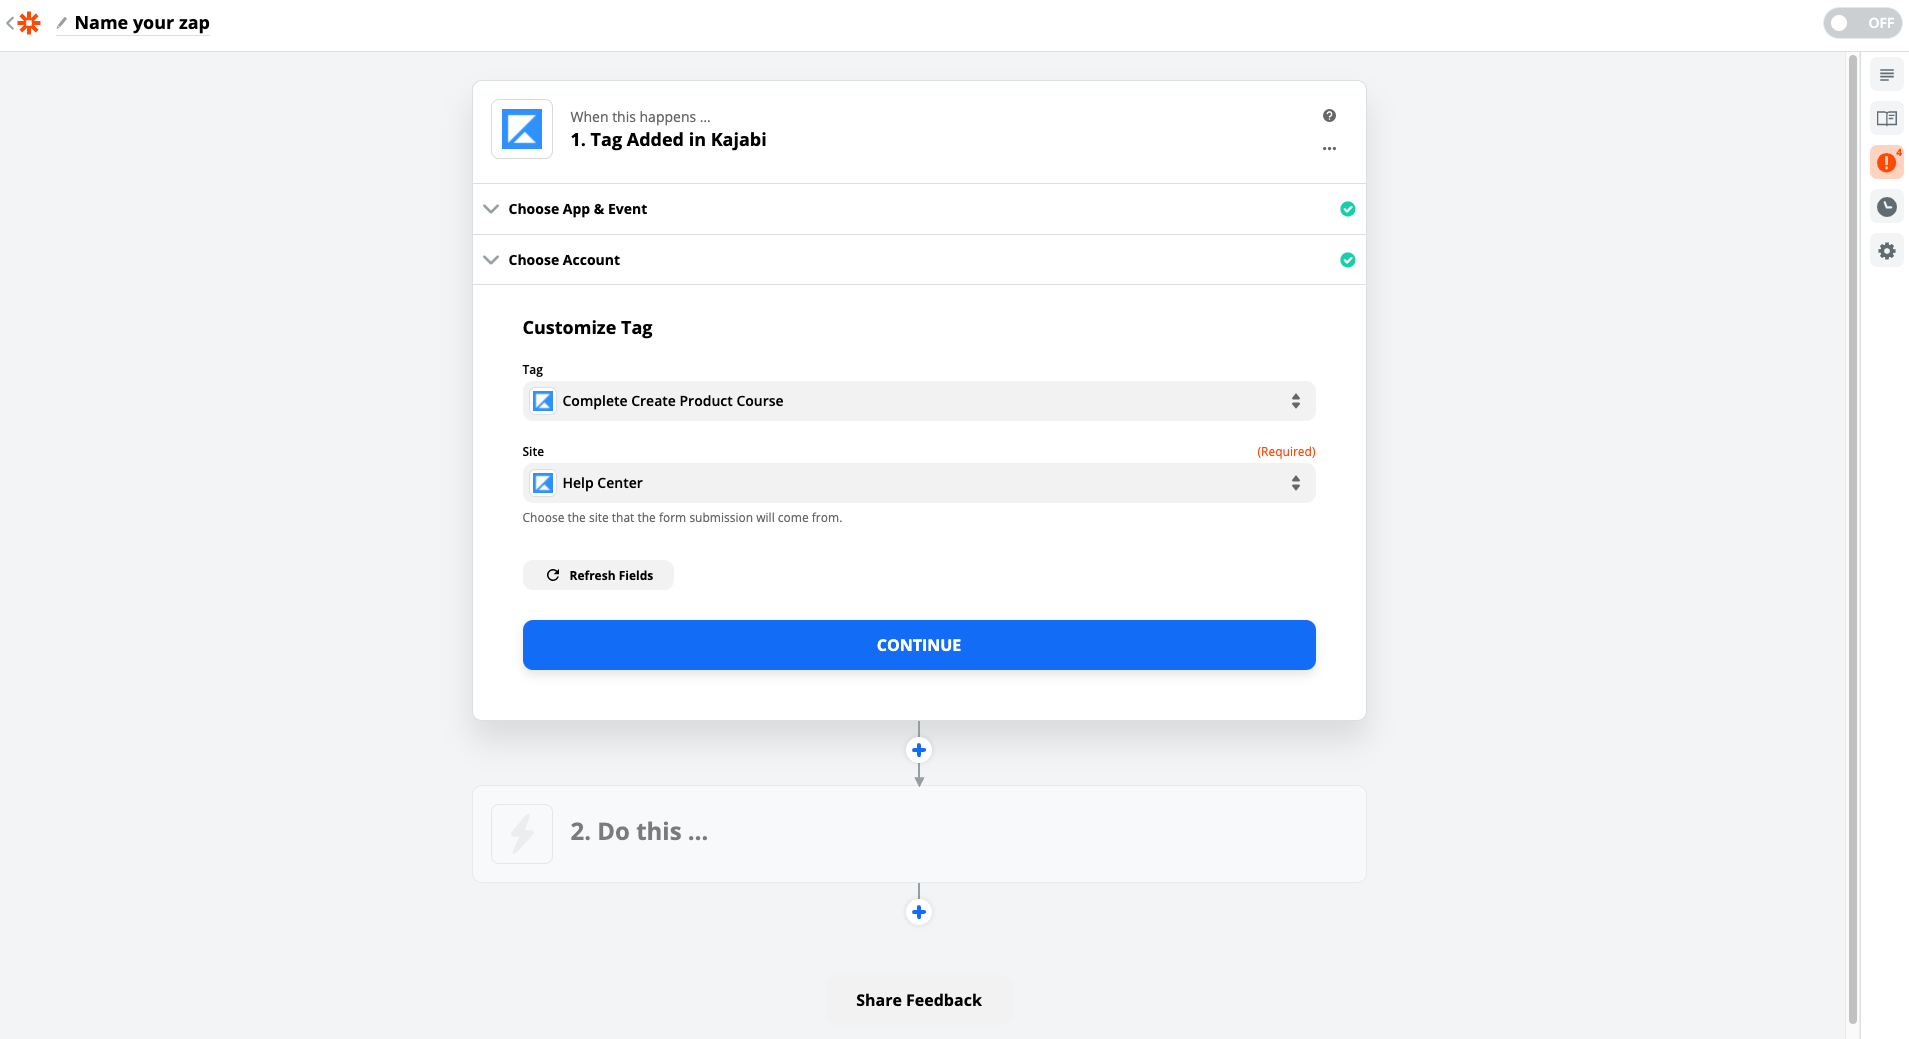
After selecting your account, complete the **Customize Tag** step:
* First, select your Site in the second dropdown menu or you will receive an error that your Tags are not available.
* Then, select the Tag created with your Automation.
* Click **Continue**.
* Then, click **Test & Continue**:
Zapier will ask you to connect your account in the next step if it isn't already connected. Read [How to Use Zapier with Kajabi](./use-zapier-with-kajabi#step-3-connect-zapier-to-your-kajabi-account) for details.
After selecting your account, complete the **Customize Tag** step:
* First, select your Site in the second dropdown menu or you will receive an error that your Tags are not available.
* Then, select the Tag created with your Automation.
* Click **Continue**.
* Then, click **Test & Continue**:
 **Note:**
The Test & Continue step requires data to successfully perform the test. Therefore, there must be a Tag in your site. If you haven't created a Tag, refer back to the Setting up your Site step. Read [Zapier's Guide](https://zapier.com/help/create/basics/change-the-sample-data-in-your-zap-trigger) if you wish to change the sample data.
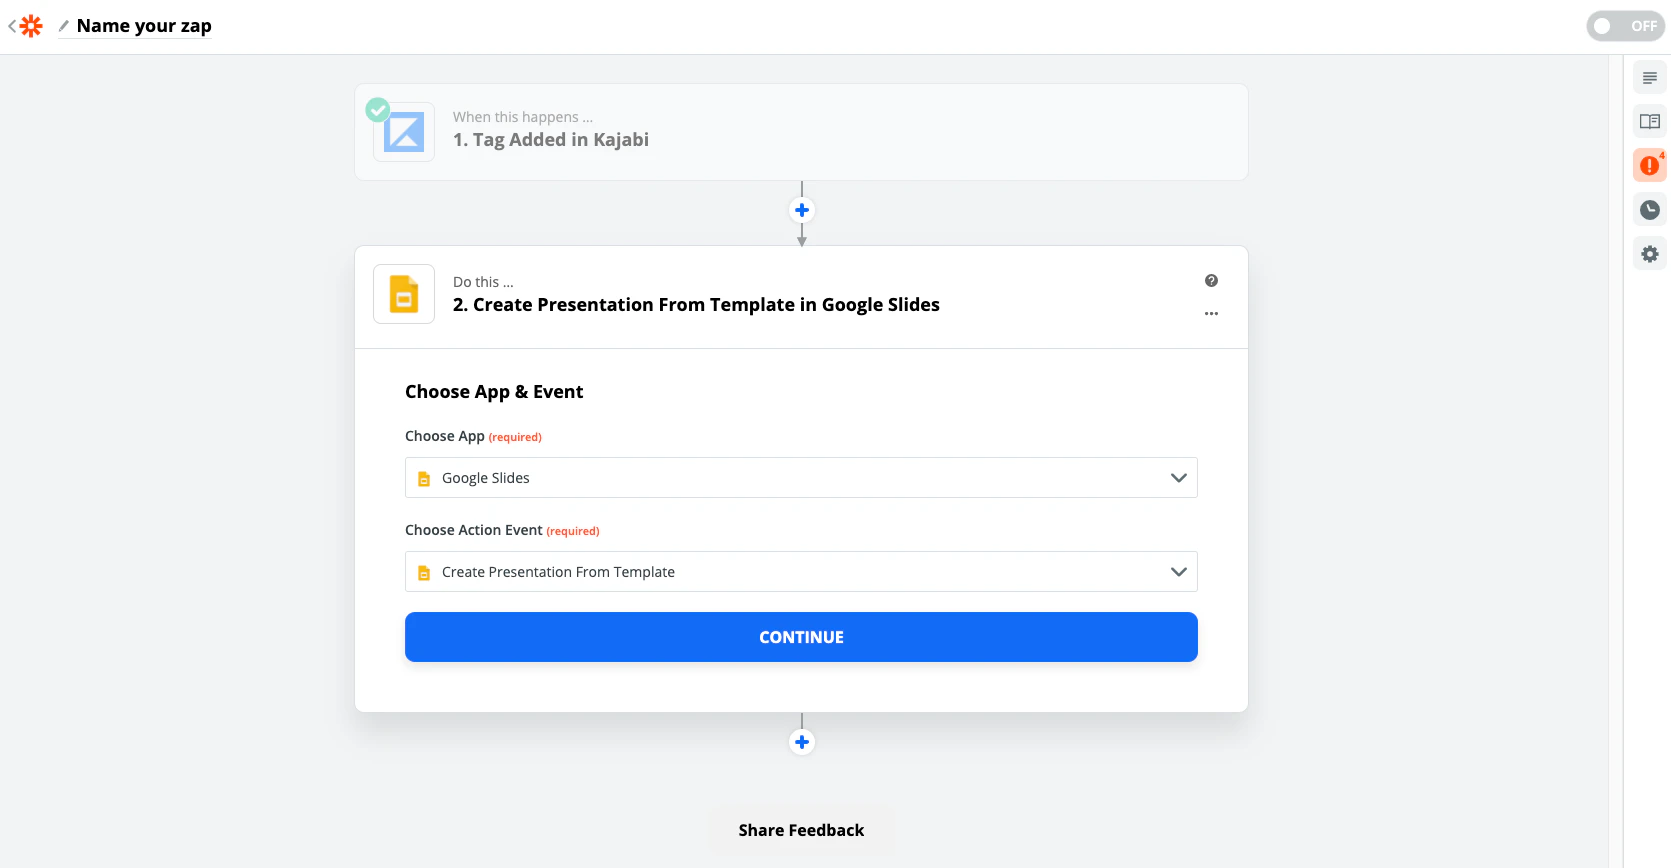
Next, configure the Action App: Google Slides
* Select **Google Slides** for the App.
* Select **Create Presentation From Template** for the Action Event.
* Click **Continue**:
**Note:**
The Test & Continue step requires data to successfully perform the test. Therefore, there must be a Tag in your site. If you haven't created a Tag, refer back to the Setting up your Site step. Read [Zapier's Guide](https://zapier.com/help/create/basics/change-the-sample-data-in-your-zap-trigger) if you wish to change the sample data.
Next, configure the Action App: Google Slides
* Select **Google Slides** for the App.
* Select **Create Presentation From Template** for the Action Event.
* Click **Continue**:
 Zapier will ask you to connect your Google Slides account in the next step if it isn't already connected. Select **Sign in to Google Slides**. Then, select your account from the popup. Click **Continue** to set up your Google Slides.
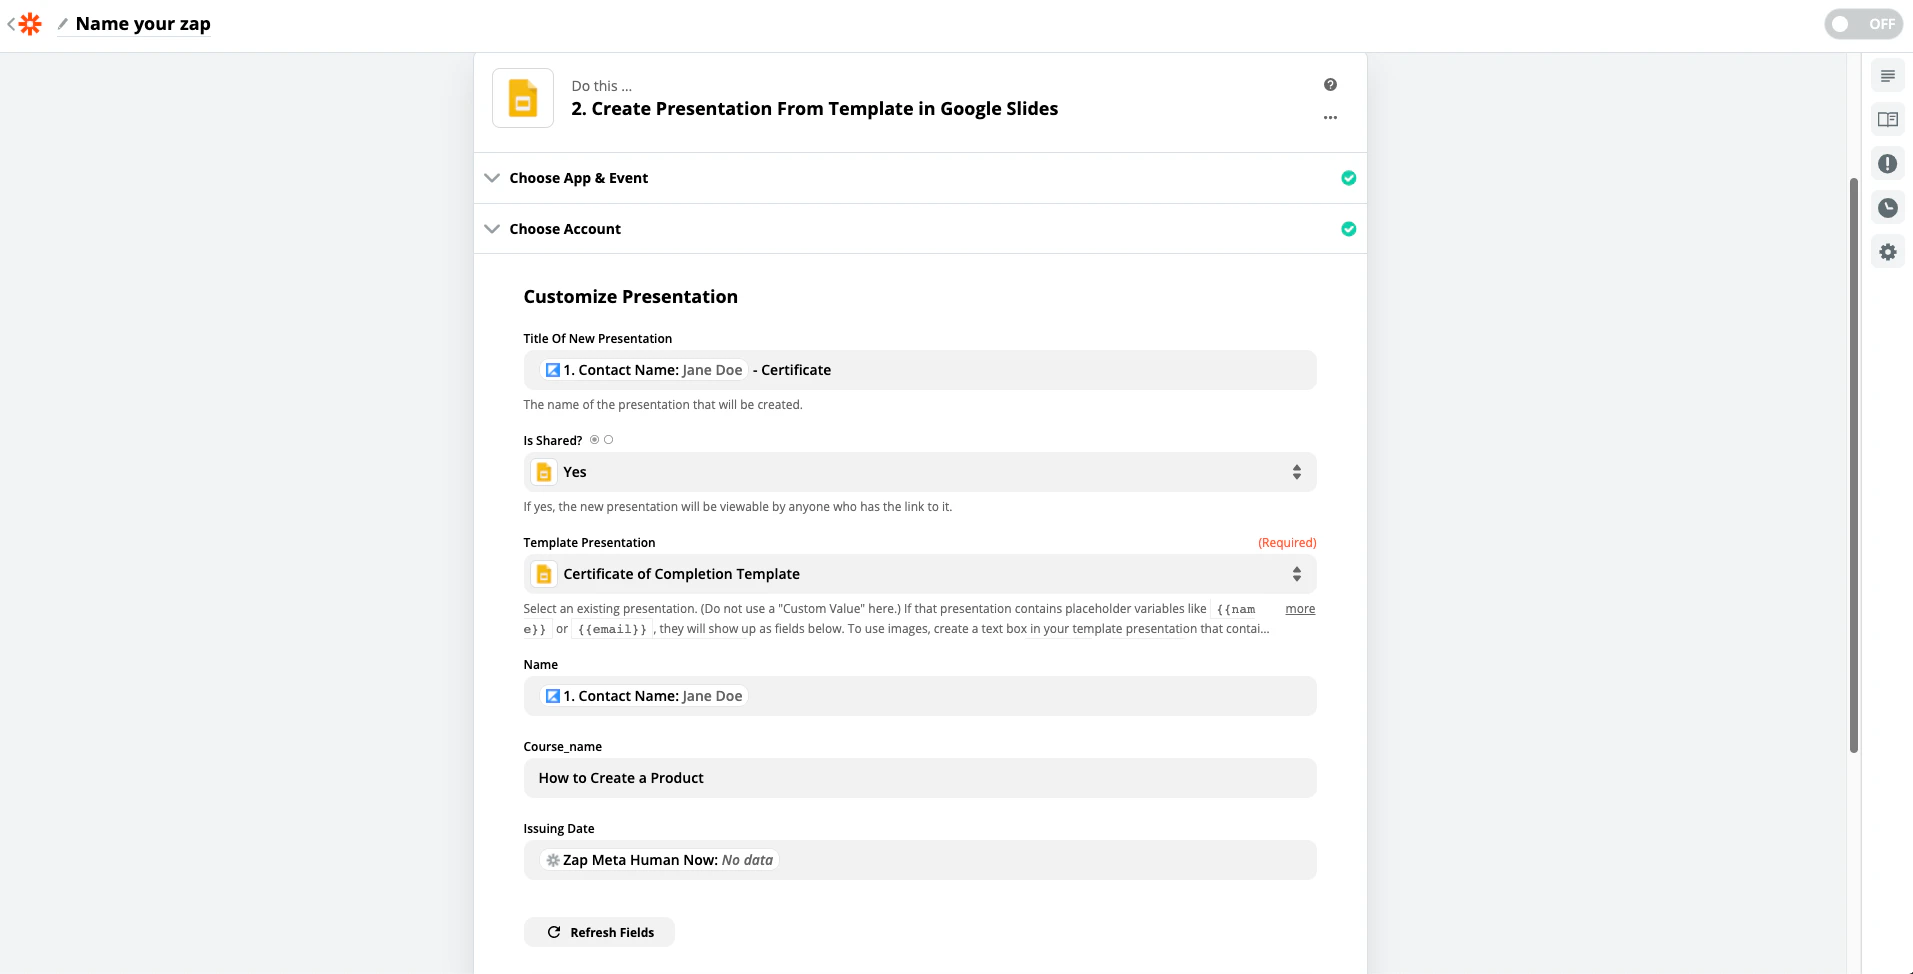
Set up Google Slides Presentation:
* Give your certificate a unique name in the **Title of New Presentation** field. This title will display for your customer. Personalize the title with a combination of the Contact Name variable and custom text for the title. To do so, click the field and select **Contact Name**. Then, enter your remaining title text.
* If you wish to allow your customers to download the Certificate, select **yes** in the **Is Shared?** field.
* In the **Template Presentation** dropdown, select your Certificate of Completion title.
Now you will see all the variables you defined in Step 1. Proceed by matching each variable to the appropriate Kajabi data:
* In the Name field, select **Contact Name**.
* In the Course\_name or custom variable created in the Google Slide, enter your Product Title.
* In the Issuing date field, enter `{{zap_meta_human_now}}` into the field to pass the date to your certificate. If you wish to modify it, check out [Zapier's Guide](https://zapier.com/help/create/customize/insert-the-time-your-zap-runs-into-a-field).
* After matching each variable, click **Continue.**
After completion, your setup should look similar to the screenshot below:
Zapier will ask you to connect your Google Slides account in the next step if it isn't already connected. Select **Sign in to Google Slides**. Then, select your account from the popup. Click **Continue** to set up your Google Slides.
Set up Google Slides Presentation:
* Give your certificate a unique name in the **Title of New Presentation** field. This title will display for your customer. Personalize the title with a combination of the Contact Name variable and custom text for the title. To do so, click the field and select **Contact Name**. Then, enter your remaining title text.
* If you wish to allow your customers to download the Certificate, select **yes** in the **Is Shared?** field.
* In the **Template Presentation** dropdown, select your Certificate of Completion title.
Now you will see all the variables you defined in Step 1. Proceed by matching each variable to the appropriate Kajabi data:
* In the Name field, select **Contact Name**.
* In the Course\_name or custom variable created in the Google Slide, enter your Product Title.
* In the Issuing date field, enter `{{zap_meta_human_now}}` into the field to pass the date to your certificate. If you wish to modify it, check out [Zapier's Guide](https://zapier.com/help/create/customize/insert-the-time-your-zap-runs-into-a-field).
* After matching each variable, click **Continue.**
After completion, your setup should look similar to the screenshot below:
 * Once you have completed the setup, click **Continue**.
## Modify the Zap to send to customers
After creating your certificate in Google Slides and setting up your Zap with Zapier, modify the Zap to automatically send to your students upon completion of the Course.
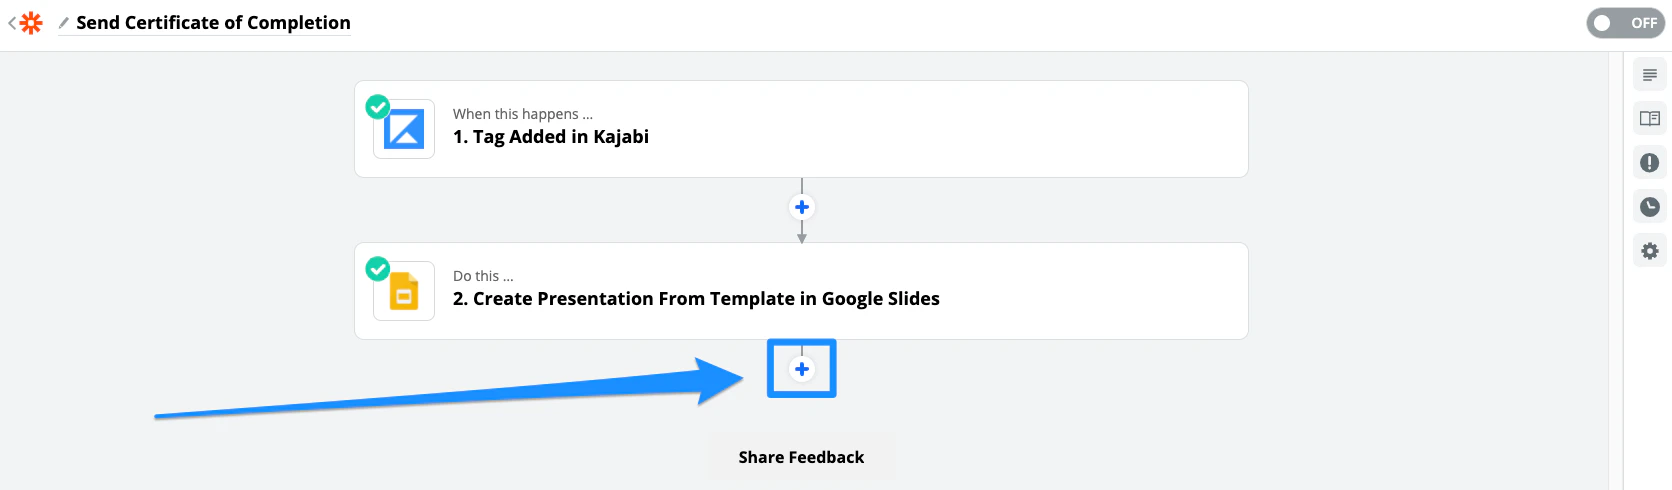
In the same Zap you created, add another Action App, **Email by Zapier**:
* Once you have completed the setup, click **Continue**.
## Modify the Zap to send to customers
After creating your certificate in Google Slides and setting up your Zap with Zapier, modify the Zap to automatically send to your students upon completion of the Course.
In the same Zap you created, add another Action App, **Email by Zapier**:
 For the Additional Action step:
* Select **Email by Zapier** for the App:
For the Additional Action step:
* Select **Email by Zapier** for the App:
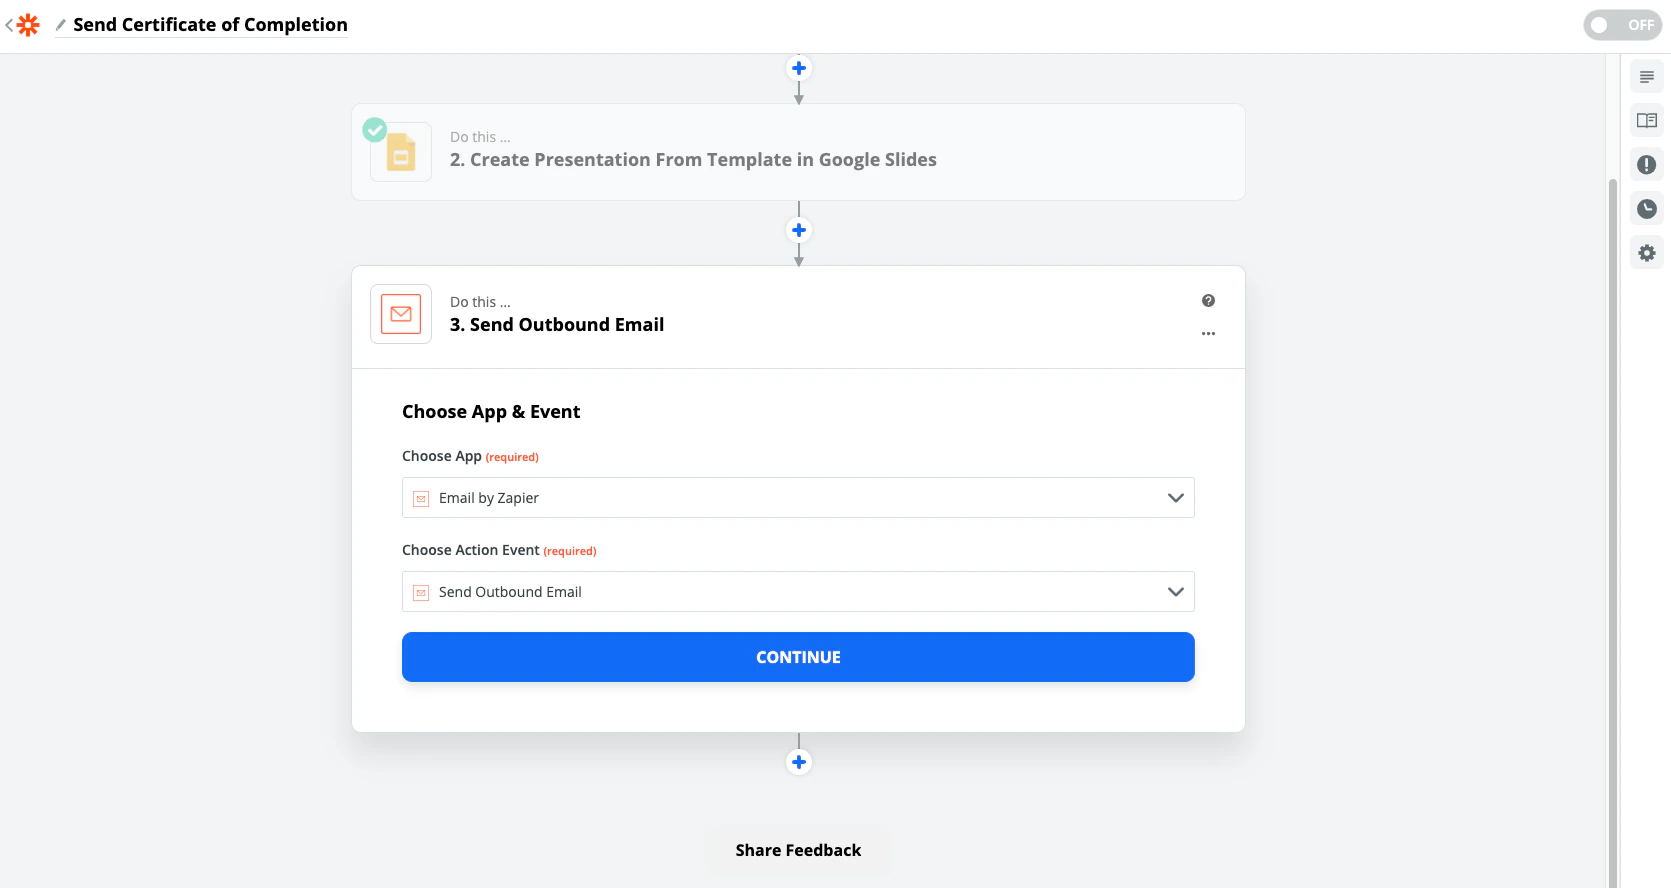
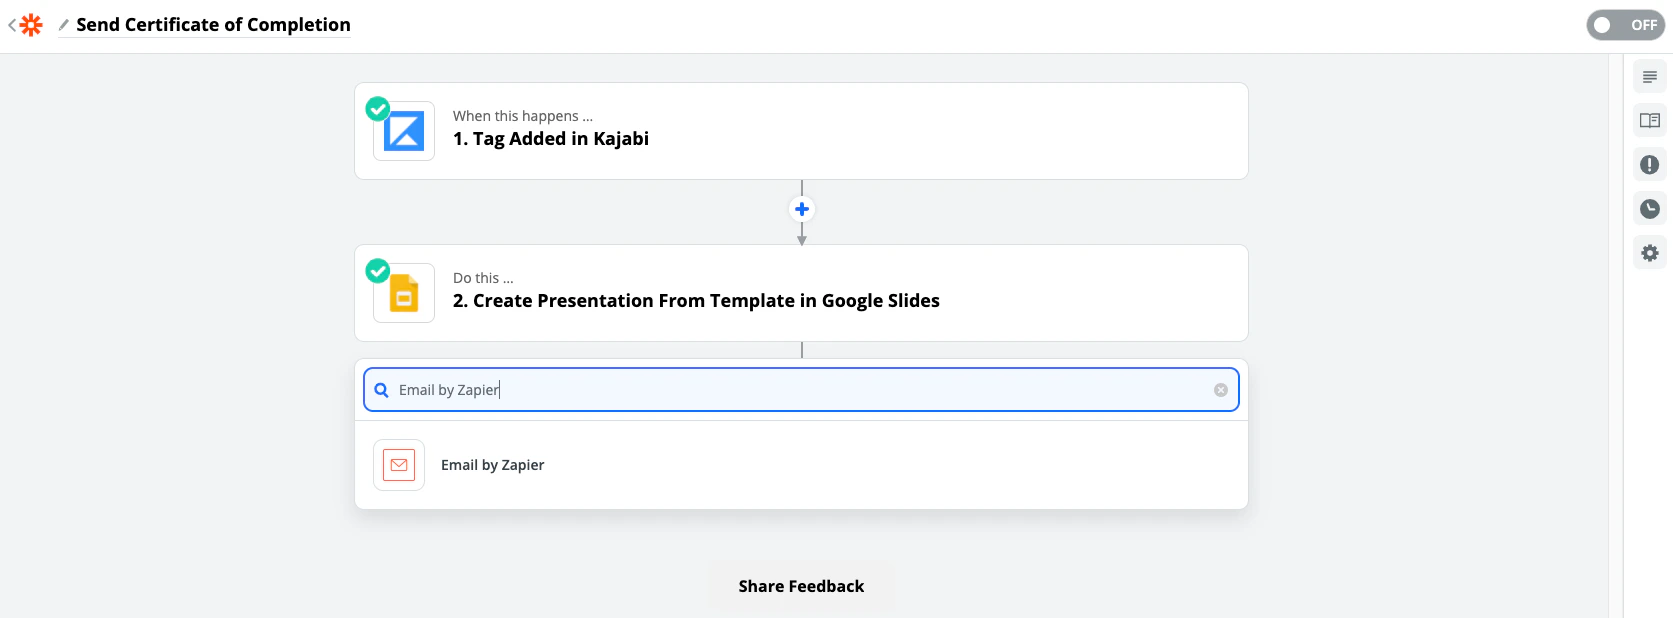 * Keep the default setup **Send Outbound Email** as the Action Event.
* Click **Continue**:
* Keep the default setup **Send Outbound Email** as the Action Event.
* Click **Continue**:
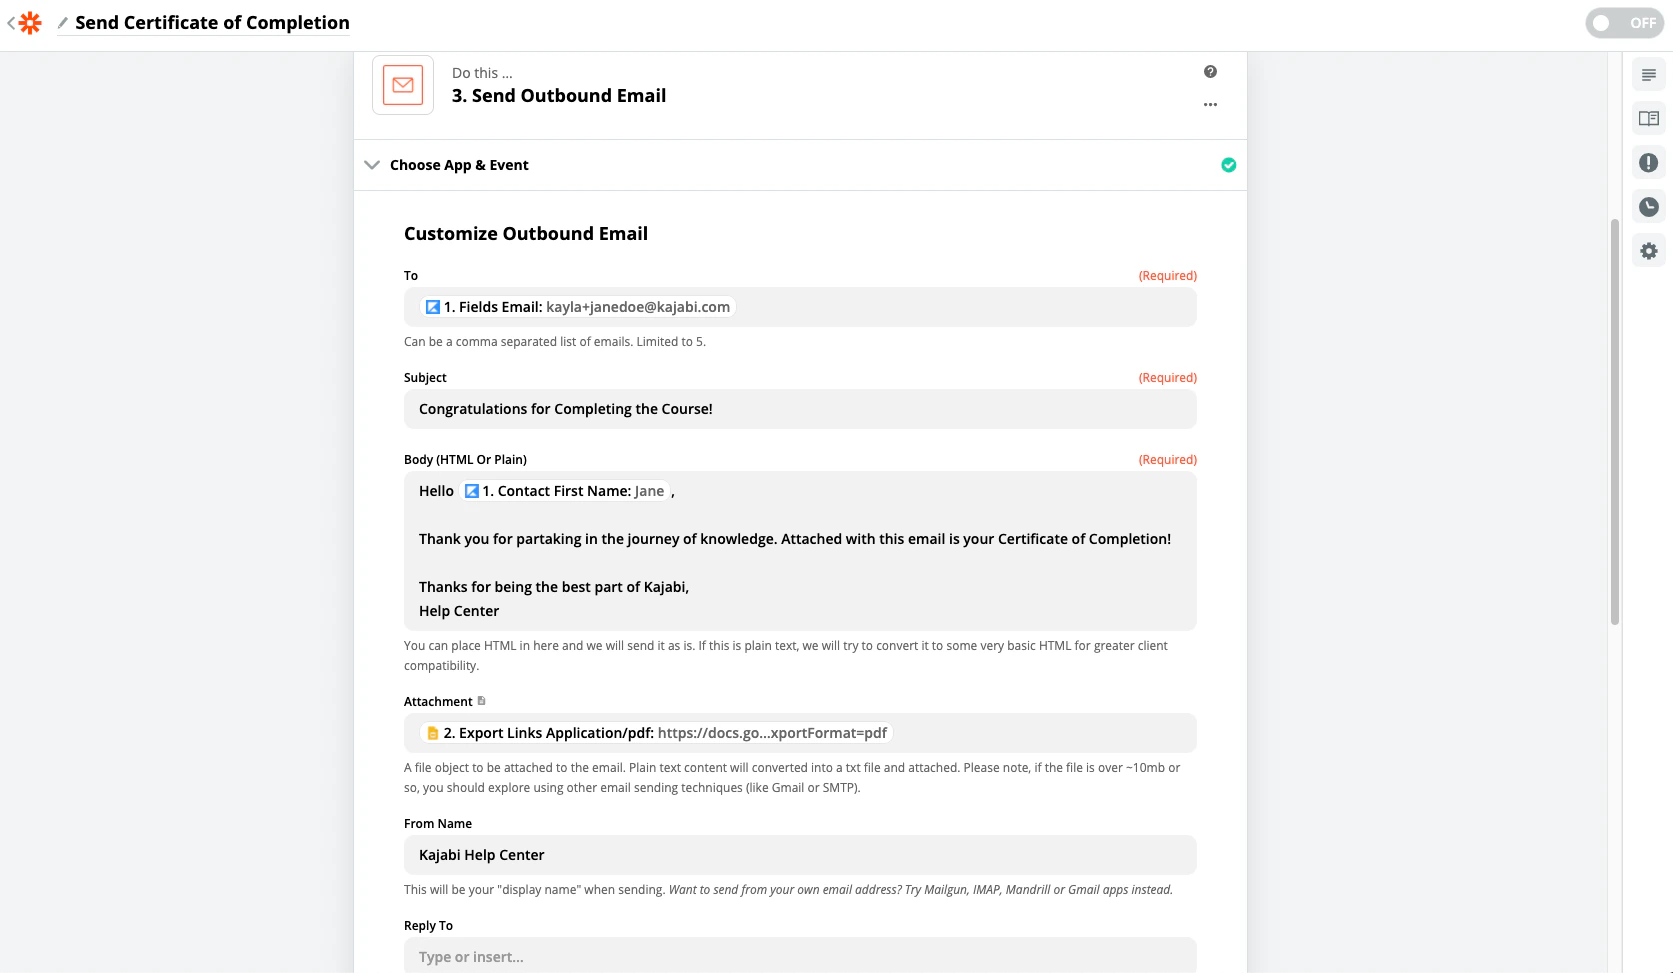
 Then, set up the email template:
* Pass the customer's email address from your Trigger App into the **To** field.
* Enter your desired Subject Line in the **Subject** field.
* Complete the **Body** of your Email Template. Use variables to personalize your email.
* Then, copy and paste `Export Links Application/pdf` into the **Attachment** field.
* Select the matching file object: **Export Links Application/pdf**. This will provide a PDF copy of the certificate to your customer.
If your email address in the **To** field contains a customer's email address, it will send a test email to that customer's email inbox.
Create a [test account in the Contacts tab](../../contacts/manage-your-contacts/how-to-manually-add-a-new-customer-to-your-site) of your site with your test email address and read [Zapier's Guide](https://zapier.com/help/create/basics/change-the-sample-data-in-your-zap-trigger) to change the sample data in the Trigger App step to receive your Test Certificate Email:
Then, set up the email template:
* Pass the customer's email address from your Trigger App into the **To** field.
* Enter your desired Subject Line in the **Subject** field.
* Complete the **Body** of your Email Template. Use variables to personalize your email.
* Then, copy and paste `Export Links Application/pdf` into the **Attachment** field.
* Select the matching file object: **Export Links Application/pdf**. This will provide a PDF copy of the certificate to your customer.
If your email address in the **To** field contains a customer's email address, it will send a test email to that customer's email inbox.
Create a [test account in the Contacts tab](../../contacts/manage-your-contacts/how-to-manually-add-a-new-customer-to-your-site) of your site with your test email address and read [Zapier's Guide](https://zapier.com/help/create/basics/change-the-sample-data-in-your-zap-trigger) to change the sample data in the Trigger App step to receive your Test Certificate Email:
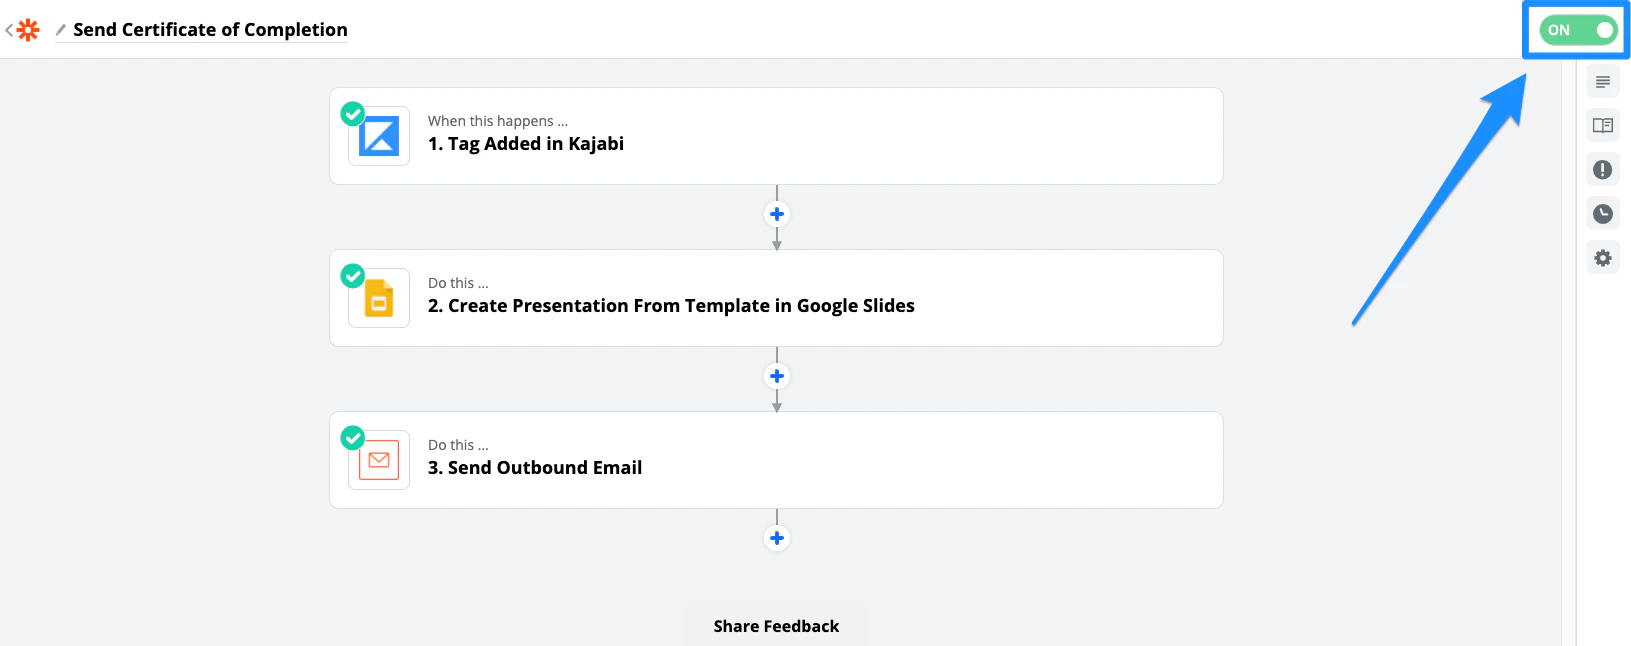
 After successfully testing your Zap, be sure to turn your Zap **On**:
 Remember, you can always return to the Zap to modify your certificate template and email template.
## Customer experience
With your Zap turned on, Zapier will create and send an automated certificate to your customers upon completion of your Course.
Now, when your customer clicks **Mark as Complete** in the Course Lesson you specify or **passes the Assessment** you set, the Tag you created will be added to your customer's profile on your site.
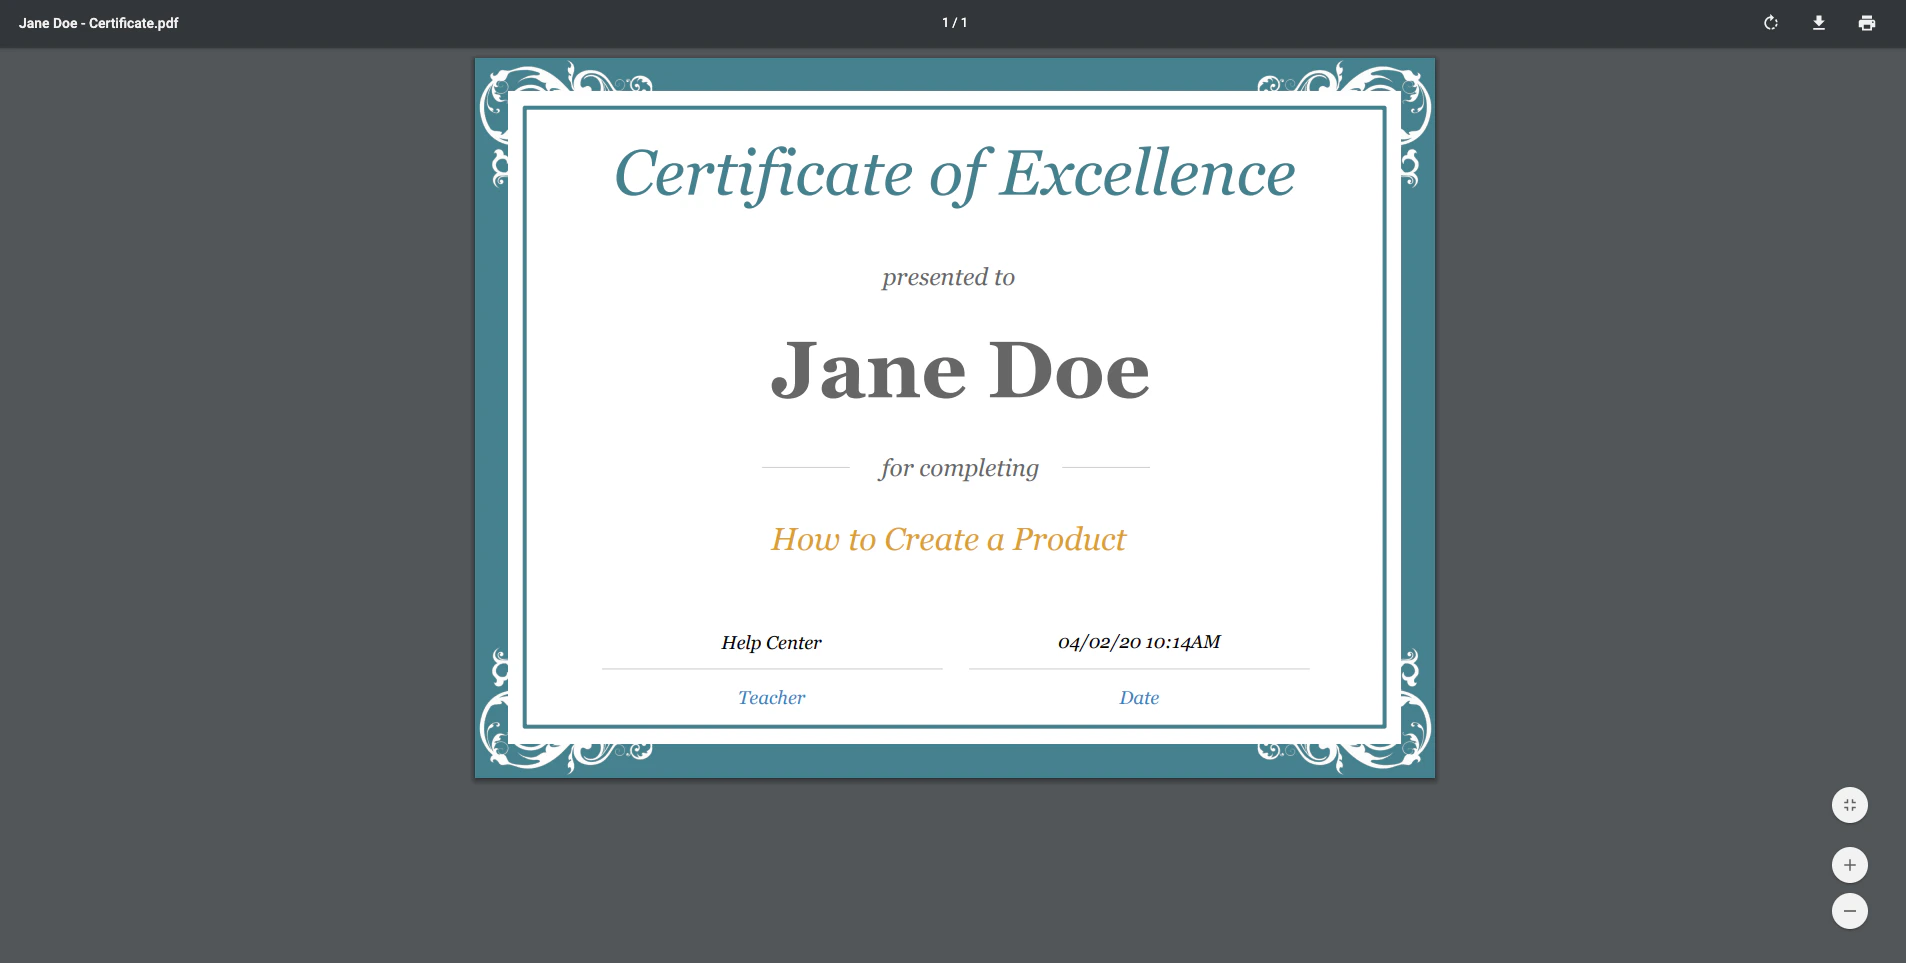
Once added, Kajabi will notify Zapier to trigger your Zap and send your Google Slide Certificate of Completion to your customer's email inbox:
Remember, you can always return to the Zap to modify your certificate template and email template.
## Customer experience
With your Zap turned on, Zapier will create and send an automated certificate to your customers upon completion of your Course.
Now, when your customer clicks **Mark as Complete** in the Course Lesson you specify or **passes the Assessment** you set, the Tag you created will be added to your customer's profile on your site.
Once added, Kajabi will notify Zapier to trigger your Zap and send your Google Slide Certificate of Completion to your customer's email inbox:
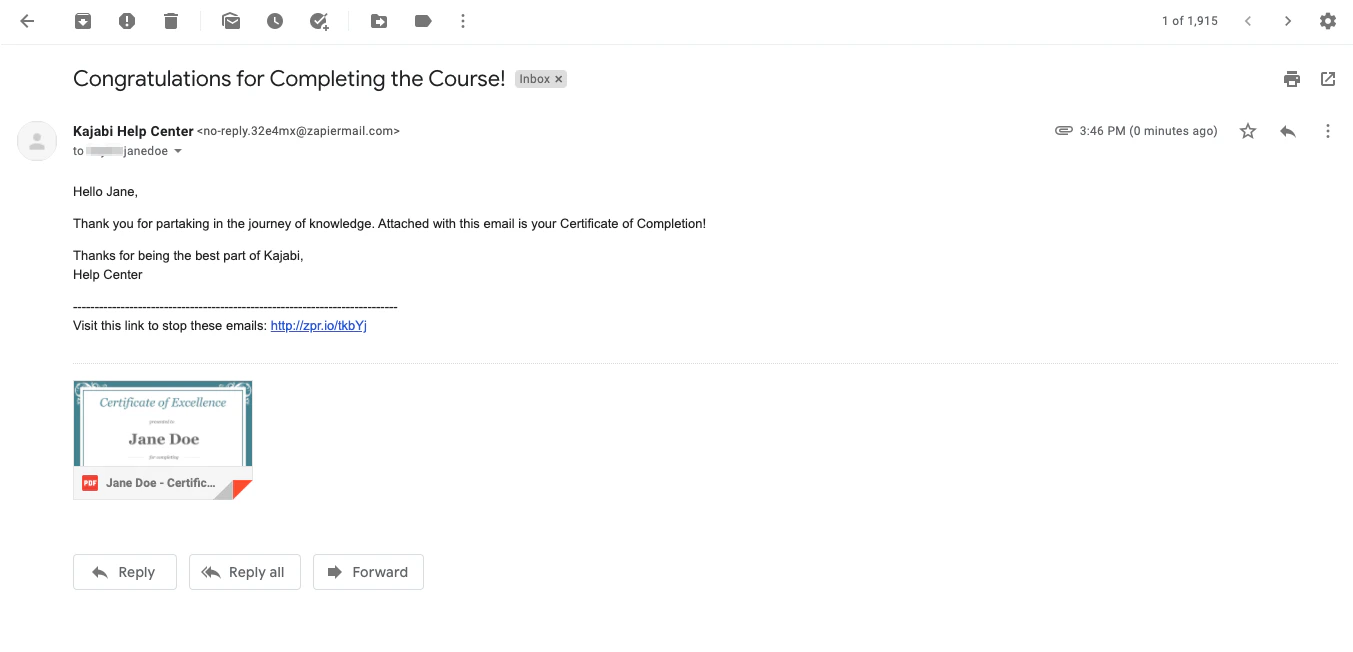 Your customer can now download, print, view the Certificate as with any PDF file: