> ## Documentation Index
> Fetch the complete documentation index at: https://help.kajabi.com/llms.txt
> Use this file to discover all available pages before exploring further.
# Import contacts into Kajabi
> Use the import tool to add and update contacts on Kajabi using CSV files, copy and paste, or direct entry.
The Contacts importer tool gives you the option to upload a comma-separated value (CSV) file with multiple custom data fields, copy and paste contacts from a spreadsheet, or type info directly into the import table.
## Import file requirements overview
The Kajabi Contact Importer tool uses intelligent column mapping.
In other words, Kajabi will recognize column headers in your .CSV file and then organize the data accordingly. This allows you to upload your contacts with up to 50 data fields and up to 100 tags per upload.
But, in order for the intelligent mapping to do its thing, you will need to prepare your .CSV file for import.
**Note:**
* You can import up to **40,000** contacts daily with an active Kajabi account.
* The Contact Import feature is only available to subscribing Kajabi users. If you are on your trial period with Kajabi, the contact importer feature will not be available until your trial expires and your paid subscription begins.
## Prepare a CSV file with the Kajabi template
Navigate to your **Contact import page** and download the linked CSV template. This will provide recommended columns for you to fill out and an example row.
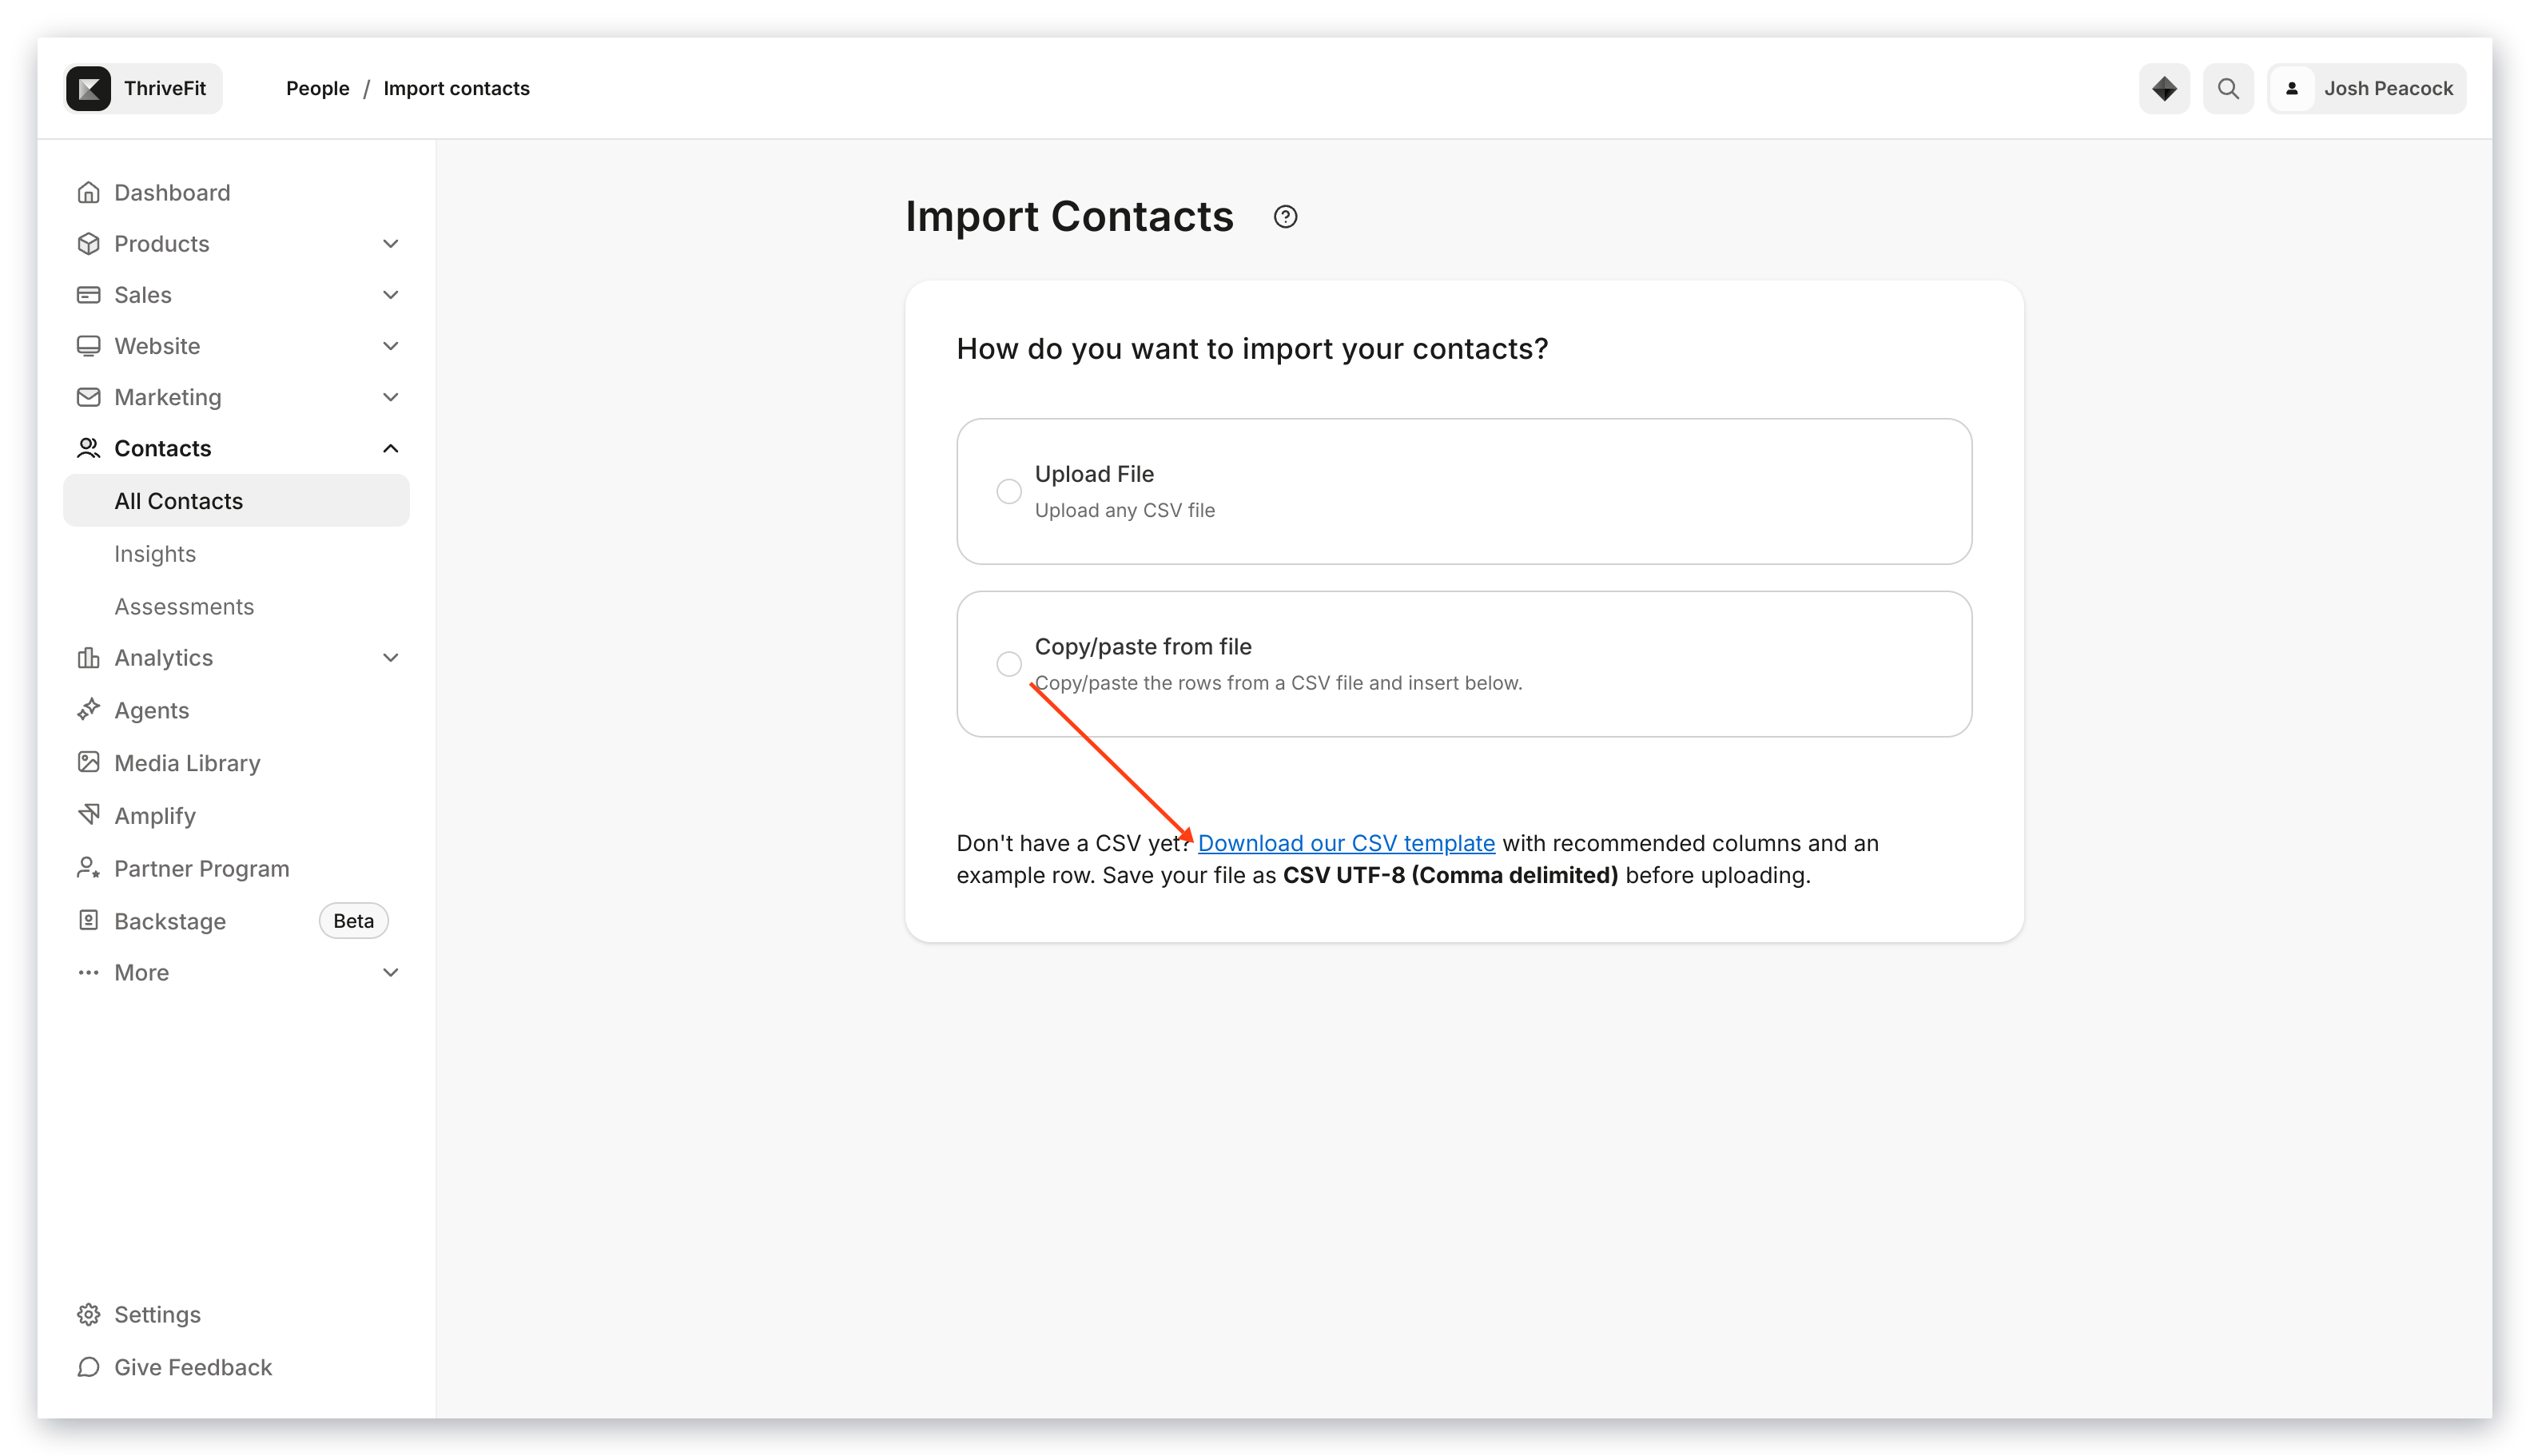 Once you've filled out the template with your list, upload the file to Kajabi's contact importer and you'll see the columns automatically map to our required fields.
## Prepare a downloaded .CSV file from a third-party CRM for importing
For the Kajabi Contact Importer to organize your contacts' data best, it is critical to label the column headings in the first row of the spreadsheet.
For the best results, start with **Email Address**, followed by **Name**, and then the other fields you would like to retrieve.
**Note:** The email column is the only one that is required.
Keep in mind the maximum number of Header Fields Kajabi can import is 50.
## Prepare a blank .CSV file for importing
Once you've filled out the template with your list, upload the file to Kajabi's contact importer and you'll see the columns automatically map to our required fields.
## Prepare a downloaded .CSV file from a third-party CRM for importing
For the Kajabi Contact Importer to organize your contacts' data best, it is critical to label the column headings in the first row of the spreadsheet.
For the best results, start with **Email Address**, followed by **Name**, and then the other fields you would like to retrieve.
**Note:** The email column is the only one that is required.
Keep in mind the maximum number of Header Fields Kajabi can import is 50.
## Prepare a blank .CSV file for importing
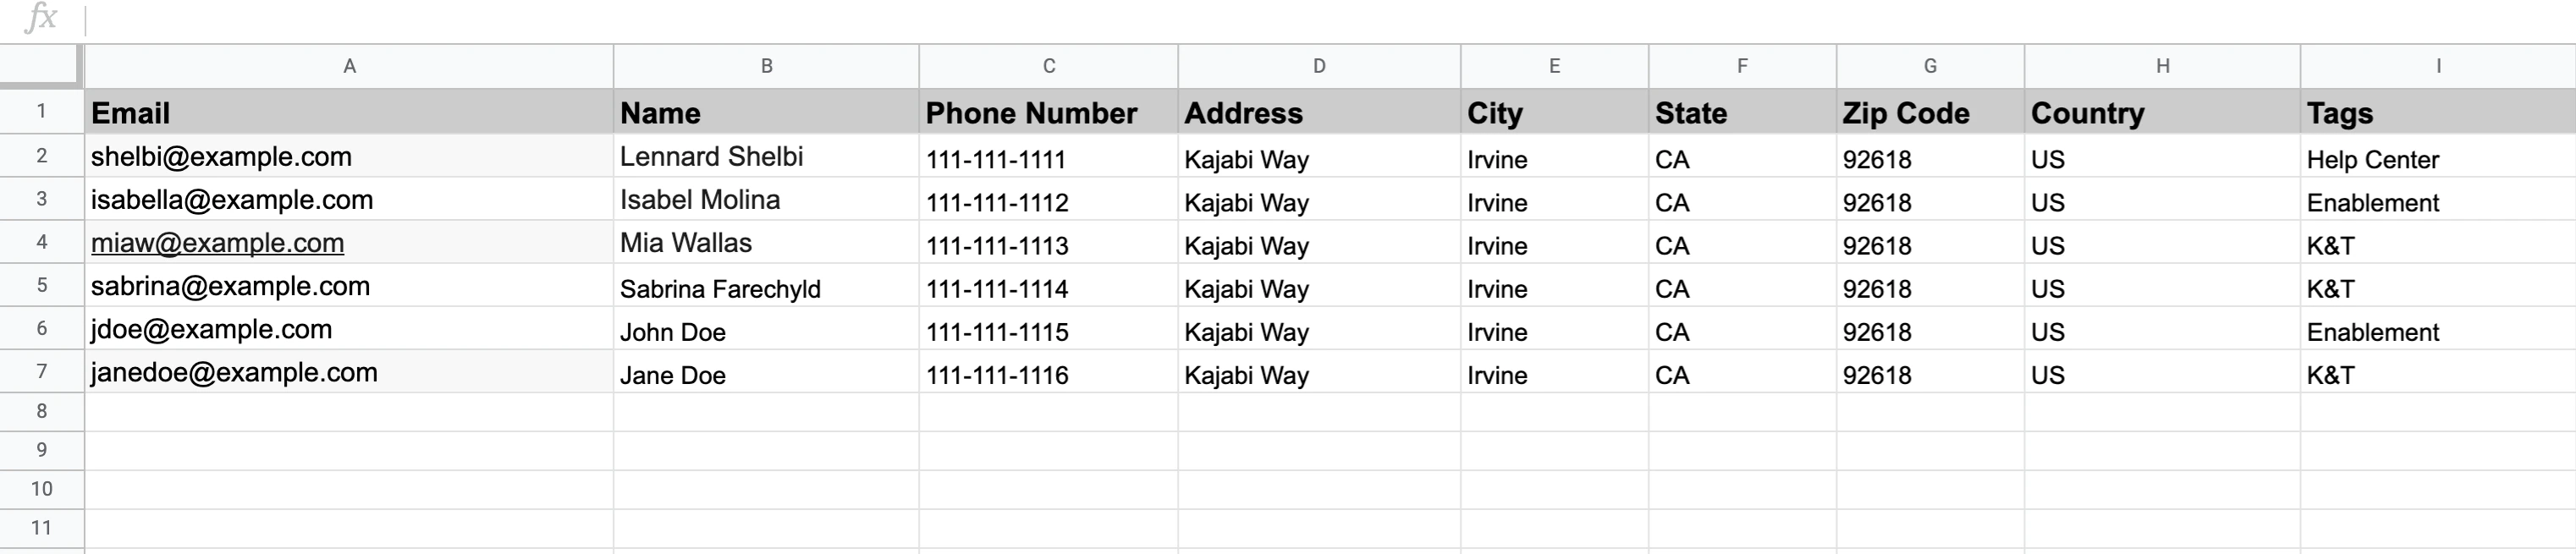 1. Get started by opening an existing .CSV file or a blank worksheet in a spreadsheet application like Google Sheets or Excel.
2. Create and label a **column** in the first **row**. We recommend naming the first column Email Address:
1. Get started by opening an existing .CSV file or a blank worksheet in a spreadsheet application like Google Sheets or Excel.
2. Create and label a **column** in the first **row**. We recommend naming the first column Email Address:
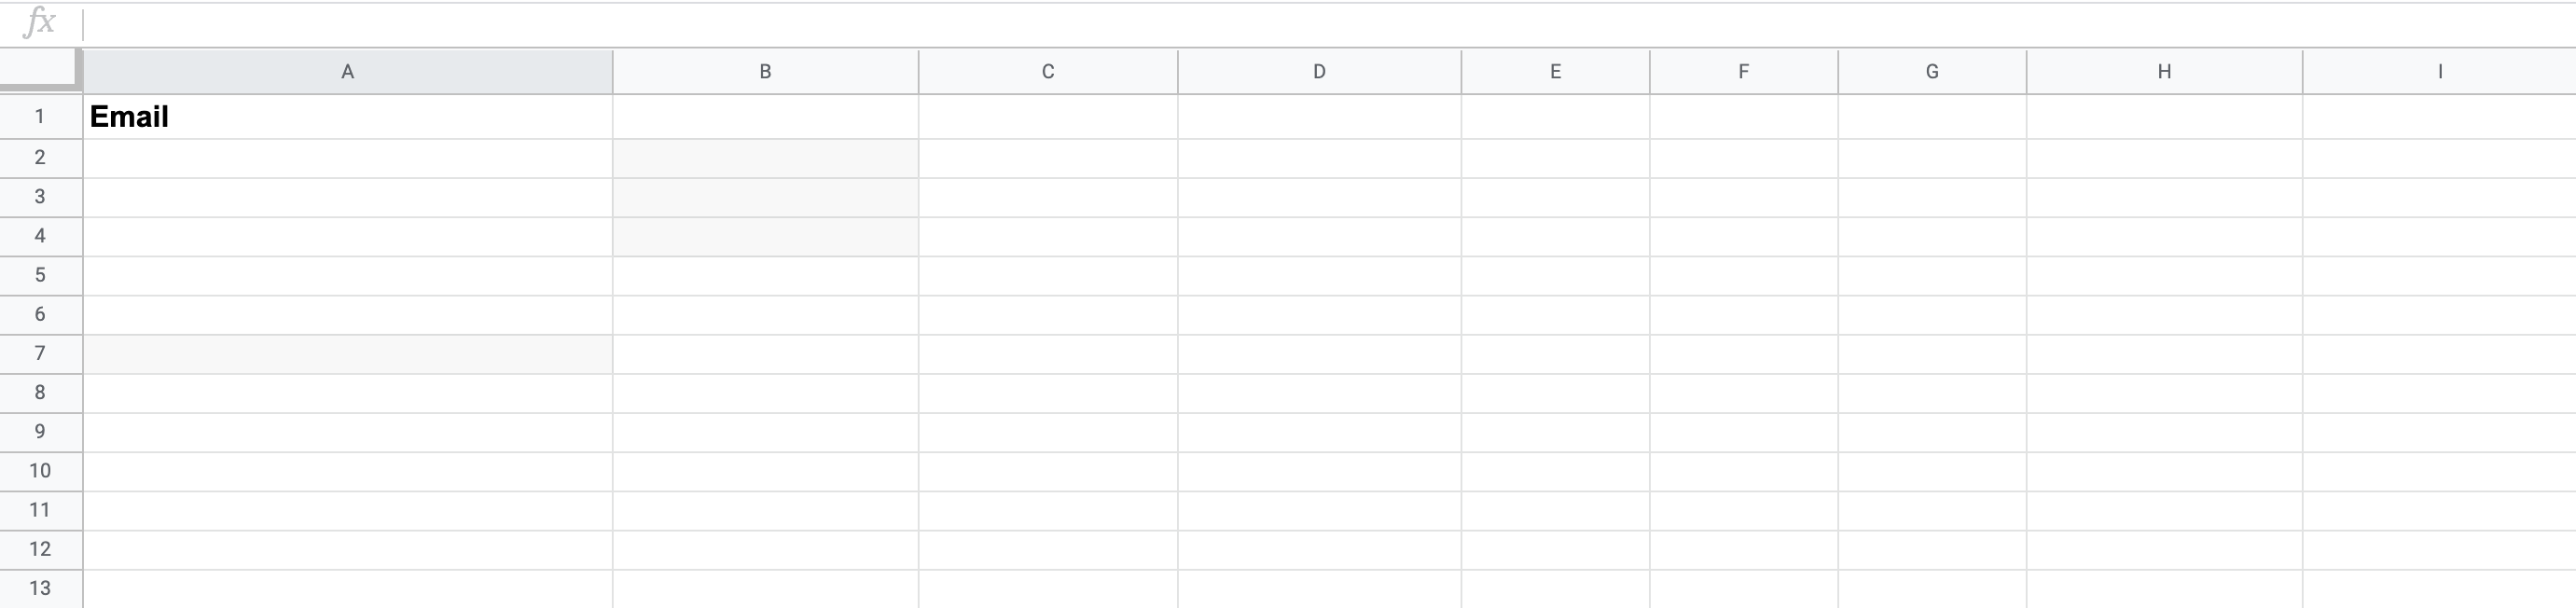 3. In the next column of the same row, create and name additional columns, such as; **Name**, **Phone Number**, and other information fields you would like to import to Kajabi:
 **Note:** Kajabi requires a single name field to function properly. If your CSV export contains two columns for first and last name, convert your multiple name column into a single name column.
For example, with a spreadsheet like Google Sheets, you can use the formula `=CONCATENATE(A2," ",B2)` to combine the first and last name fields in Column A and Column B into a single name column. [Learn more](../../contacts/manage-your-contacts/how-to-use-google-sheets-to-combine-first-and-last-name)
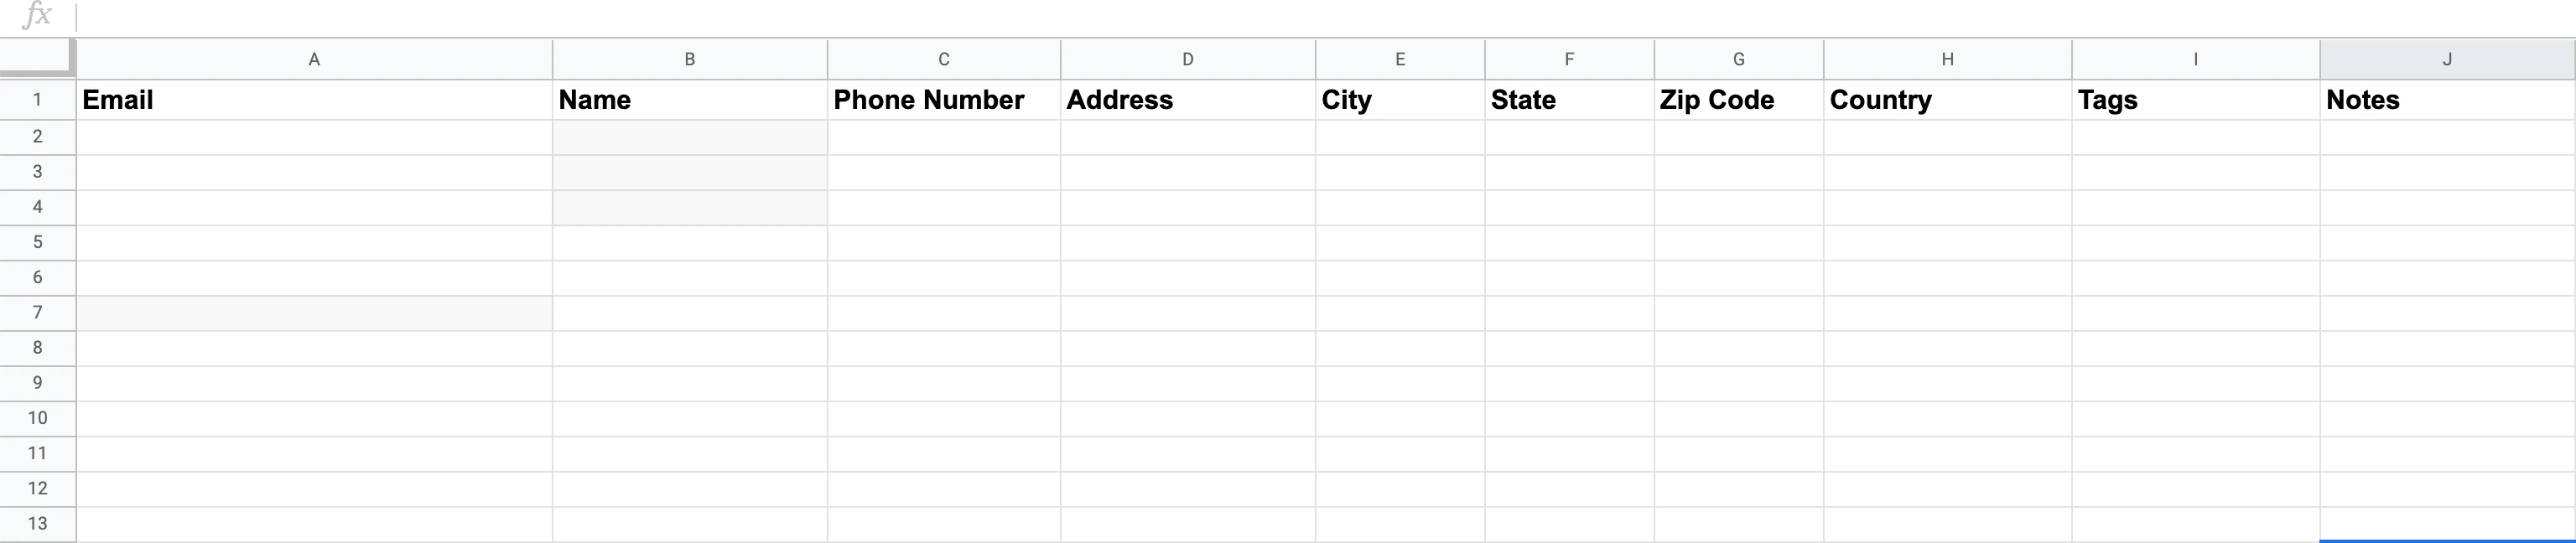
4. Then, paste the contact information into the relevant cells in the spreadsheet:
**Note:** Kajabi requires a single name field to function properly. If your CSV export contains two columns for first and last name, convert your multiple name column into a single name column.
For example, with a spreadsheet like Google Sheets, you can use the formula `=CONCATENATE(A2," ",B2)` to combine the first and last name fields in Column A and Column B into a single name column. [Learn more](../../contacts/manage-your-contacts/how-to-use-google-sheets-to-combine-first-and-last-name)
4. Then, paste the contact information into the relevant cells in the spreadsheet:
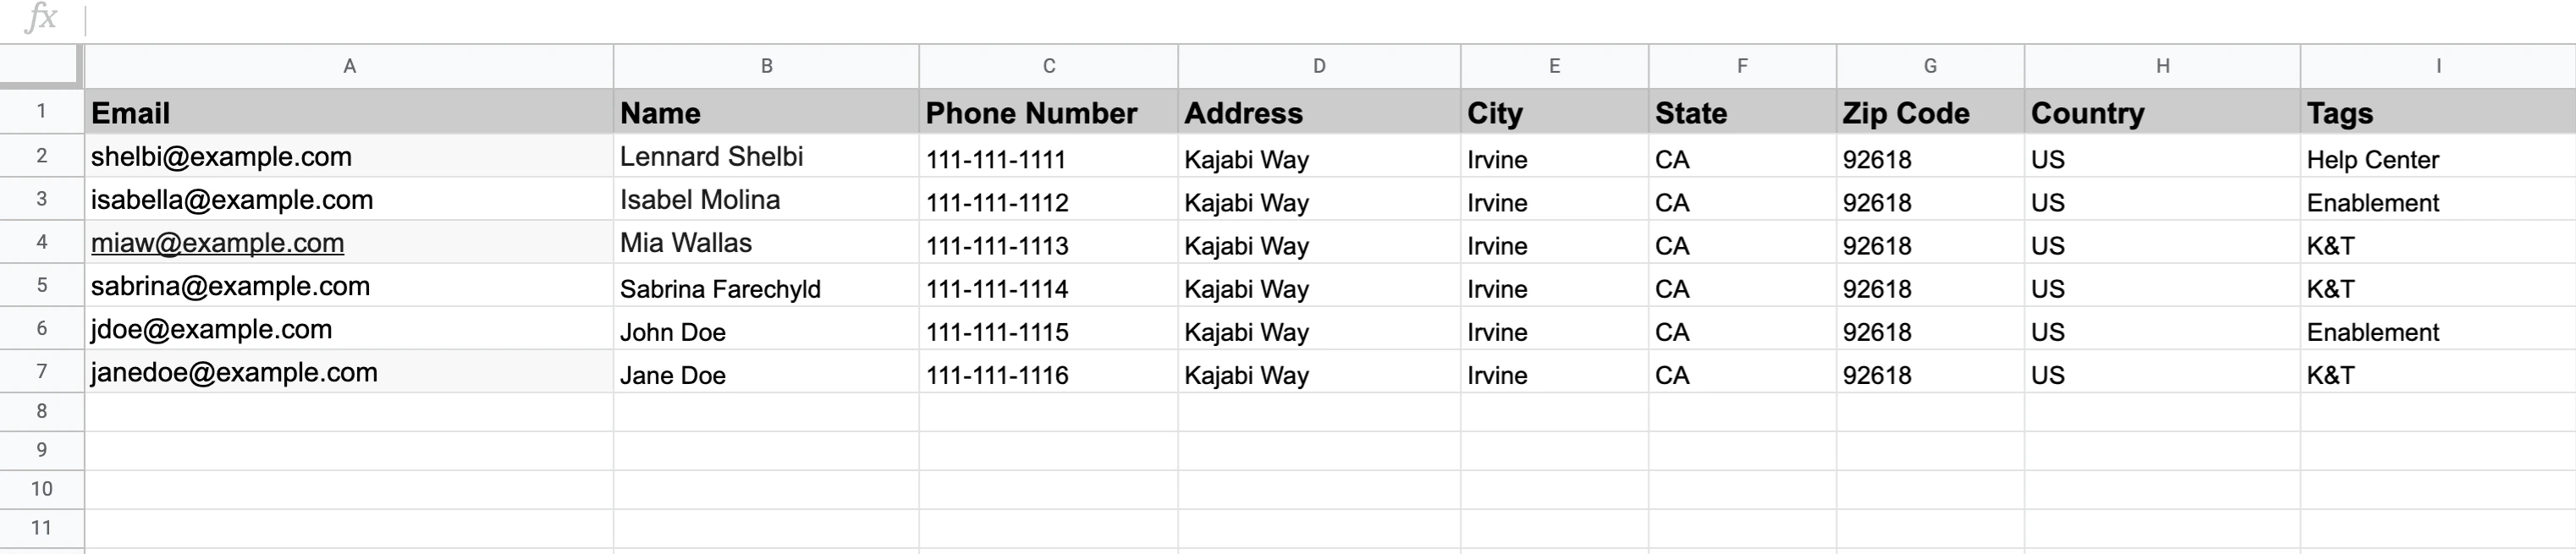 **Note:** Custom fields using the Country data type must be in the capitalized, 2-letter format (e.g., US not USA).
5. Add up to 50 data fields and 100 tags.
**Note:** Custom fields using the Country data type must be in the capitalized, 2-letter format (e.g., US not USA).
5. Add up to 50 data fields and 100 tags.
 6. **Save** or **Download** the file as a .**CSV** file.
**Note:**
* You can have a max of **20,000** rows in the file per import.
* The max file size for each import is **30MB**.
* Be sure to create different header titles for each column to avoid the "Mapped header has duplicate field ids" error message. If you wish to add multiple tags to your contacts, create a single "Tag" column and separate each tag with a comma or import your contacts in batches with a single Tag column for each batch of tags.
## Import contacts to Kajabi
1. Open the **Contacts** tab from the Dashboard.
2. From the Contact Manager dashboard, click the **+ Import Contacts** button or **+ Add Contacts** to begin adding contacts to your site.
3. Then select how you would like to import your contacts:
* **Import CSV** to upload multiple contacts
* **Add Single Contact** to import an individual contact quickly and easily to your list
## Import a single contact
1. Navigate to your **Kajabi Dashboard**.
2. Go to your **Contacts Page** and click **Add contacts**.
3. Click **Add Single Contact**.
4. Complete the **Name** and **Email** fields.
* You may also wish to **Add a Tag** or **Grant Offers**.
5. Select the **Subscribe to marketing emails** field.
6. When you're done, click **Save**.
## Import CSV
If you choose to import a CSV, select your preferred method:
* Upload File
* Copy/paste from file
### Upload file
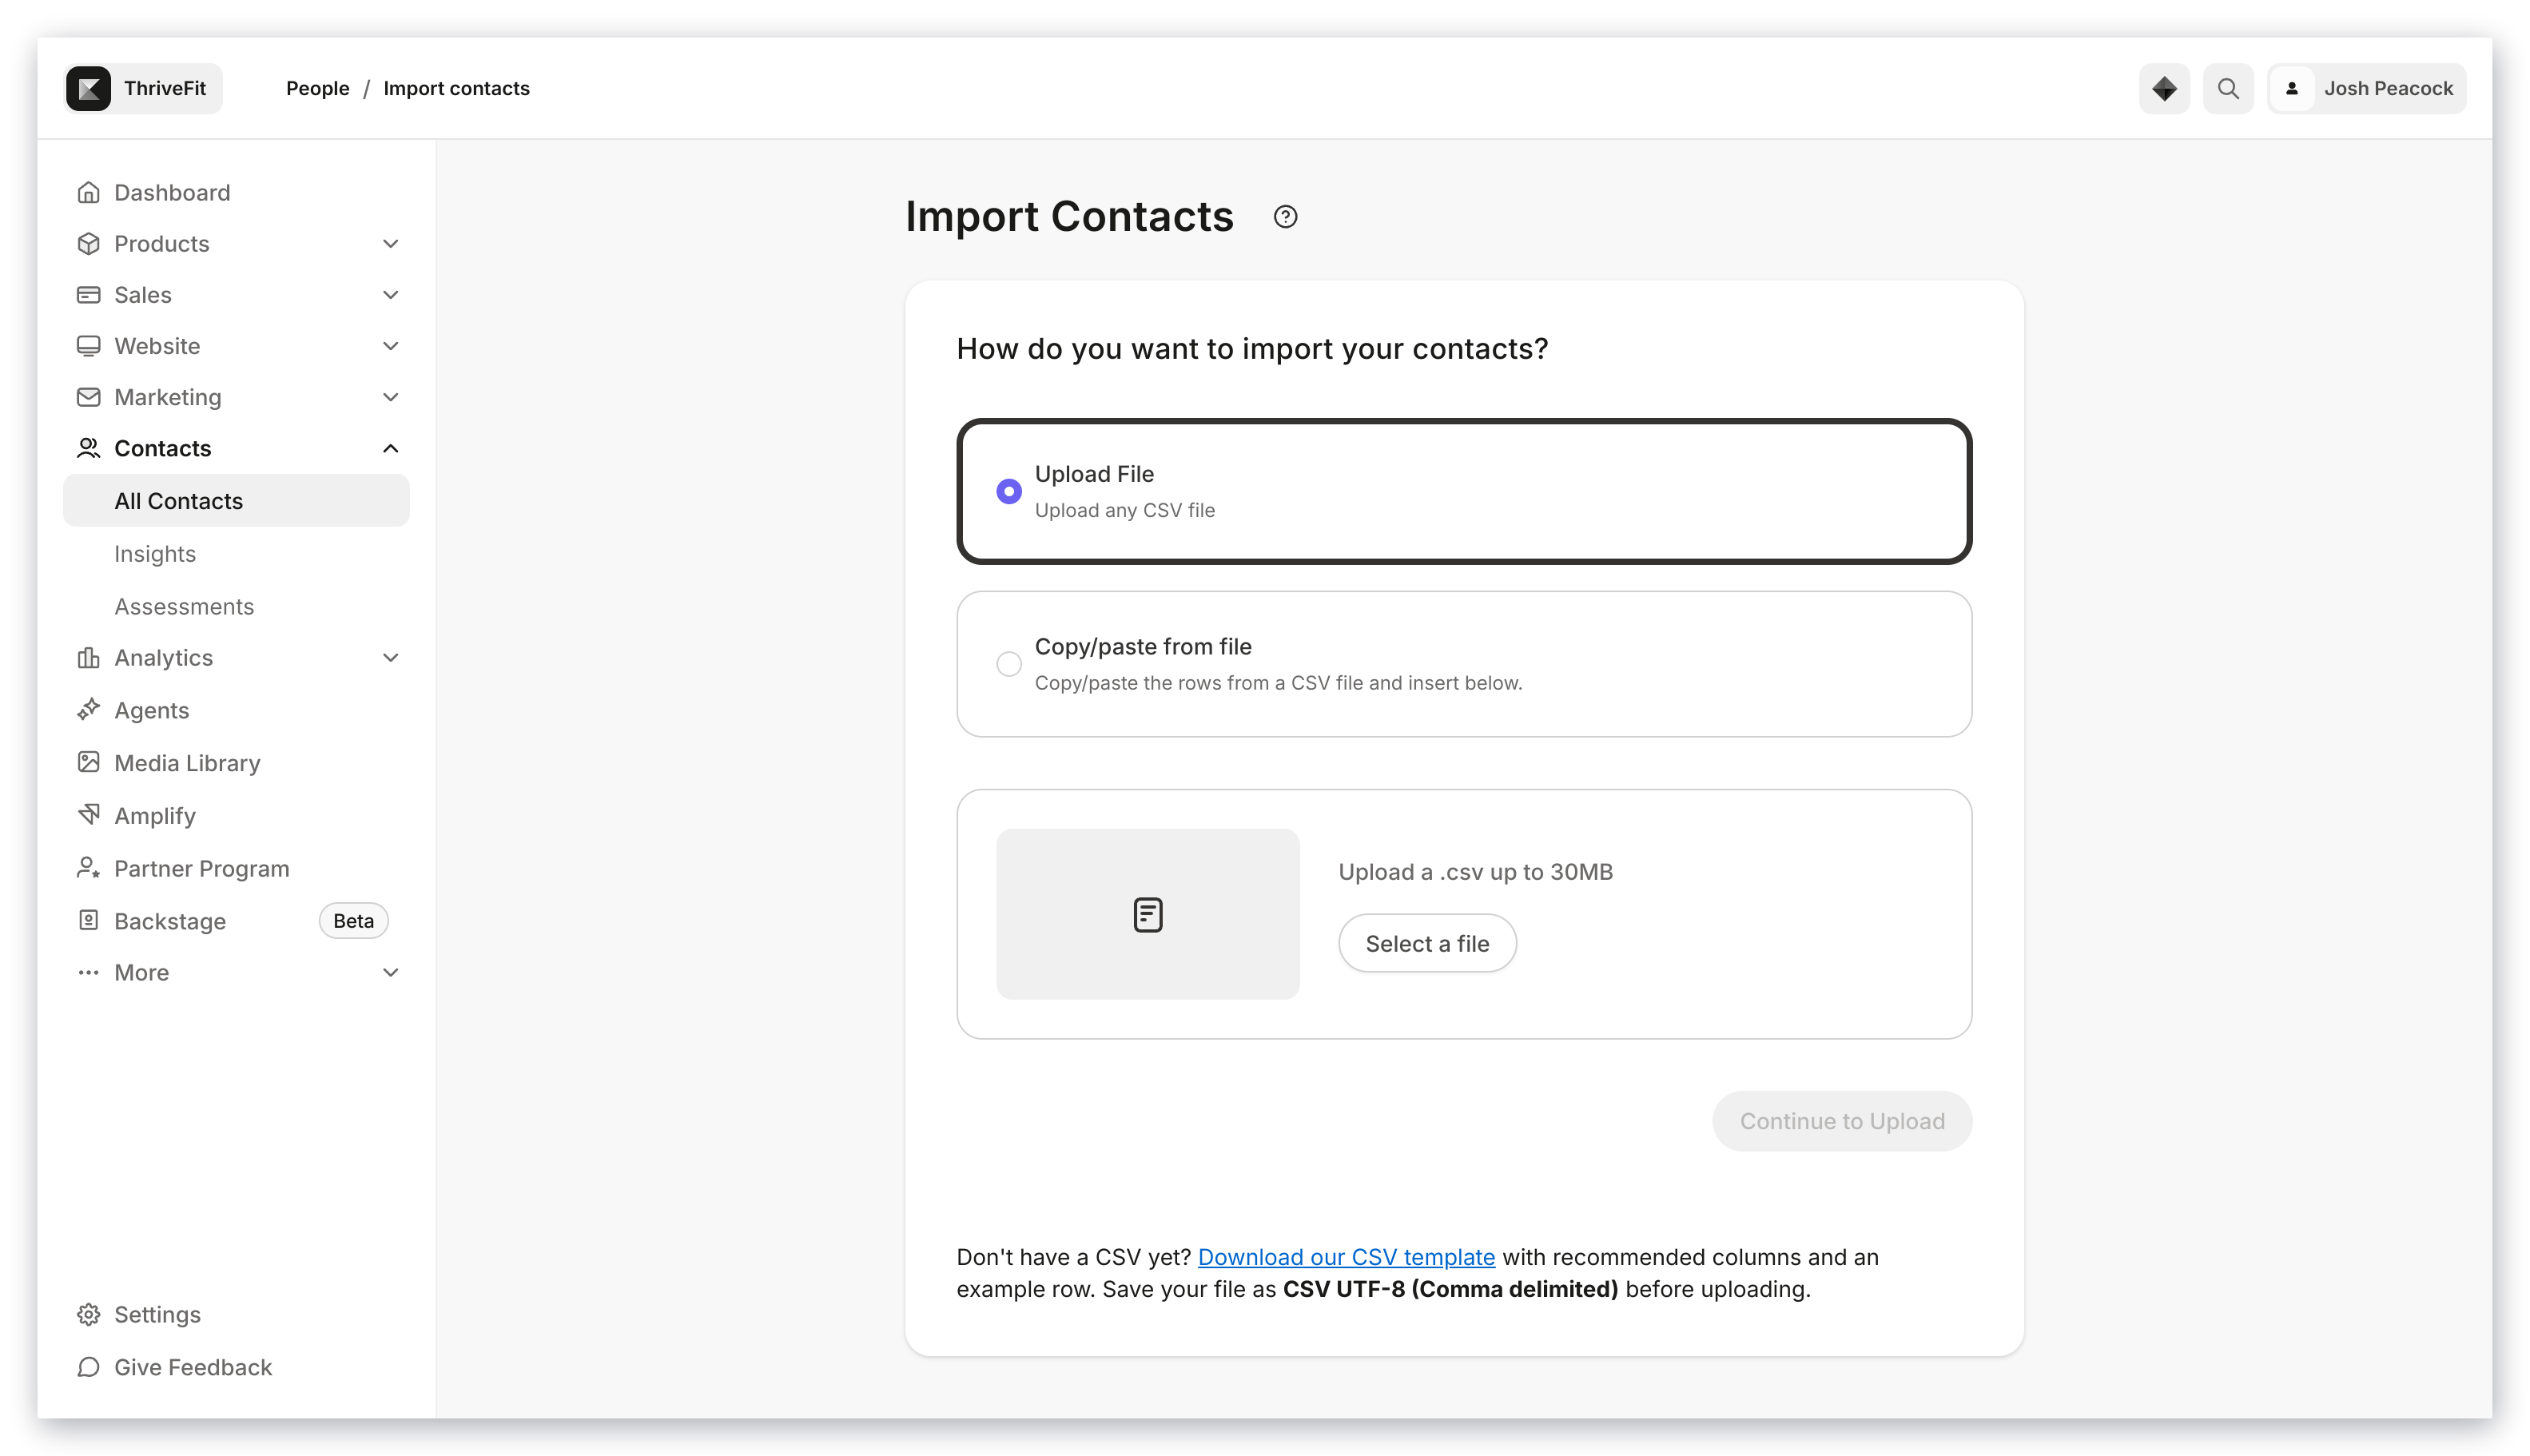
1. Click **Upload File** and select your prepared .CSV file into the file picker.
6. **Save** or **Download** the file as a .**CSV** file.
**Note:**
* You can have a max of **20,000** rows in the file per import.
* The max file size for each import is **30MB**.
* Be sure to create different header titles for each column to avoid the "Mapped header has duplicate field ids" error message. If you wish to add multiple tags to your contacts, create a single "Tag" column and separate each tag with a comma or import your contacts in batches with a single Tag column for each batch of tags.
## Import contacts to Kajabi
1. Open the **Contacts** tab from the Dashboard.
2. From the Contact Manager dashboard, click the **+ Import Contacts** button or **+ Add Contacts** to begin adding contacts to your site.
3. Then select how you would like to import your contacts:
* **Import CSV** to upload multiple contacts
* **Add Single Contact** to import an individual contact quickly and easily to your list
## Import a single contact
1. Navigate to your **Kajabi Dashboard**.
2. Go to your **Contacts Page** and click **Add contacts**.
3. Click **Add Single Contact**.
4. Complete the **Name** and **Email** fields.
* You may also wish to **Add a Tag** or **Grant Offers**.
5. Select the **Subscribe to marketing emails** field.
6. When you're done, click **Save**.
## Import CSV
If you choose to import a CSV, select your preferred method:
* Upload File
* Copy/paste from file
### Upload file
1. Click **Upload File** and select your prepared .CSV file into the file picker.
 ### Copy/paste from file
1. Click **Copy and Paste from file** and then copy and paste the rows from a prepared CSV file into the text box.
### Copy/paste from file
1. Click **Copy and Paste from file** and then copy and paste the rows from a prepared CSV file into the text box.
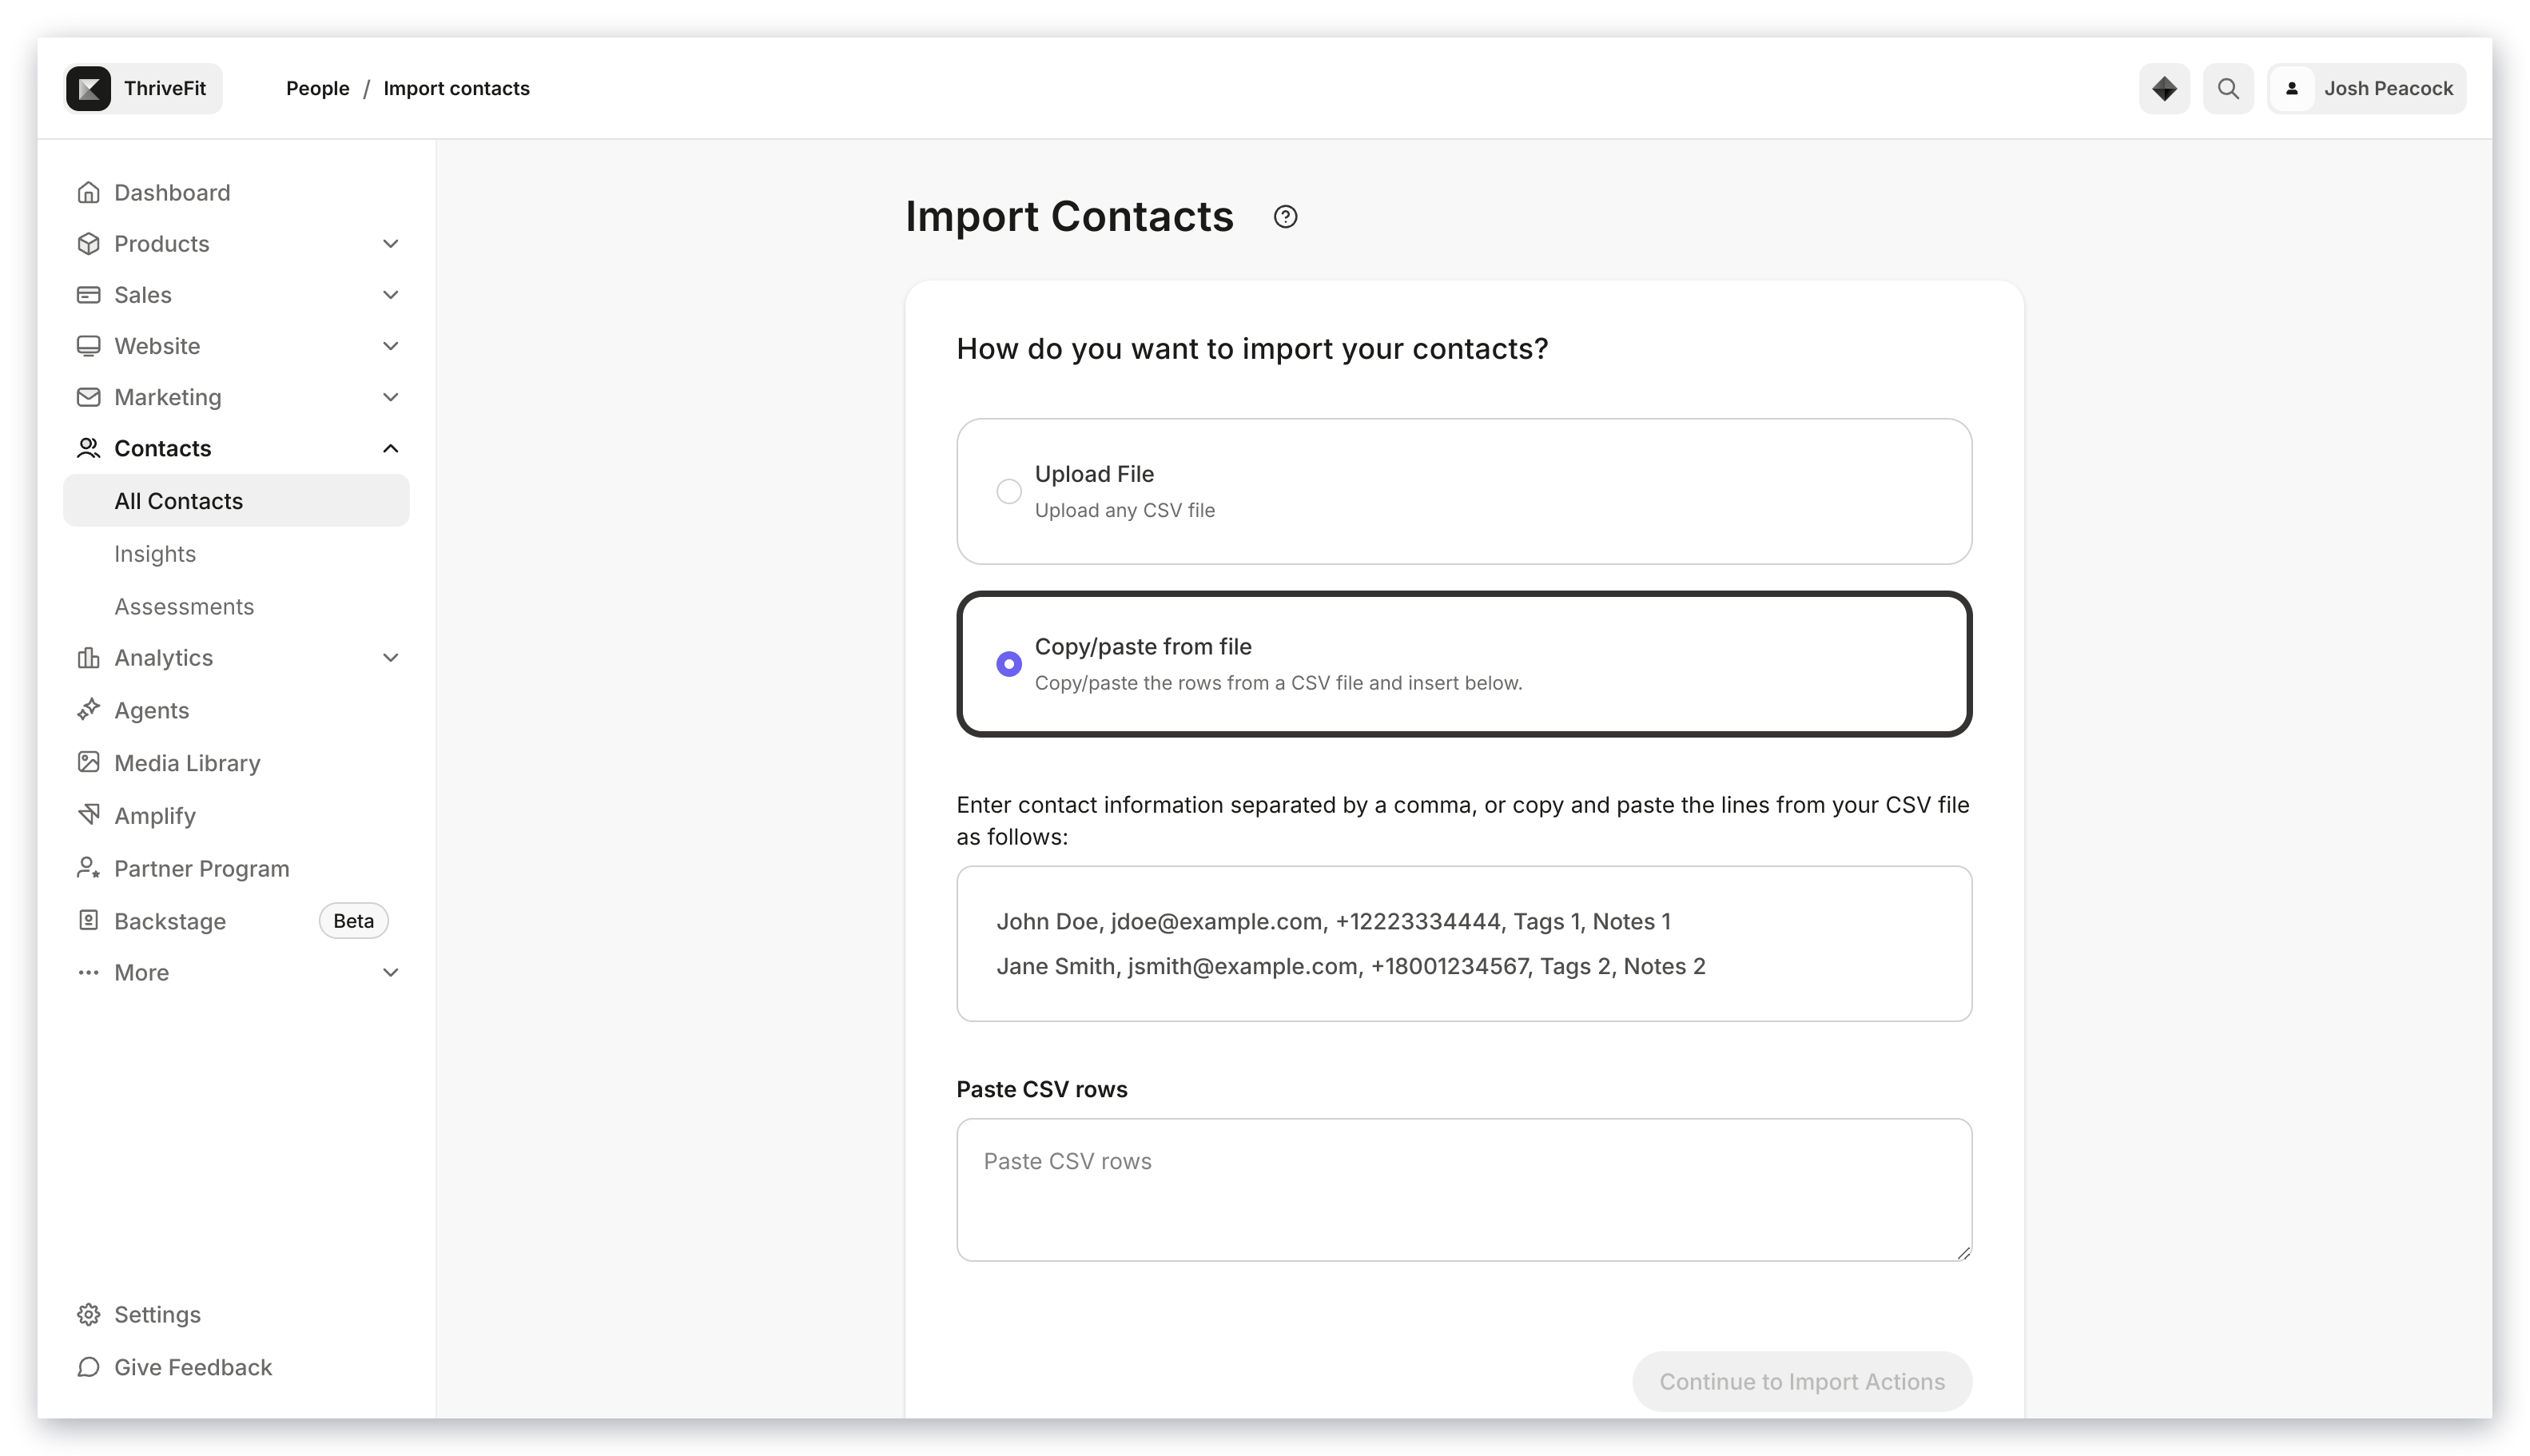 **Note:** You may encounter the error **Invalid CSV format. CSV rows must include commas** if you're only using the email column. To fix this, add a comma after each email address.
## Column mapping
The Kajabi Contact Importer uses intelligent column mapping. This means that Kajabi will recognize column headers and then organize the data accordingly.
## Review and edit the recognized columns
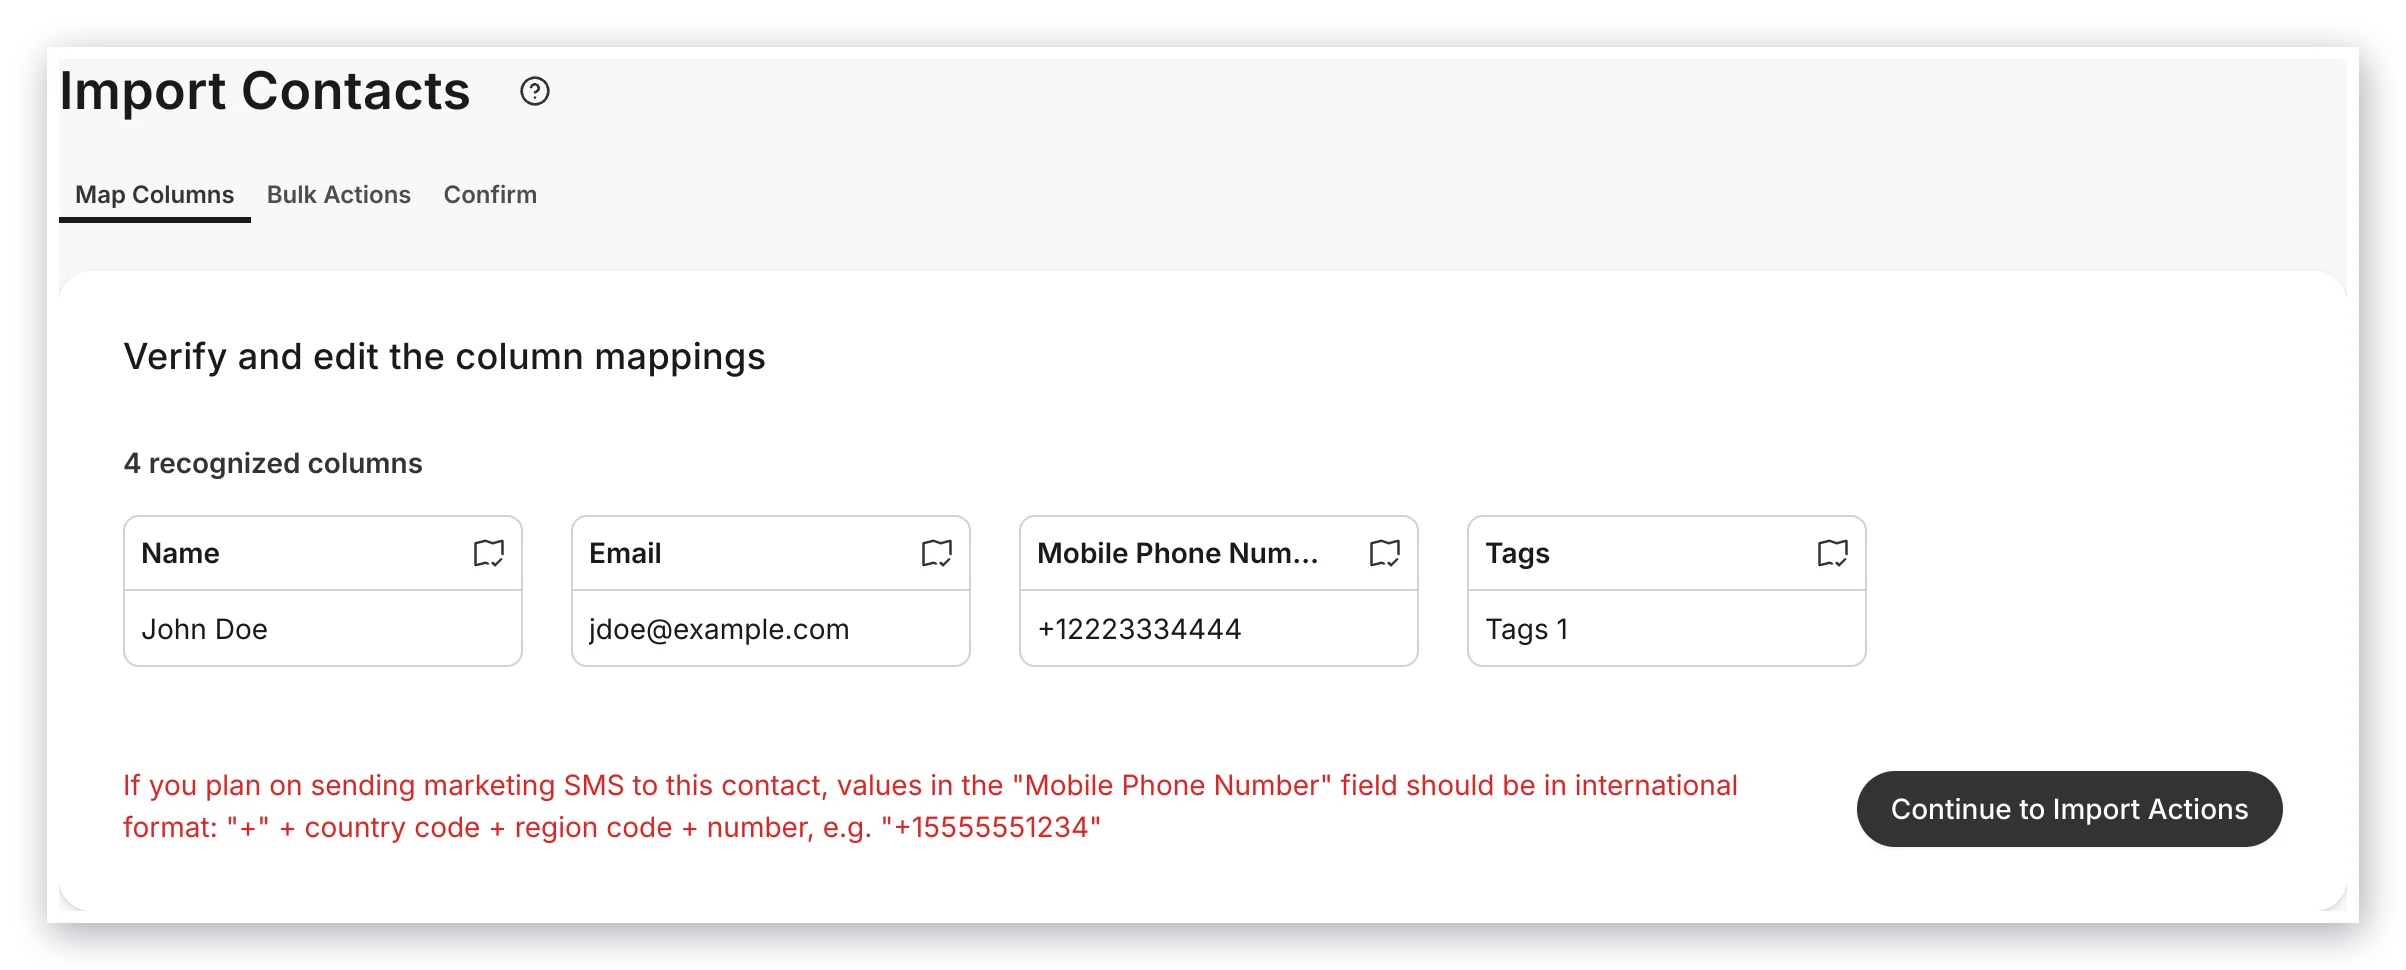
Though the Kajabi Contact Importer is pretty awesome, it's not perfect. Make sure to review and edit the columns from the .CSV file. When clicking on the icon in the top right corner of the column, Kajabi will give you the options:
* **Existing Field:** Choose an existing field from your Contacts tab.
* **New Field:** Create a field that will be saved to your Contacts tab.
* **Skip Column:** Skip the column and waive the accompanying data.
**Note:** You may encounter the error **Invalid CSV format. CSV rows must include commas** if you're only using the email column. To fix this, add a comma after each email address.
## Column mapping
The Kajabi Contact Importer uses intelligent column mapping. This means that Kajabi will recognize column headers and then organize the data accordingly.
## Review and edit the recognized columns
Though the Kajabi Contact Importer is pretty awesome, it's not perfect. Make sure to review and edit the columns from the .CSV file. When clicking on the icon in the top right corner of the column, Kajabi will give you the options:
* **Existing Field:** Choose an existing field from your Contacts tab.
* **New Field:** Create a field that will be saved to your Contacts tab.
* **Skip Column:** Skip the column and waive the accompanying data.
 ## Create custom fields during the import process
If the field is not recognized, Kajabi will then prompt you to create a Custom Field.
For instance, if the header is something specific such as a company name, Kajabi will ask to create a field.
This field will then be recognized when importing future contacts.
## Create custom fields during the import process
If the field is not recognized, Kajabi will then prompt you to create a Custom Field.
For instance, if the header is something specific such as a company name, Kajabi will ask to create a field.
This field will then be recognized when importing future contacts.
## Bulk actions
* **Grant an offer**: Grant your imported contacts an Offer upon import.
* **Add Tags**: Add an existing tag to your imported contacts or create a tag on the fly.
* **Subscribe to email marketing:** Click the checkbox to subscribe your imported contacts to your email marketing list. Keep in mind, this could harm your deliverability if your contacts did not opt-in to your mailing list.
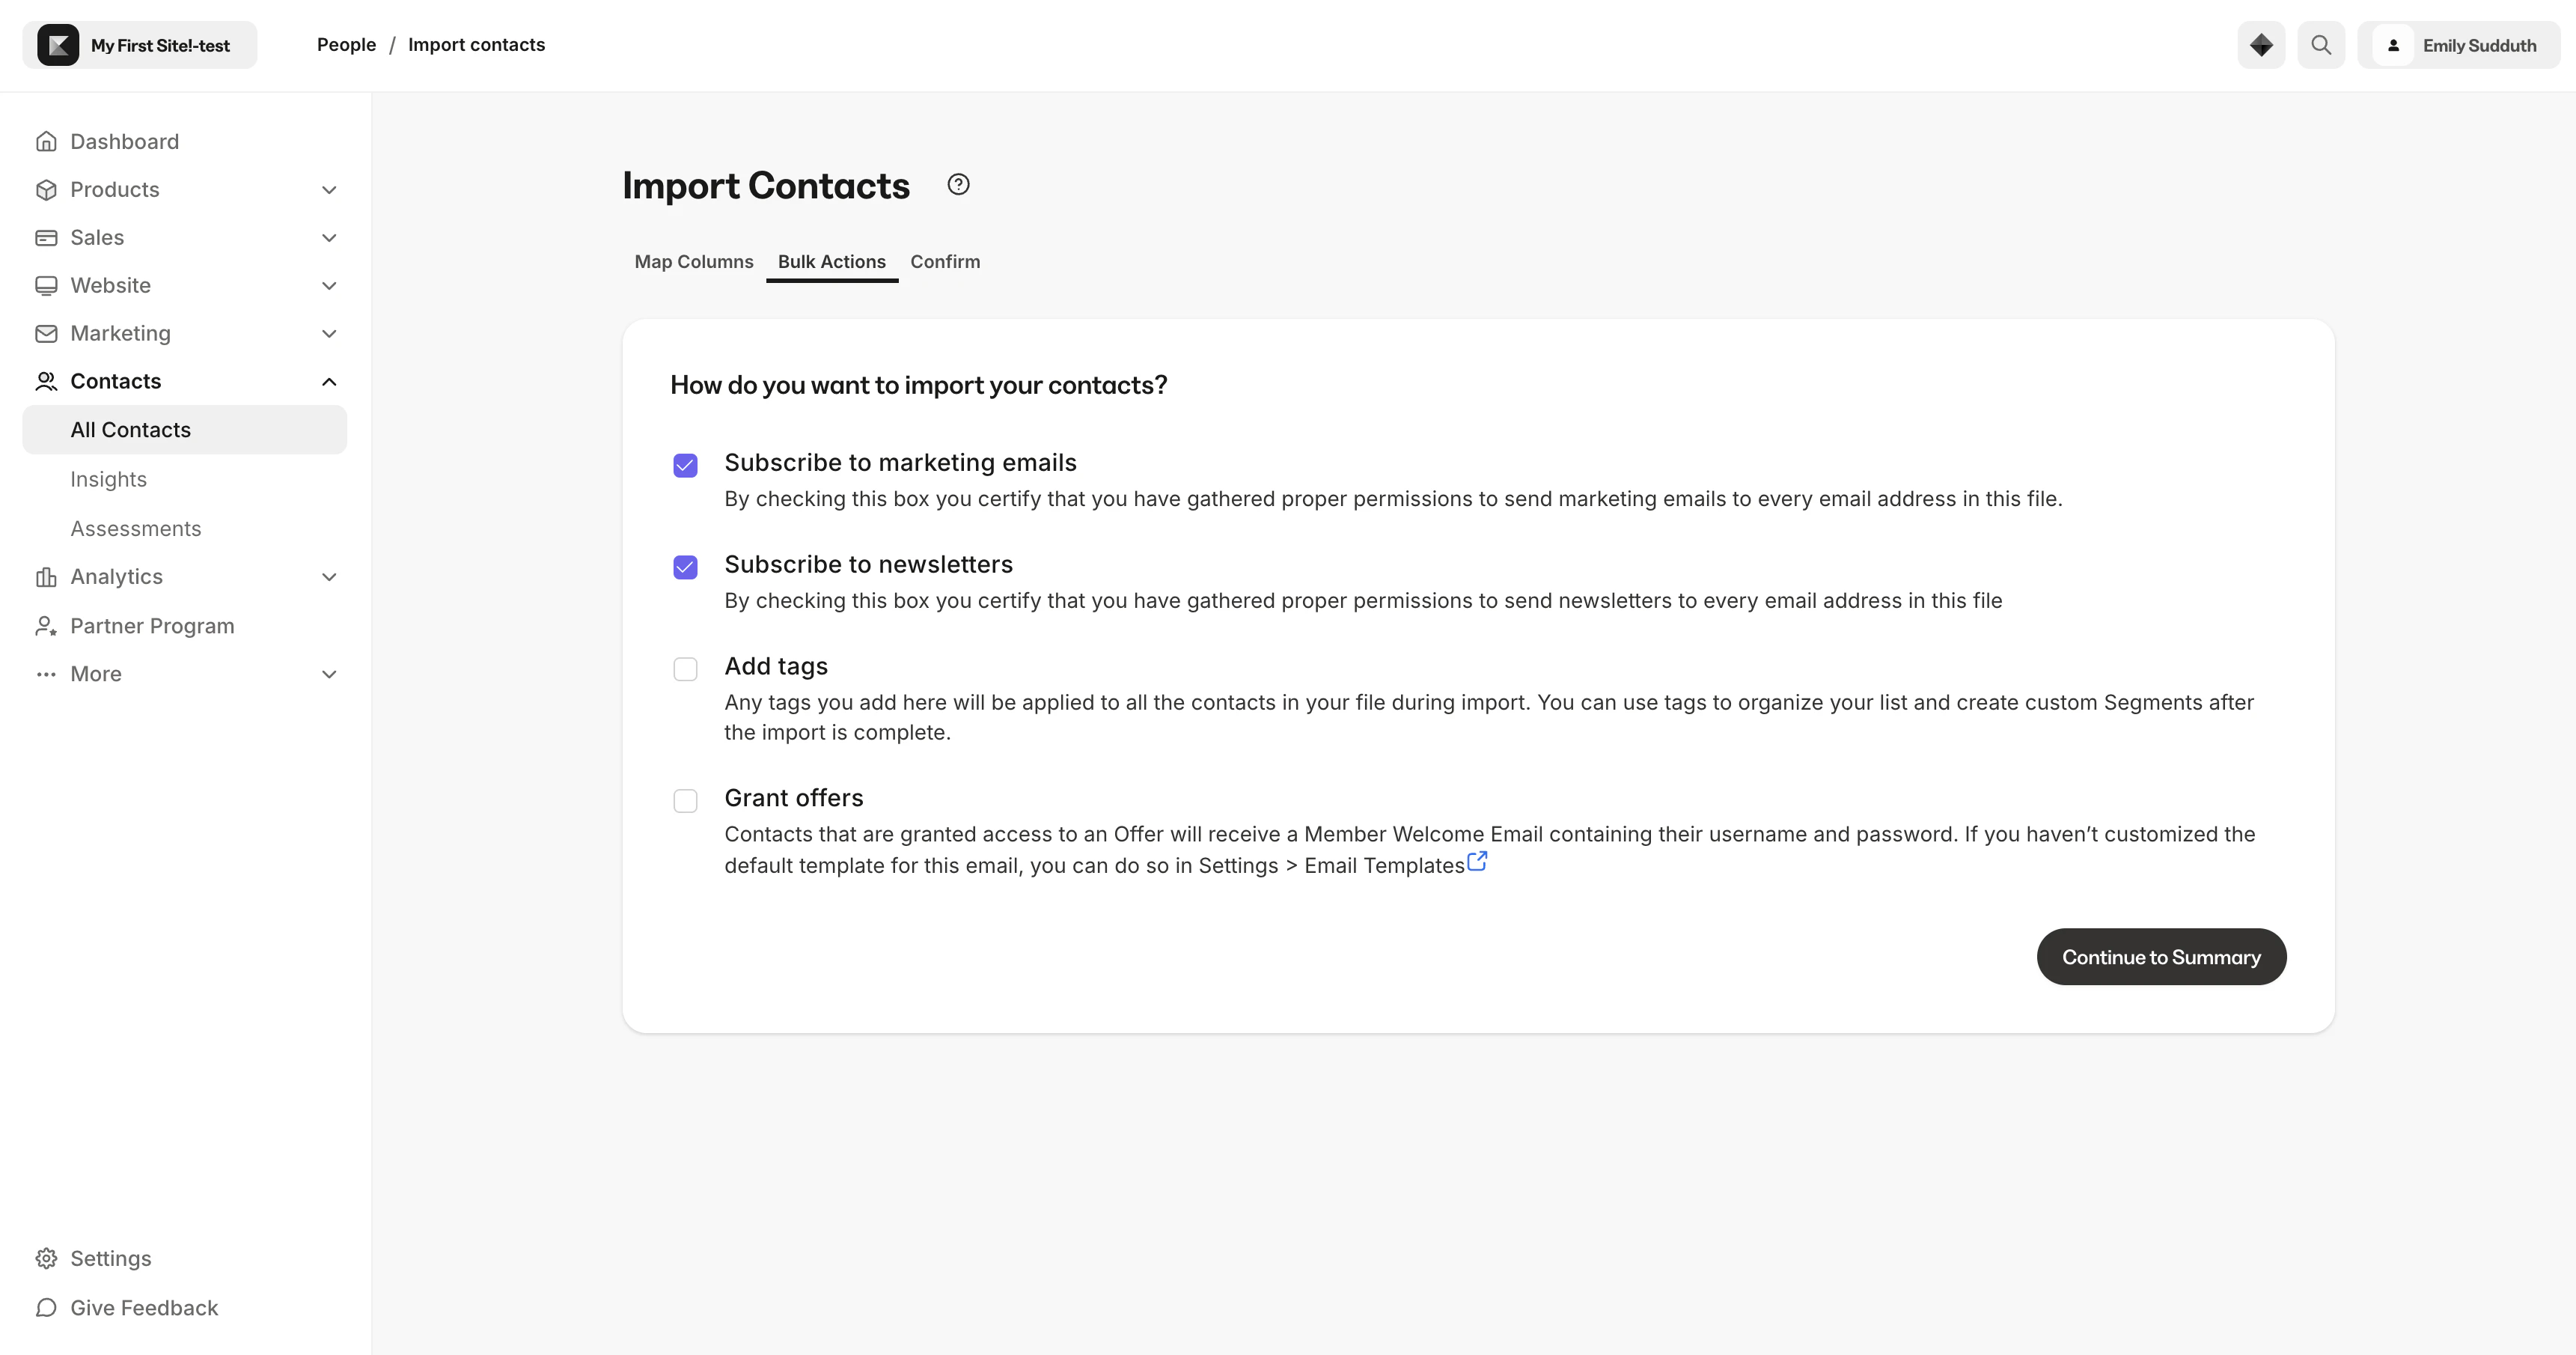 **Important:** Import contacts as subscribers that have explicitly agreed to join your mailing list to comply with [CAN-SPAM](../../marketing/email-campaigns/what-is-can-spam) and all laws and regulations applicable to you and your business.
[Learn more about Email List best practices](../../marketing/email-campaigns/best-practices-for-growing-and-maintaining-your-contact-lists)
## Confirmation
**Kajabi will send a confirmation email to the email address associated with your account once the upload is complete.**
This email will include:
* The total count of successfully imported contacts with both updated and created contact counts combined.
* A link to a file that explains which contacts weren't uploaded along with the error reason.
The file of rejected contacts includes a record of rejected contacts and rows, along with an explanation of the error.
**What happens if there is a duplicate contact?**
Kajabi prevents the creation of duplicate contacts to help you keep an organized list so long as the same email address is used when added to your site.
[Learn more](../../contacts/manage-your-contacts/how-to-check-for-duplicate-contacts)
## Automatic emails sent after import
When importing your users onto Kajabi they will be created as **Contacts** or as **Customers**.
[Learn more about the differences between contacts, customers, and subscribers.](../../contacts/manage-your-contacts/what-is-the-difference-between-a-customer-contact-and-a-subscriber)
## Import contacts
A user is imported as a **Contact** when they are added to your Kajabi list **without** being granted an Offer:
**Important:** Import contacts as subscribers that have explicitly agreed to join your mailing list to comply with [CAN-SPAM](../../marketing/email-campaigns/what-is-can-spam) and all laws and regulations applicable to you and your business.
[Learn more about Email List best practices](../../marketing/email-campaigns/best-practices-for-growing-and-maintaining-your-contact-lists)
## Confirmation
**Kajabi will send a confirmation email to the email address associated with your account once the upload is complete.**
This email will include:
* The total count of successfully imported contacts with both updated and created contact counts combined.
* A link to a file that explains which contacts weren't uploaded along with the error reason.
The file of rejected contacts includes a record of rejected contacts and rows, along with an explanation of the error.
**What happens if there is a duplicate contact?**
Kajabi prevents the creation of duplicate contacts to help you keep an organized list so long as the same email address is used when added to your site.
[Learn more](../../contacts/manage-your-contacts/how-to-check-for-duplicate-contacts)
## Automatic emails sent after import
When importing your users onto Kajabi they will be created as **Contacts** or as **Customers**.
[Learn more about the differences between contacts, customers, and subscribers.](../../contacts/manage-your-contacts/what-is-the-difference-between-a-customer-contact-and-a-subscriber)
## Import contacts
A user is imported as a **Contact** when they are added to your Kajabi list **without** being granted an Offer:
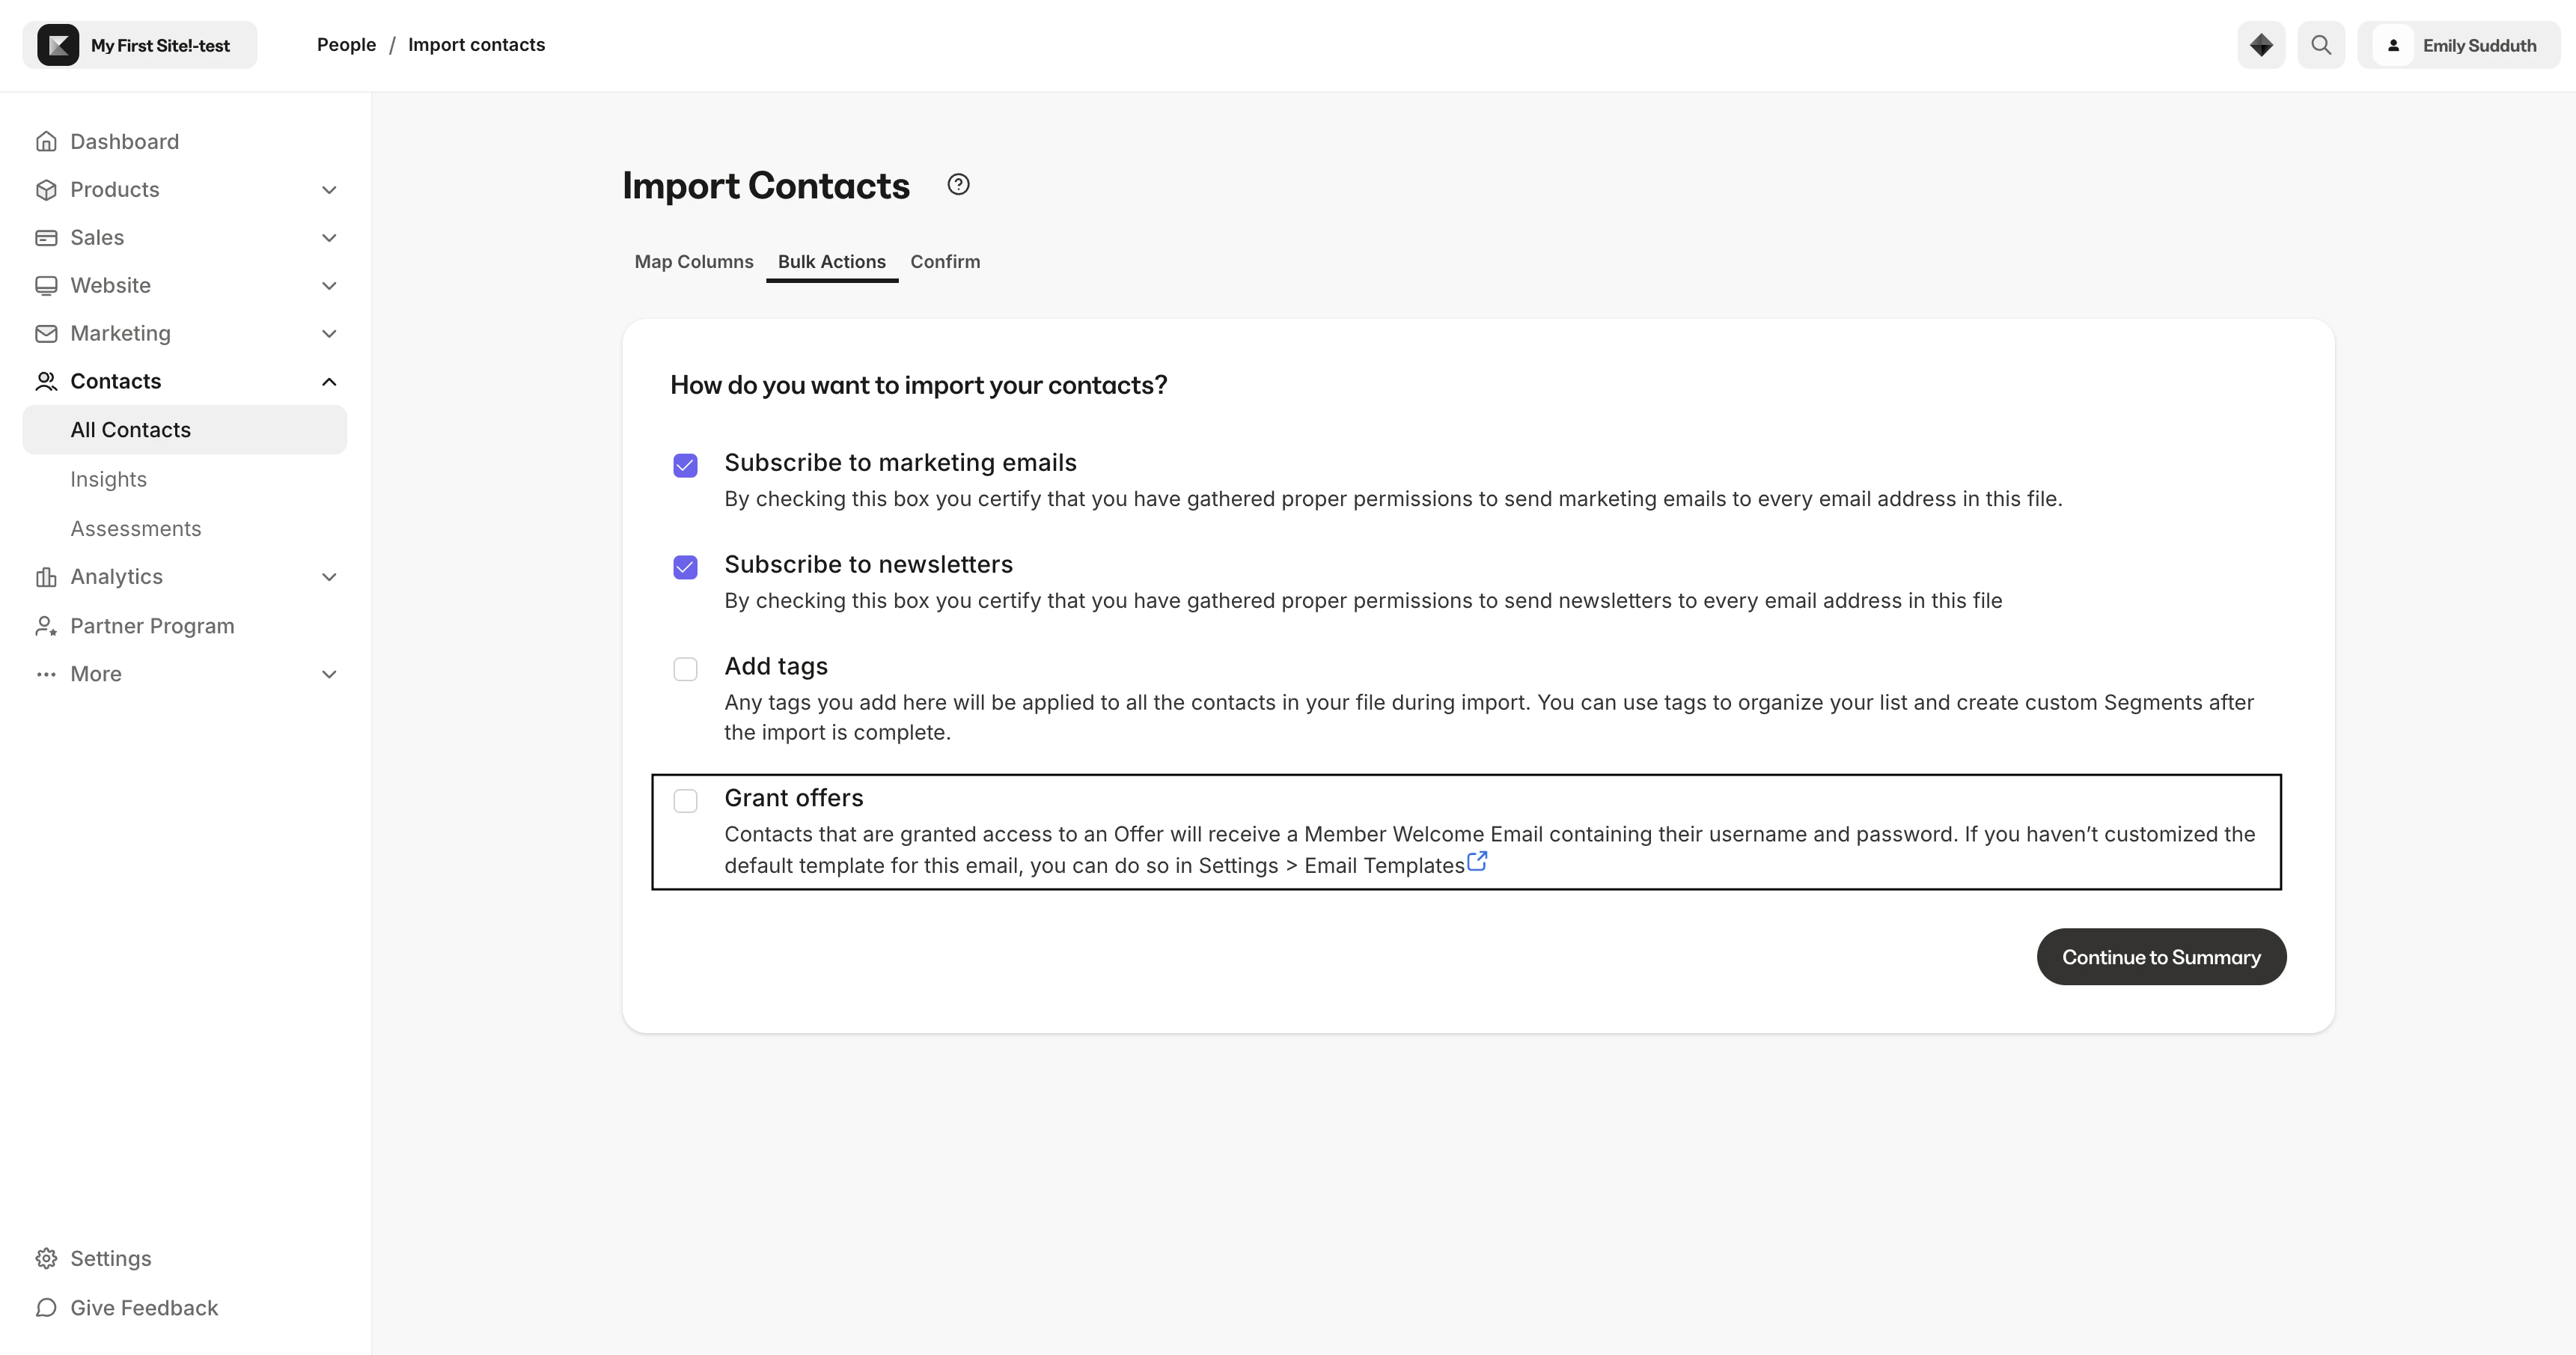 Contacts **will not** receive an automatic email of any kind when you import them to your Kajabi list.
[Learn about the automated emails sent by your site](../../account-settings/notifications/edit-automated-email-notifications)
## Import customers
A user is imported and created as a Customer when they are granted an Offer during the import process:
Contacts **will not** receive an automatic email of any kind when you import them to your Kajabi list.
[Learn about the automated emails sent by your site](../../account-settings/notifications/edit-automated-email-notifications)
## Import customers
A user is imported and created as a Customer when they are granted an Offer during the import process:
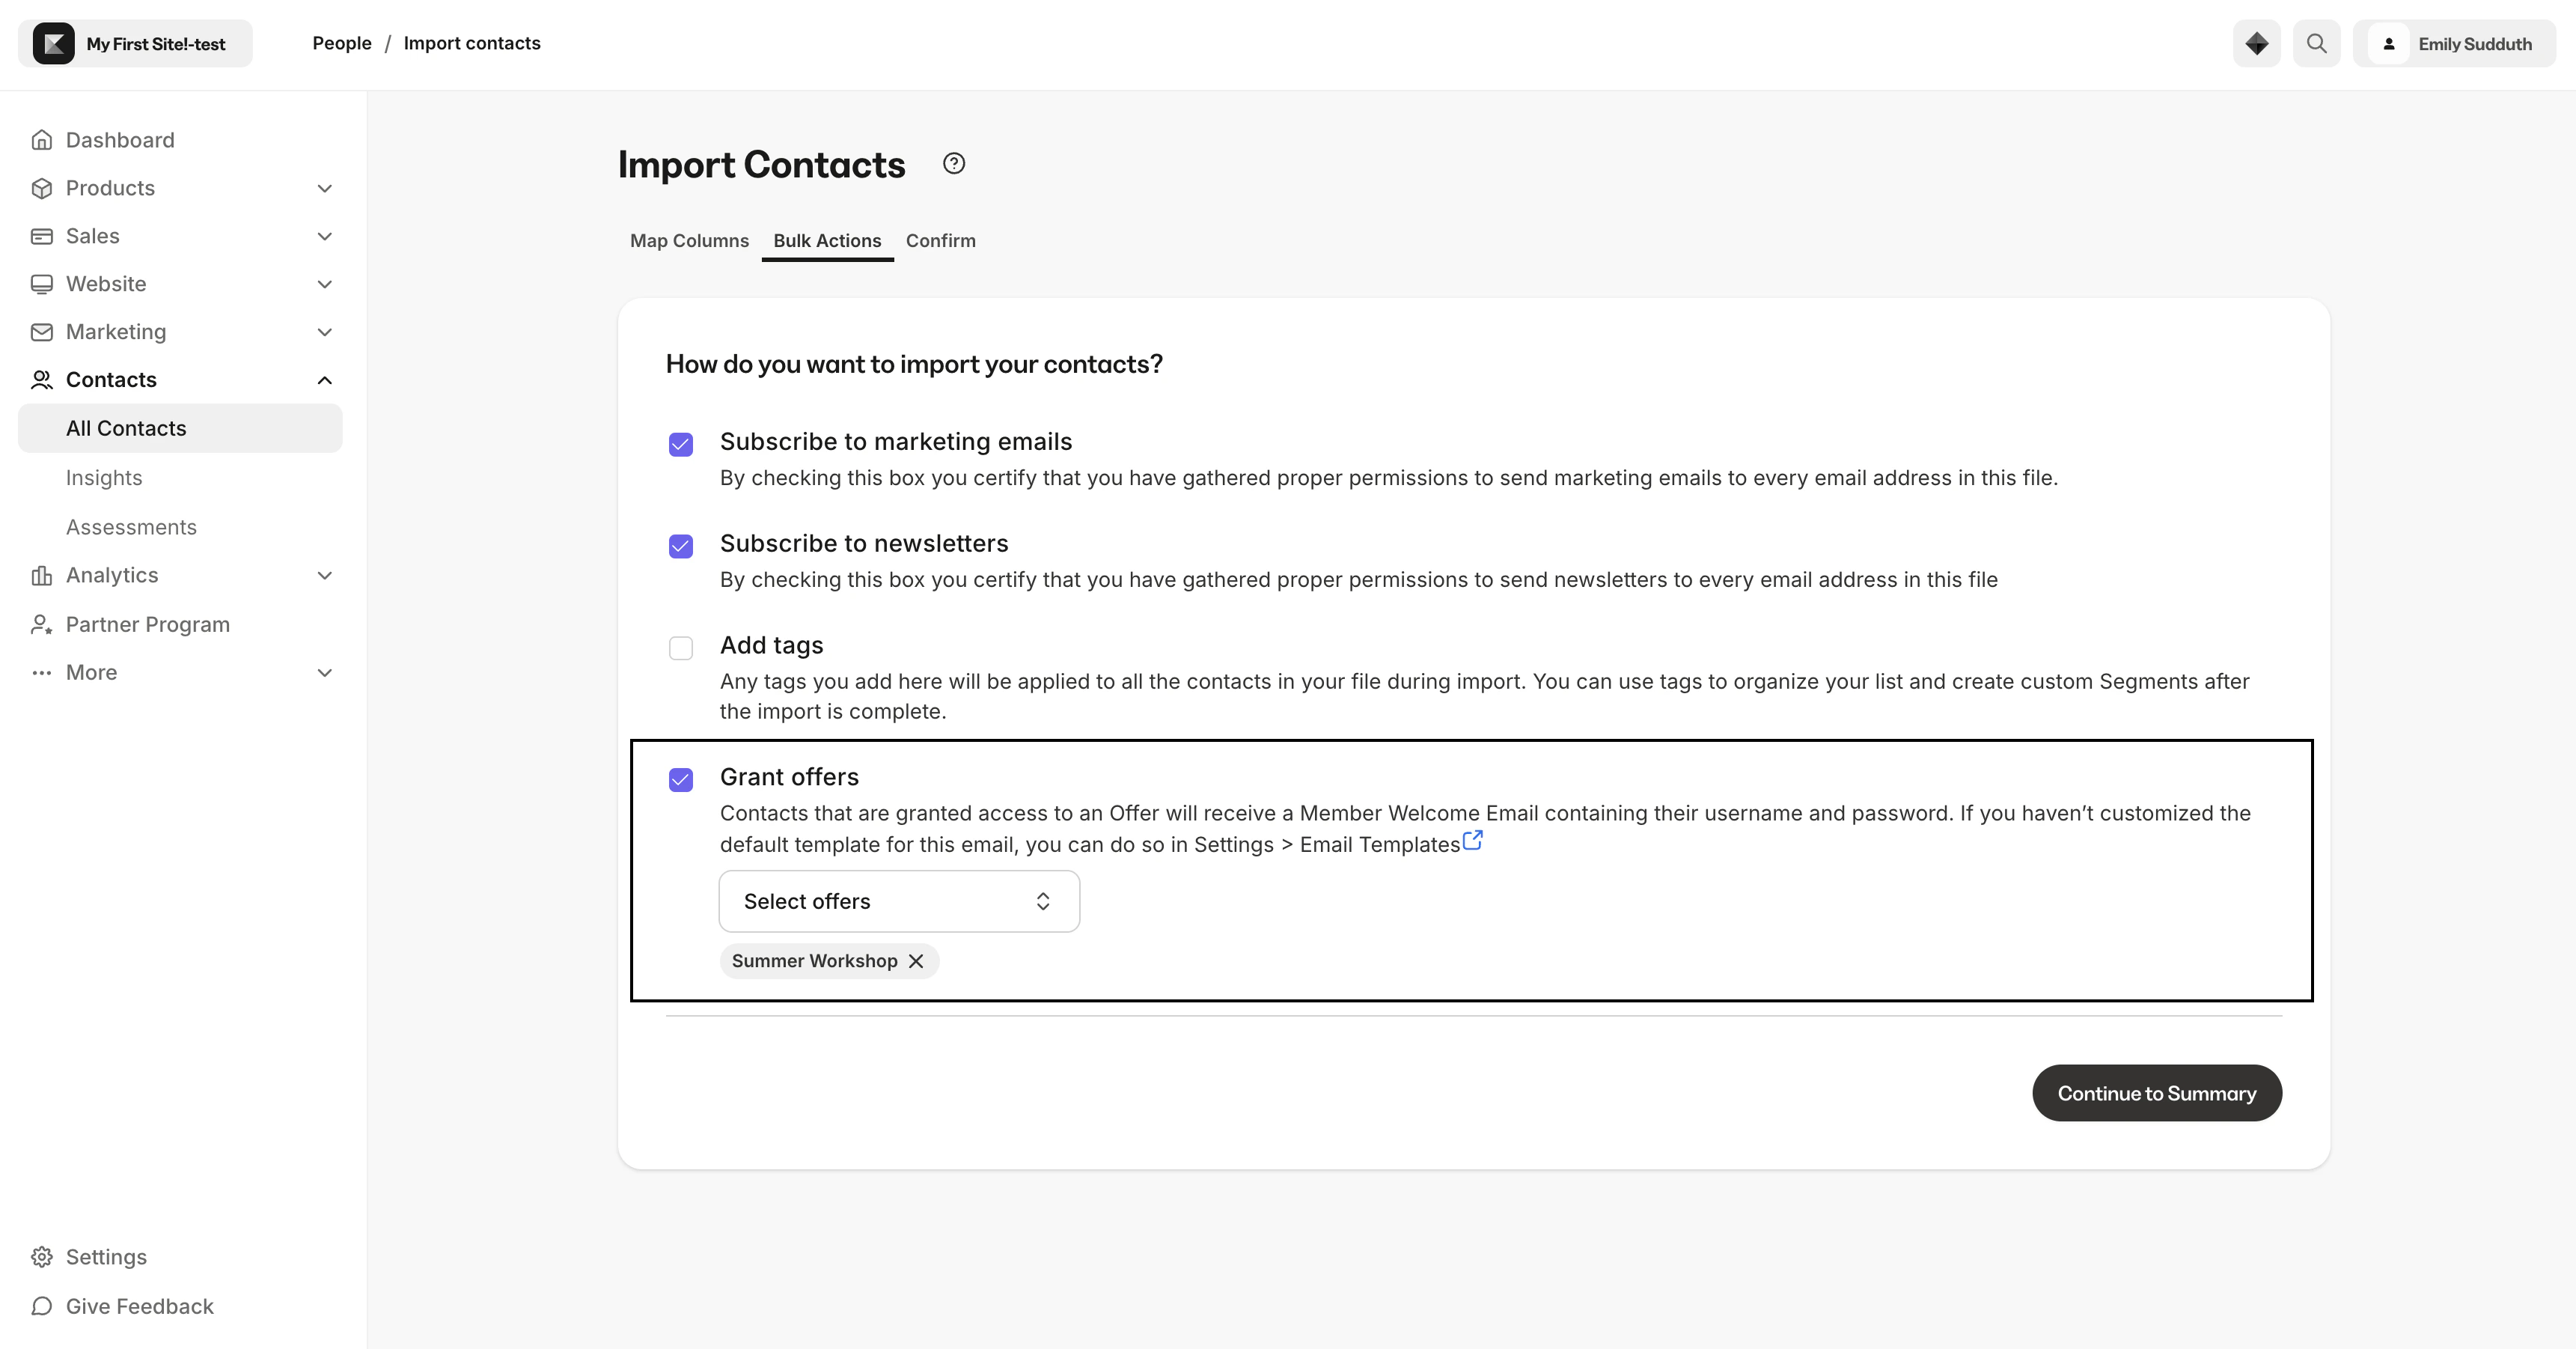 Customers will receive the:
* Customer Welcome Email
* As well as the Offer Grant Confirmation email
[Learn more about the automated emails sent by your site](../../account-settings/notifications/edit-automated-email-notifications).
Customers will receive the:
* Customer Welcome Email
* As well as the Offer Grant Confirmation email
[Learn more about the automated emails sent by your site](../../account-settings/notifications/edit-automated-email-notifications).