> ## Documentation Index
> Fetch the complete documentation index at: https://help.kajabi.com/llms.txt
> Use this file to discover all available pages before exploring further.
# Re-engage inactive subscribers
> Identify dormant subscribers, send a re-engagement email campaign, and unsubscribe contacts that do not re-engage.
## Re-engaging
Your email list is a crucial asset to your online business. But a large list is not as valuable as a list filled with **active** email subscribers.
Inactive contacts can be detrimental to your sending reputation, disastrous for your email deliverability, and can ultimately decrease your ability to reach your intended audience.
**But instead of tossing them out the door as soon as they identify themselves as inactive, send a re-engagement email.**
Before cleaning out your entire list of inactive contacts, try sending an email broadcast to remind them why they subscribed to your email list in the first place.
Remind your subscribers of the value you have to offer and the relevant content you deliver. With a re-engagement strategy, you can retain subscribers while maintaining a healthy email list.
## Identify inactive subscribers
Begin your re-engagement process by first identifying inactive subscribers to reach out to.
With Kajabi, your Contacts tab contains all the contacts added to your site and can help you easily filter and locate your inactive subscribers.
### To identify inactive subscribers
1. Open the **Contacts** tab from your Dashboard. [Learn more](/articles/contacts/manage-your-contacts/apply-filters-to-your-contacts-tab)
2. Click **Filters**.
3. Select your **Category**, **Conditional**, and **Value**:
* Category: **Email Activity**
* Conditional: **Was delivered**
* Value: **90 days**
4. Click **+ Add filter** to filter your list further.
5. Select your second **Category**, **Conditional**, and **Value**:
* Category: **Email Activity**
* Conditional: **Was not opened**
* Value: **90 days**
6. Before applying, click **+ Add filter** again to add a third filter.
7. Select your third **Category**, **Conditional**, and **Value**:
* Category: **Email Activity**
* Conditional: **Was not clicked**
* Value: **90 days**
8. After adding three filters, click **Apply Filters**:
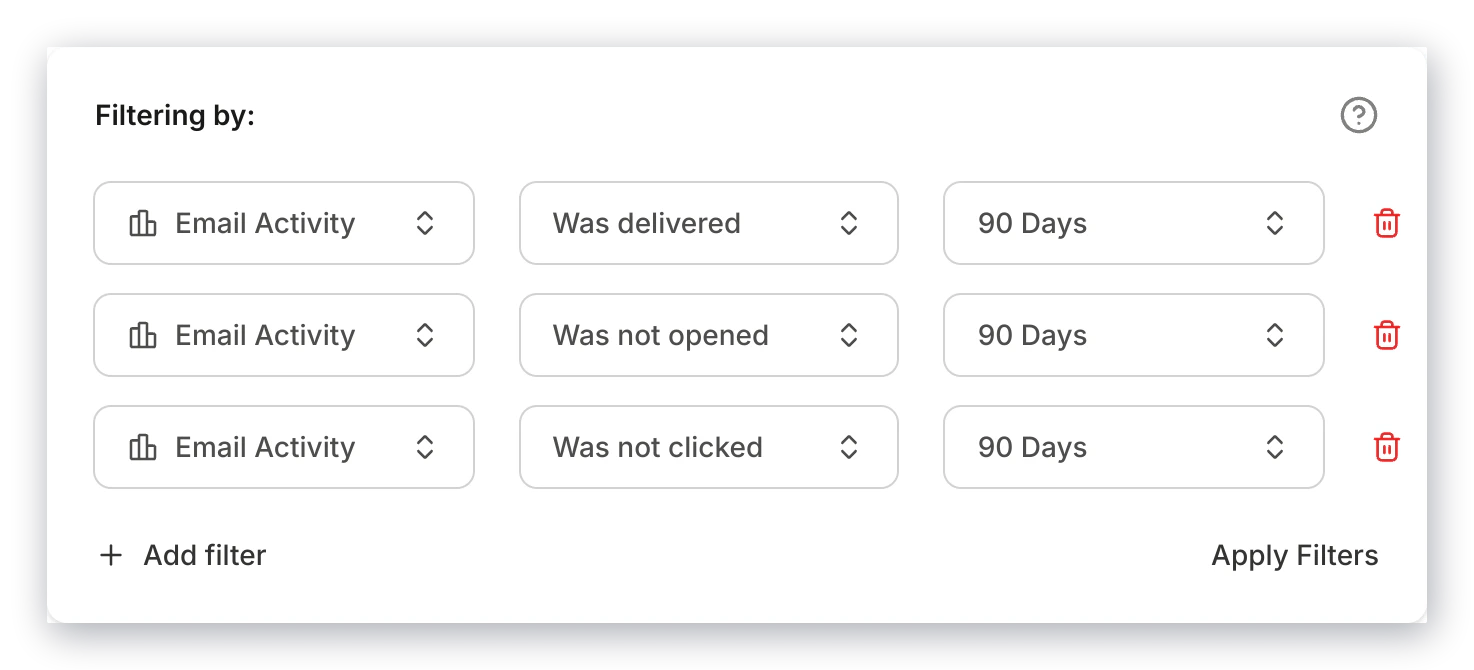 Kajabi will apply your custom filters to select the contacts that meet your filters. The remaining list will display your identified inactive subscribers.
## Add a Tag to segment inactive subscribers
With your custom filters, you can create a custom Segment to easily email and re-engage your contacts directly from Kajabi.
To send a re-engagement email to your inactive subscribers, you must first create an identifier to segment when preparing your re-engagement email.
In this example, we will add a Tag to easily filter your inactive subscribers when selecting your email recipients in your Email Broadcast.
### To add a Tag
1. First, complete the previous step if you have not already done so.
2. Then, click **Select All** to bulk select.
3. Open the **Bulk Actions** menu.
4. Select **Add tag**.
5. Create an easily identifiable tag (e.g., reengage) by typing your desired tag title and clicking **enter**.
6. Then, click **Submit** to create your tag:
Kajabi will apply your custom filters to select the contacts that meet your filters. The remaining list will display your identified inactive subscribers.
## Add a Tag to segment inactive subscribers
With your custom filters, you can create a custom Segment to easily email and re-engage your contacts directly from Kajabi.
To send a re-engagement email to your inactive subscribers, you must first create an identifier to segment when preparing your re-engagement email.
In this example, we will add a Tag to easily filter your inactive subscribers when selecting your email recipients in your Email Broadcast.
### To add a Tag
1. First, complete the previous step if you have not already done so.
2. Then, click **Select All** to bulk select.
3. Open the **Bulk Actions** menu.
4. Select **Add tag**.
5. Create an easily identifiable tag (e.g., reengage) by typing your desired tag title and clicking **enter**.
6. Then, click **Submit** to create your tag:
With the created Tag, you are now prepared to send a re-engagement email to your inactive subscribers.
## Create a re-engagement Email Broadcast
Now is your time to shine! Craft a re-engagement email that:
* Explains why they want to re-engage
* Clearly communicates that non-engagement will result in removal
* Includes a [call to action](../../marketing/email-campaigns/how-to-add-and-customize-your-button-in-email-campaigns) with a link or a button that provides value that only you can provide (i.e., a specific landing page, a webinar, pdf resource, etc.)
Add your branding and personality and give them a reason to re-engage.
With Kajabi, you can customize and design your email broadcast to create an engaging email experience.
### To create a re-engagement email
First, select the Email Broadcast Template that works best with your content.
1. Open the **Marketing** tab from your Dashboard.
2. Select **Email Campaigns**.
3. Click **+ New Email Campaign** on the Email Campaigns dashboard.
4. Select **Email Broadcast**.
5. Click **Continue**:
From there, select the email broadcast template that best fits your design and brand.
After selecting your email template begin the email creation process by first selecting your segmented inactive subscribers:
1. Open the **dropdown menu** to select your email recipients.
2. Click **Custom Segment**.
3. Open the **Select filter** dropdown menu.
4. Select **Has any of these tag(s)**.
5. In the next field, select the title of your re-engagement tag completed in the previous step.
6. Then, click **Apply**.
7. And proceed to customize your email by clicking **Save & Continue**:
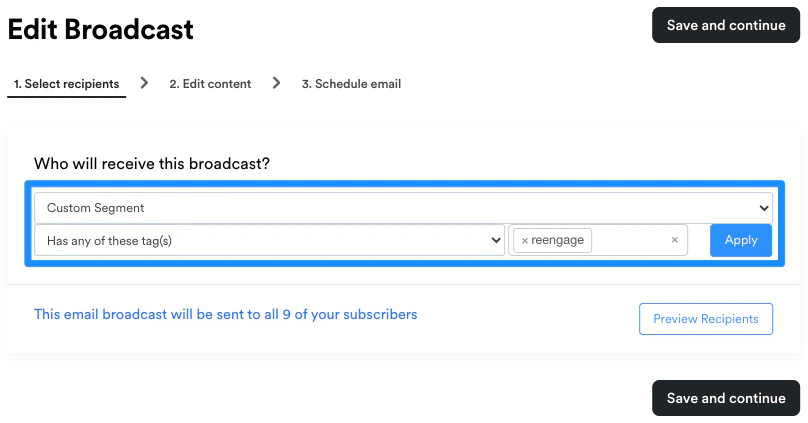 Now that you have specified your recipients, begin designing your email to re-engage your inactive subscribers! [Learn to design your Email Broadcast with the Email Visual Editor](../../marketing/email-campaigns/email-visual-editor-overview)
**Note:** Add a call to action to encourage your email recipients to engage with your email campaign. This will be required for the next step.
## Create an Automation
Create an Automation in your Email Broadcast to remove your re-engagement tag if they engage with your email.
This will set you up to easily delete or unsubscribe any inactive subscribers that fail to re-engage.
With this example, we will walk you through the steps of creating an Automation that will remove your re-engagement tag when the link (or call to action button) is clicked in your email broadcast.
This will ensure that contacts that were previously inactive, but show interest again are no longer considered part of your inactive contacts.
In the Edit Content step of your Email Broadcast Builder, scroll to the bottom of the page to add an Automation:
Now that you have specified your recipients, begin designing your email to re-engage your inactive subscribers! [Learn to design your Email Broadcast with the Email Visual Editor](../../marketing/email-campaigns/email-visual-editor-overview)
**Note:** Add a call to action to encourage your email recipients to engage with your email campaign. This will be required for the next step.
## Create an Automation
Create an Automation in your Email Broadcast to remove your re-engagement tag if they engage with your email.
This will set you up to easily delete or unsubscribe any inactive subscribers that fail to re-engage.
With this example, we will walk you through the steps of creating an Automation that will remove your re-engagement tag when the link (or call to action button) is clicked in your email broadcast.
This will ensure that contacts that were previously inactive, but show interest again are no longer considered part of your inactive contacts.
In the Edit Content step of your Email Broadcast Builder, scroll to the bottom of the page to add an Automation:
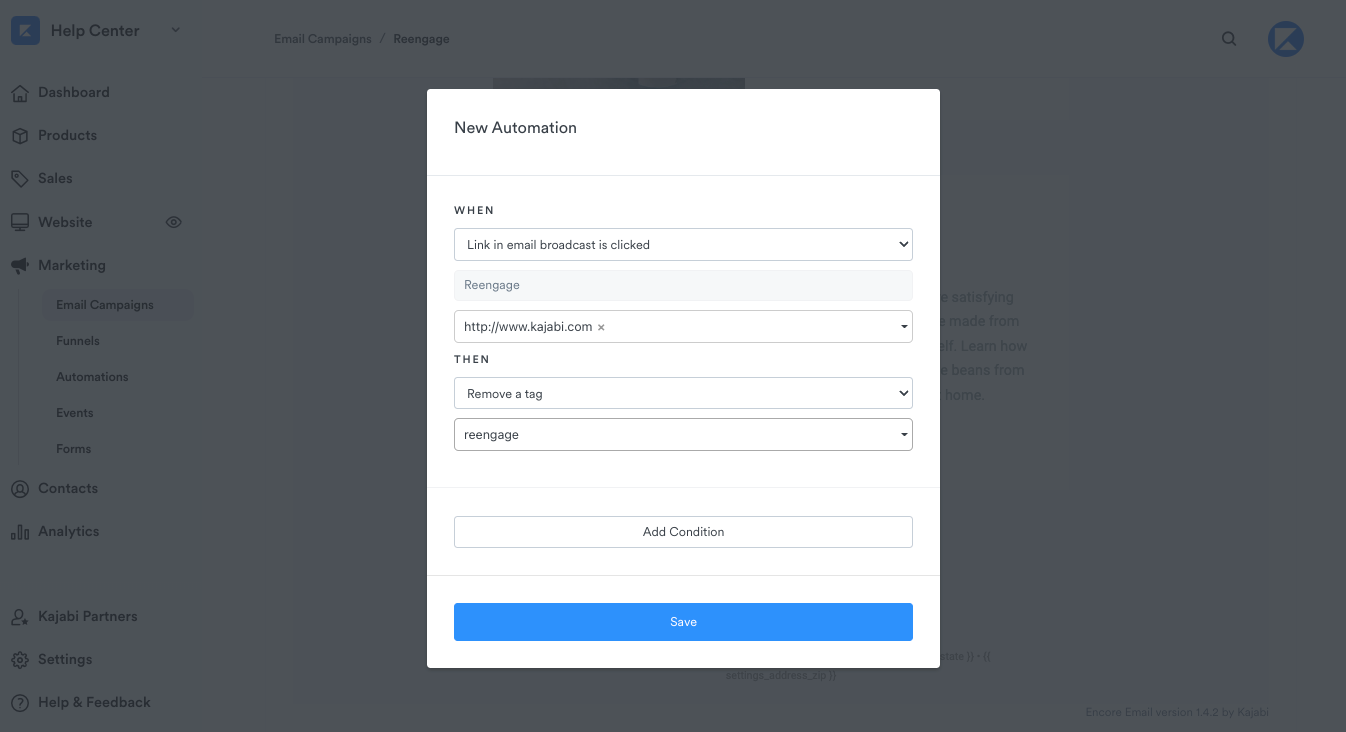
Then, complete the pop up to create your Automation:
1. Open the **WHEN** dropdown menu.
2. Select **Link in email broadcast is clicked**.
3. Select your desired link in your email broadcast.
4. Next, open the **THEN** dropdown menu.
5. Select **Remove a tag**.
6. In the next field, select your re-engagement tag.
7. Then, click **Save** to apply:
 ## Send the email
Now that you have prepped and designed your re-engagement email, it is time to send to your identified recipients!
## Send the email
Now that you have prepped and designed your re-engagement email, it is time to send to your identified recipients!
After sending your re-engagement email we recommend waiting 3-7 days before deleting or removing your remaining inactive subscribers. This will allow your subscribers time to engage with your email and remain on your email list.
## Unsubscribe subscribers that fail to re-engage
After sending your email broadcast and allowing inactive subscribers to re-engage, clean up your mailing list by unsubscribing the remaining inactive contacts that did not engage with your re-engagement email.
### To bulk unsubscribe inactive subscribers
1. Open the **Contacts** tab from the Dashboard.
2. Click **Filters**.
3. Select your **Category**, **Conditional**, and **Value**:
* Category: **# Tags**
* Conditional: **Has any**
* Value: **Your Re-Engagement Tag Title**
4. Check **Select All**.
5. Open the **Actions** dropdown menu.
6. Click **Unsubscribe** or **Delete**.
7. Follow the prompts.
8. Click **Submit**:
## FAQs
### **Why should I send a re-engagement email before removing inactive contacts?**
Inactive contacts hurt your sender reputation and email deliverability, but that doesn't mean they're a lost cause. A re-engagement email gives you a chance to remind them why they subscribed and recapture their interest. Cleaning your list without trying first means leaving potential subscribers on the table.
### **How do I find my inactive subscribers in Kajabi?**
Use the Contacts tab with three stacked filters under Email Activity: contacts who were delivered an email, did not open it, and did not click it, all within the last 90 days. Apply all three filters together and Kajabi will surface your inactive subscriber list.
### **Why do I need to tag inactive subscribers before sending the re-engagement email?**
You need a way to target just those contacts when creating your Email Broadcast. Adding a tag (like "reengage") lets you select them as a Custom Segment during email setup. Without a tag, you cannot easily target that filtered group as recipients.
### **What should my re-engagement email include?**
It should explain why you are reaching out, clearly communicate that non-engagement will result in removal from the list, and include a call to action. This can be a link or button that leads somewhere valuable, like a landing page, webinar, or downloadable resource. The call to action is also required for the automation step.
### **How do I send the re-engagement email only to inactive contacts?**
When building your Email Broadcast, set your recipients to a Custom Segment and filter by the tag you created for inactive subscribers. Go to **Marketing > Email Campaigns**, create a new Email Broadcast, and select your re-engagement tag under "Has any of these tag(s)" in the custom segment filter.
### **What automation should I set up, and why?**
Create an automation inside the Email Broadcast that removes the re-engagement tag when a contact clicks the link in your email. This automatically separates contacts who re-engage from those who do not. When you go to clean your list, anyone who still has the tag is confirmed inactive and safe to remove.
### **How long should I wait before removing contacts who did not re-engage?**
Wait 3 to 7 days after sending your re-engagement email before taking action. This gives subscribers enough time to open and engage. After that window, filter by your re-engagement tag and use the Bulk Actions menu to either unsubscribe or delete contacts who still have the tag.
### **Can I resubscribe a contact that was accidentally unsubscribed?**
Yes, but you will need to use a Double Opt-In Form. Using a Double Opt-in Form will require your contact to confirm their desire to subscribe to your marketing emails and can help aid in staying compliant with email laws. You cannot manually flip a contact back to subscribed directly. Create the form first, then open it via **Marketing > Forms**, click **Preview**, and fill it out with the contact's correct information. [**Learn more about maintaining a healthy mailing list.**](https://help.kajabi.com/articles/contacts/manage-your-contacts/how-auto-unsubscribe-helps-you-maintain-a-healthy-mailing-list#resubscribe-unsubscribed-contacts)