> ## Documentation Index
> Fetch the complete documentation index at: https://help.kajabi.com/llms.txt
> Use this file to discover all available pages before exploring further.
# Refund customers
> Issue full or partial refunds to customers directly from a Kajabi account.
Refund your customers directly from your Kajabi account. If you wish to refund your customers in Stripe or PayPal, read [Cancel and refund a payment in Stripe](../../api-integrations/payment-integrations/how-to-cancel-and-refund-a-payment-in-stripe) or [Cancel and refund a transaction in PayPal](../../api-integrations/payment-integrations/how-to-cancel-and-refund-a-transaction-in-paypal) for details.
## Refund a customer
To perform a full or partial refund for your Customer(s) from the Transactions page:
1. Open the **Sales** tab from the Dashboard.
2. Select **Payments** from the Sales tab.
3. From the Payments page, select **Transactions** to be taken to the Transactions page.
4. Here you can search or filter to find the customer's transaction that you want to refund. [View transaction details](../../sales/kajabi-payments/transactions)
5. Once you have found the payment you wish to refund and select the `…` button for **More Actions**.
6. In the More Actions drop-down menu, select **Refund**.
7. Enter your **Refund amount** and select a reason (optional) for your records.
8. Press **Refund** to complete the Refund process:
Perform a full or partial refund for your Customer(s) from the Contacts page:
1. Open the **Contacts** tab from the Dashboard.
2. Search or Filter your Contacts to locate the Customer you wish to refund.
3. Select the **name** of the Customer you wish to refund.
4. Click **View More** next to "Total Offers".
5. Select **More Info** for the Offer to refund.
6. Open **Purchases**.
7. Select the **Transaction** you wish to refund.
8. In the Transactions tab, click the `…` button for **More Actions**.
9. Select **Refund**.
10. Enter your **Refund amount** and select a reason (optional).
11. Press **Refund** to complete.
### Tax-exclusive refunds
When issuing a refund:
* Enter the refund amount excluding taxes.
* Kajabi automatically calculates the corresponding tax amount.
* The total refund sent to the customer includes both the refund amount and calculated taxes.
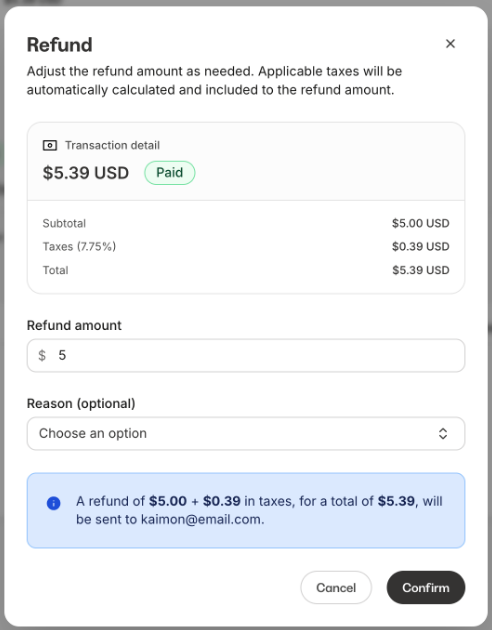
Before confirming the refund, you will see a message showing the refund amount, tax amount, and total refund that will be sent.
**Example**
* A partial refund of **$4.00** results in **$4.00 plus applicable taxes** being refunded to the customer.
* Refunding the full **$5.00** subtotal results in **$5.00 plus full taxes**, returning the original total paid.
* Kajabi tracks refunded sales tax, so sales tax reports correctly account for refunded amounts
 ### Tax-inclusive refunds
For tax-inclusive payments, taxes are already included in the price paid by the customer.
When issuing a refund:
* Enter the total amount you want to refund.
* Kajabi automatically determines how much of that amount is tax.
* The total refund sent to the customer matches the amount you entered.
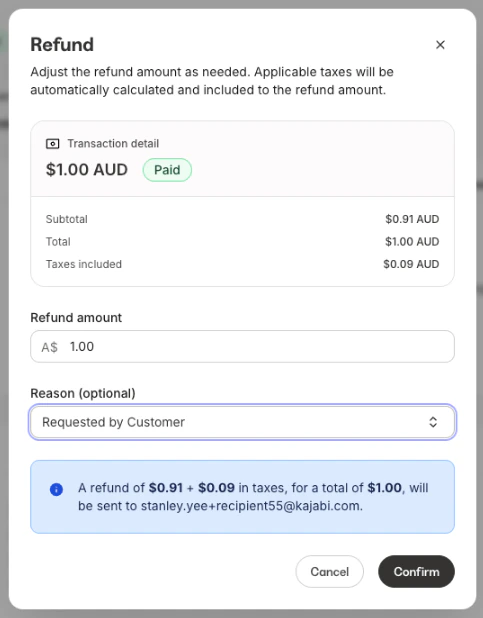
Before confirming the refund, you will see a message showing how the refund amount is split between subtotal and taxes.
**Example** when tax is included in the offer price:
* Refunding **$1.00** results in **$1.00** being refunded to the customer.
* Kajabi determines the amount of sales tax that was included in the purchase so sales tax reports correctly account for refunded amounts
### Tax-inclusive refunds
For tax-inclusive payments, taxes are already included in the price paid by the customer.
When issuing a refund:
* Enter the total amount you want to refund.
* Kajabi automatically determines how much of that amount is tax.
* The total refund sent to the customer matches the amount you entered.
Before confirming the refund, you will see a message showing how the refund amount is split between subtotal and taxes.
**Example** when tax is included in the offer price:
* Refunding **$1.00** results in **$1.00** being refunded to the customer.
* Kajabi determines the amount of sales tax that was included in the purchase so sales tax reports correctly account for refunded amounts
 ## Send refund receipts
Once activated, refund receipts will be automatically emailed for all full and partial refunds issued.
The refund receipt message can also be customized to better fit your brand.
To activate refund receipts:
1. From your Kajabi Dashboard click **Settings**.
2. In Settings, navigate to **Customer Payments**.
3. Turn ON the **Send receipt for refunds** option.
4. Customize your Refund Receipt message. (Optional)
5. Hit Save then preview your Refund Receipt:
## Send refund receipts
Once activated, refund receipts will be automatically emailed for all full and partial refunds issued.
The refund receipt message can also be customized to better fit your brand.
To activate refund receipts:
1. From your Kajabi Dashboard click **Settings**.
2. In Settings, navigate to **Customer Payments**.
3. Turn ON the **Send receipt for refunds** option.
4. Customize your Refund Receipt message. (Optional)
5. Hit Save then preview your Refund Receipt:
**Note:**
If you are seeking a refund for an account payment made to Kajabi, please reach out to [our support team](../../resources/support/how-to-contact-kajabi-support).
## Kajabi Cart refunds
With [Kajabi Cart](../../sales/checkout/kajabi-cart-overview), you can easily issue refunds for entire orders or specific items within an order. Whether you want to refund the full value of a single item or a partial amount for one or more items, the process is straightforward.
To initiate a refund (full or partial) for a [Kajabi Cart](../../sales/checkout/kajabi-cart-overview) order, follow these steps:
1. Open the **Sales** tab from the Dashboard.
2. Select **Payments** from the Sales tab.
3. On the Payments page, choose **Transactions** to access the Transactions page.
4. Use the search or filter options to locate the customer's transaction that you want to refund. [View transaction details](../../sales/kajabi-payments/transactions).
5. Once you have found the transaction you wish to refund, select the … button to open the **More Actions** menu.
6. In the drop-down menu, select **View More Details.**
7. On the Transaction Details page, select **Refund.**
8. Next, you'll be directed to the Cart Refund page. Here you can select the items that you wish to refund by checking the box to the left of the offer.
9. Once the box is checked, enter your **Refund amount** and select a reason (optional) for your records.
10. Decide if you want to send a refund receipt to your customer by selecting the corresponding checkbox.
11. Click **Refund** to complete the process: