> ## Documentation Index
> Fetch the complete documentation index at: https://help.kajabi.com/llms.txt
> Use this file to discover all available pages before exploring further.
# Use a Wait Node with Automations
> Add delays between steps in your Automations for timed follow-ups, delayed coupon delivery, or drip-style sequences.
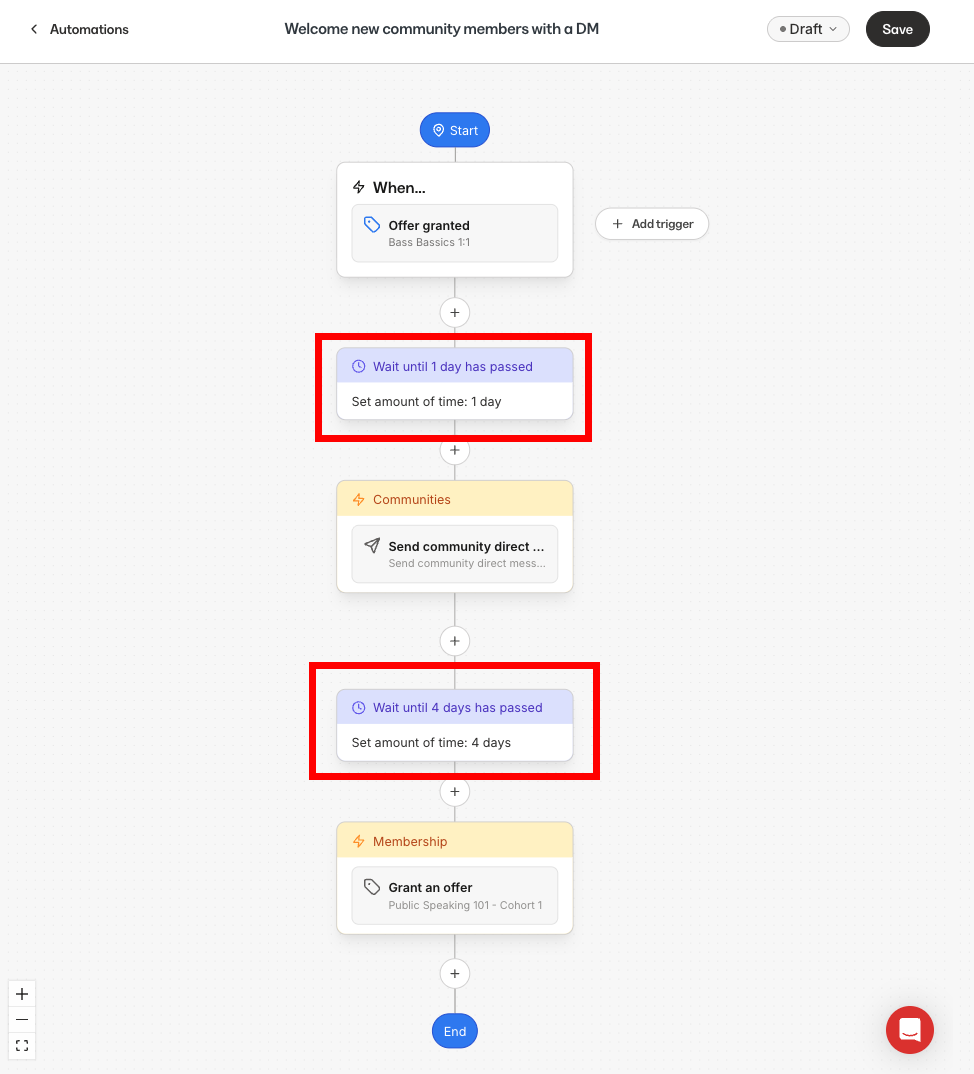
A **Wait Node** pauses your Automation for a set period before executing the next step. Use Wait Nodes for timed follow-ups, delayed coupon delivery, or drip-style sequences.
**Note:** This feature is available only if you have:
* Upgraded to the [visual Automation Builder](/articles/marketing/automations/whats-new-with-kajabi-automations)
* A [Growth plan or higher](https://kajabi.com/pricing) (Advanced Automations)
## What the Wait Node does
The Wait Node pauses your Automation for an amount of time. You can place it before or after any action and choose a **set amount of time**, **calendar date**, specific **day of the week**, or **time of day**:
 ## Add a Wait Node
You can add a Wait Node either **before** choosing an action or **after** the action is already in place.
### Add a Wait Node before selecting an action
1. From your Kajabi Dashboard, click **Marketing** > **Automations**.
2. Choose a preexisting Automation or create a new one.
3. Open your Automation and confirm a trigger is already added.
4. Click the **+** beneath the trigger.
5. Select **Wait**.
6. Configure the Wait Node:
* **Name** (optional)
* Wait until:
\| **Set amount of time** | Choose a duration based in **minutes**, **hours**, or **days** for the Automation delay. | | **Calendar date** | Set a **specific date** and **time** for the next step of your Automation to trigger. Once the set calendar date has passed, Automations with this type of Wait Node become outdated and contacts will not be able to complete the Automation flow. | | **Day of week** | Specify which **days of the week** and what **time** on those days you would like your Automation to send. | | **Time of day** | Pick a specific **time of day** for the following Automation step to trigger. |
7. The Wait Node appears in the workflow.
**Note:** Wait Nodes with a specific time are always based on your account's time zone.
**Tip:** Naming your Wait Node can make it easier to understand your Automation at a glance.
### Add a Wait Node after selecting an action
1. Add an action to your Automation.
2. Click the **+** between the trigger and the action.
3. Select **Wait**.
4. Choose a **Wait until** option (set amount of time, calendar date, day of week, time of day).
5. Save your changes. The Wait Node is added between the trigger and the action.
## FAQs
## Can the Wait Node be renamed?
Yes. You can rename the Wait Node for clarity at any time.
### Does the Wait Node block publishing?
A Wait Node prevents publishing only if no action follows it. If this happens, you'll see a warning before publishing.
### Can I add multiple Wait Nodes?
Yes. Multiple Wait Nodes can be added throughout the Automation to create the timing you need.
## Add a Wait Node
You can add a Wait Node either **before** choosing an action or **after** the action is already in place.
### Add a Wait Node before selecting an action
1. From your Kajabi Dashboard, click **Marketing** > **Automations**.
2. Choose a preexisting Automation or create a new one.
3. Open your Automation and confirm a trigger is already added.
4. Click the **+** beneath the trigger.
5. Select **Wait**.
6. Configure the Wait Node:
* **Name** (optional)
* Wait until:
\| **Set amount of time** | Choose a duration based in **minutes**, **hours**, or **days** for the Automation delay. | | **Calendar date** | Set a **specific date** and **time** for the next step of your Automation to trigger. Once the set calendar date has passed, Automations with this type of Wait Node become outdated and contacts will not be able to complete the Automation flow. | | **Day of week** | Specify which **days of the week** and what **time** on those days you would like your Automation to send. | | **Time of day** | Pick a specific **time of day** for the following Automation step to trigger. |
7. The Wait Node appears in the workflow.
**Note:** Wait Nodes with a specific time are always based on your account's time zone.
**Tip:** Naming your Wait Node can make it easier to understand your Automation at a glance.
### Add a Wait Node after selecting an action
1. Add an action to your Automation.
2. Click the **+** between the trigger and the action.
3. Select **Wait**.
4. Choose a **Wait until** option (set amount of time, calendar date, day of week, time of day).
5. Save your changes. The Wait Node is added between the trigger and the action.
## FAQs
## Can the Wait Node be renamed?
Yes. You can rename the Wait Node for clarity at any time.
### Does the Wait Node block publishing?
A Wait Node prevents publishing only if no action follows it. If this happens, you'll see a warning before publishing.
### Can I add multiple Wait Nodes?
Yes. Multiple Wait Nodes can be added throughout the Automation to create the timing you need.