> ## Documentation Index
> Fetch the complete documentation index at: https://help.kajabi.com/llms.txt
> Use this file to discover all available pages before exploring further.
# Grow and maintain engaged contact lists
> Build and maintain a healthy, organic contact list to improve email marketing results.
In email marketing, the best results are generated when you send emails exclusively to an audience that interacts with your content. Follow these best practices to build and maintain a healthy, engaged **contact list**.
## Grow an organic contacts list
You will attain the best email marketing results by sending emails to contacts who want to receive them. In other words, don't purchase email lists.
Purchased lists are typically full of invalid and other bad email addresses. If someone does not opt-in directly to you, then they are not opted-in to receive email from you.
**Important:**
The use of purchased email lists is prohibited by Kajabi's Anti-Spam Policy.
Be sure to grow your contact list naturally through Double-Opt-In forms on pages that fit your target audience.
## Offer a double opt-in subscription
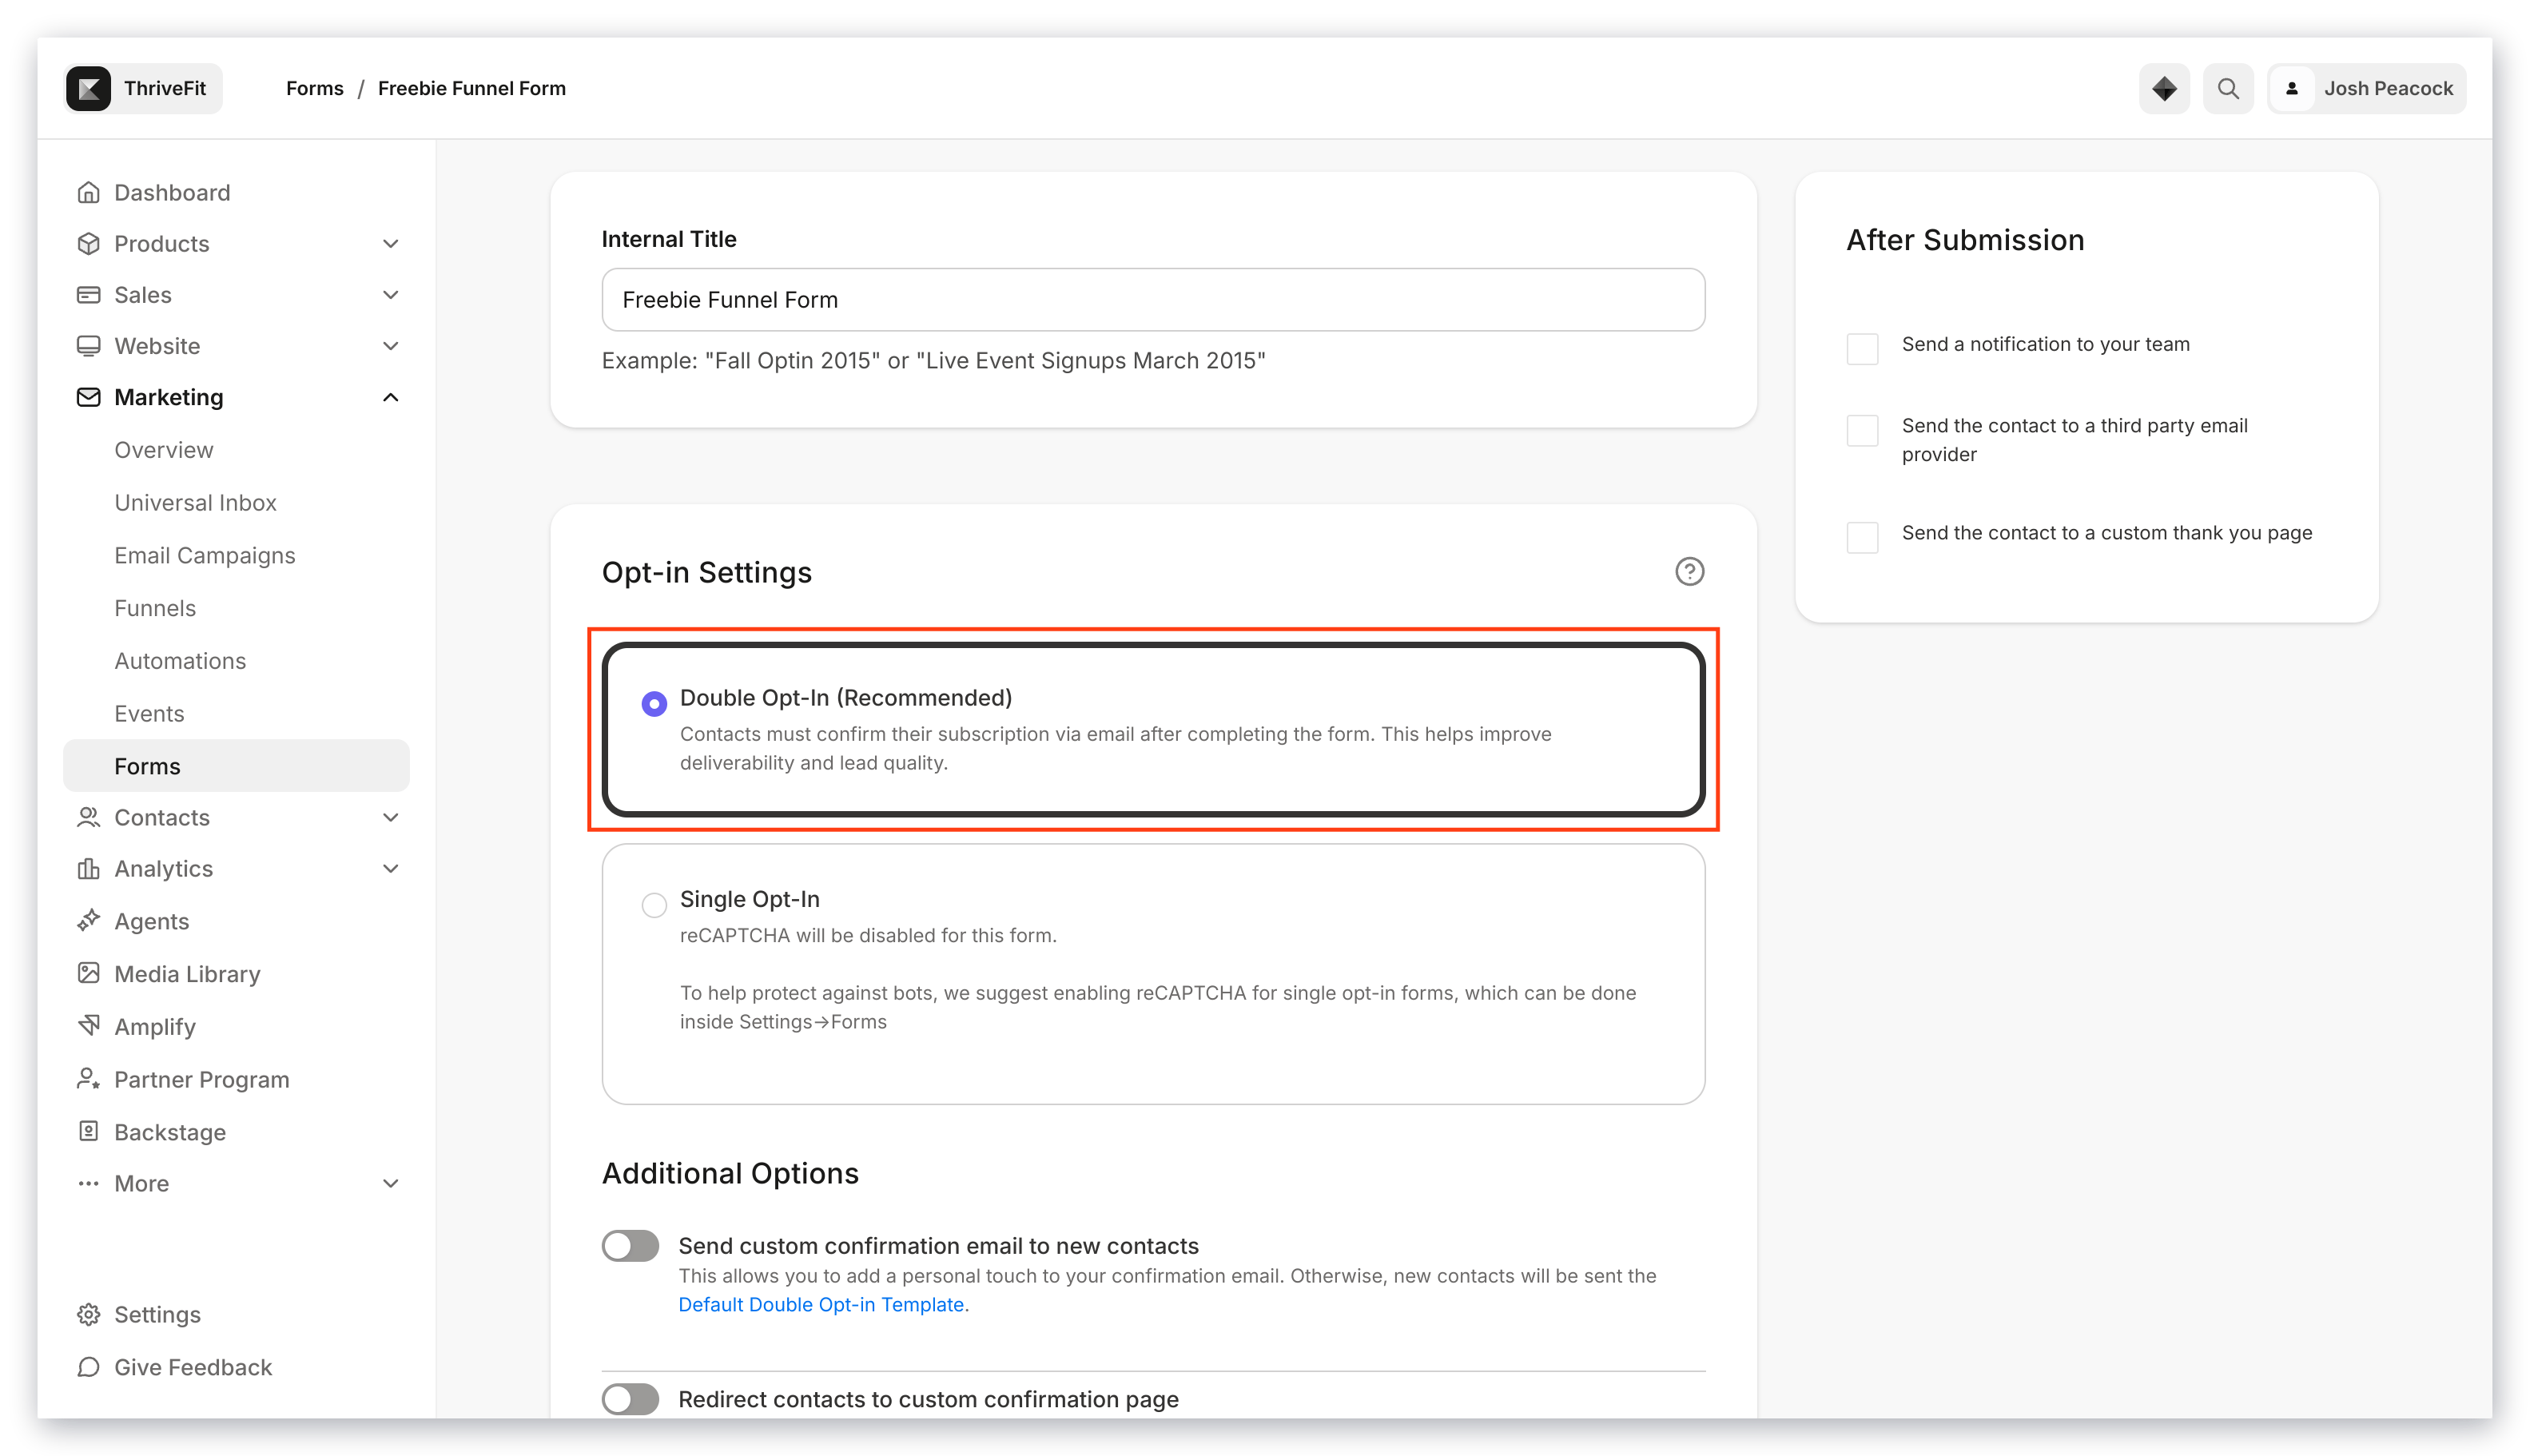
The number one rule of growing an organic contact list is using a Double-Opt-In form. Acquiring contacts through your own opt-in is vital to holding a good sender reputation.
A double opt-in means the sender is validating the email entered on its website twice, first by having the user enter the address on the site and then asking recipients to confirm their subscription through a confirmation email.
### Set up a double opt-in subscription
1. Open the **Marketing** tab from your Dashboard.
2. Select **Forms**.
3. Open your desired Form or [create one](../../marketing/forms/create-and-build-your-form).
4. Select **Double Opt-In (Recommended)** to enable it.
5. Select any [Additional Options](../../marketing/forms/how-to-set-up-a-form-with-double-opt-in#h_01F33JX84VQS2XDS7M4CAXWT4B) you wish to apply and customize.
6. Click **Save** to apply your changes.
 ## More best practices
* **Offer an Opt-Out**: Due to U.S. and International Anti-Spam Laws, Kajabi has added an Opt-Out to your Email Sequences, so we've already got you covered.
* **Verify Recipient Engagement**: ESPs measure your reputation through the engagement of your recipients. If recipients are opening, forwarding, and replying to your emails, it will improve your status.
### Find recipient engagement
1. Open the **Marketing** tab from your Dashboard.
2. Select **Email Campaigns**.
3. Select the desired Email Campaign and then click **Report**.
## Use free, quality content as a lead magnet
A great way to organically grow your contact list is to offer some type of value in exchange for opting in, a.k.a., a lead magnet. Here is a list of some tried-and-true lead magnets you can use to organically grow your list:
* Live webinar
* Quiz (i.e., Assessments)
* Video
* Image
* Discounted offer
* Guide
* Checklists
## Maintain mailing list health
### Unsubscribe inactive contacts
To improve your sender reputation, we recommend unsubscribing contacts who aren't responding or interacting with their emails after 180 days.
ISPs measure engagement, such as opens or clicks, as a positive sign, which improves the sender's reputation.
Kajabi defines "inactive" as a non-customer, subscribed, at least 30 days old, has been delivered an email in the past 90 days, but has not opened an email in the past 90 days, and has not clicked a link within an email.
### Manage inactive contacts
1. Open the **Contacts** tab from your Dashboard.
2. Click **Filters** to filter your list:
* **Category:** Email Engagement
* **Conditional:** Inactive Contacts
* **Value:** Include email opens
3. Click **Apply Filters**.
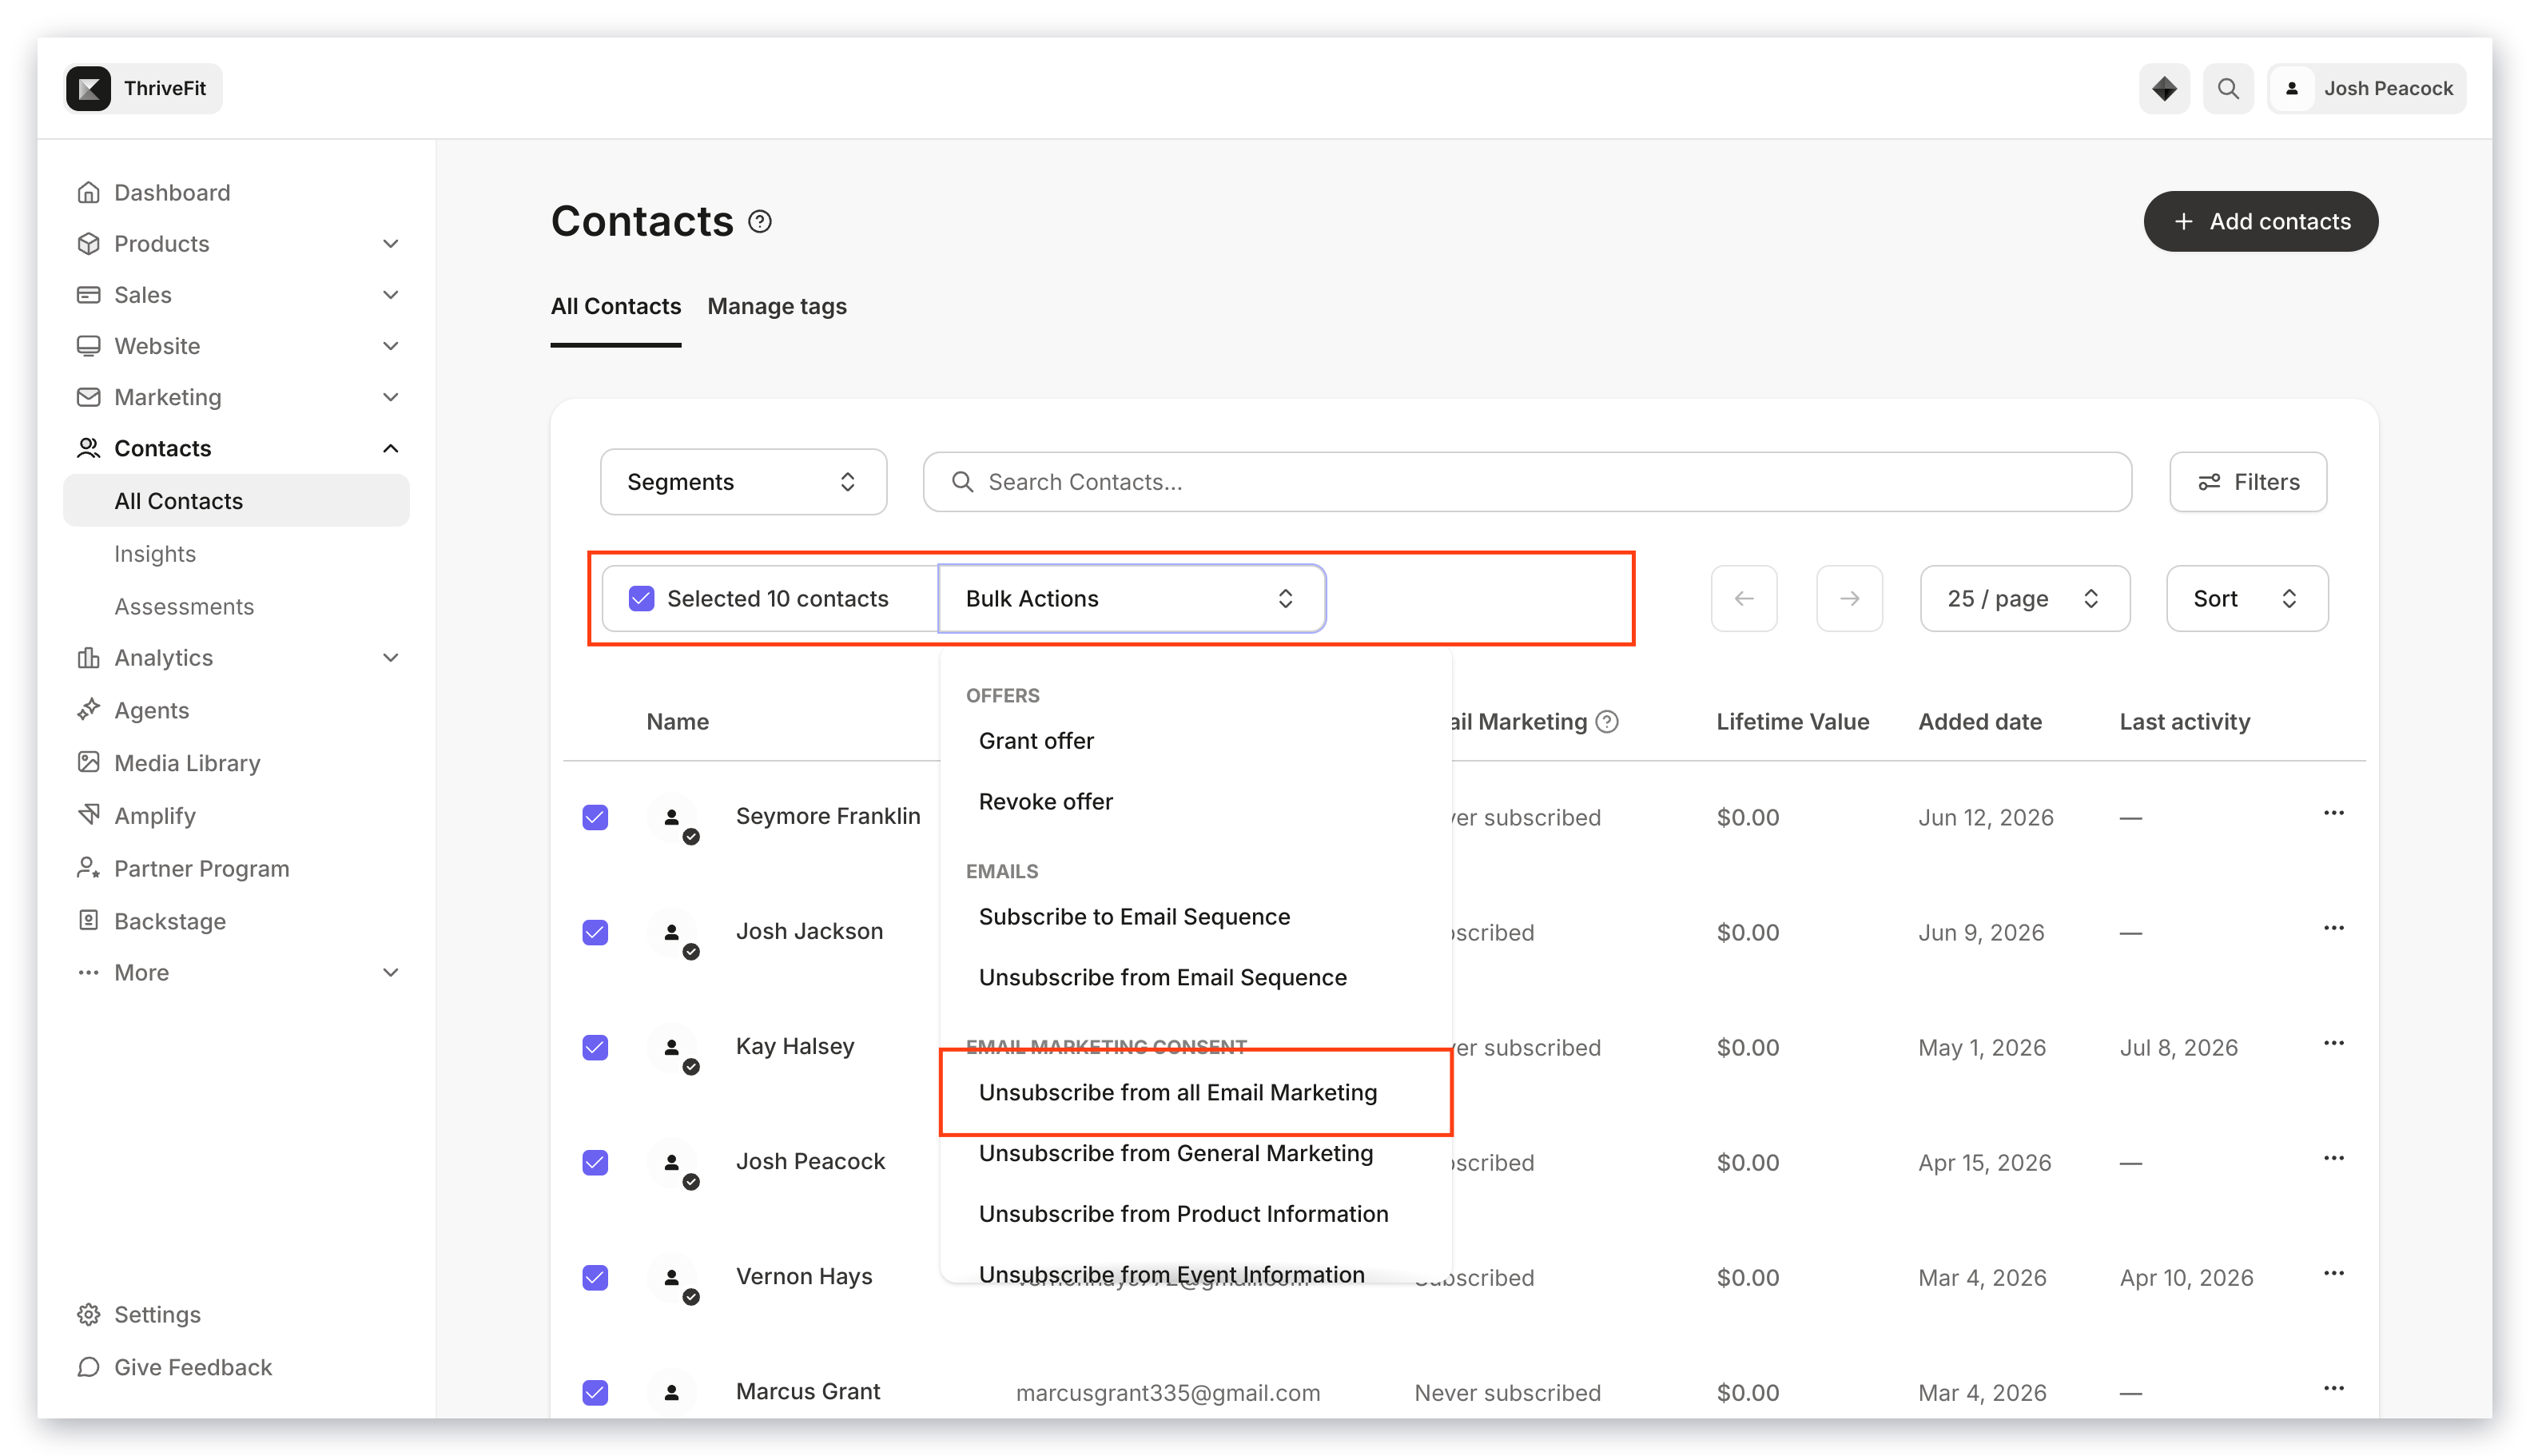
4. Click the **Select all checkbox** or manually select the inactive contacts of your choosing.
5. Open the **Bulk Actions** dropdown menu.
6. Select **Unsubscribe from email marketing**.
7. Complete the prompt and confirm your intention to unsubscribe.
[Learn how to perform bulk actions to manage your inactive contacts](../../contacts/manage-your-contacts/perform-bulk-actions-in-the-contacts-tab#h_71801d2d-bc8f-4b24-88dc-61798c6f8375).
## More best practices
* **Offer an Opt-Out**: Due to U.S. and International Anti-Spam Laws, Kajabi has added an Opt-Out to your Email Sequences, so we've already got you covered.
* **Verify Recipient Engagement**: ESPs measure your reputation through the engagement of your recipients. If recipients are opening, forwarding, and replying to your emails, it will improve your status.
### Find recipient engagement
1. Open the **Marketing** tab from your Dashboard.
2. Select **Email Campaigns**.
3. Select the desired Email Campaign and then click **Report**.
## Use free, quality content as a lead magnet
A great way to organically grow your contact list is to offer some type of value in exchange for opting in, a.k.a., a lead magnet. Here is a list of some tried-and-true lead magnets you can use to organically grow your list:
* Live webinar
* Quiz (i.e., Assessments)
* Video
* Image
* Discounted offer
* Guide
* Checklists
## Maintain mailing list health
### Unsubscribe inactive contacts
To improve your sender reputation, we recommend unsubscribing contacts who aren't responding or interacting with their emails after 180 days.
ISPs measure engagement, such as opens or clicks, as a positive sign, which improves the sender's reputation.
Kajabi defines "inactive" as a non-customer, subscribed, at least 30 days old, has been delivered an email in the past 90 days, but has not opened an email in the past 90 days, and has not clicked a link within an email.
### Manage inactive contacts
1. Open the **Contacts** tab from your Dashboard.
2. Click **Filters** to filter your list:
* **Category:** Email Engagement
* **Conditional:** Inactive Contacts
* **Value:** Include email opens
3. Click **Apply Filters**.
4. Click the **Select all checkbox** or manually select the inactive contacts of your choosing.
5. Open the **Bulk Actions** dropdown menu.
6. Select **Unsubscribe from email marketing**.
7. Complete the prompt and confirm your intention to unsubscribe.
[Learn how to perform bulk actions to manage your inactive contacts](../../contacts/manage-your-contacts/perform-bulk-actions-in-the-contacts-tab#h_71801d2d-bc8f-4b24-88dc-61798c6f8375).
 ## Manage hard-bounced contacts
A **hard bounce** is an email that has failed to deliver for permanent reasons, such as the recipient's address is invalid, either because the domain name is incorrect, isn't real, or the recipient is unknown.
We know how important it is for your content to reach your subscribers' inboxes, so Kajabi has taken action to help you manage your bounced contacts and [improve your email deliverability](/articles/marketing/email-campaigns/sender-reputation-guide) by automating the process of unsubscribing your bounced emails.
**Note:**
You may encounter contacts in your hard-bounced segment that remain subscribed. Your contacts will remain subscribed unless they are determined to be permanently undeliverable. As such, contacts may not be unsubscribed immediately upon a hard bounce.
Learn [how auto-unsubscribe helps you maintain a healthy mailing list](../../contacts/manage-your-contacts/how-auto-unsubscribe-helps-you-maintain-a-healthy-mailing-list).
## Identify unsubscribed contacts
1. Click the **Contacts** tab from your Dashboard.
2. Create a [Filter](../../contacts/manage-your-contacts/apply-filters-to-your-contacts-tab).
3. Select **Marketing Status** as the Category.
4. Select **Subscribed** as the Conditional.
5. Select **No** as the Value.
6. Click **Apply Filters**.
## Manage hard-bounced contacts
A **hard bounce** is an email that has failed to deliver for permanent reasons, such as the recipient's address is invalid, either because the domain name is incorrect, isn't real, or the recipient is unknown.
We know how important it is for your content to reach your subscribers' inboxes, so Kajabi has taken action to help you manage your bounced contacts and [improve your email deliverability](/articles/marketing/email-campaigns/sender-reputation-guide) by automating the process of unsubscribing your bounced emails.
**Note:**
You may encounter contacts in your hard-bounced segment that remain subscribed. Your contacts will remain subscribed unless they are determined to be permanently undeliverable. As such, contacts may not be unsubscribed immediately upon a hard bounce.
Learn [how auto-unsubscribe helps you maintain a healthy mailing list](../../contacts/manage-your-contacts/how-auto-unsubscribe-helps-you-maintain-a-healthy-mailing-list).
## Identify unsubscribed contacts
1. Click the **Contacts** tab from your Dashboard.
2. Create a [Filter](../../contacts/manage-your-contacts/apply-filters-to-your-contacts-tab).
3. Select **Marketing Status** as the Category.
4. Select **Subscribed** as the Conditional.
5. Select **No** as the Value.
6. Click **Apply Filters**.