> ## Documentation Index
> Fetch the complete documentation index at: https://help.kajabi.com/llms.txt
> Use this file to discover all available pages before exploring further.

# Organize content with folders

> Organize Email Campaigns with Kajabi Folders to improve your systems and manage content efficiently.

Organize your Email Campaigns with **Kajabi Folders**. With custom folders you can create, manage, and organize your emails to improve your systems and manage your content efficiently.

## Kajabi Folders

Organize your email content into tidy folders with Kajabi Folders. With these custom folders, you can group your Email Campaigns tailored to your business needs to help you stay organized.

## Create a folder

### Create a Kajabi Folder for Email Campaigns

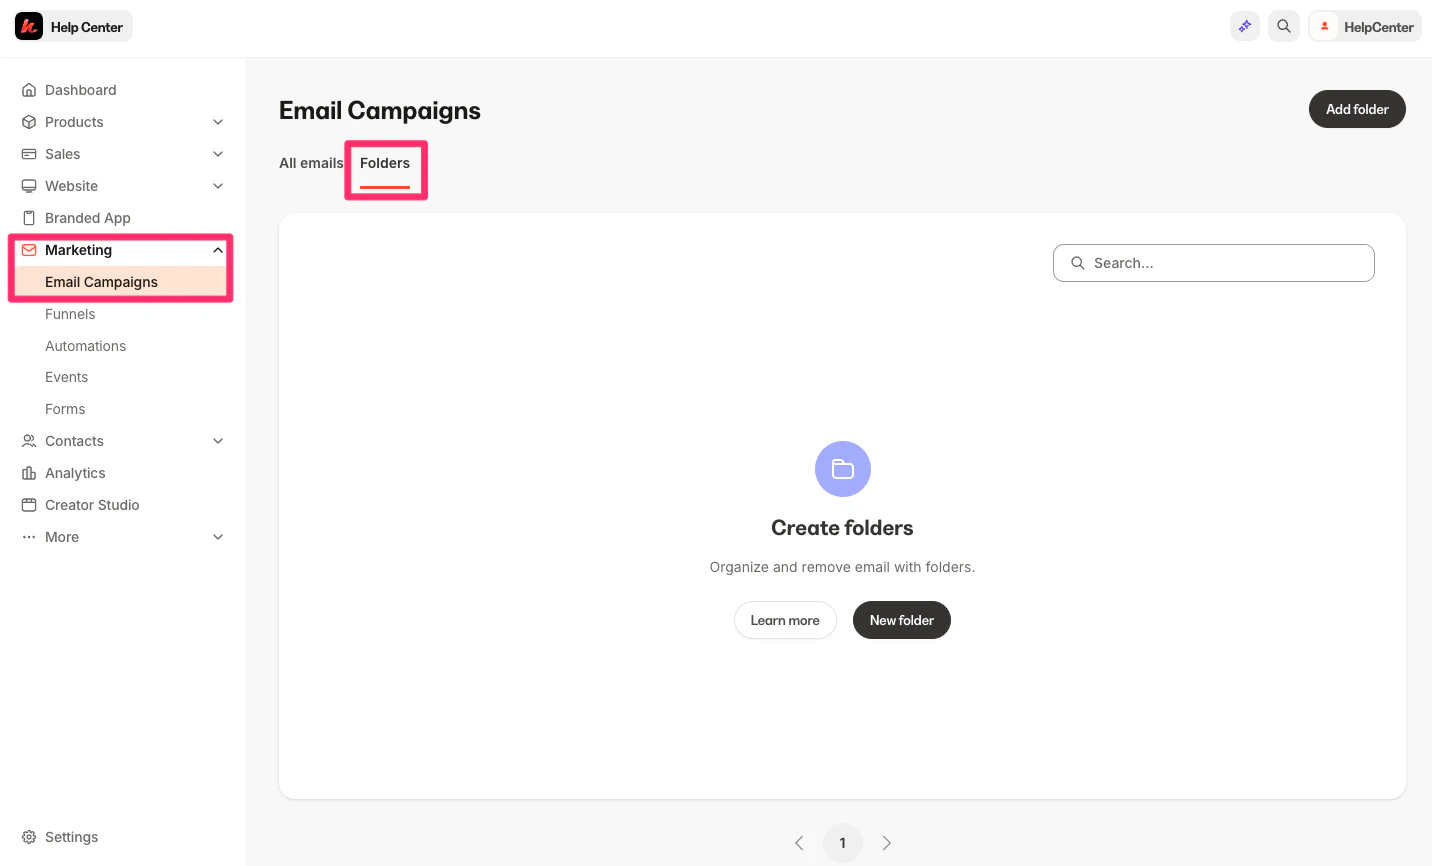
1. Open the **Marketing** tab from your Dashboard.
2. Click **Email Campaigns**.
3. Open the **Folders** tab from the Email Campaigns top menu:

<img src="https://mintcdn.com/kajabi-support/oDd10s3Gsc03FIcd/articles/images/825ad224_33583281440923.png?fit=max&auto=format&n=oDd10s3Gsc03FIcd&q=85&s=aa7d3e46eda9b9b5668051051aac5577" alt="Folders Tab" width="1432" height="866" data-path="articles/images/825ad224_33583281440923.png" />

4. Click **New folder**.
   If you have created a folder previously, you can select the **New folder** button from the top-right:
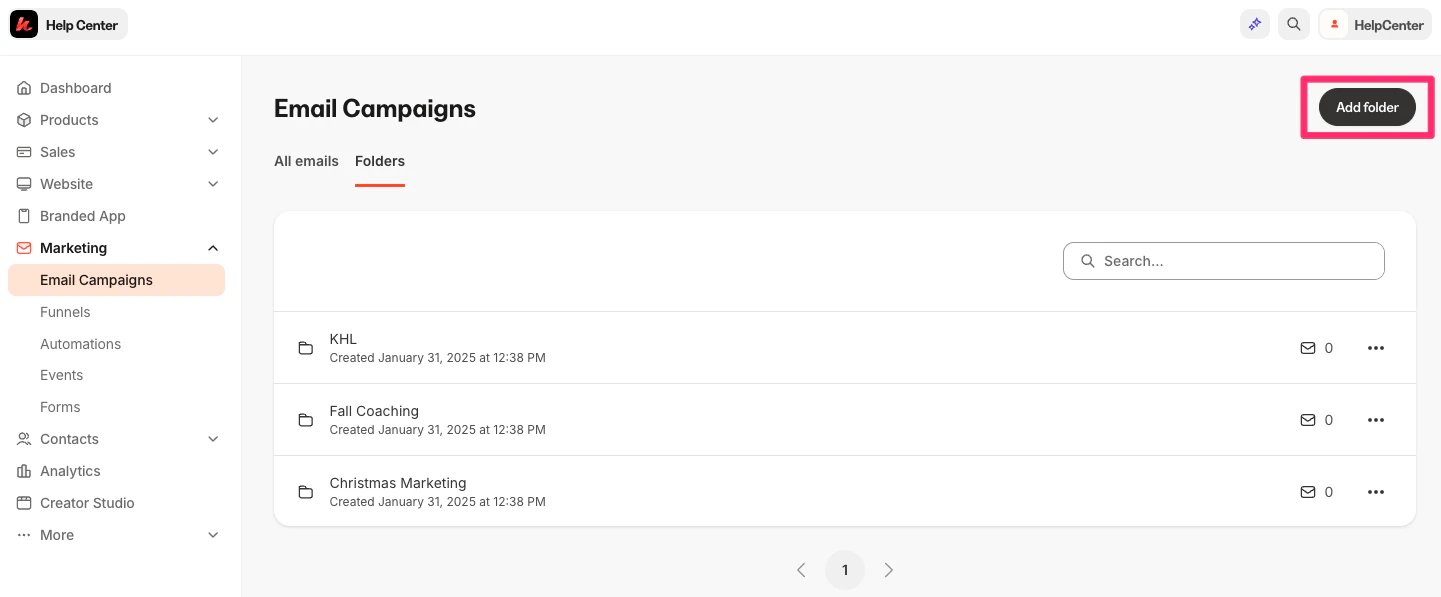
<img src="https://mintcdn.com/kajabi-support/gPLd9epPHl3pyPMl/articles/images/db78a2ef_33583250905499.png?fit=max&auto=format&n=gPLd9epPHl3pyPMl&q=85&s=ce37239a9960cb1819c411b612058ec3" alt="New Folder Button" width="1441" height="597" data-path="articles/images/db78a2ef_33583250905499.png" />

5. Enter your folder title.
6. Click **Save** to create your folder:
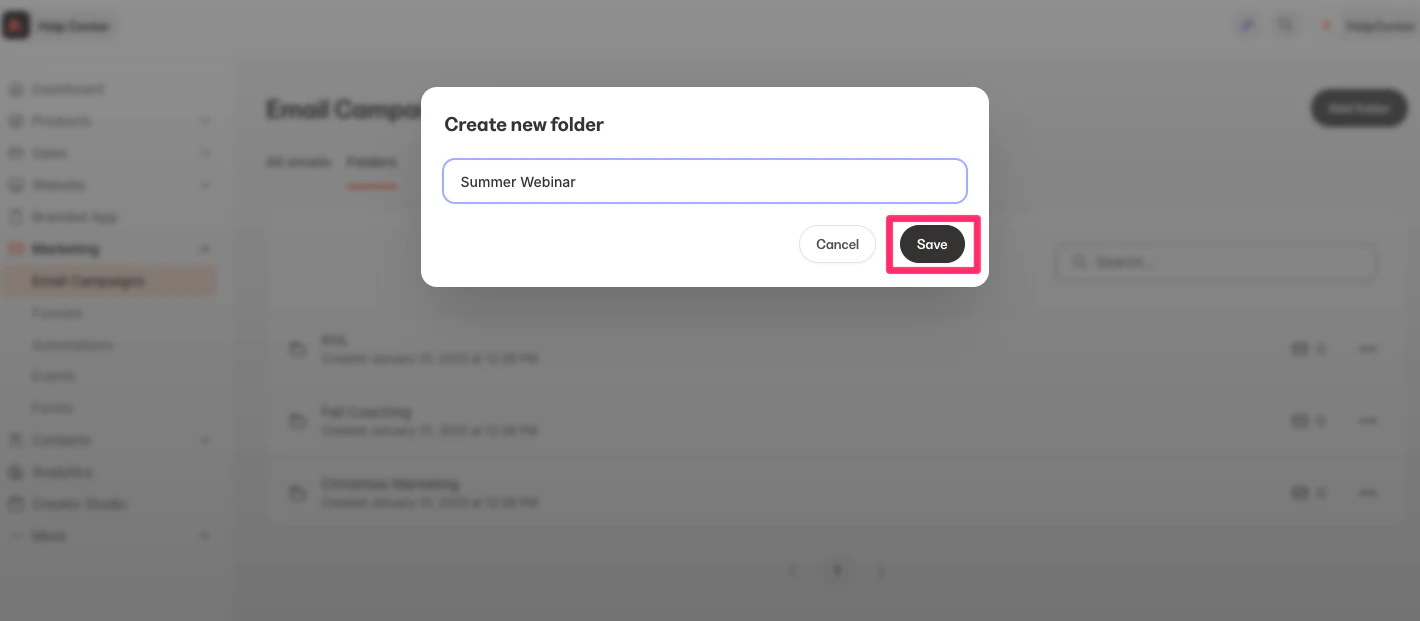
<img src="https://mintcdn.com/kajabi-support/3Y-k0yYjJG6ZJVOo/articles/images/edfe2a6d_33583281454619.png?fit=max&auto=format&n=3Y-k0yYjJG6ZJVOo&q=85&s=f1ab9a64ef80ed54280dd9d37dcbcd65" alt="Save New Folder" width="1420" height="621" data-path="articles/images/edfe2a6d_33583281454619.png" />

## Manage folders

### Add to folders

To add emails to a folder:

1. Navigate to the **All emails** tab within Email Campaigns:
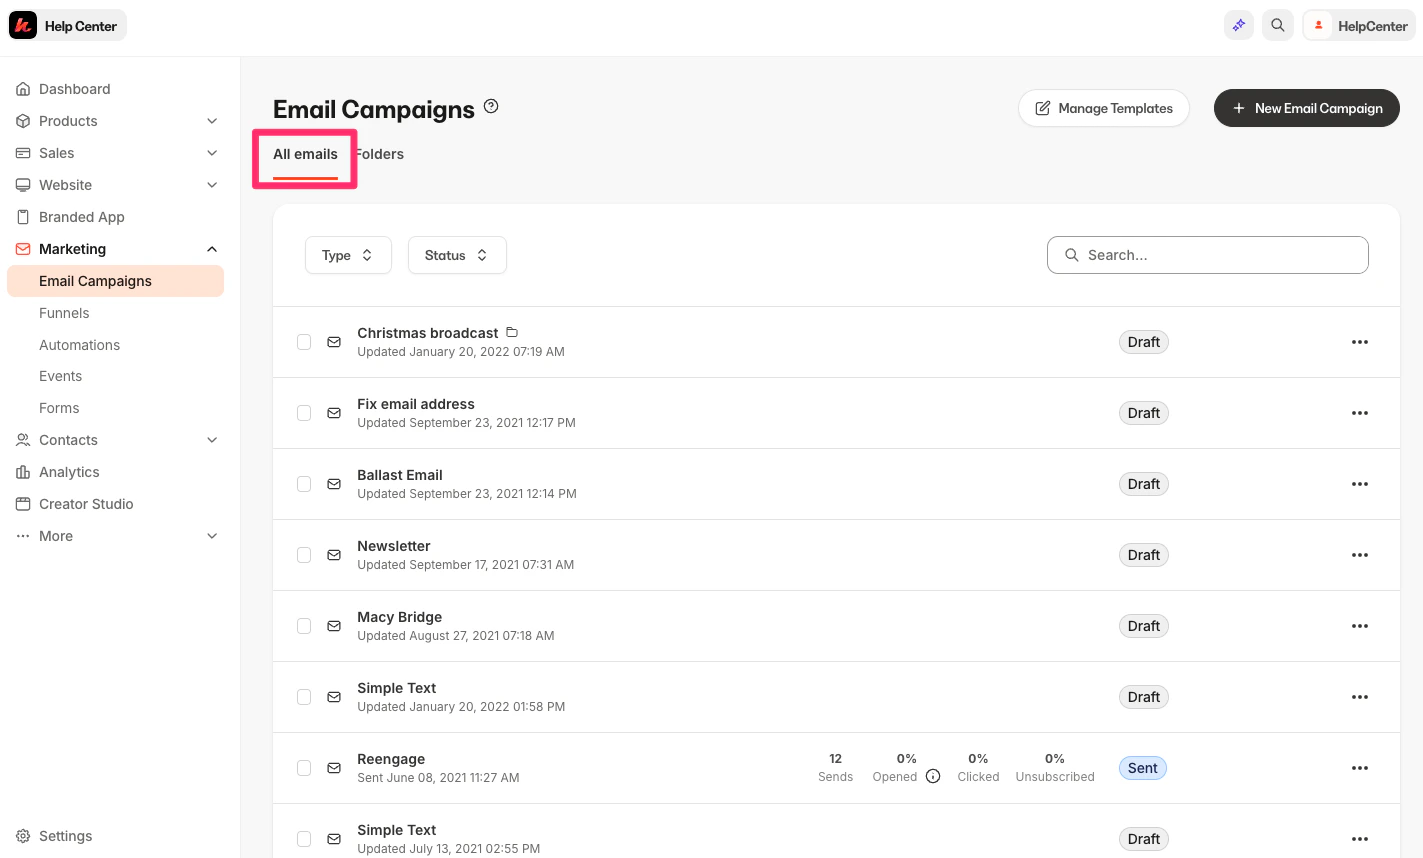
<img src="https://mintcdn.com/kajabi-support/OtYg3iR4Ks8hETRd/articles/images/239126ae_33583250918811.png?fit=max&auto=format&n=OtYg3iR4Ks8hETRd&q=85&s=a60b64b12d3cd362edd9f7975e24181e" alt="All Emails Tab" width="1423" height="858" data-path="articles/images/239126ae_33583250918811.png" />

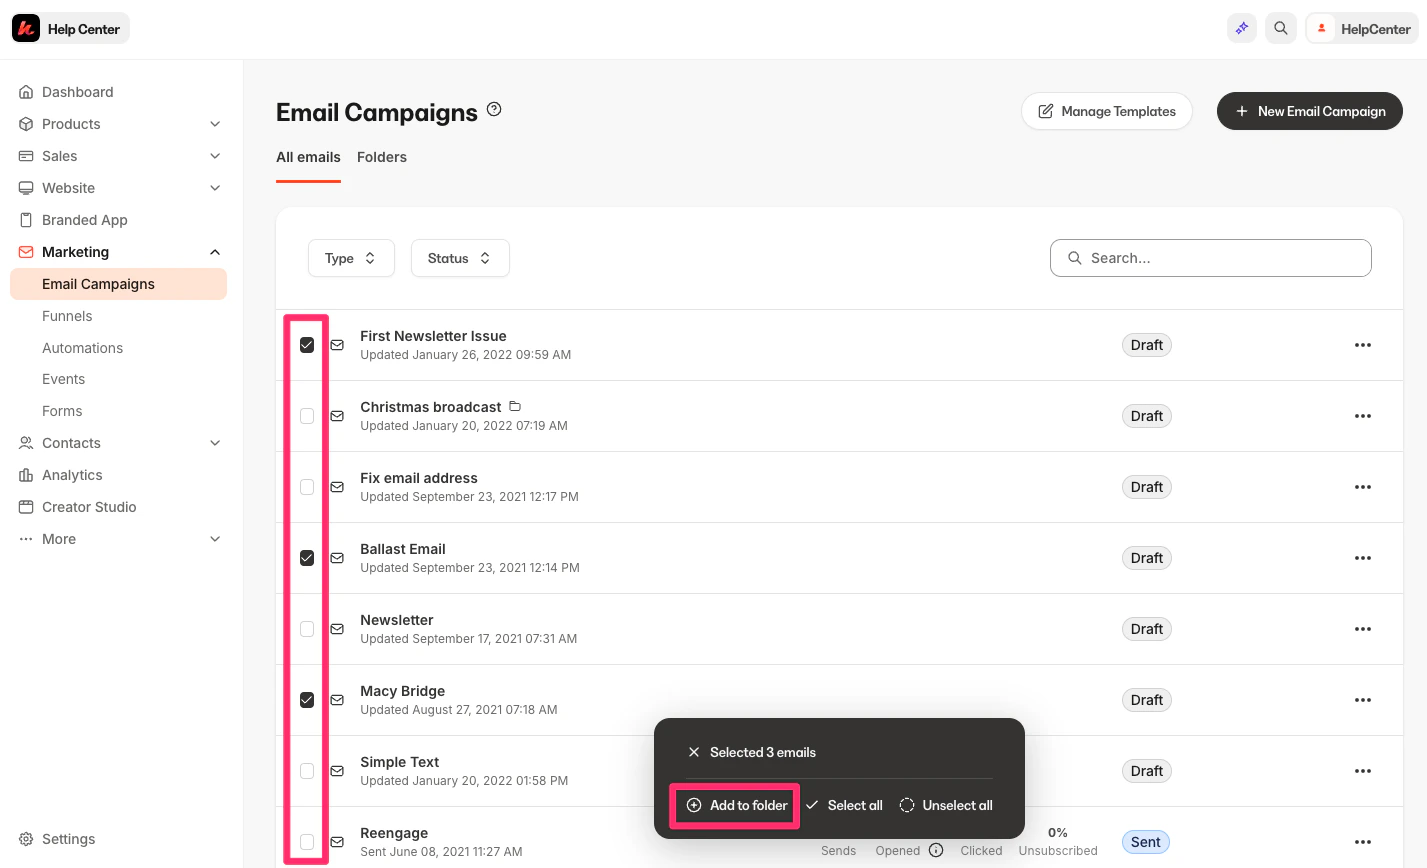
2. Select the emails you want to add to your folder.
3. Click **Add to folder**:
<img src="https://mintcdn.com/kajabi-support/4Tq1KxWrCeOGslKH/articles/images/1624990b_33583250927771.png?fit=max&auto=format&n=4Tq1KxWrCeOGslKH&q=85&s=65449f1020f9c537704073eb851d2562" alt="Add to Folder" width="1427" height="868" data-path="articles/images/1624990b_33583250927771.png" />

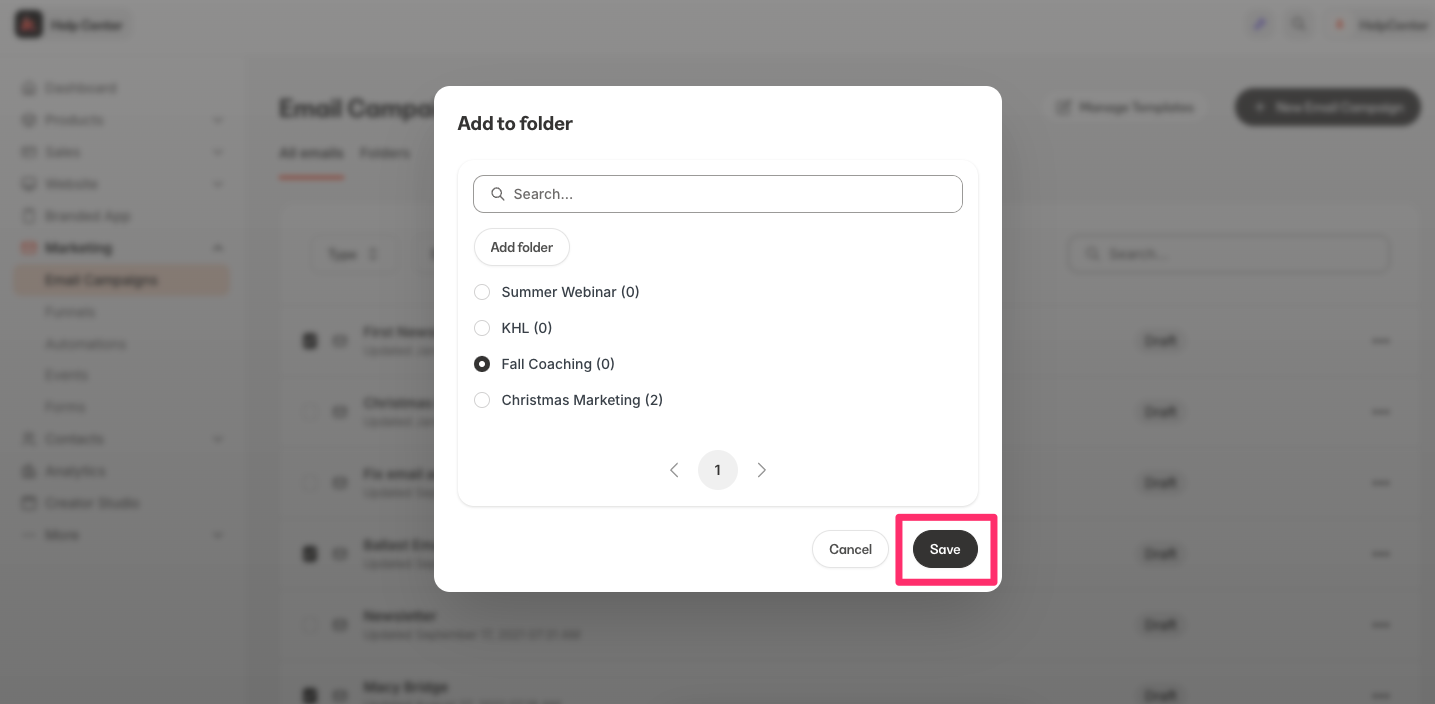
4. Select your desired folder and click **Save**:
<img src="https://mintcdn.com/kajabi-support/Hqq2NscHyg4tLbph/articles/images/50db8cde_33583281467163.png?fit=max&auto=format&n=Hqq2NscHyg4tLbph&q=85&s=bb6d66b2bffa6f530f934a7ebcf90ec9" alt="Select Folder" width="1435" height="704" data-path="articles/images/50db8cde_33583281467163.png" />

### Remove from folders

To remove emails from a folder:

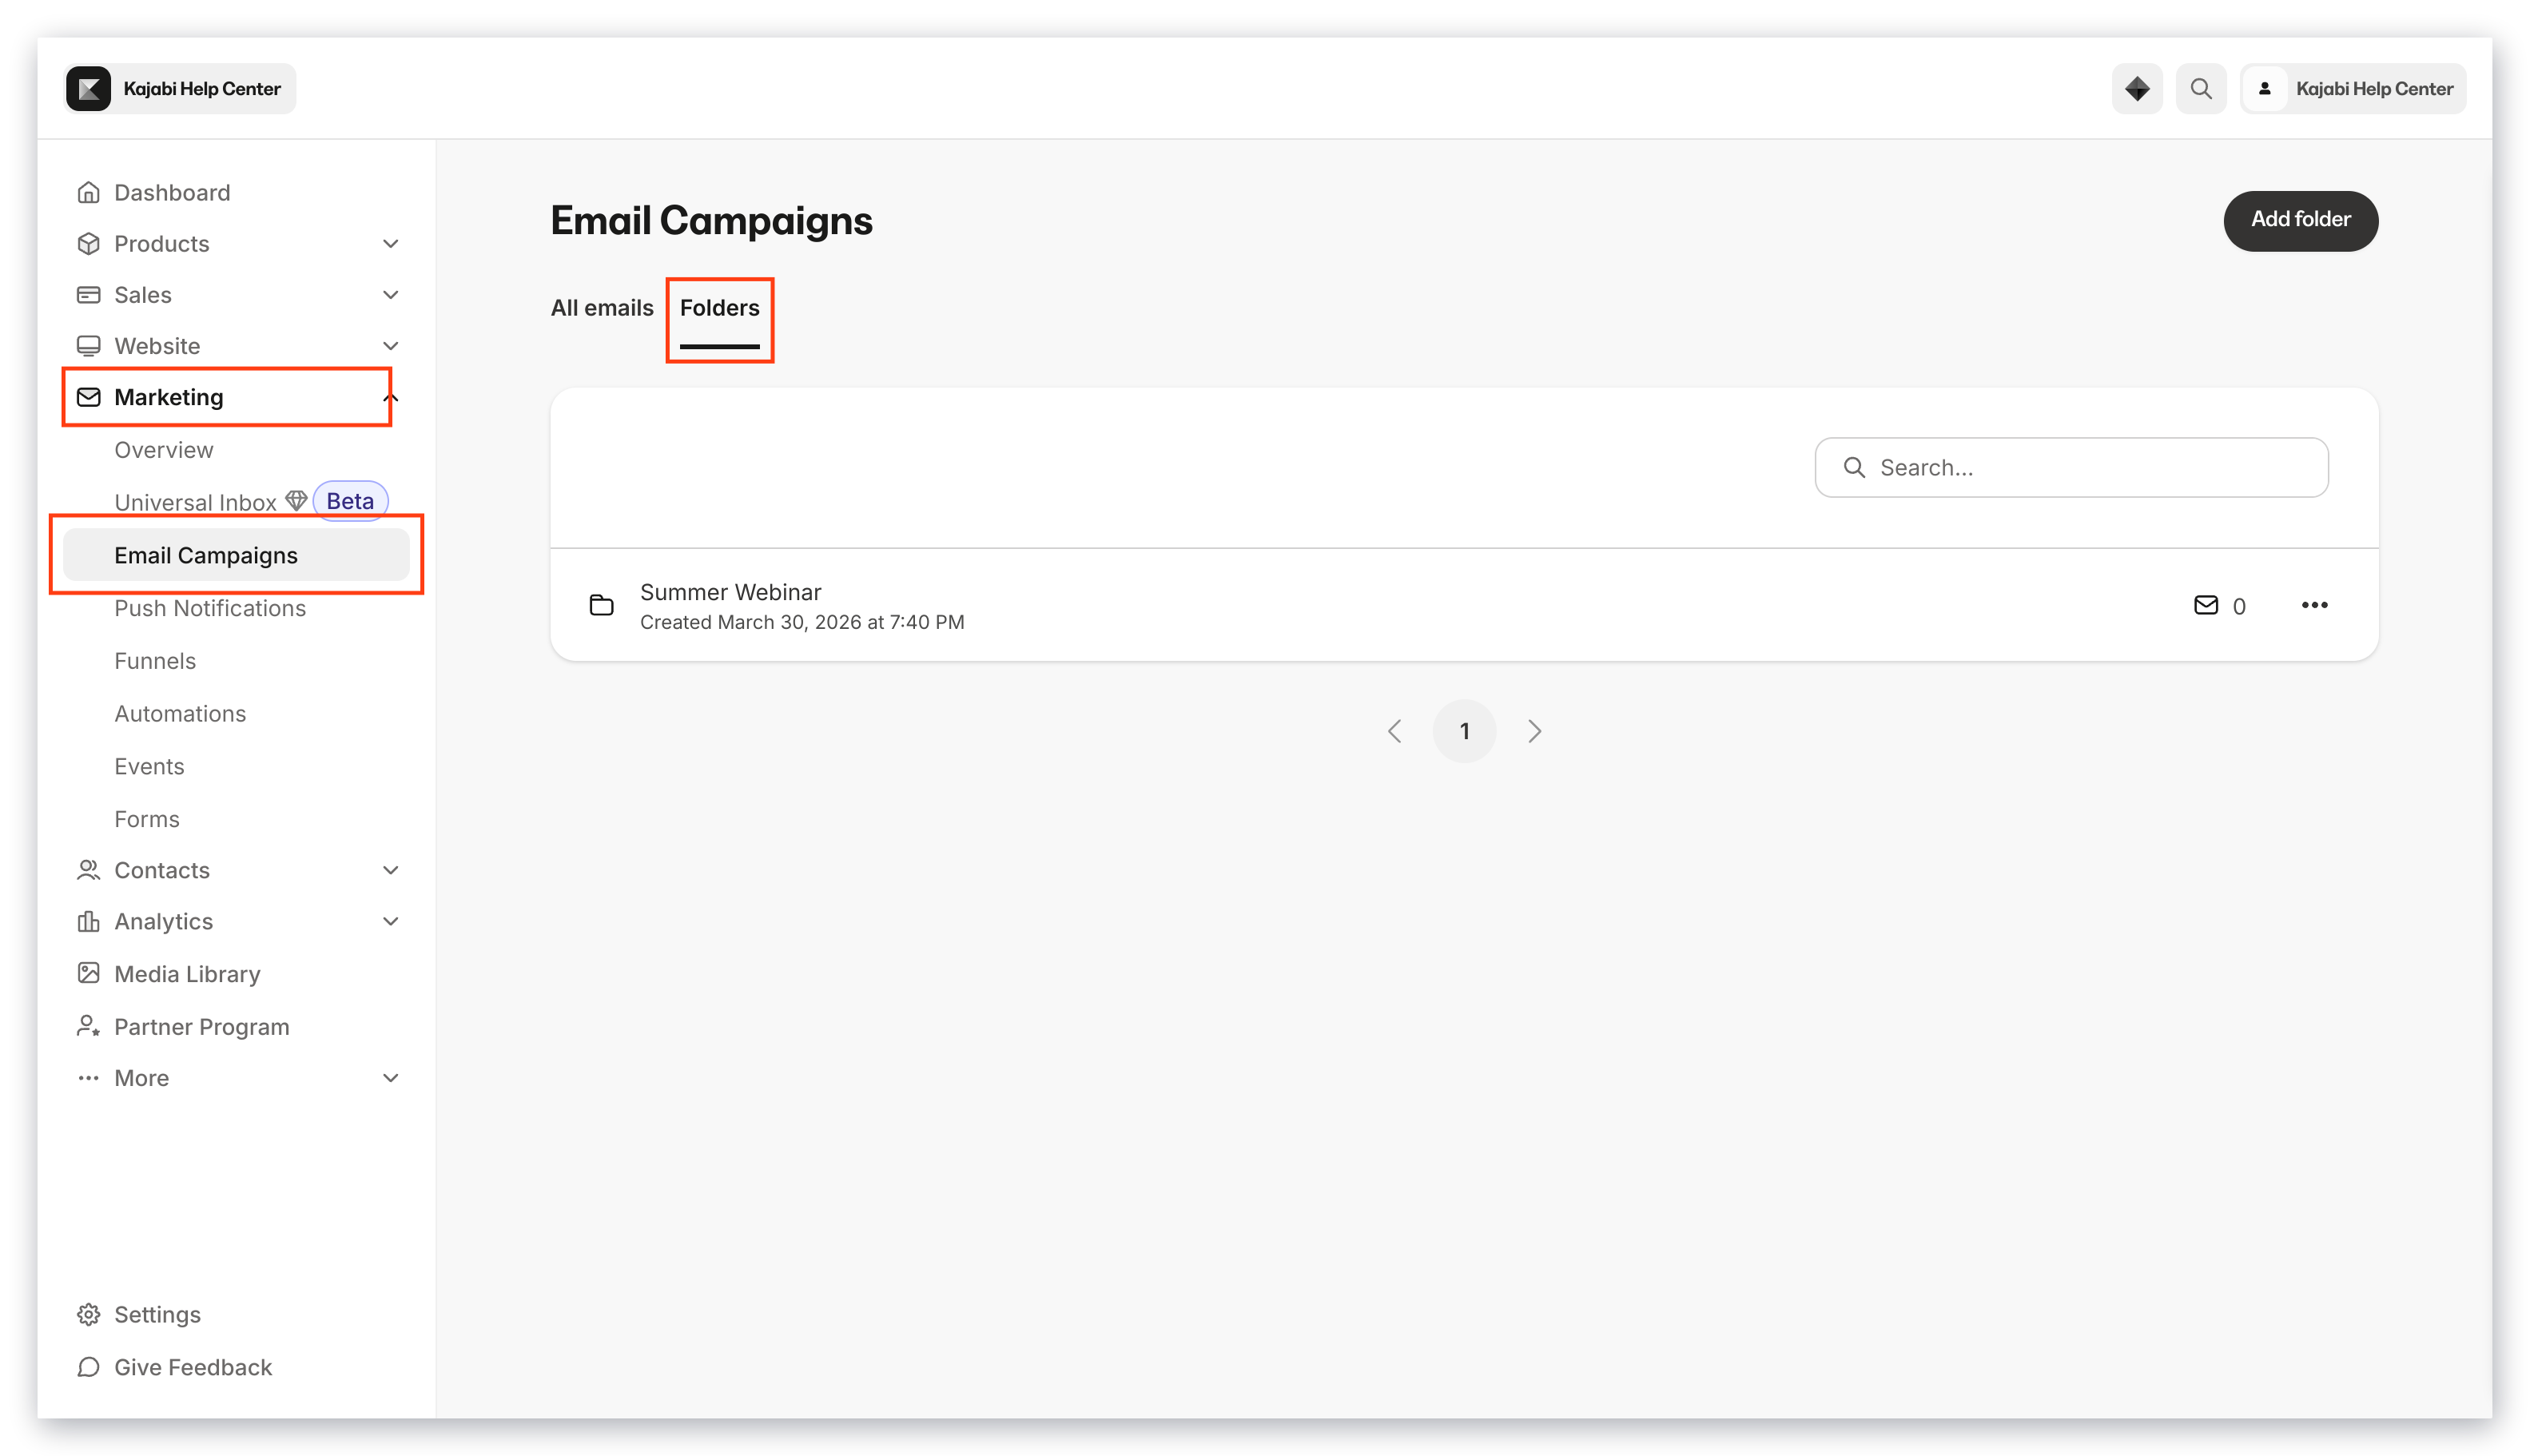
1. Navigate to the **Folders** tab within Email Campaigns:
<img src="https://mintcdn.com/kajabi-support/NHosPLWrdBkWec8r/articles/images/19956fd0_33583281471259.png?fit=max&auto=format&n=NHosPLWrdBkWec8r&q=85&s=b73b1c60fd2f38dfcc8355cc3742e96c" alt="Folders Tab" width="1439" height="856" data-path="articles/images/19956fd0_33583281471259.png" />

2. Select the folder containing the emails you want to remove.
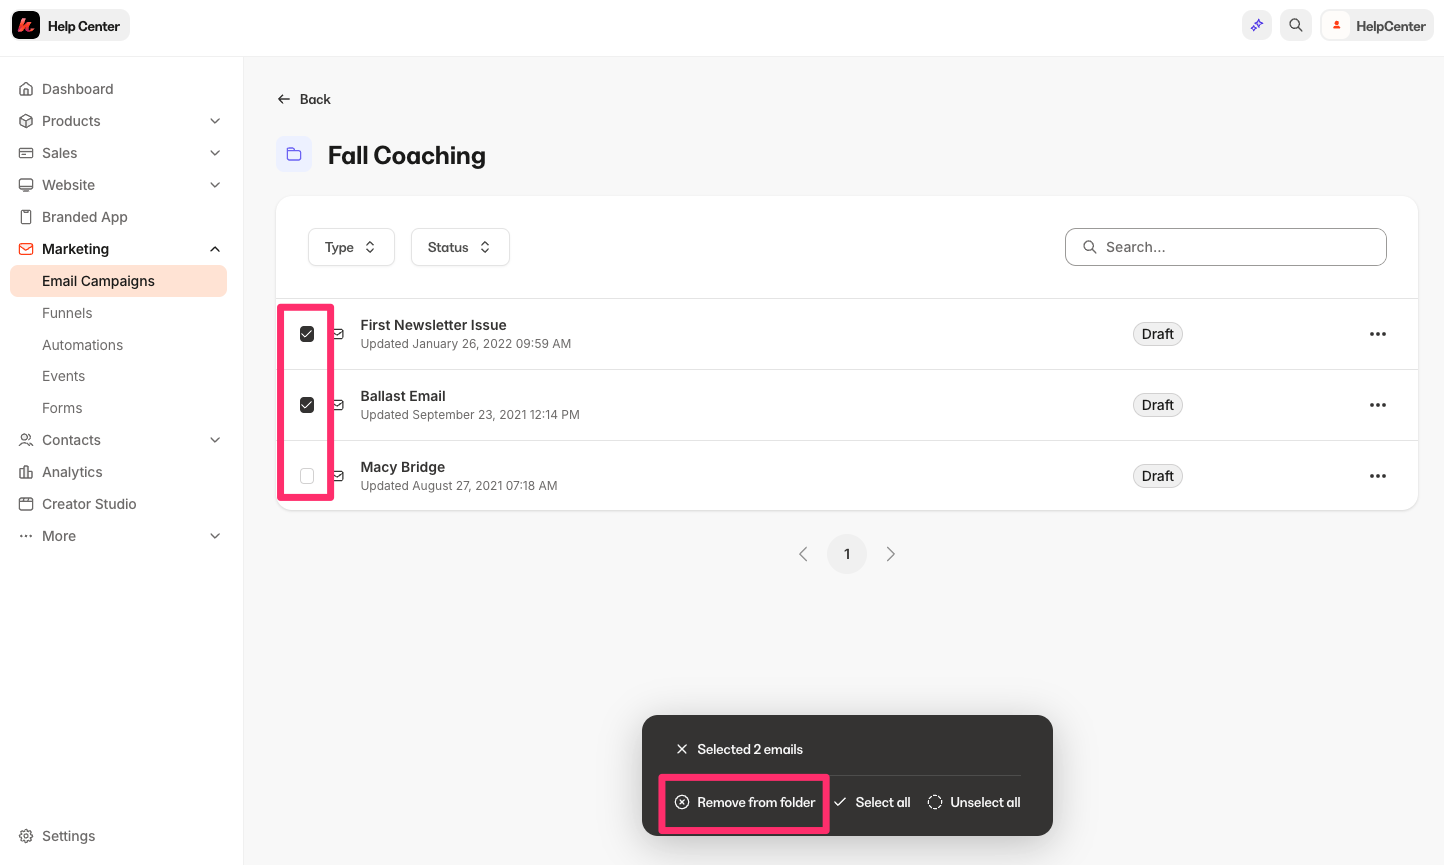
3. Select the emails you want to remove from your folder.
4. Click **Remove from folder**.
5. Complete the prompt to confirm by clicking **Remove**:
<img src="https://mintcdn.com/kajabi-support/ig0P6X_YYqhSgRa-/articles/images/1de8ac91_33583281479707.png?fit=max&auto=format&n=ig0P6X_YYqhSgRa-&q=85&s=2ab2b44af70e919af703e7e9ebd7be92" alt="Remove from Folder" width="1444" height="865" data-path="articles/images/1de8ac91_33583281479707.png" />

<Note>
  **Note:**
  Removing emails from a folder will not permanently delete your email campaigns. The emails will still be accessible through the "All emails" tab.
</Note>

### Rename folders

To rename folders:

1. Navigate to the **Folders** tab within Email Campaigns.
2. Locate the folder you wish to rename.
3. Select the `…` menu.
4. Click **Rename** folder.
5. Enter your new folder title.
6. Click **Save** to keep and apply:

<div className="w-full aspect-video">
  <iframe src="https://fast.wistia.net/embed/iframe/hv9otcdzym" allow="autoplay; fullscreen" allowFullScreen className="w-full h-full" />
</div>

### Delete folders

To permanently remove folders:

1. Navigate to the **Folders** tab within Email Campaigns.
2. Locate the folder you wish to delete.
3. Select the `…` menu.
4. Click **Delete folder**.
5. Click **Delete** to confirm removal of the folder permanently:

<div className="w-full aspect-video">
  <iframe src="https://fast.wistia.net/embed/iframe/yoansm7y2k" allow="autoplay; fullscreen" allowFullScreen className="w-full h-full" />
</div>

<Note>
  **Note:**
  Permanently removing folders will not delete your email campaigns contained in the folder. The emails will still be accessible through the "All emails" tab.
</Note>
