> ## Documentation Index
> Fetch the complete documentation index at: https://help.kajabi.com/llms.txt
> Use this file to discover all available pages before exploring further.
# Create and build a Form
> Create a Form to subscribe contacts, grant Offers, and register contacts for Events.
A **Form** in Kajabi is a versatile tool that can be used for many actions such as: [subscribing someone to an email sequence](../../marketing/email-campaigns/create-an-email-sequence), [granting them an offer](./how-to-grant-access-to-an-offer-after-a-form-submission), [registering them to an event](../../marketing/events/how-to-register-people-to-your-event), and more.
[Learn how to customize the look and feel of your Form in a Page](../../website/pages/how-to-add-a-form-to-your-page#h_945e7c2f-3dac-40cc-8518-31f996ec9df7) built with Kajabi, or [learn how to design your Kajabi Form for an external location](./embed-a-kajabi-form-on-an-external-webpage).
## Create and build a Form
1. From the Dashboard, open the **Marketing** tab.
2. Click **Forms**.
3. Select **+ New form**.
4. Give the Form an internal **Title**.
5. Click **Save**.
6. Now, build out the form. Under **Opt-in Settings**, select either Double Opt-In (recommended) or Single Opt-in.
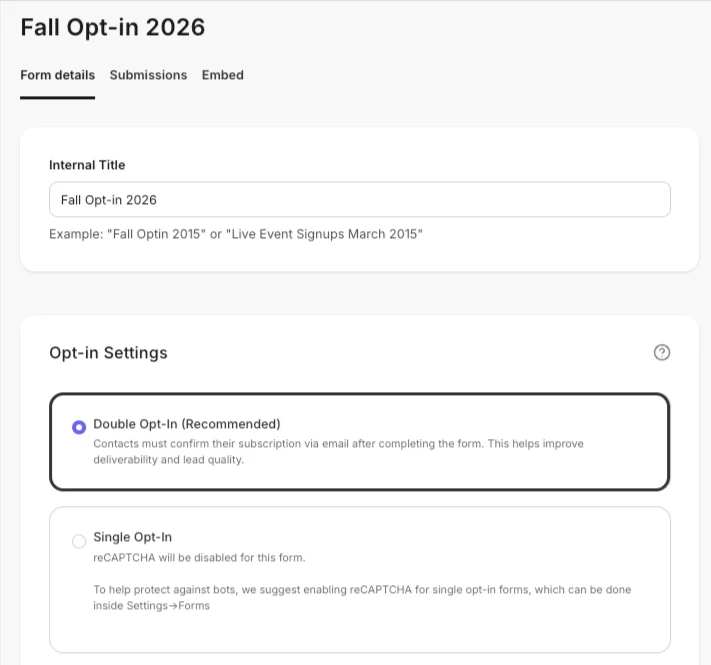 * **Double Opt-In** requires contacts to confirm their subscription via email after completing the form. This helps improve deliverability and lead quality. See [Set up a Form with double opt-in](./how-to-set-up-a-form-with-double-opt-in).
* **Single Opt-In** means reCAPTCHA is disabled for the form. To help protect against bots, enable reCAPTCHA under **Settings** > **Forms**.
7. Under **Additional Options**, Toggle wether you want to **Send a custom confirmation email to new contacts** coming through the Form. Otherwise, new contacts will be sent the default Double Opt-in Email Template.
8. If sending a custom email, edit the **Subject** and **Body**. Use [**liquid objects**](/articles/marketing/email-campaigns/how-to-create-and-use-liquid-objects-in-email-marketing) to personalize the email.
* **Double Opt-In** requires contacts to confirm their subscription via email after completing the form. This helps improve deliverability and lead quality. See [Set up a Form with double opt-in](./how-to-set-up-a-form-with-double-opt-in).
* **Single Opt-In** means reCAPTCHA is disabled for the form. To help protect against bots, enable reCAPTCHA under **Settings** > **Forms**.
7. Under **Additional Options**, Toggle wether you want to **Send a custom confirmation email to new contacts** coming through the Form. Otherwise, new contacts will be sent the default Double Opt-in Email Template.
8. If sending a custom email, edit the **Subject** and **Body**. Use [**liquid objects**](/articles/marketing/email-campaigns/how-to-create-and-use-liquid-objects-in-email-marketing) to personalize the email. 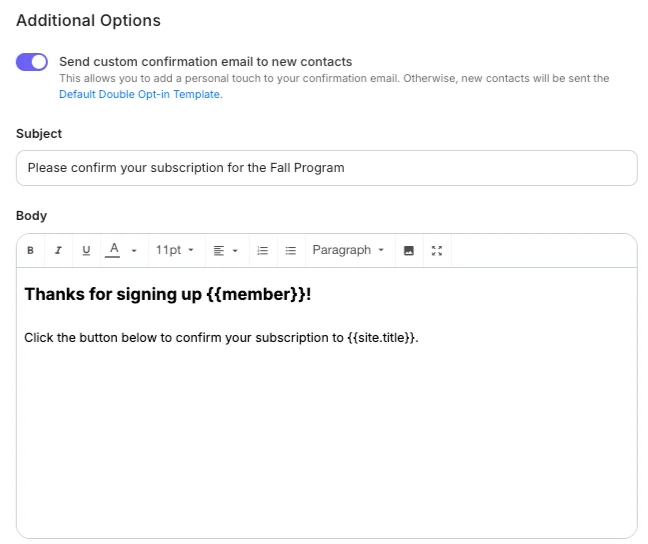 9. Edit the **Button text**, and choose a **Background color** and **Text color** for the email.
10. Choose whether to **Redirect contacts to a custom confirmation page**. \
Otherwise, new contacts will be redirected to the Default Confirmation Page.
11. Click **Preview in Browser** to check how the custom email will appear.
12. If desired, add one or more additional **Form Fields** to collect data by choosing from the provided list, such as **City** or **Business Number**.
13. Or, click **Create a New Field** to add your own field. Choose a field **Type** and enter a **Title**, then click the checkbox if you want to **make this field required** on your form.
9. Edit the **Button text**, and choose a **Background color** and **Text color** for the email.
10. Choose whether to **Redirect contacts to a custom confirmation page**. \
Otherwise, new contacts will be redirected to the Default Confirmation Page.
11. Click **Preview in Browser** to check how the custom email will appear.
12. If desired, add one or more additional **Form Fields** to collect data by choosing from the provided list, such as **City** or **Business Number**.
13. Or, click **Create a New Field** to add your own field. Choose a field **Type** and enter a **Title**, then click the checkbox if you want to **make this field required** on your form. 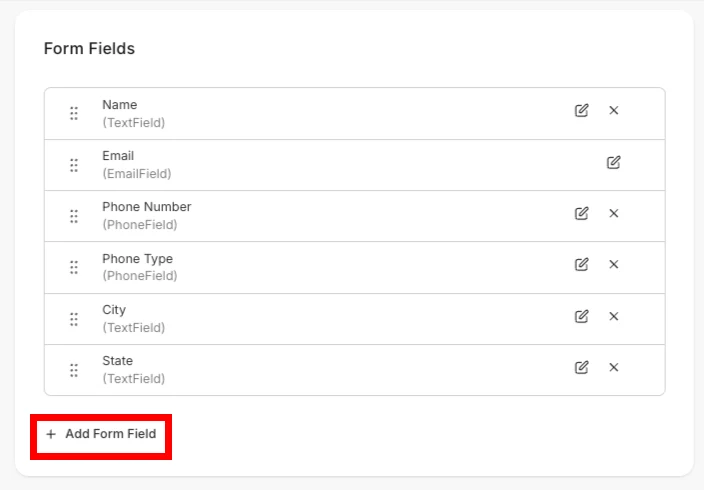 14. You may edit the values for any field by clicking the **pencil icon**.
15. Rearrange the order fields appear on your form by clicking and dragging the **drag handle** next to fields.
16. If needed, add a Form submission **Automation**.\
\
Set up **Automations** in opt-in Forms to automatically generate Offers, Email Sequences, Events, Tags, Transactional Emails, and Coupons. See [Use Automations in Forms](./how-to-use-automations-in-forms)
14. You may edit the values for any field by clicking the **pencil icon**.
15. Rearrange the order fields appear on your form by clicking and dragging the **drag handle** next to fields.
16. If needed, add a Form submission **Automation**.\
\
Set up **Automations** in opt-in Forms to automatically generate Offers, Email Sequences, Events, Tags, Transactional Emails, and Coupons. See [Use Automations in Forms](./how-to-use-automations-in-forms) 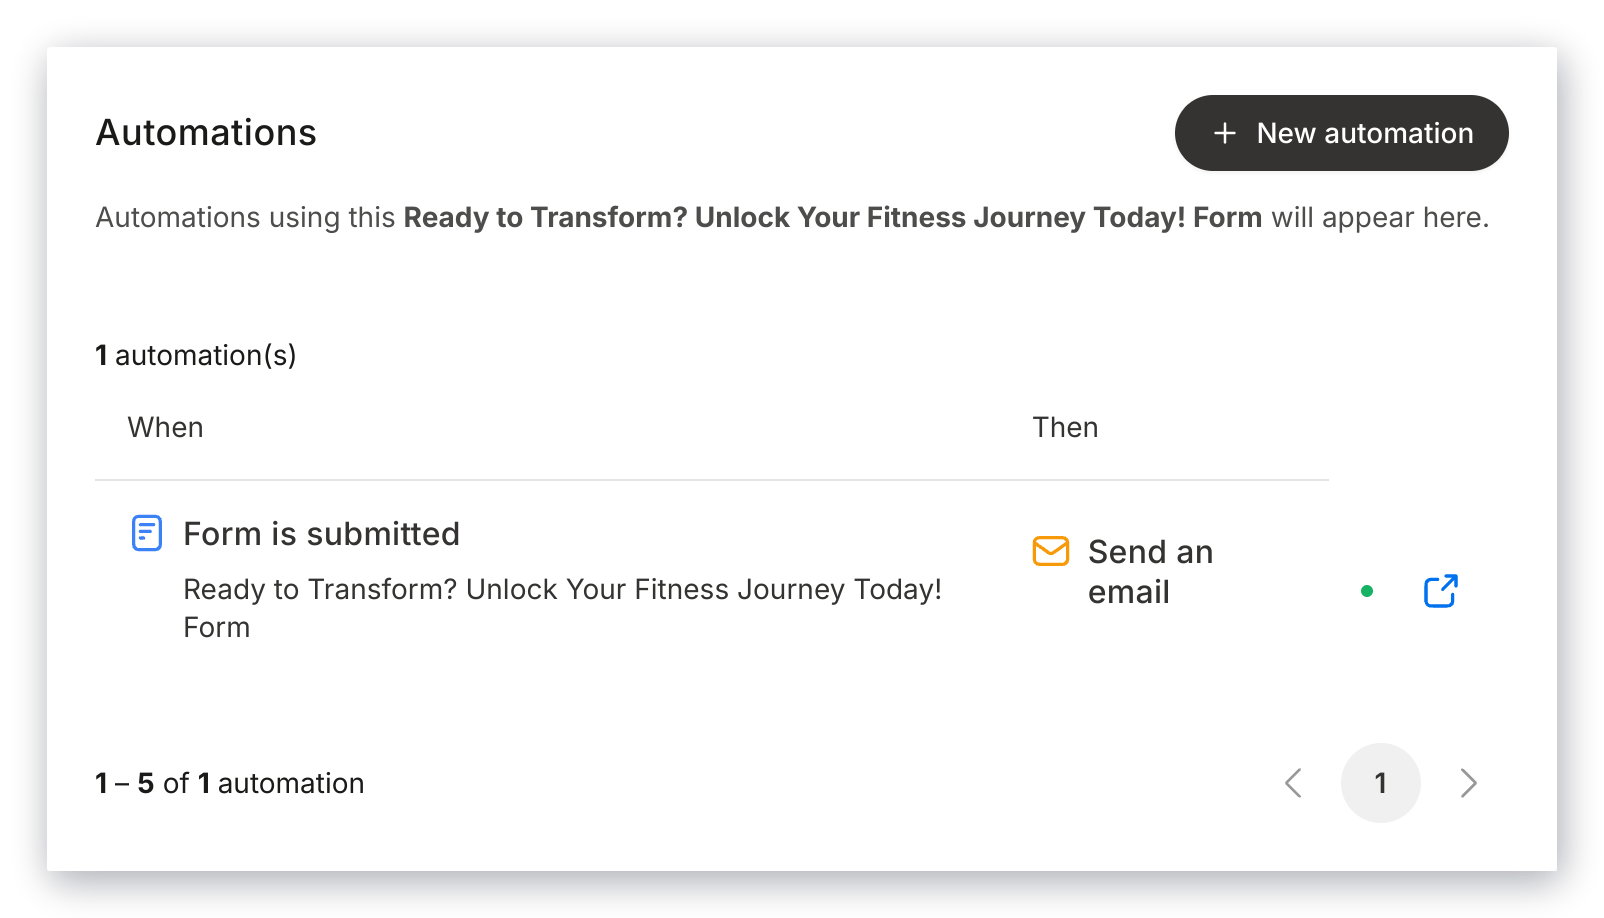 17. In the **After Submission** section, choose what happens once the Form is submitted. See [Use After Submission settings in Forms](./how-to-use-the-after-submission-settings-in-forms) for more details.
* **Send a notification to your team -** Add team email addresses
* **Send the contact to a third party email provider -** Connect an integration
* **Send the contact to a custom thank you page** - Choose a previously created page
18. Click **Save** to apply your changes.
## Duplicate a Form
1. From the Dashboard, open the **Marketing** tab.
2. Click **Forms**.
3. Next to the **Title** of a Form, click the **more options icon** (…).
4. Select **Duplicate**.
5. Choose whether to **include automations**, and click **Duplicate**.
6. The duplicate form will appear at the top of the **Forms** list. Click the **more options icon (...)**, and select Edit to modify the new Form.
## Delete a Form
1. From the **Forms** page, click the **Title** of the Form you wish to delete.
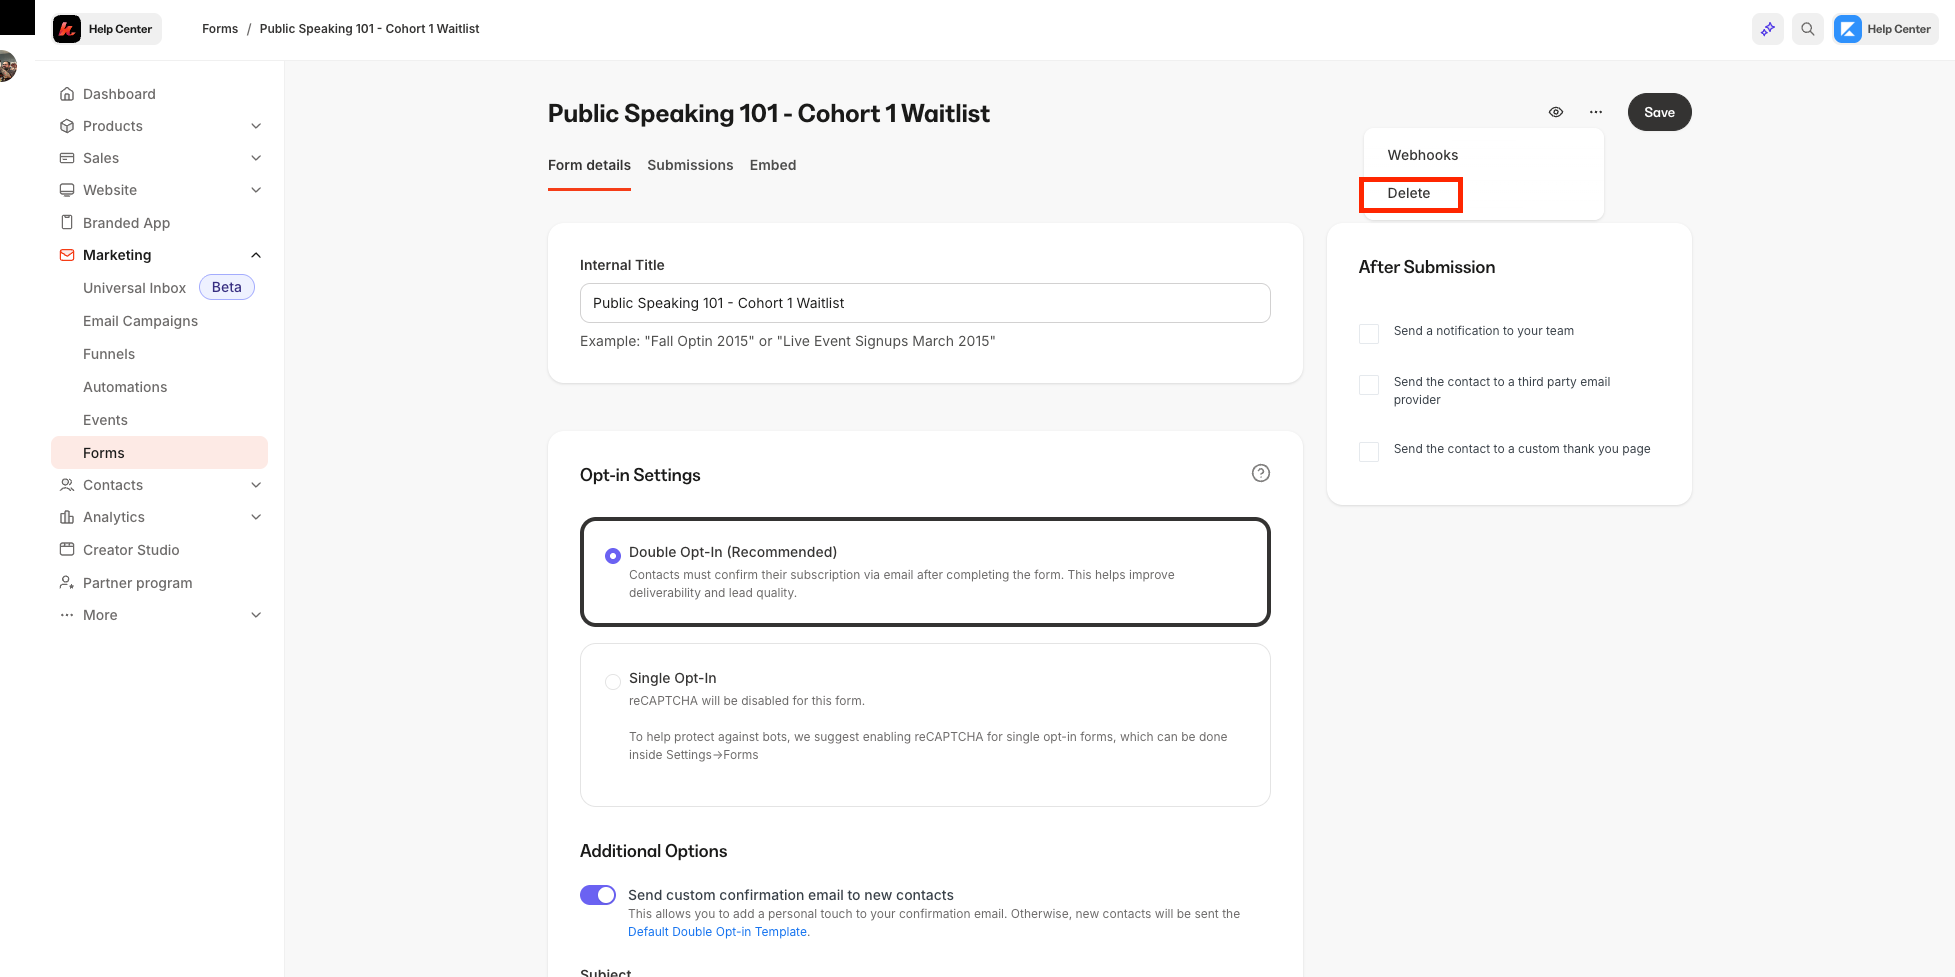
2. Click the **more options icon (…)** and select **Delete**:
17. In the **After Submission** section, choose what happens once the Form is submitted. See [Use After Submission settings in Forms](./how-to-use-the-after-submission-settings-in-forms) for more details.
* **Send a notification to your team -** Add team email addresses
* **Send the contact to a third party email provider -** Connect an integration
* **Send the contact to a custom thank you page** - Choose a previously created page
18. Click **Save** to apply your changes.
## Duplicate a Form
1. From the Dashboard, open the **Marketing** tab.
2. Click **Forms**.
3. Next to the **Title** of a Form, click the **more options icon** (…).
4. Select **Duplicate**.
5. Choose whether to **include automations**, and click **Duplicate**.
6. The duplicate form will appear at the top of the **Forms** list. Click the **more options icon (...)**, and select Edit to modify the new Form.
## Delete a Form
1. From the **Forms** page, click the **Title** of the Form you wish to delete.
2. Click the **more options icon (…)** and select **Delete**:
 ## Design Forms for Pages and external sites
[Design a Form within a Website Page or Landing Page built with Kajabi](../../website/pages/how-to-add-a-form-to-your-page), or [design a Form for an external website](./embed-a-kajabi-form-on-an-external-webpage#embed-settings).
Learn how to [customize and design text, colors, and messaging](../../website/pages/how-to-add-a-form-to-your-page#h_945e7c2f-3dac-40cc-8518-31f996ec9df7) for any Form.
After adding a Form to a Page, [copy the page link](../../website/pages/how-to-copy-your-page-link) to share it on social platforms, in email campaigns, in Products, and more.
### Embed a Form in an external webpage
1. From the Dashboard, open the **Marketing** tab.
2. Select **Forms**.
3. Select the **Form** you would like to embed.
4. Open the **Embed tab**.
5. Then, click the copy icon next to **Embed your form with one line of javascript:**
## Design Forms for Pages and external sites
[Design a Form within a Website Page or Landing Page built with Kajabi](../../website/pages/how-to-add-a-form-to-your-page), or [design a Form for an external website](./embed-a-kajabi-form-on-an-external-webpage#embed-settings).
Learn how to [customize and design text, colors, and messaging](../../website/pages/how-to-add-a-form-to-your-page#h_945e7c2f-3dac-40cc-8518-31f996ec9df7) for any Form.
After adding a Form to a Page, [copy the page link](../../website/pages/how-to-copy-your-page-link) to share it on social platforms, in email campaigns, in Products, and more.
### Embed a Form in an external webpage
1. From the Dashboard, open the **Marketing** tab.
2. Select **Forms**.
3. Select the **Form** you would like to embed.
4. Open the **Embed tab**.
5. Then, click the copy icon next to **Embed your form with one line of javascript:** 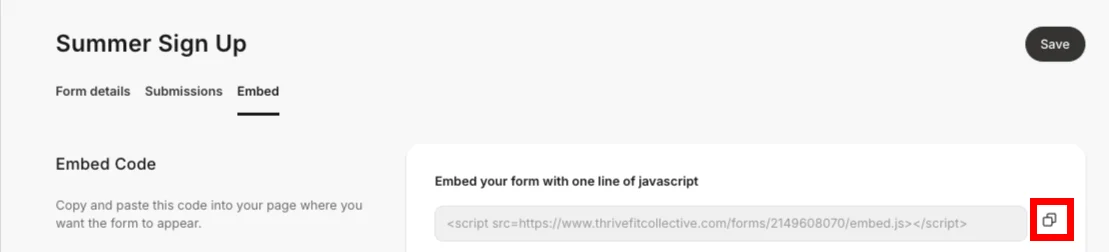 6. Paste the embed code into the source code of the external web page.
### Embed Settings and Style
You can further customize the design and copy of an embedded Form.
1. From the **Forms** page, open the **Embed** tab.
2. Under **Settings**, edit the Form **Title**, **Subtitle**, and **Button text**.
3. Choose a **Button color**, **Background color**, and **Font color**.
4. Under **Embed Style**, determine how the embedded form will display on the webpage:
* An **Inline** embed displays within the webpage.
* A **Pop-up** displays the form in a separate pop-up window.
5. Click **Save** to apply your changes before copying the Embed Code.
6. Paste the embed code into the source code of the external web page.
### Embed Settings and Style
You can further customize the design and copy of an embedded Form.
1. From the **Forms** page, open the **Embed** tab.
2. Under **Settings**, edit the Form **Title**, **Subtitle**, and **Button text**.
3. Choose a **Button color**, **Background color**, and **Font color**.
4. Under **Embed Style**, determine how the embedded form will display on the webpage:
* An **Inline** embed displays within the webpage.
* A **Pop-up** displays the form in a separate pop-up window.
5. Click **Save** to apply your changes before copying the Embed Code.