> ## Documentation Index
> Fetch the complete documentation index at: https://help.kajabi.com/llms.txt
> Use this file to discover all available pages before exploring further.
# Android app transfer process
> Set up and gather the information necessary for an Android App transfer.
The **Android app transfer** process requires adding Kajabi as an admin and gathering specific account information. Follow the steps below to prepare for and complete the transfer.
## Add Kajabi as a Google Play Account Admin
Complete the steps discussed in our guide to add Kajabi as an Admin on the Google Play Console.
[Learn to add Kajabi as an Admin](/articles/mobile-apps/branded-app/how-to-add-kajabi-as-an-admin-to-your-google-play-console-and-project-owner-on-google-cloud-console).
## Locate the Developers Account ID
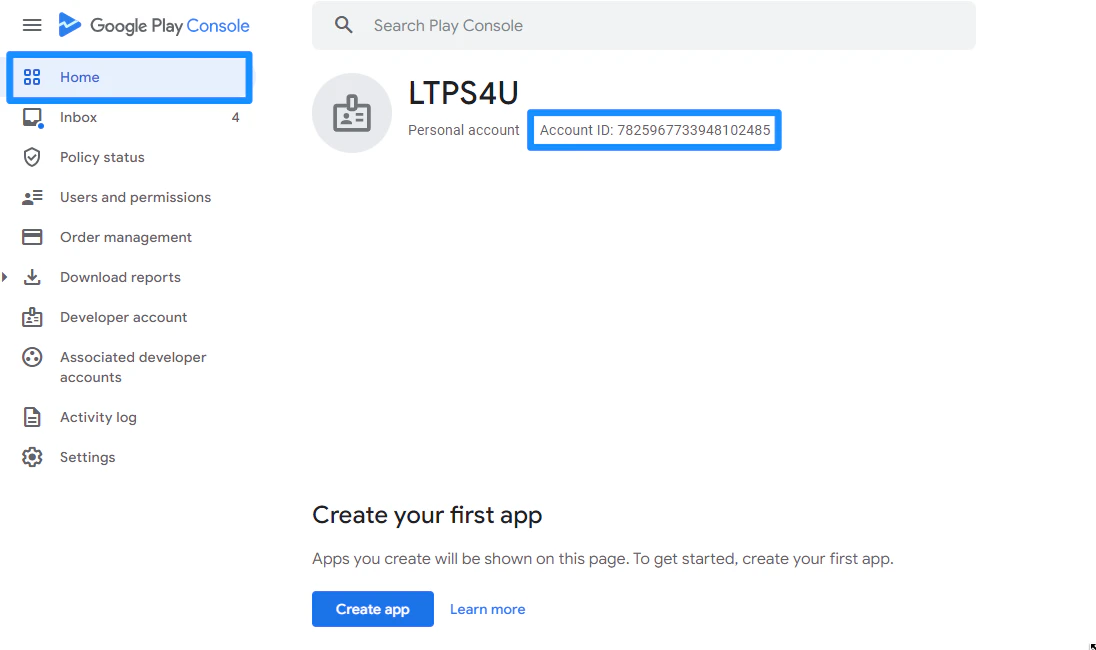
After adding Kajabi as a Google Play Account Admin, you will need to locate the Developers Account ID.
1. Navigate to the [Google Play Console homepage](https://play.google.com/console)
2. Located at the top of the Google Play Console homepage will be the Personal Account ID, this is the Developers Account ID:
 ## Locate the Payment Transaction ID
After you have located the Developers Account ID, you will also need to provide the Payment Transaction ID.
You will need the Registration Transaction ID for the account and the target account.
1. To find the Transaction ID, search the target account owner's email inbox for **developer registration fee**
However, if you cannot locate the Transaction ID email receipt, you can sign into Google Payments.
2. With the target account owner's email address, [sign in to Google Payments](https://payments.google.com/payments/home)
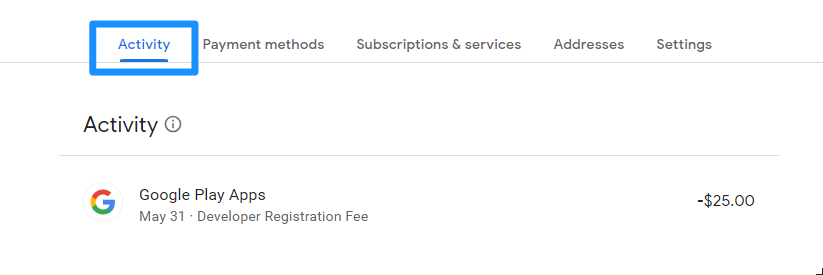
3. Select **Activity** from the menu:
## Locate the Payment Transaction ID
After you have located the Developers Account ID, you will also need to provide the Payment Transaction ID.
You will need the Registration Transaction ID for the account and the target account.
1. To find the Transaction ID, search the target account owner's email inbox for **developer registration fee**
However, if you cannot locate the Transaction ID email receipt, you can sign into Google Payments.
2. With the target account owner's email address, [sign in to Google Payments](https://payments.google.com/payments/home)
3. Select **Activity** from the menu:
 4. Locate the transaction for the developer account registration in the Activity tab
**Tip:**
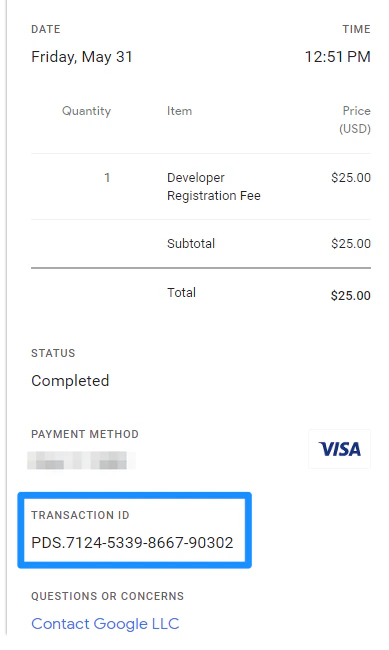
Search the transactions for "Google Play Developer." The Transaction ID will be listed near the bottom of the transaction details.
4. Locate the transaction for the developer account registration in the Activity tab
**Tip:**
Search the transactions for "Google Play Developer." The Transaction ID will be listed near the bottom of the transaction details.
 **Note:**
Copy the Transaction Number starting from "PDS." Registration Transaction IDs are typically in one of the following formats: PDS.1234-5678-9012-3456.
## Contact support
After completing the steps above, you will need to reach out to Kajabi at [bma.support@kajabi.com](mailto:bma.support@kajabi.com) to finalize the app transfer.
**Note:**
Copy the Transaction Number starting from "PDS." Registration Transaction IDs are typically in one of the following formats: PDS.1234-5678-9012-3456.
## Contact support
After completing the steps above, you will need to reach out to Kajabi at [bma.support@kajabi.com](mailto:bma.support@kajabi.com) to finalize the app transfer.