> ## Documentation Index
> Fetch the complete documentation index at: https://help.kajabi.com/llms.txt
> Use this file to discover all available pages before exploring further.
# Add Kajabi as an admin to Google Play Console and Google Cloud Console
> Grant Kajabi admin access to Google Play Console and project owner access on Google Cloud Console for a Branded Mobile App build.
For Kajabi to build an Android Branded App, you need to grant **admin access** to both Google Play Console and Google Cloud Console. The steps below cover inviting Kajabi to both consoles, creating a cloud project, and enabling the required APIs.
**Note:**
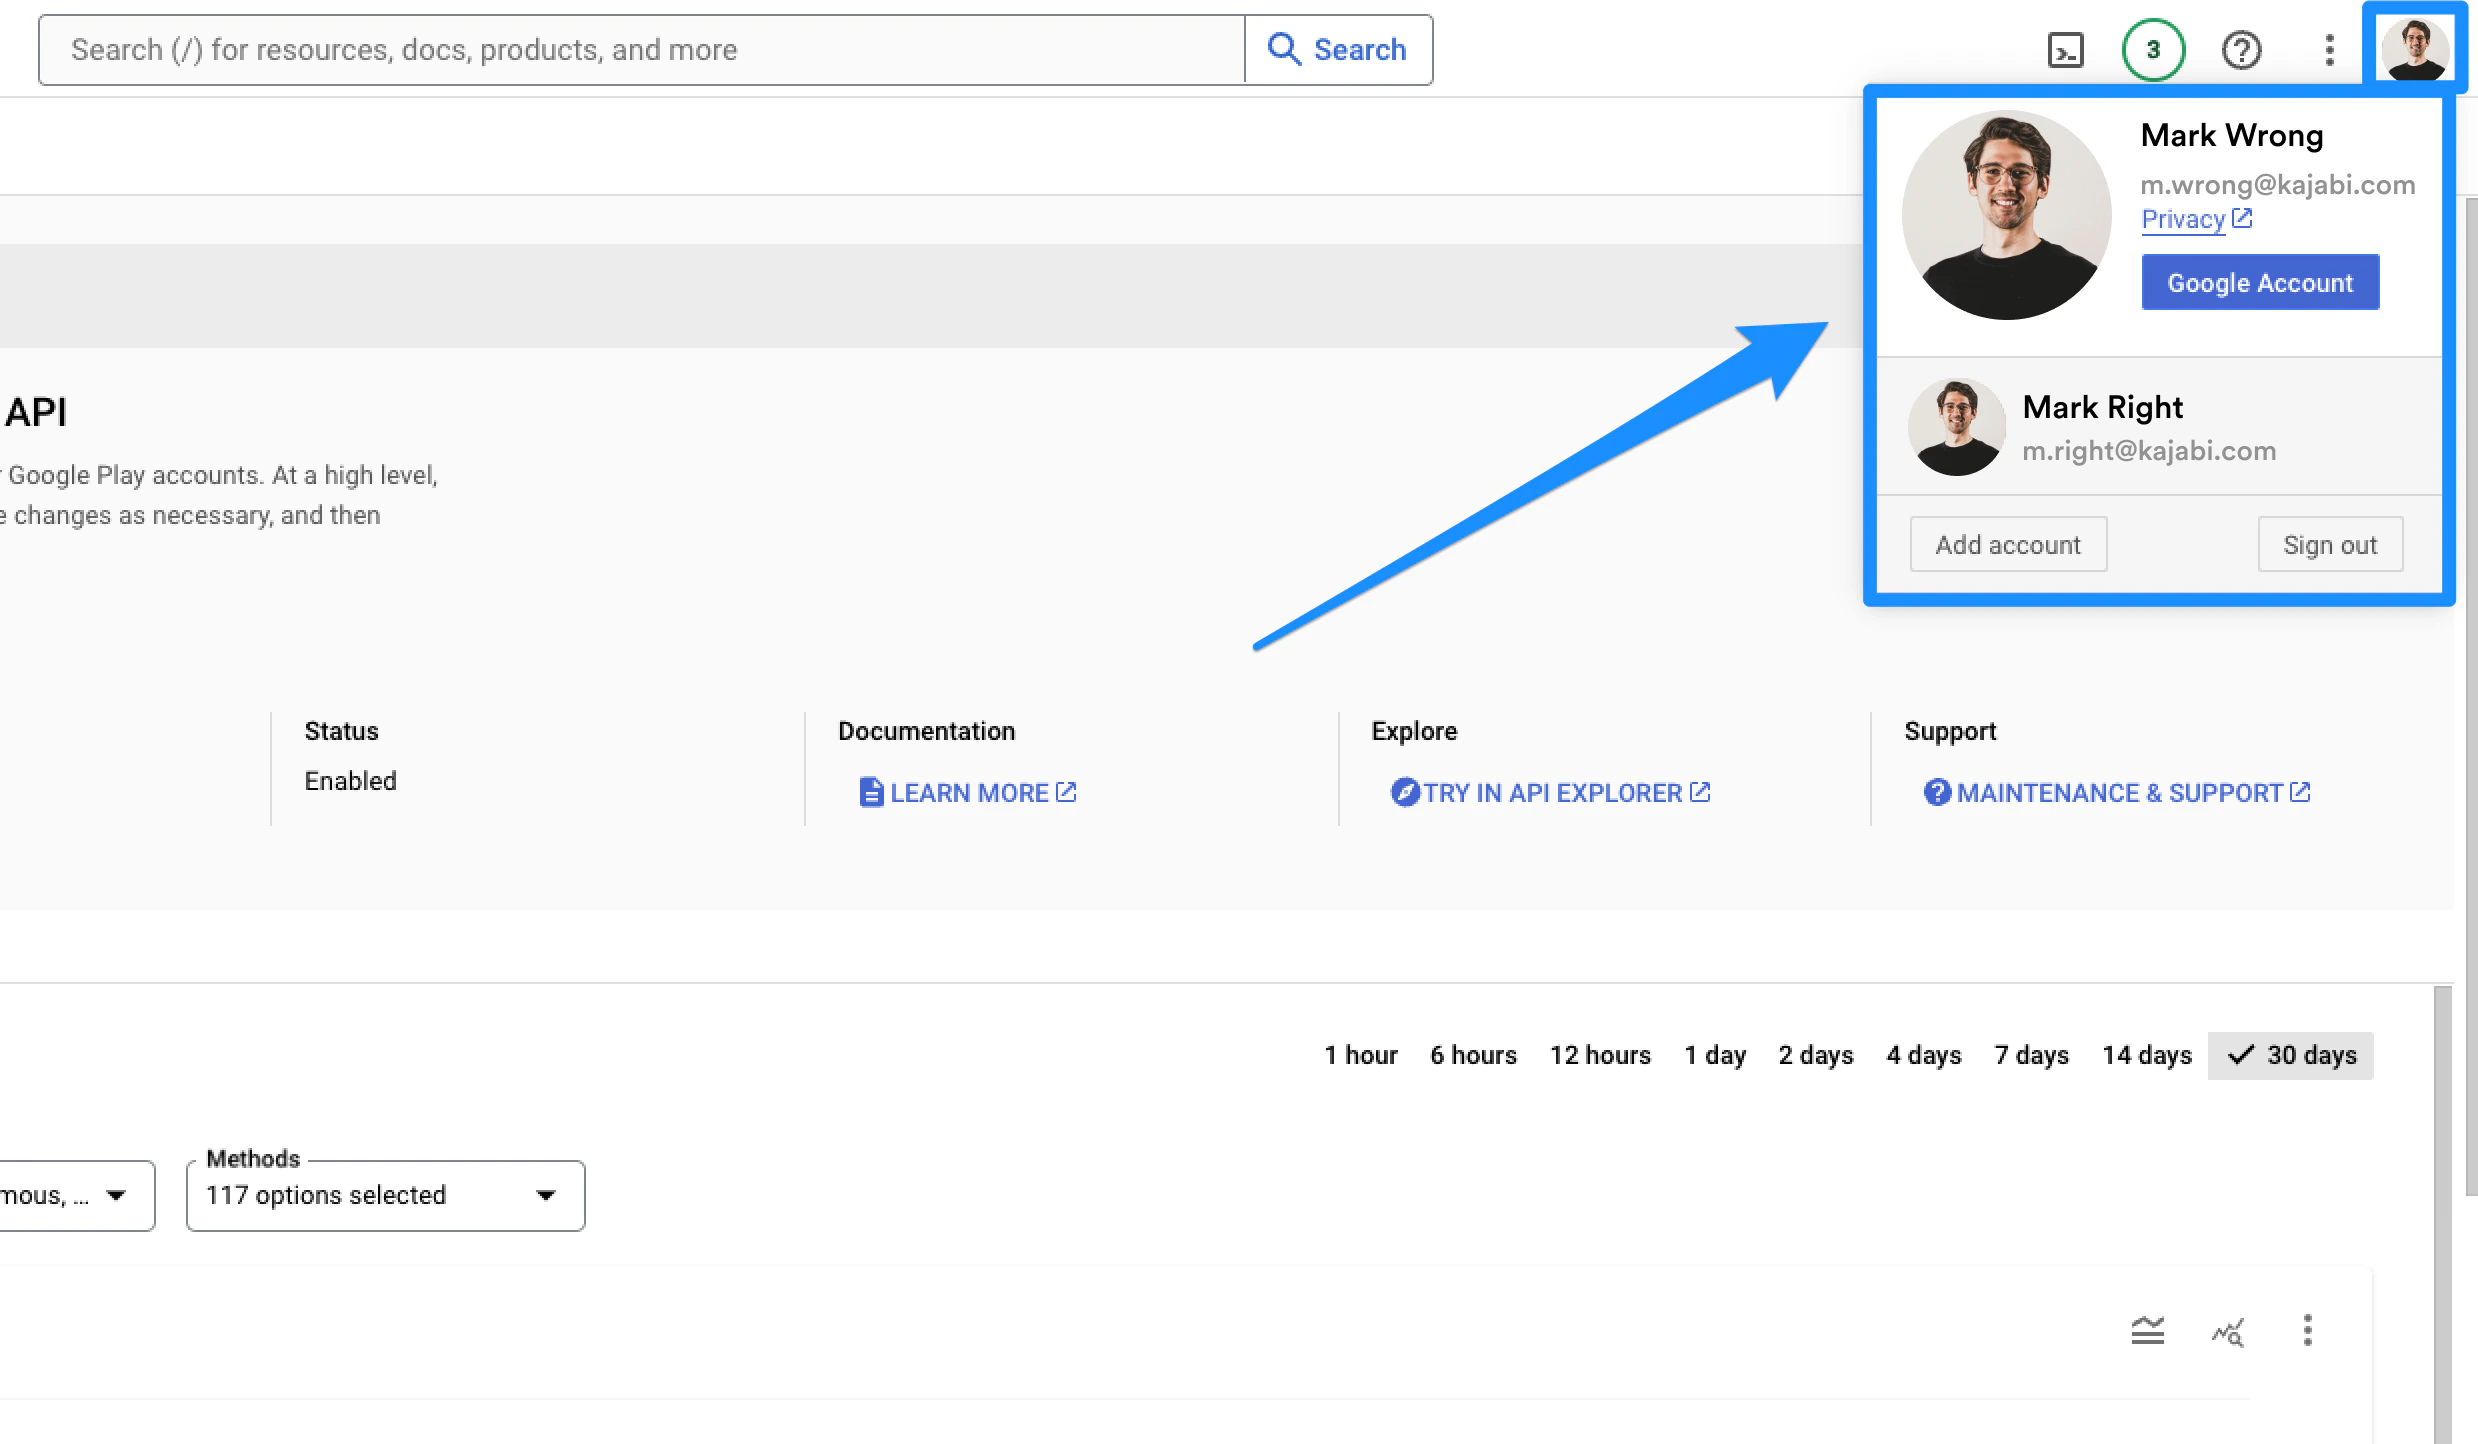
If you are logged into Google with more than one Gmail account where one of them is not the account owner email listed on the developer account, you may experience errors. We recommend logging in through an incognito or private window to ensure that you are logged into a single email.
## Add Kajabi as a Google Play account admin
Grant the Kajabi team admin access to Google Play Console to allow Kajabi to access and create the Android App.
1. Log into your [Google Play Console](https://play.google.com/console) and make sure that you are not clicked into a specific app.
2. Click **Users and Permissions** in the sidebar menu.
3. Then, click **Invite New Users**:
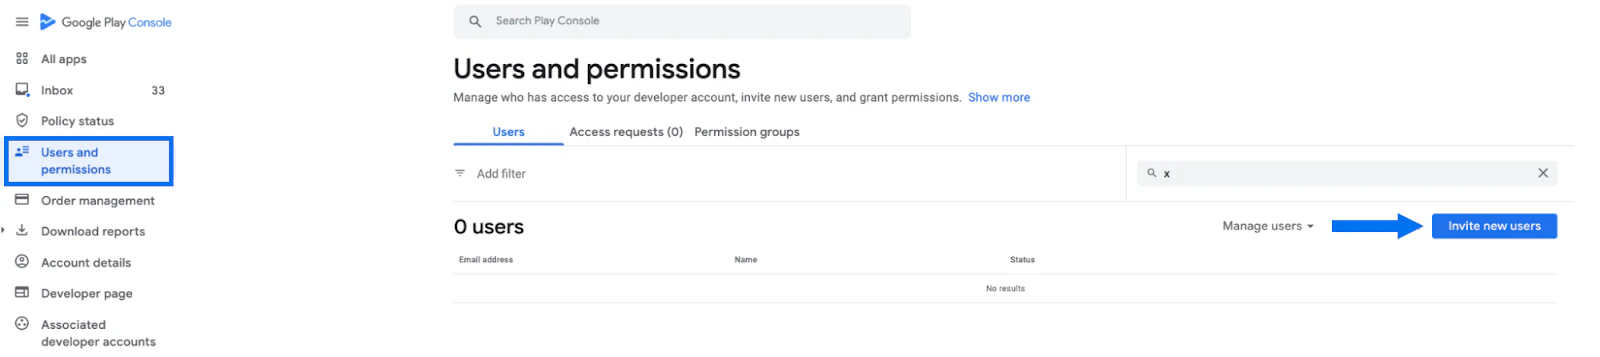 4. In the email address field, input: **[Creative.Coder@oc-corpeng.com](mailto:Creative.Coder@oc-corpeng.com)**
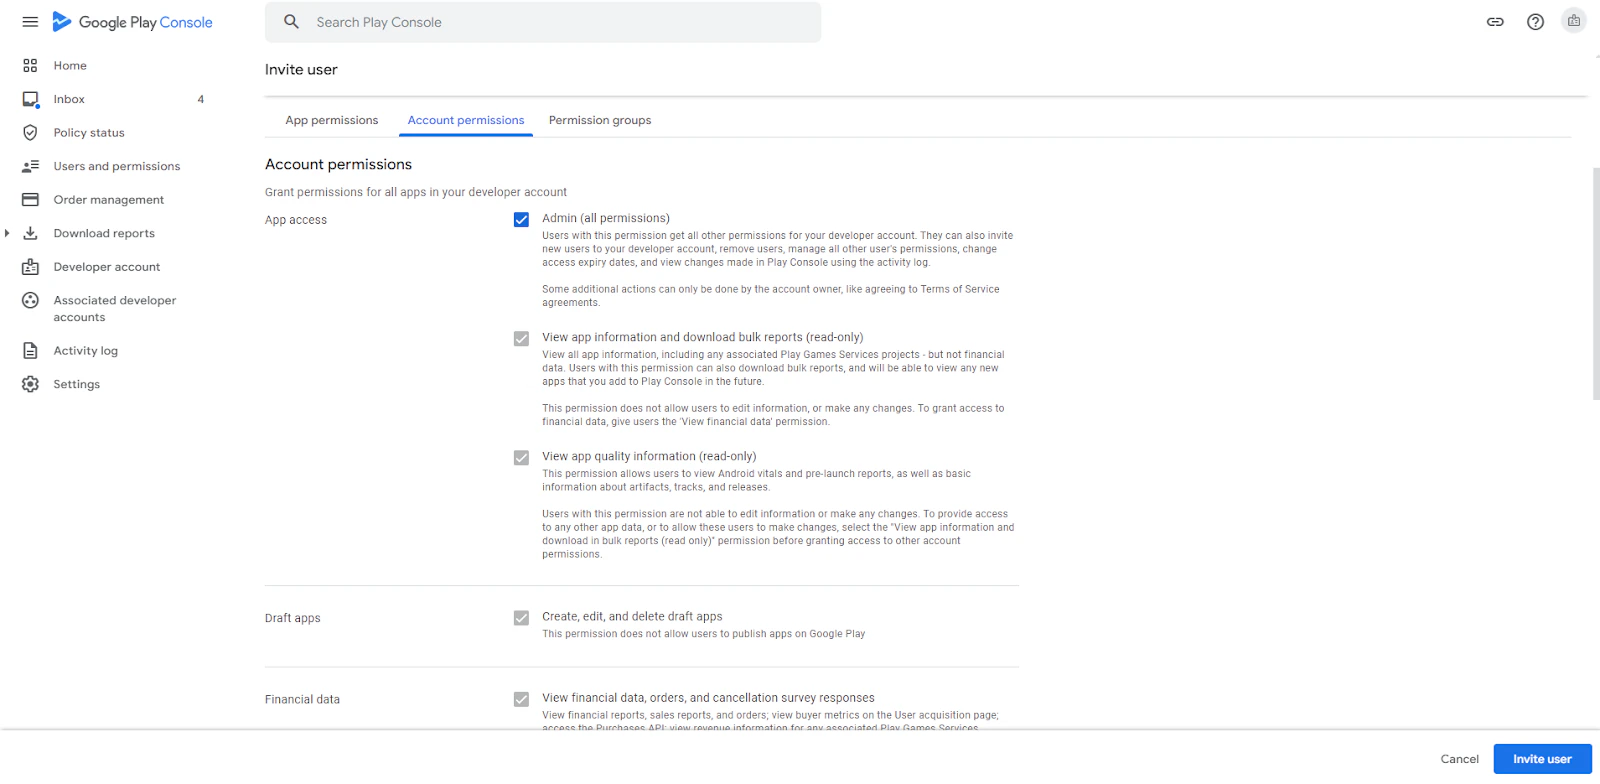
5. Then, select the **Admin** checkbox under **Account permissions**.
6. Click **Invite User**:
4. In the email address field, input: **[Creative.Coder@oc-corpeng.com](mailto:Creative.Coder@oc-corpeng.com)**
5. Then, select the **Admin** checkbox under **Account permissions**.
6. Click **Invite User**:
 ## Add Kajabi as a Google Cloud account admin
**Note:**
If you do not have a Google account currently, please follow [these instructions](https://support.google.com/accounts/answer/27441?hl=en) to create one.
Grant the Kajabi team Owner access to Google Cloud Console to allow Kajabi access and create the API key for the Android App(s).
1. Log into the [Google Cloud Console](https://cloud.google.com/console/).
2. Ensure that you are logged into the correct account as the account owner:
## Add Kajabi as a Google Cloud account admin
**Note:**
If you do not have a Google account currently, please follow [these instructions](https://support.google.com/accounts/answer/27441?hl=en) to create one.
Grant the Kajabi team Owner access to Google Cloud Console to allow Kajabi access and create the API key for the Android App(s).
1. Log into the [Google Cloud Console](https://cloud.google.com/console/).
2. Ensure that you are logged into the correct account as the account owner:
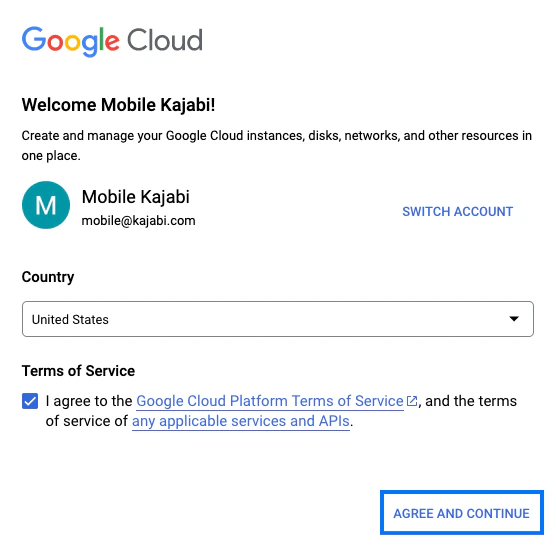
 3. Then, agree to the terms and conditions:
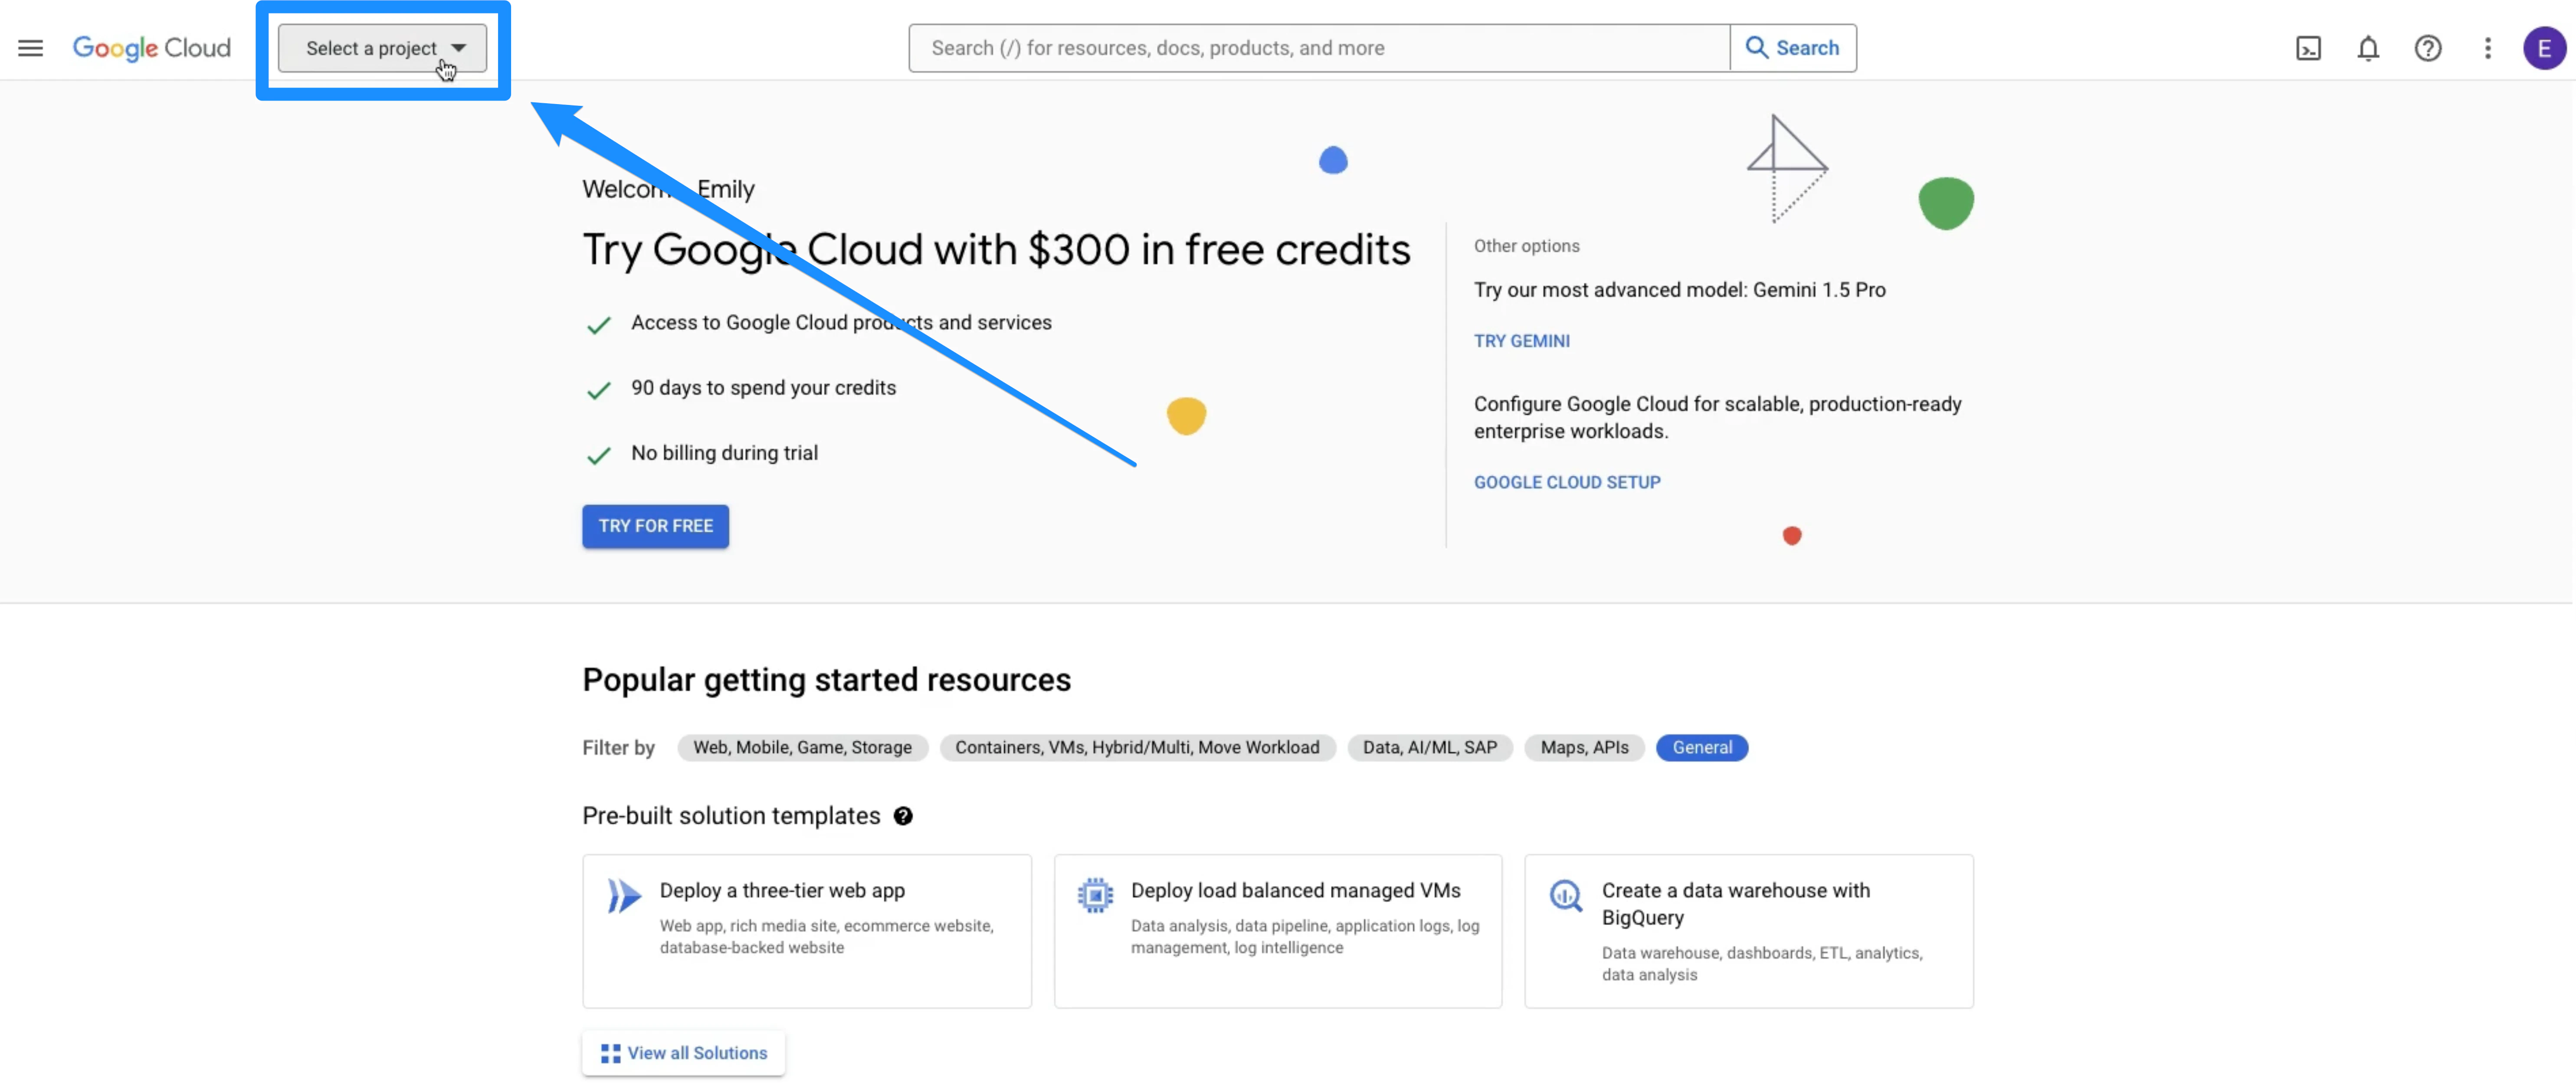
 4. In the top left corner, click the dropdown menu to **Select a Project**:
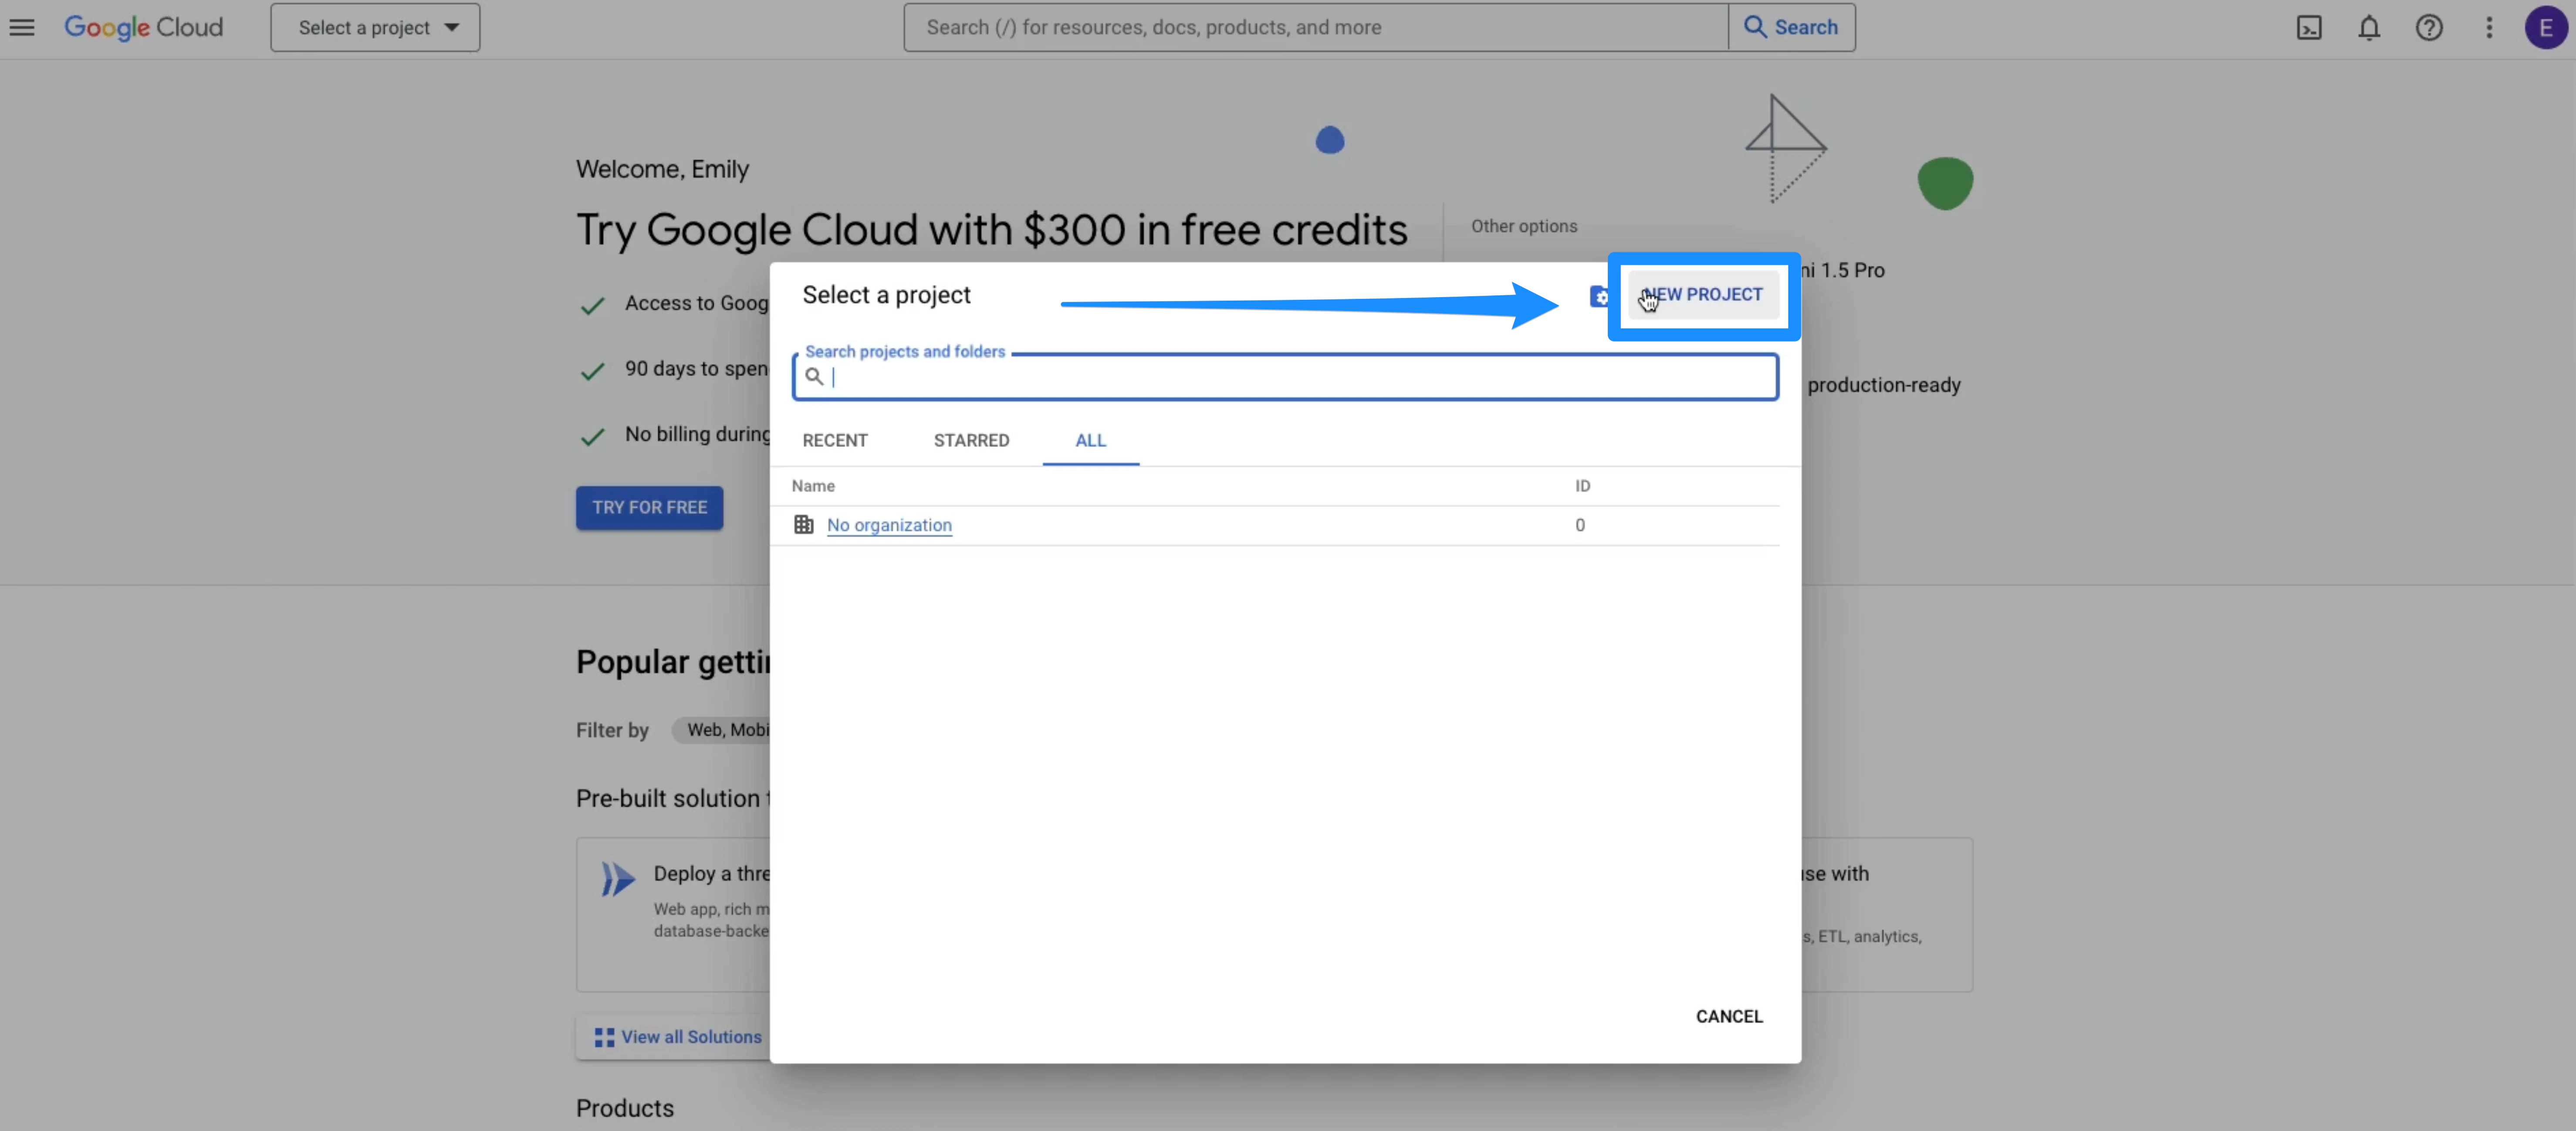
 5. When the next dialog box appears, select **New Project**:
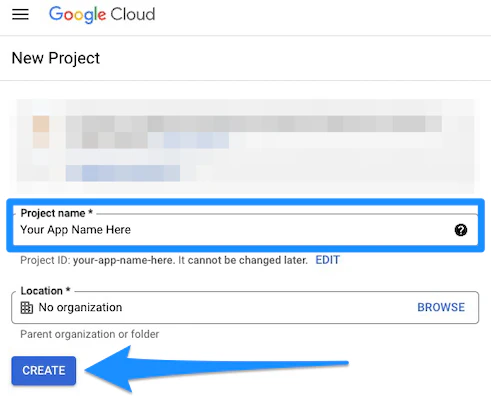
 6. Enter the Project name and click **Create**:
**Note:**
Be sure to use the App Name as the Project Name.
6. Enter the Project name and click **Create**:
**Note:**
Be sure to use the App Name as the Project Name.
 The creation process will take a moment to complete.
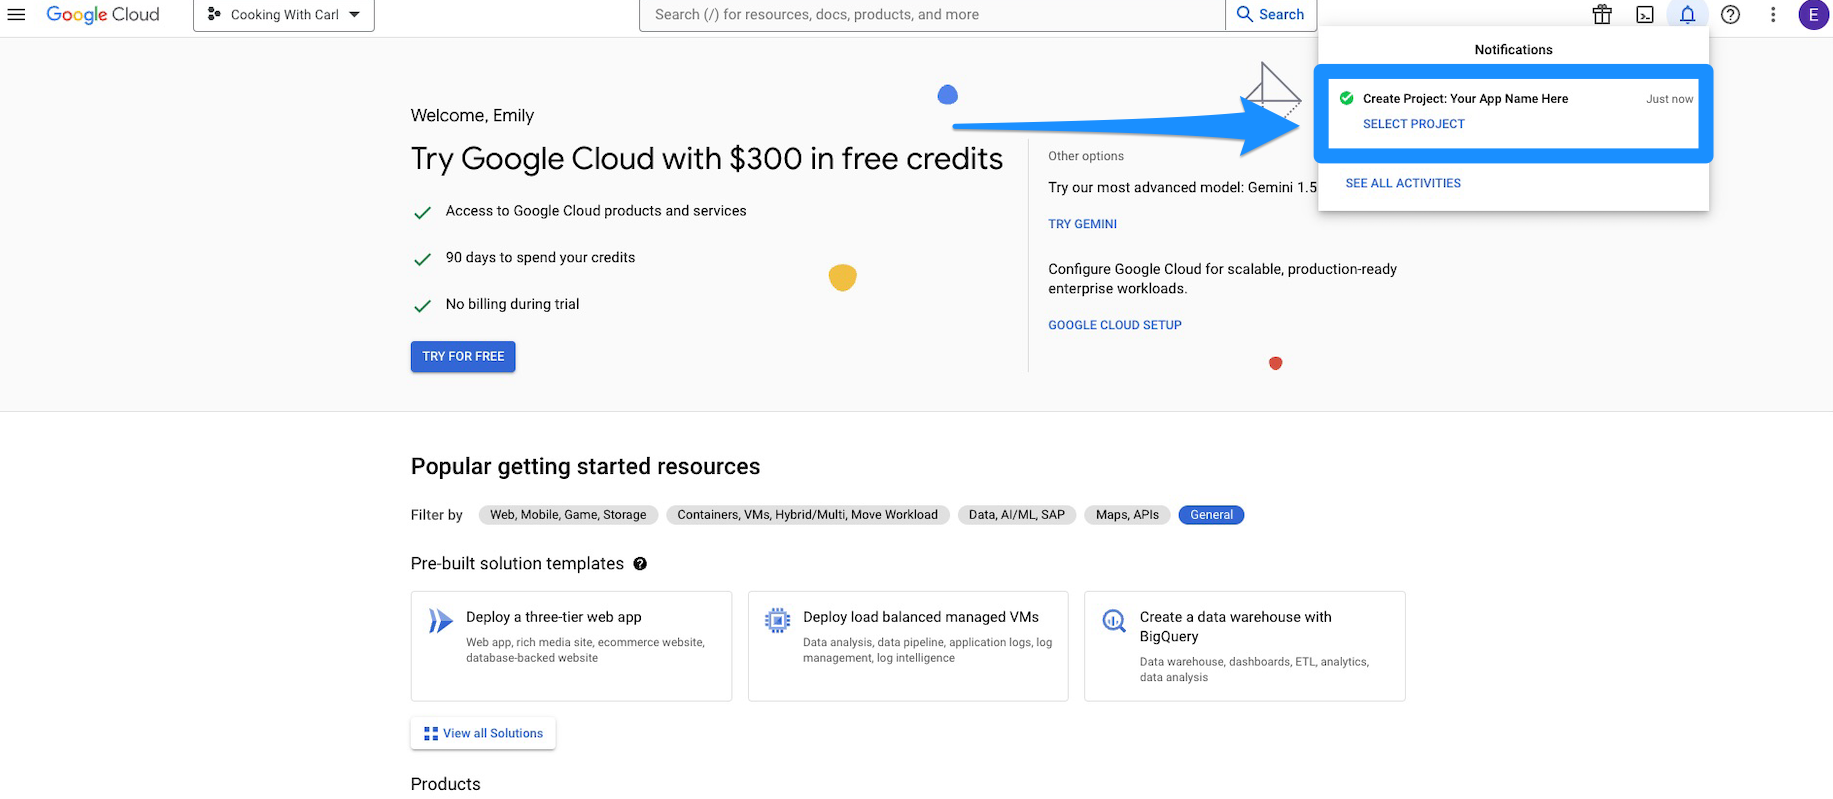
7. After the project has been created, click the **Select Project** link in the notification window located at the top-right section of the window:
The creation process will take a moment to complete.
7. After the project has been created, click the **Select Project** link in the notification window located at the top-right section of the window:
 ## Locate API credentials
**Important:**
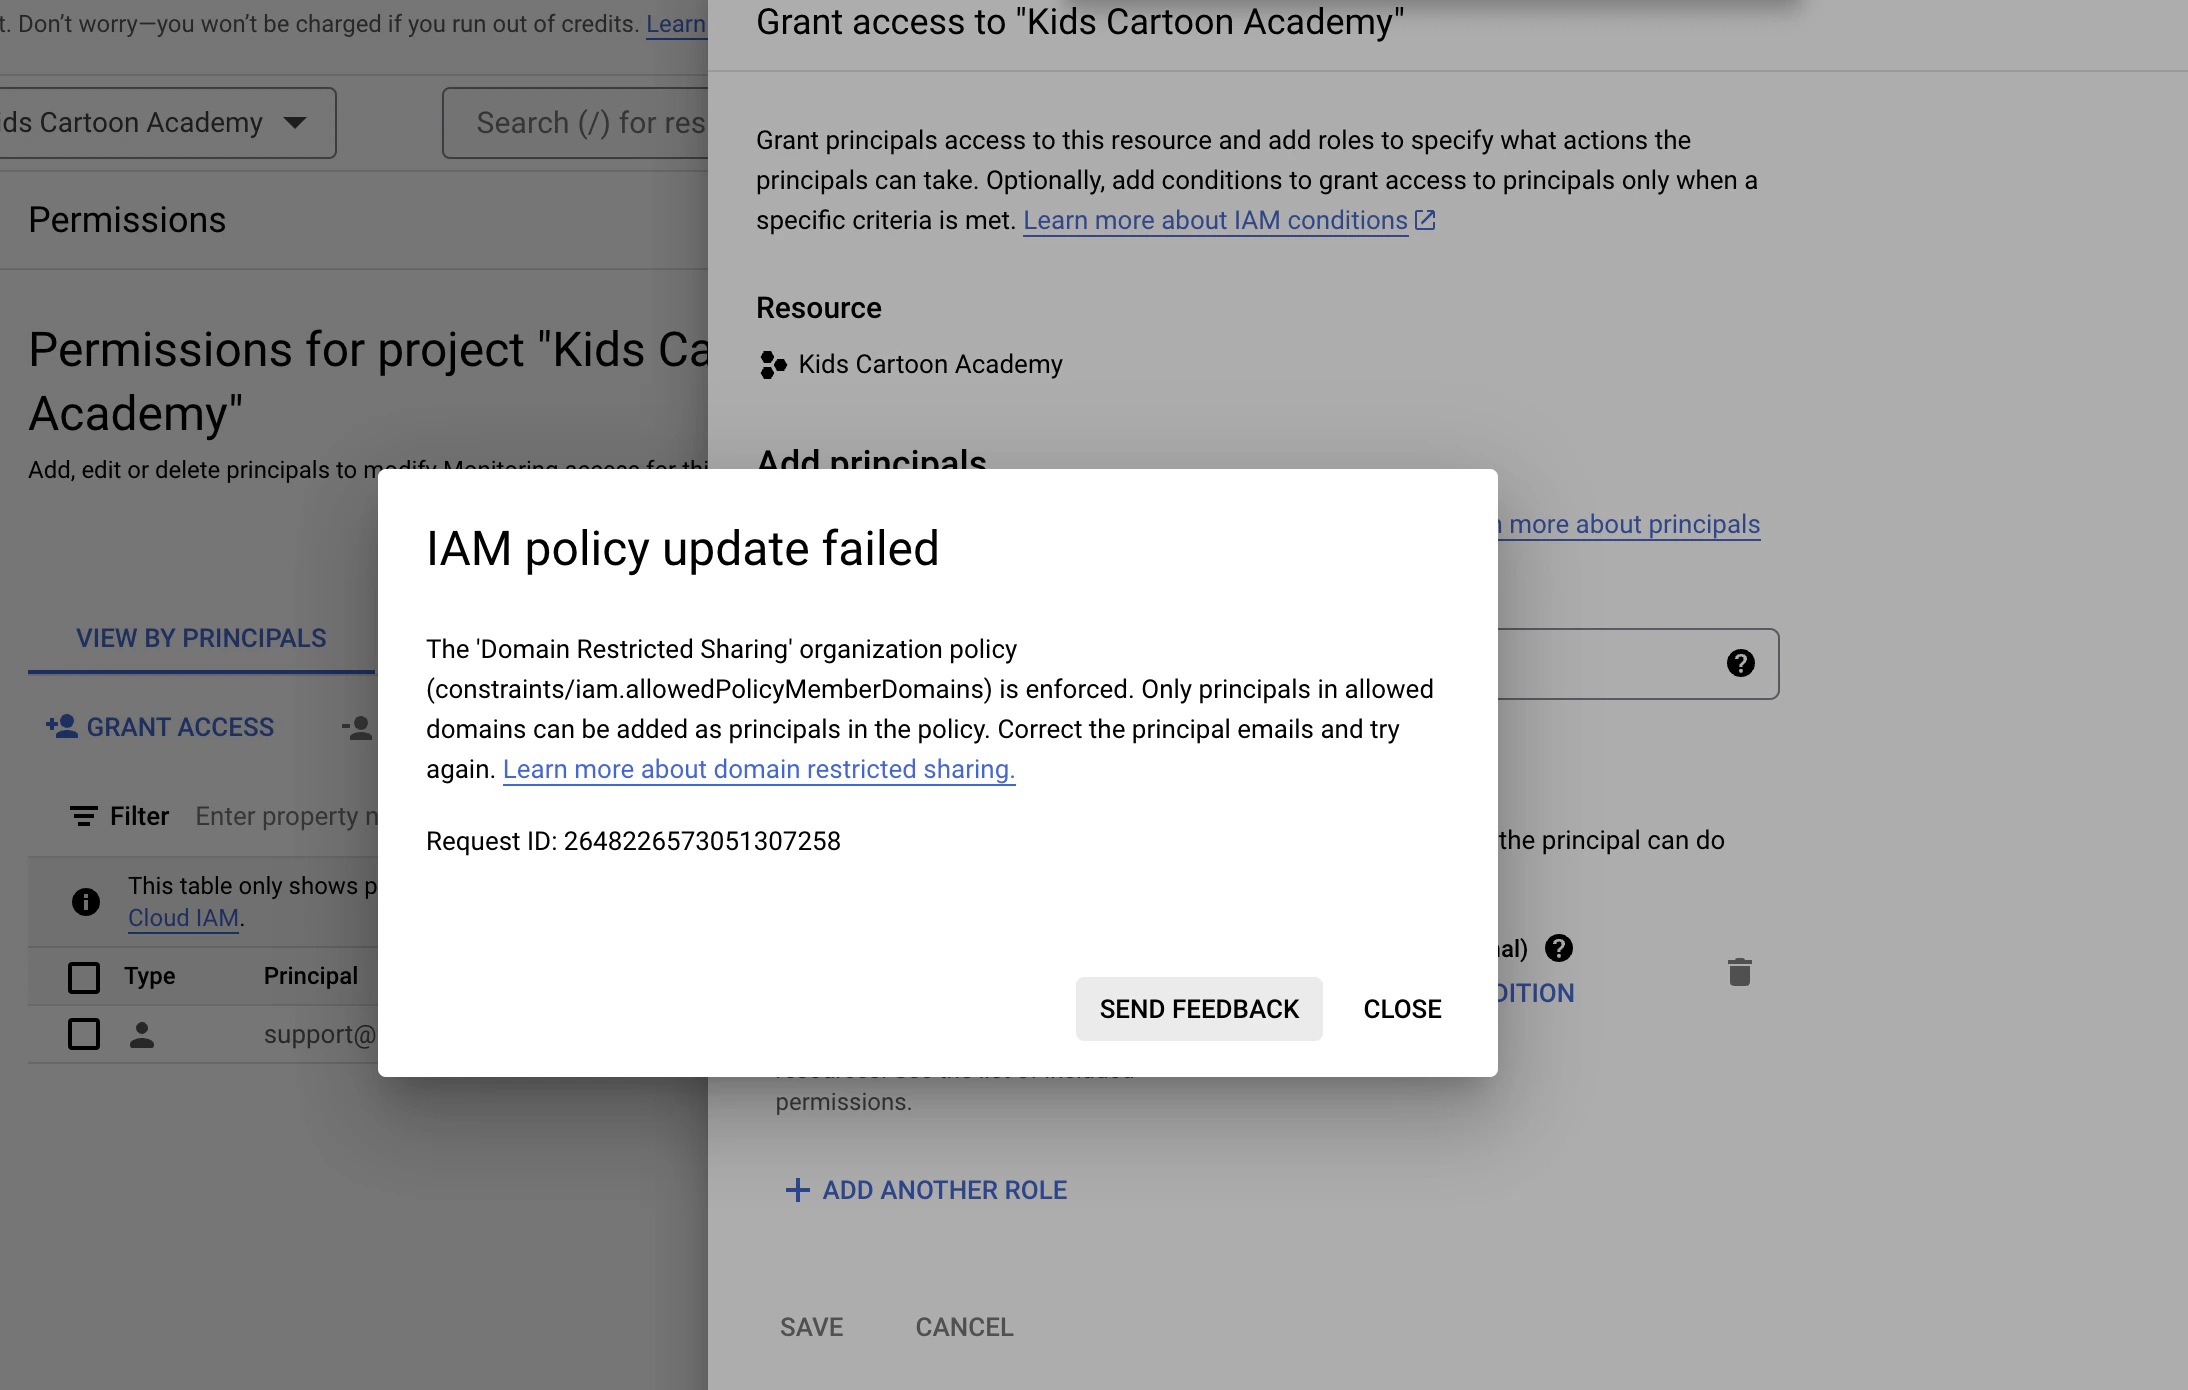
If your organization was created on or after May 3rd, 2023, you will receive the error "IAM policy update failed" when trying to invite Kajabi to Google Cloud. If you are encountering this issue, [click here to follow these additional steps first](/articles/mobile-apps/branded-app/additional-steps-to-change-google-cloud-iap-policy).
## Locate API credentials
**Important:**
If your organization was created on or after May 3rd, 2023, you will receive the error "IAM policy update failed" when trying to invite Kajabi to Google Cloud. If you are encountering this issue, [click here to follow these additional steps first](/articles/mobile-apps/branded-app/additional-steps-to-change-google-cloud-iap-policy).
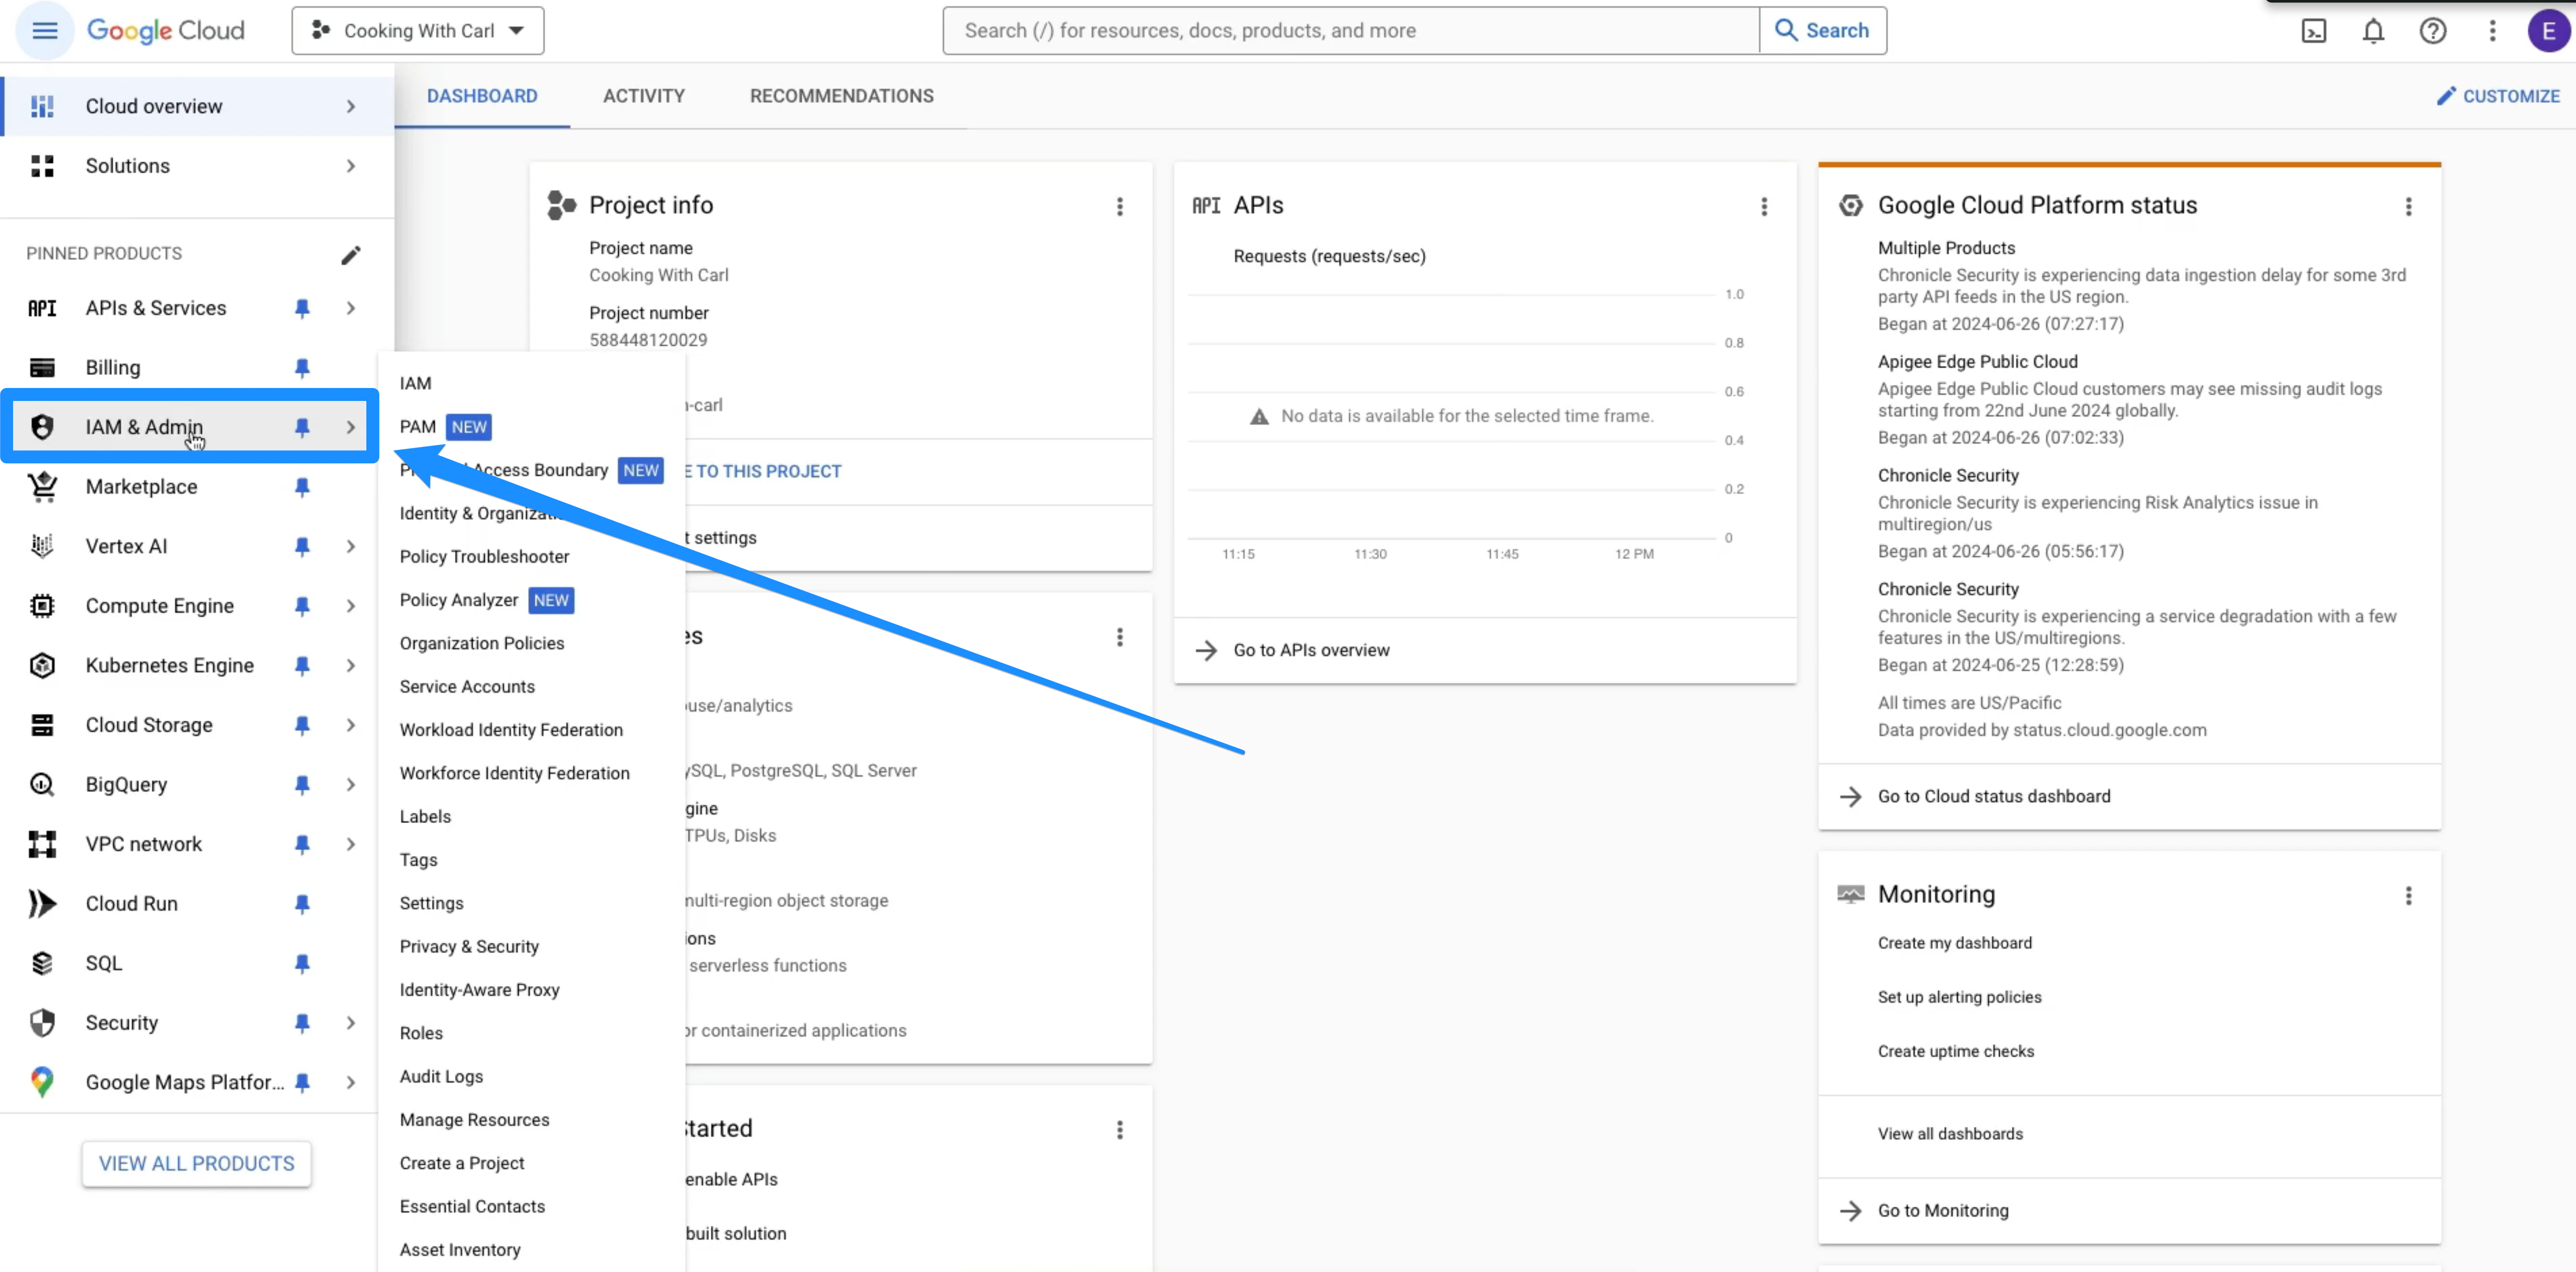
 1. On the left-side panel, click **IAM & Admin**:
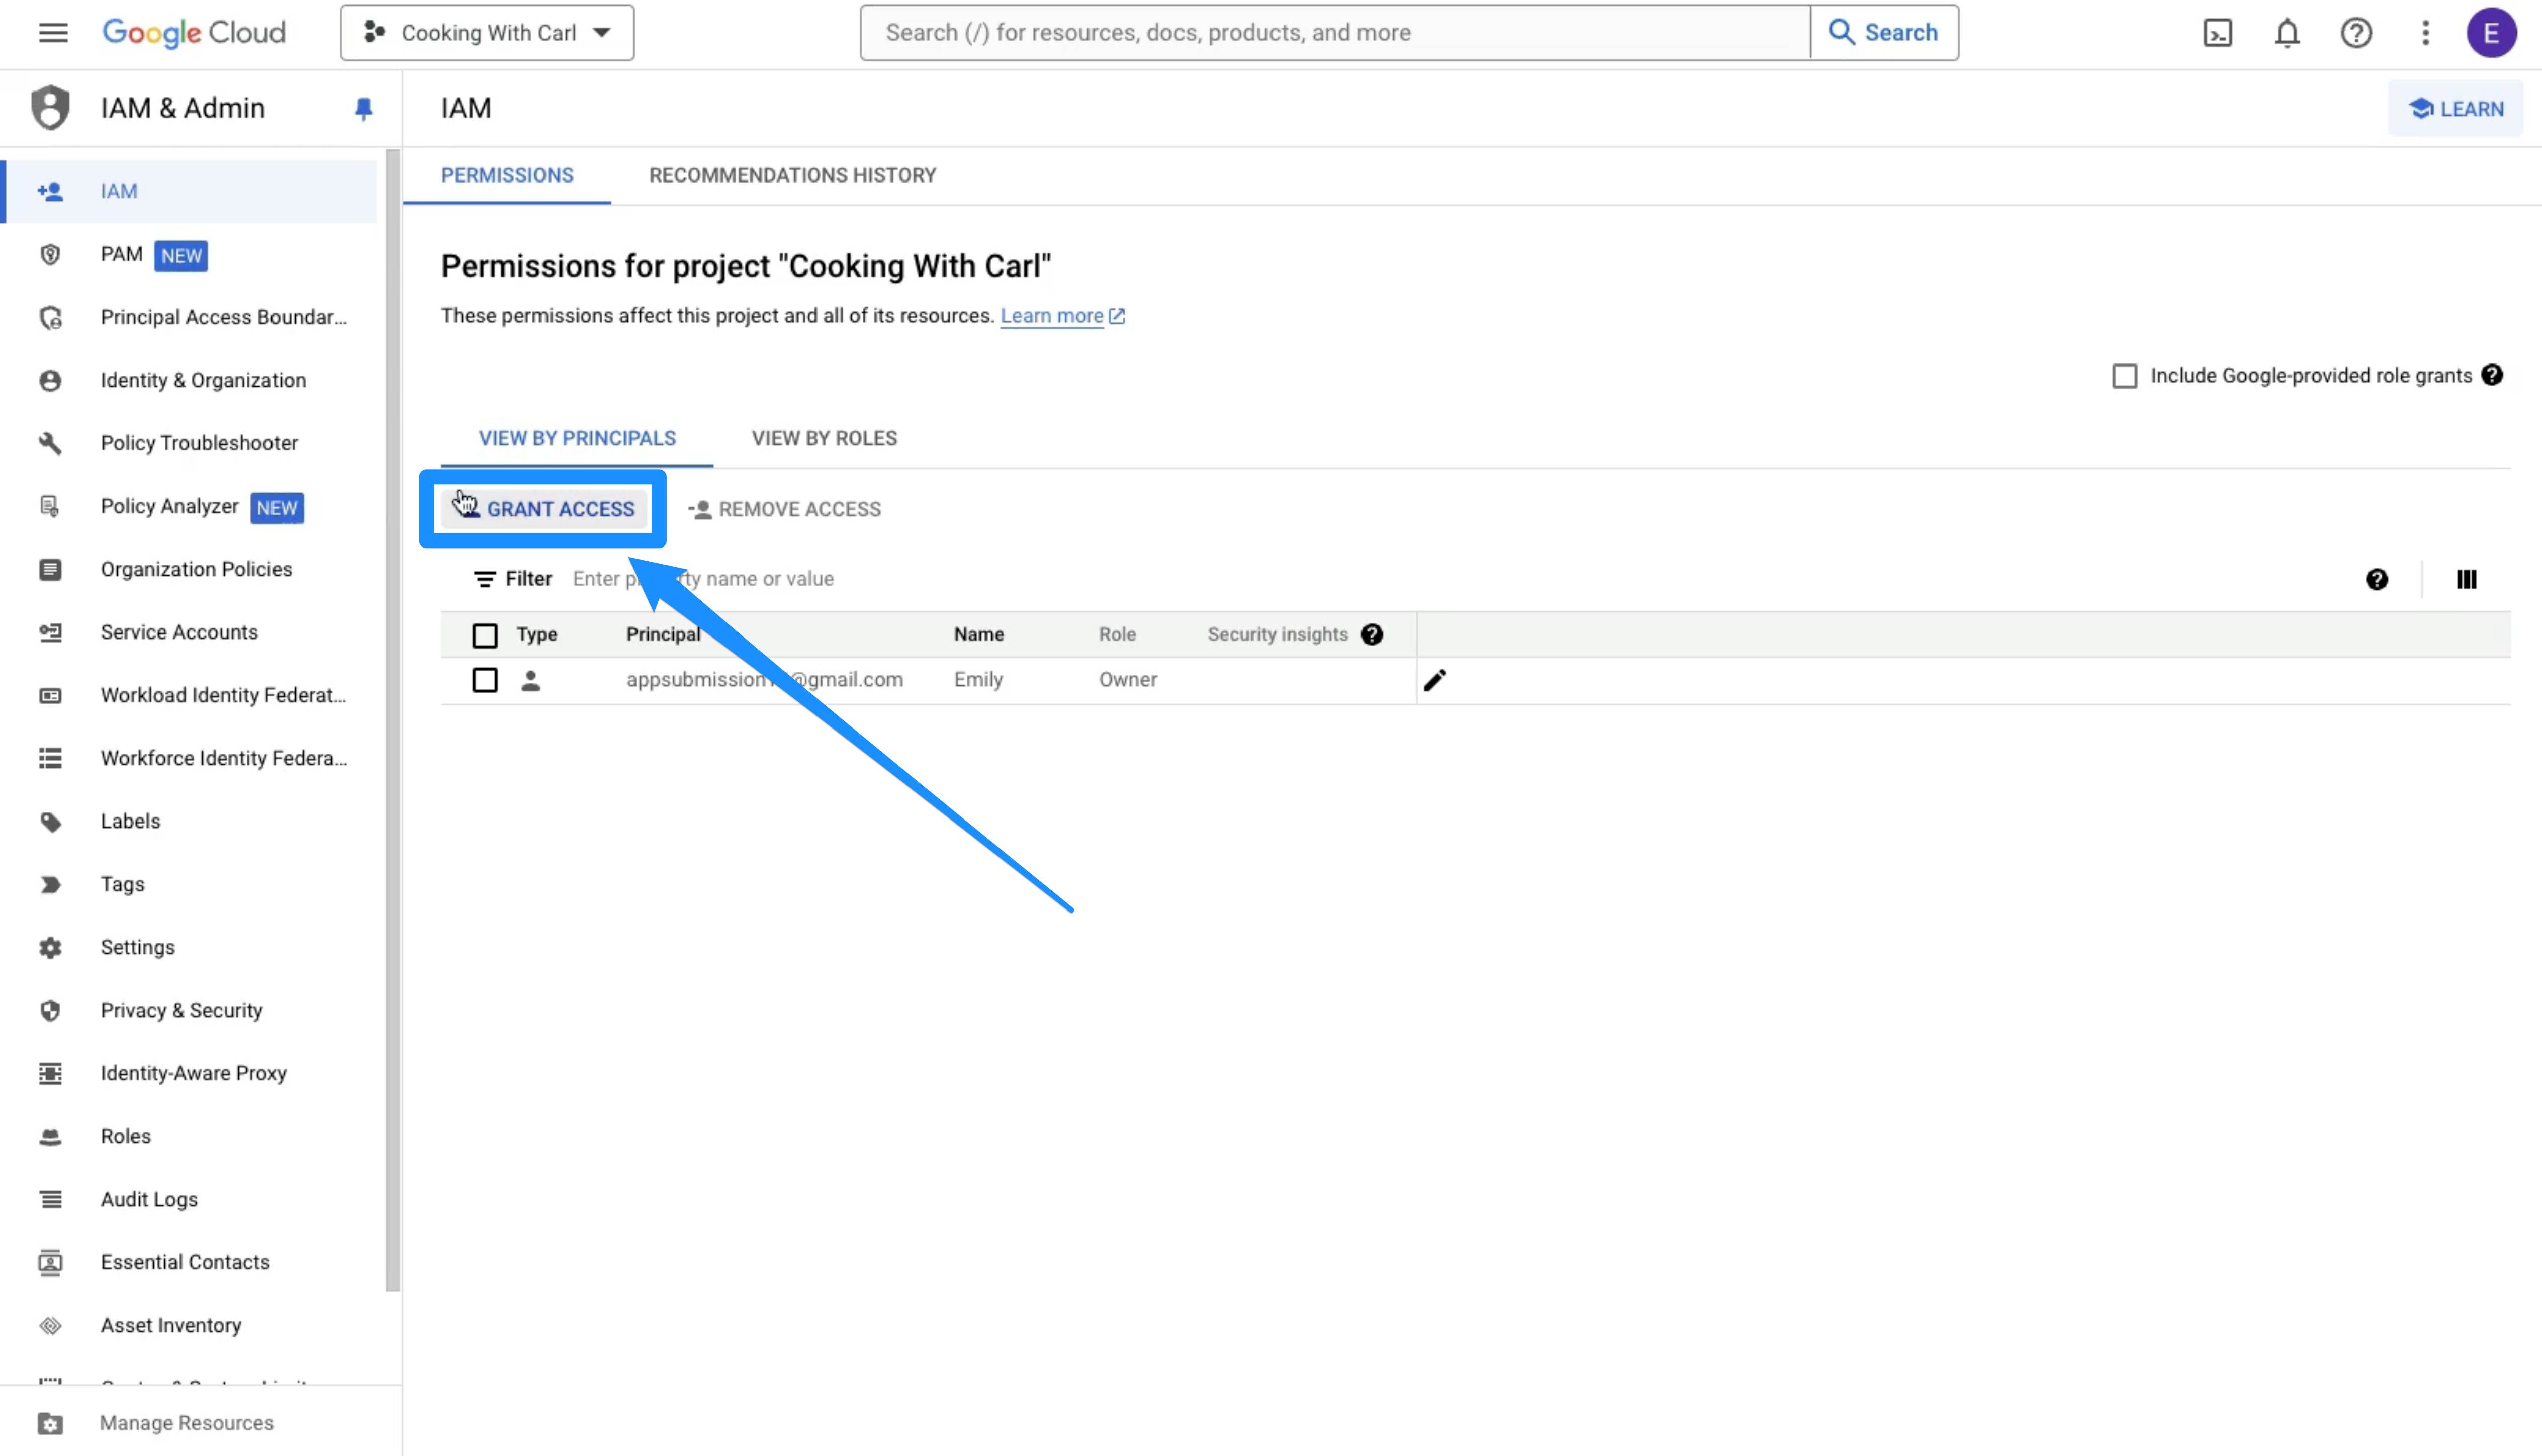
 2. Click **Grant Access**:
 3. There will be a pop-up menu on the left side panel under **New principals**. Add the following email address: [Creative.Coder@oc-corpeng.com](mailto:Creative.Coder@oc-corpeng.com)
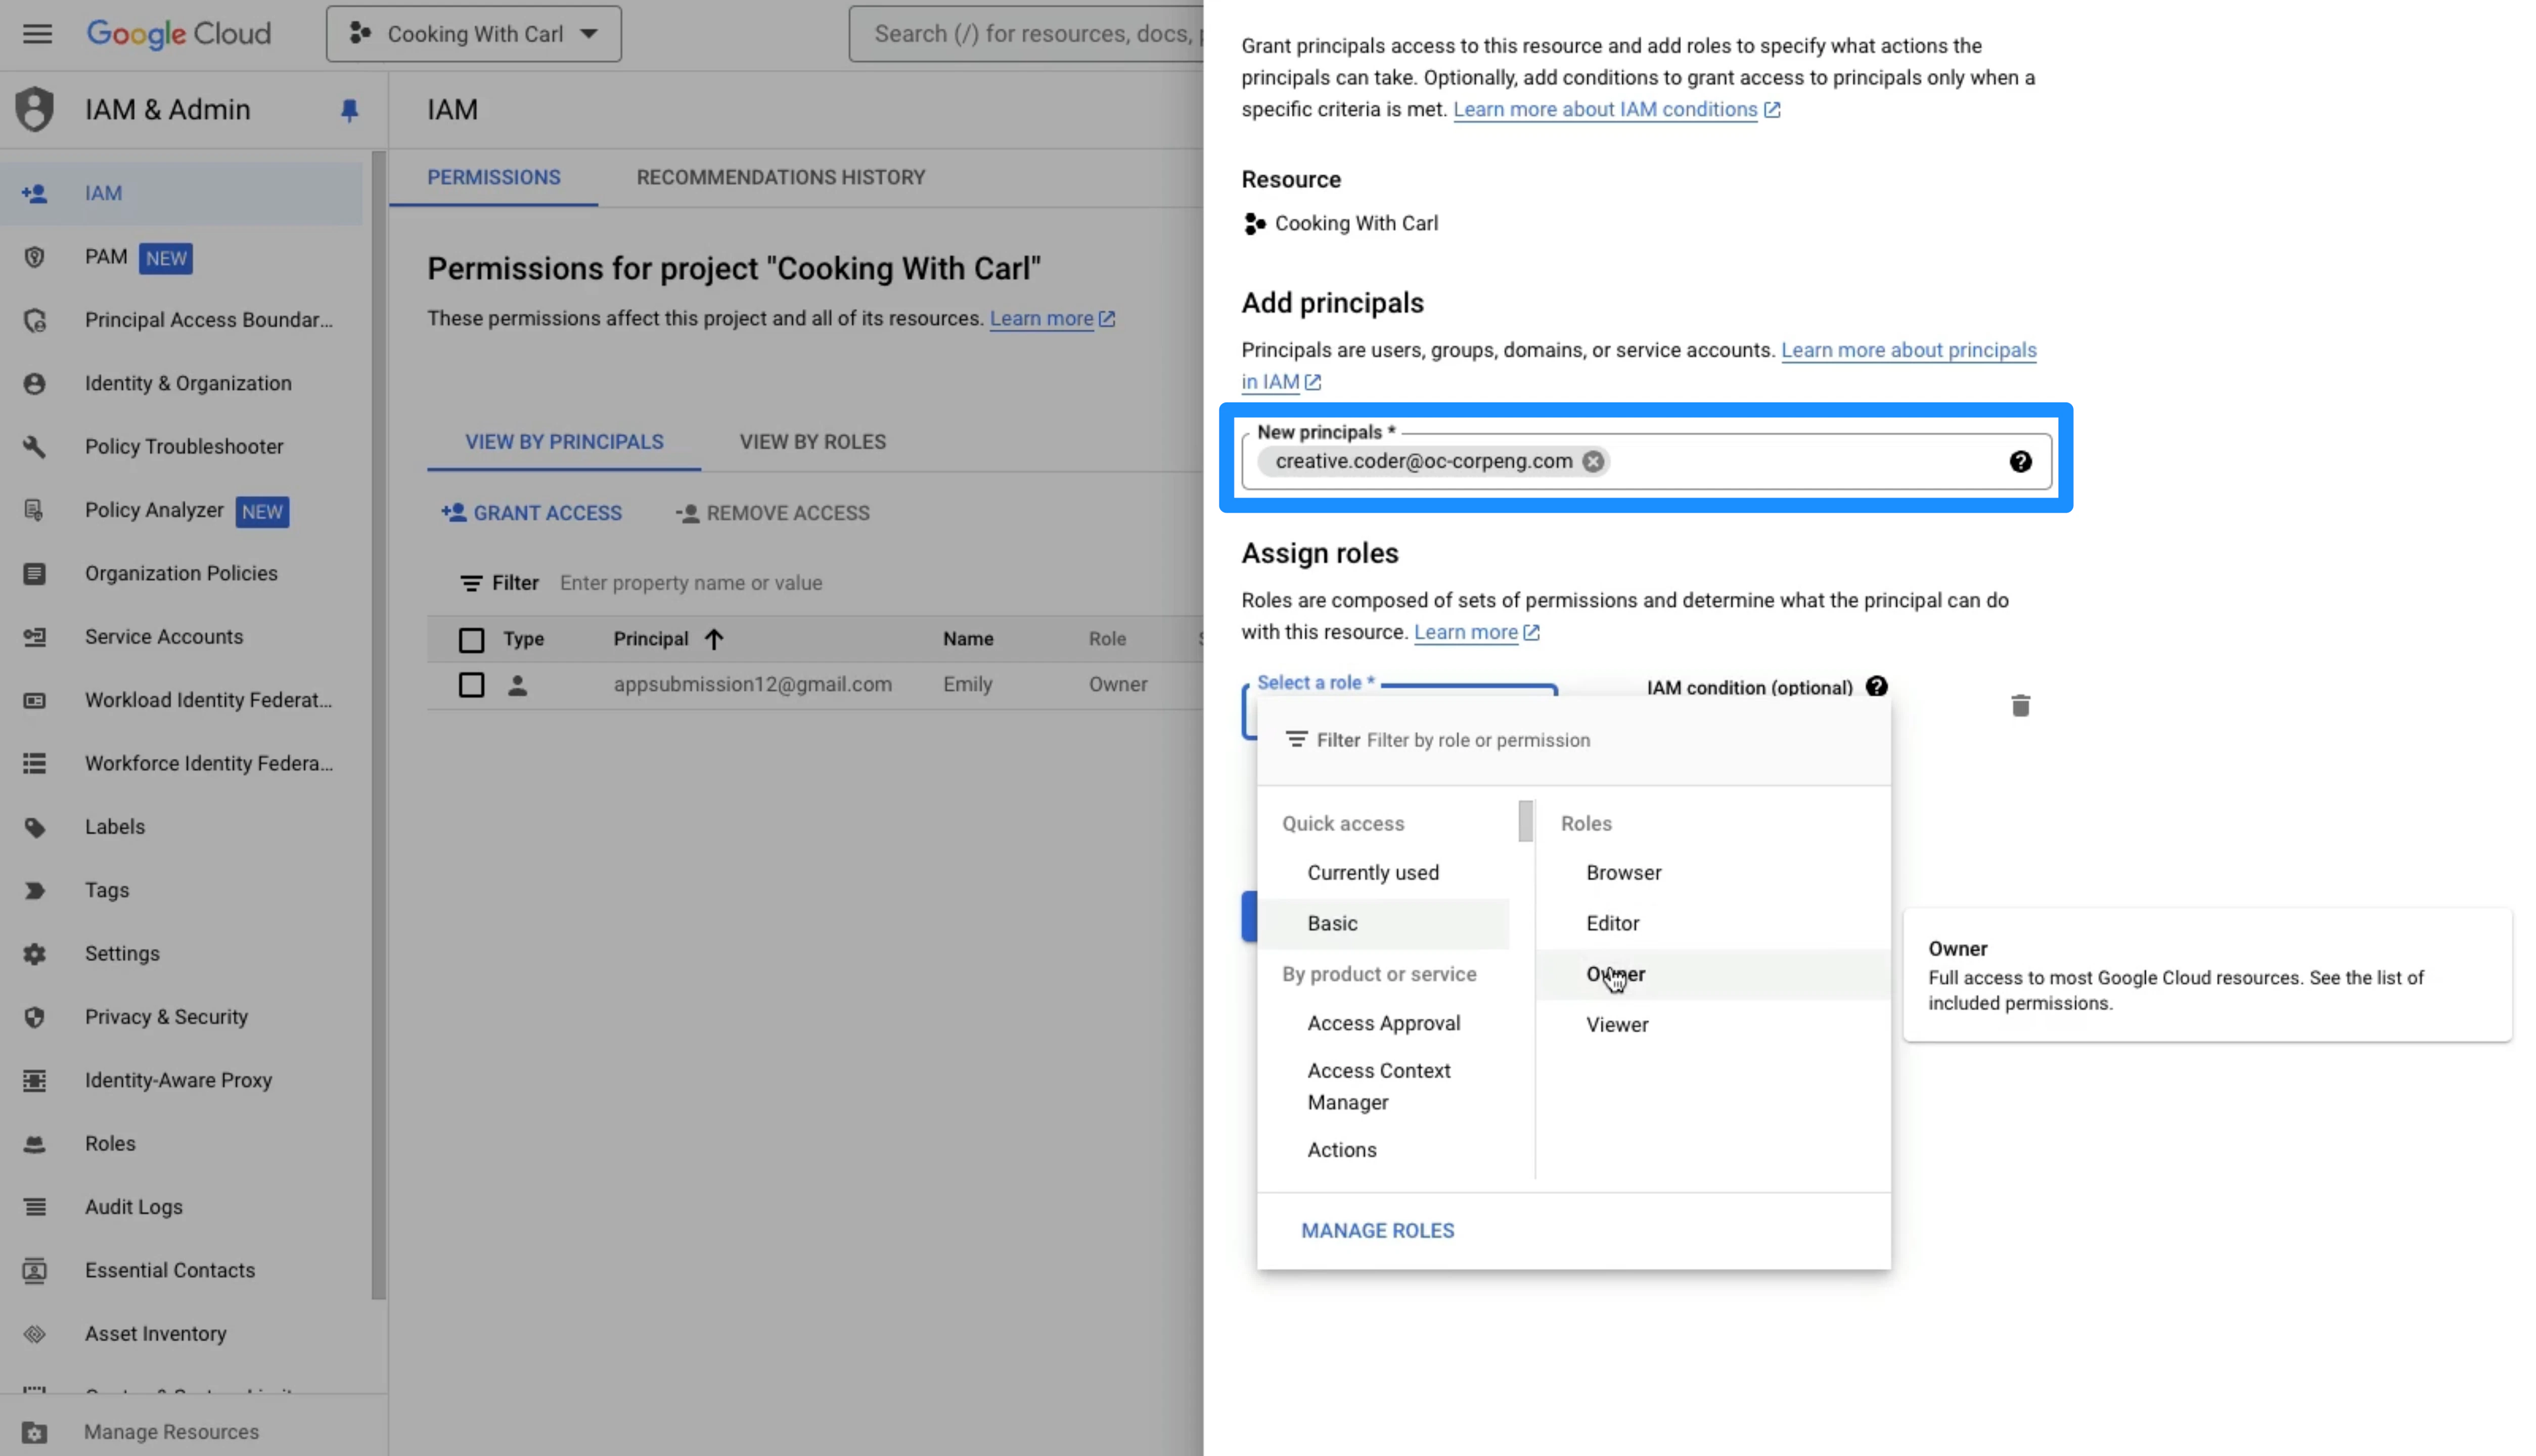 4. Navigate to **Step 2: Assign Role**.
5. Then, click **Select a role**.
6. Select **Basic** as the access type and **Owner** as the role type.
7. Click **Save**:
## Enable the API
### Enable the Google Publisher API
1. Navigate to the [Google Publisher API Settings](https://console.cloud.google.com/apis/library/androidpublisher.googleapis.com).
2. Ensure that you are logged into the correct account as the account owner:
3. Then, click **Enable**:
4. Navigate to **Step 2: Assign Role**.
5. Then, click **Select a role**.
6. Select **Basic** as the access type and **Owner** as the role type.
7. Click **Save**:
## Enable the API
### Enable the Google Publisher API
1. Navigate to the [Google Publisher API Settings](https://console.cloud.google.com/apis/library/androidpublisher.googleapis.com).
2. Ensure that you are logged into the correct account as the account owner:
3. Then, click **Enable**:
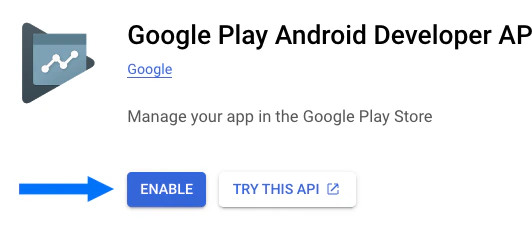 A progress spinner will appear after a moment or so, then you will be redirected to a page. At this point the API has been properly enabled.
One additional API that needs to be enabled is Firebase.
### Enable Firebase
1. Navigate to the [Firebase Management API - Google Cloud Console](https://console.cloud.google.com/apis/library/firebase.googleapis.com).
2. Ensure that you are logged into the correct account as the account owner:
3. Then, click **Enable**:
A progress spinner will appear after a moment or so, then you will be redirected to a page. At this point the API has been properly enabled.
One additional API that needs to be enabled is Firebase.
### Enable Firebase
1. Navigate to the [Firebase Management API - Google Cloud Console](https://console.cloud.google.com/apis/library/firebase.googleapis.com).
2. Ensure that you are logged into the correct account as the account owner:
3. Then, click **Enable**:
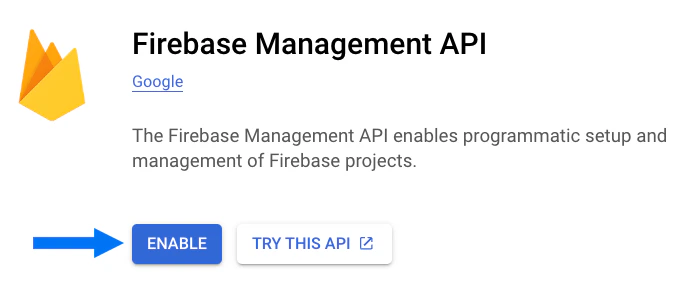 After completing these steps, you do not need to contact Kajabi unless you are experiencing issues. We will email you with a confirmation that we have successfully been invited to the account within 1-2 business days.