> ## Documentation Index
> Fetch the complete documentation index at: https://help.kajabi.com/llms.txt
> Use this file to discover all available pages before exploring further.
# Create custom screens for a Branded Mobile App
> Customize app screens with widgets to enhance navigation, showcase products, and engage members.
**Custom screens** let you shape every page of a Branded App — from a home dashboard to a product showcase. Customize screens with widgets to enhance navigation, highlight products, and engage members with tailored content.
## What screens can I create?
In a Branded App, screens function as individual pages that display content, guide users, or provide interactive features. By creating and customizing screens, you can enhance navigation, showcase products, and offer unique experiences tailored to your audience.
Here are just a few ideas to get you started:
* **Home Screen**: Use the app home screen to welcome members and visitors, highlight and recommend courses, provide valuable information about your business, and more.
* **Custom Product Offering Pages**: Showcase Products and Services in a custom page.
* **Introductions/About You**: Create a personalized custom page that highlights who you are and your mission.
* **Additional Resources**: Provide information and resources to assist customers as they engage with your business.
By leveraging custom screens, you can tailor the app experience to better serve your audience, improve engagement, and enhance usability.
## Add a screen
1. Select **Branded Mobile App** from your Kajabi dashboard.
You should see your app Design settings if you've fully completed your [app setup](/articles/mobile-apps/branded-app/how-do-i-get-started-creating-my-own-branded-app).
2. Select the **Design** tab.
3. Click **Customize**.
4. Click **Screens** to view existing screens and create ones.
5. Select **+ New screen**.
6. Enter the title of the screen.
7. Select the icon to display for the screen.
8. Then, click **Save & Publish**:
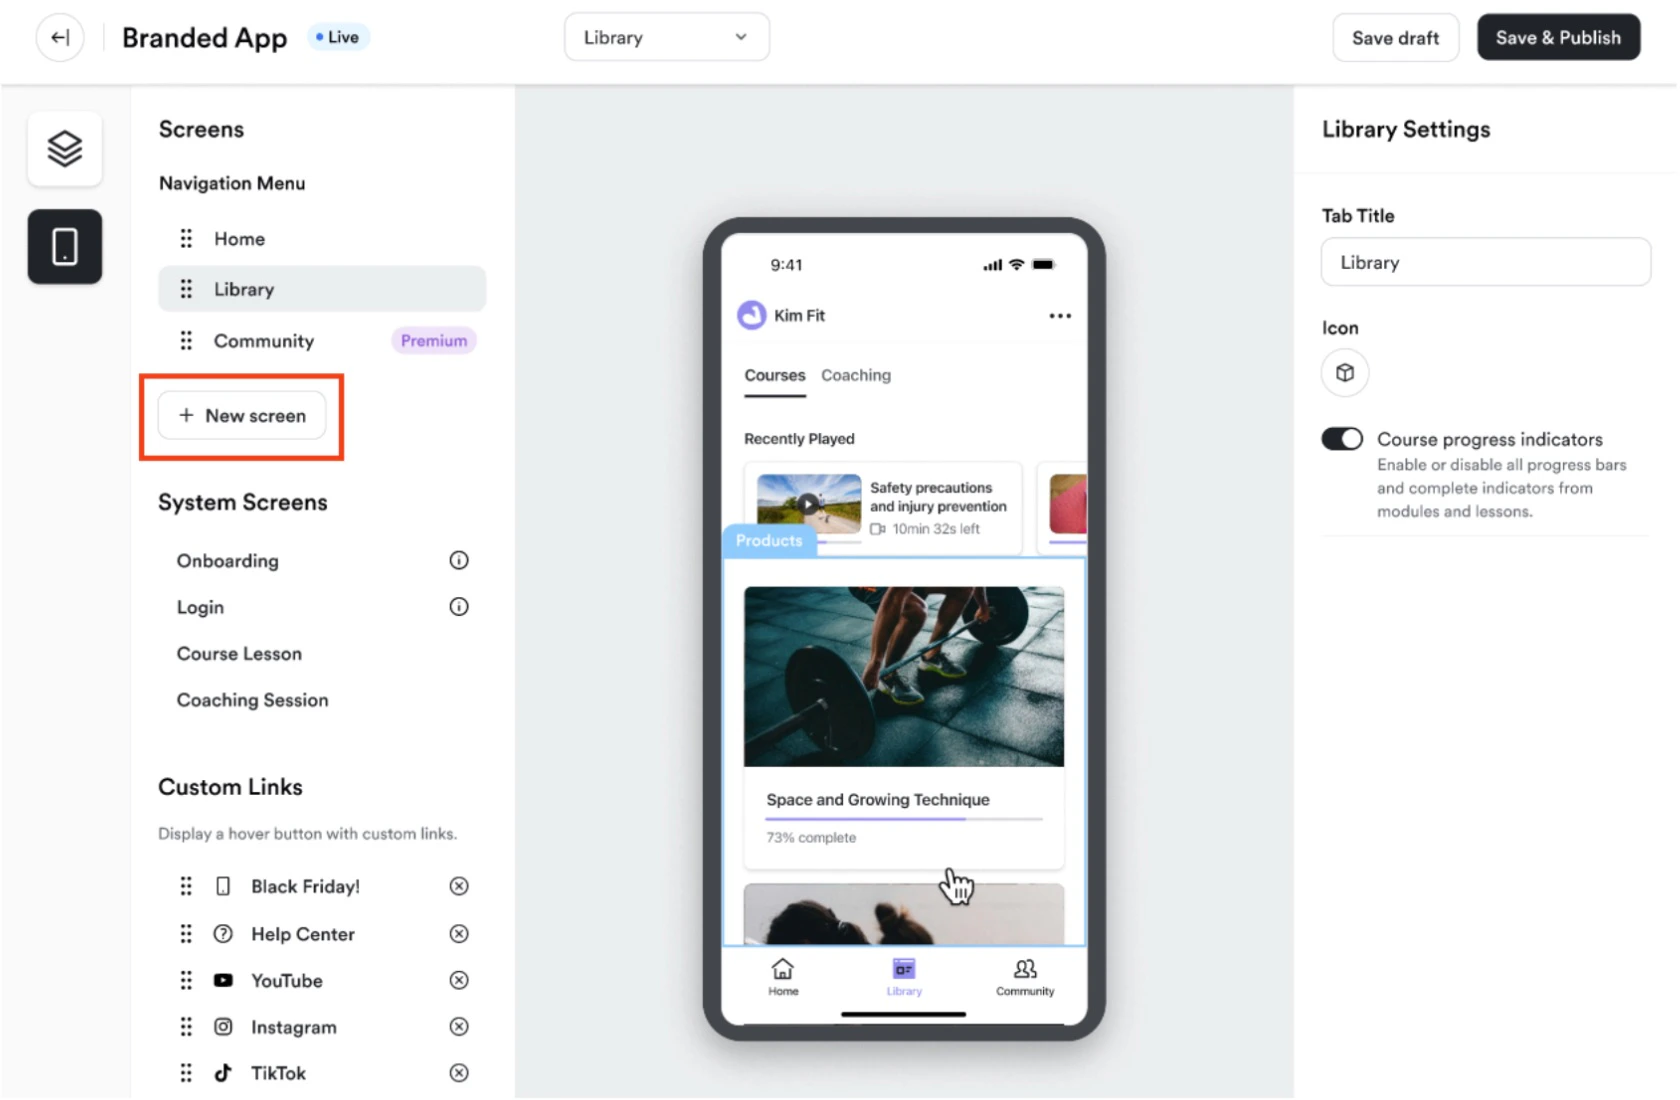
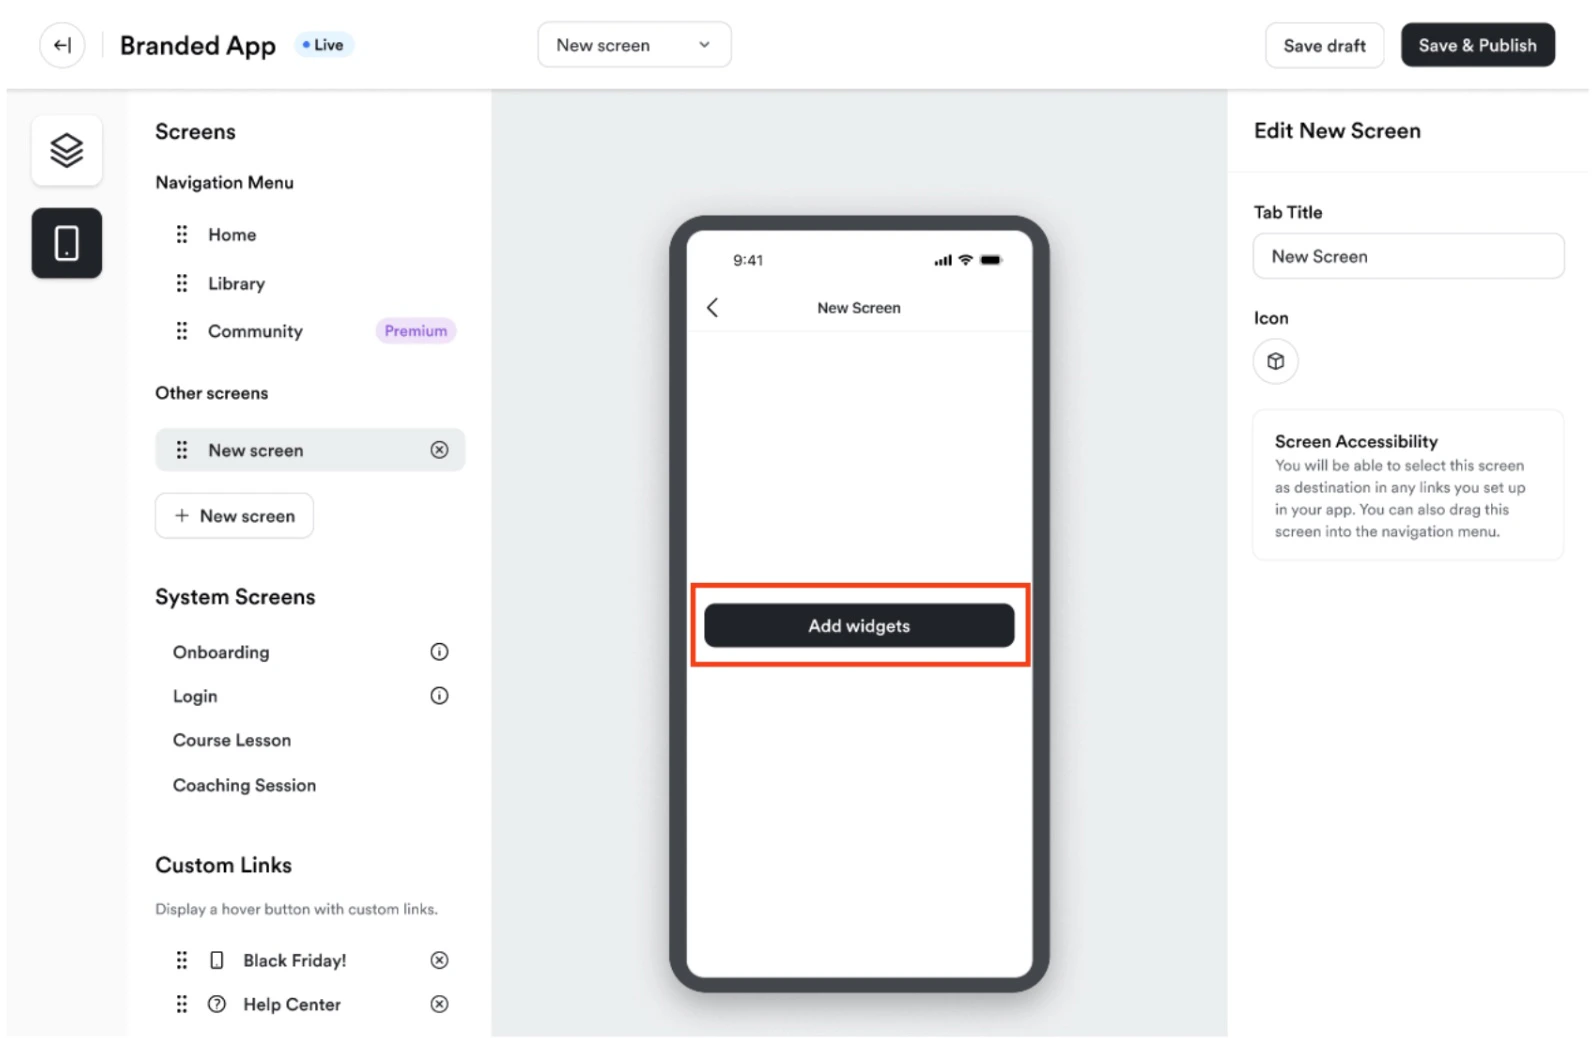
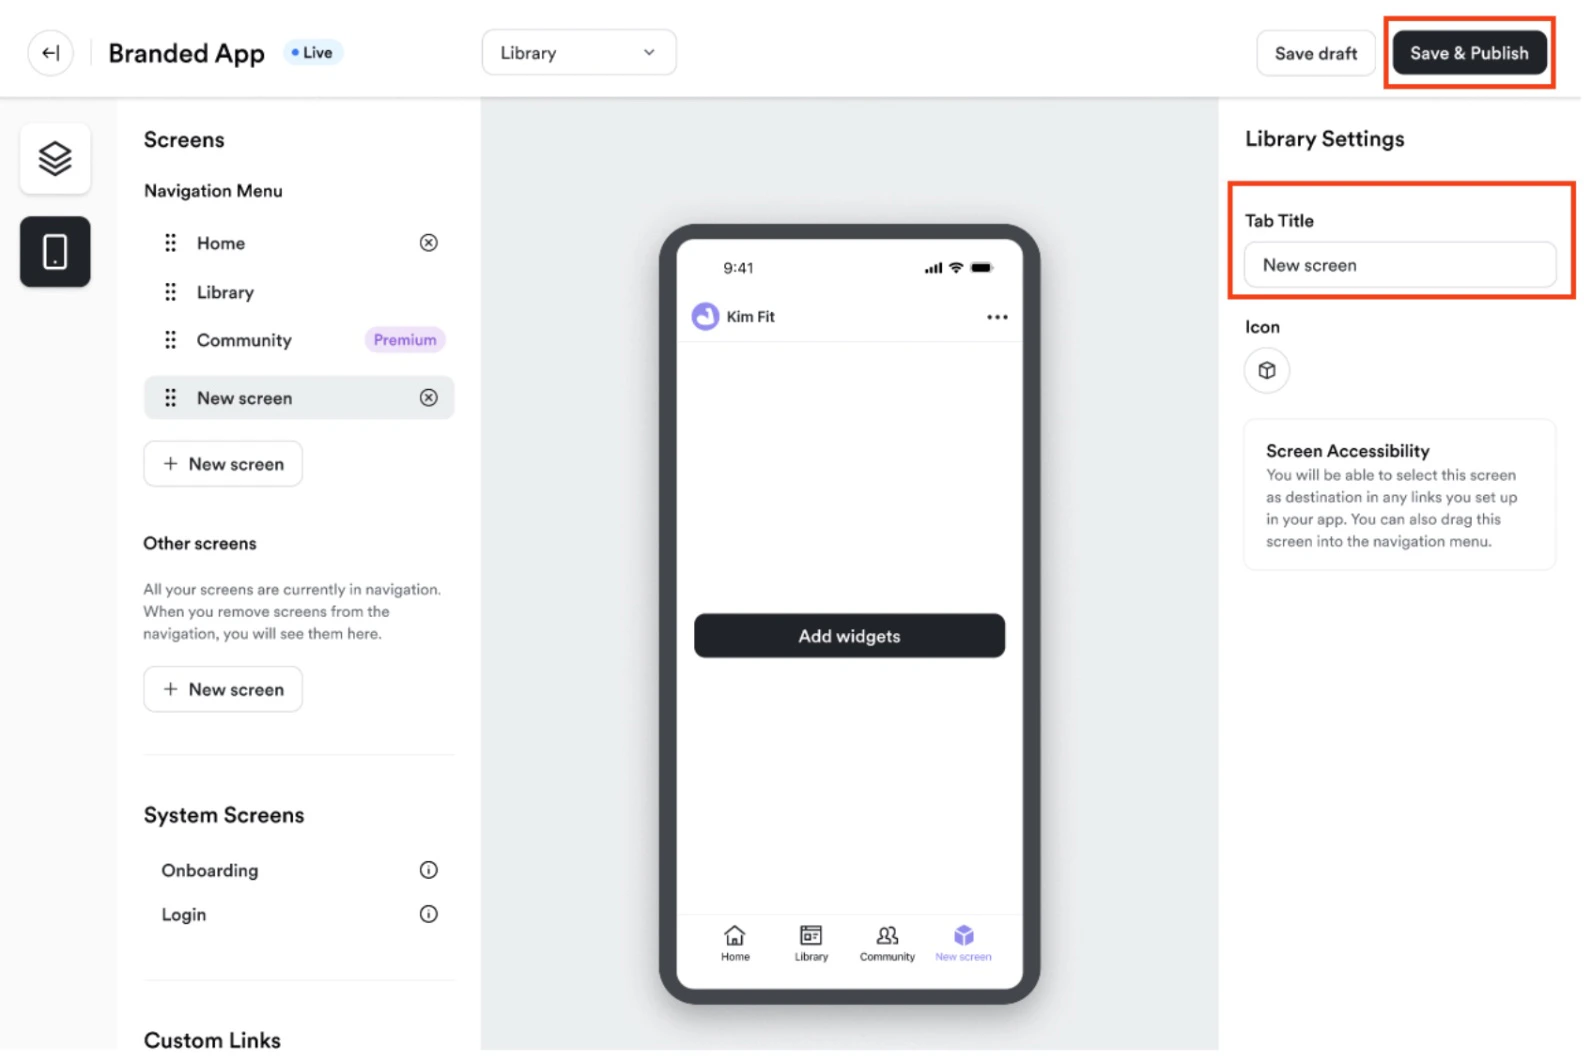 The newly created screen will initially display an **Add Widgets** button to get you started with building out the custom screen.
## Create "other" screens
In addition to main screens, you can create "other" screens that serve as hidden or future-use pages within the Branded App. These screens can be used in a variety of ways, such as building out content that you plan to release later or creating dedicated spaces that aren't directly accessible through the app's main navigation.
To create an "other" screen, follow the same process as creating a screen, then move the screen under the **Other screens** section:
The newly created screen will initially display an **Add Widgets** button to get you started with building out the custom screen.
## Create "other" screens
In addition to main screens, you can create "other" screens that serve as hidden or future-use pages within the Branded App. These screens can be used in a variety of ways, such as building out content that you plan to release later or creating dedicated spaces that aren't directly accessible through the app's main navigation.
To create an "other" screen, follow the same process as creating a screen, then move the screen under the **Other screens** section:
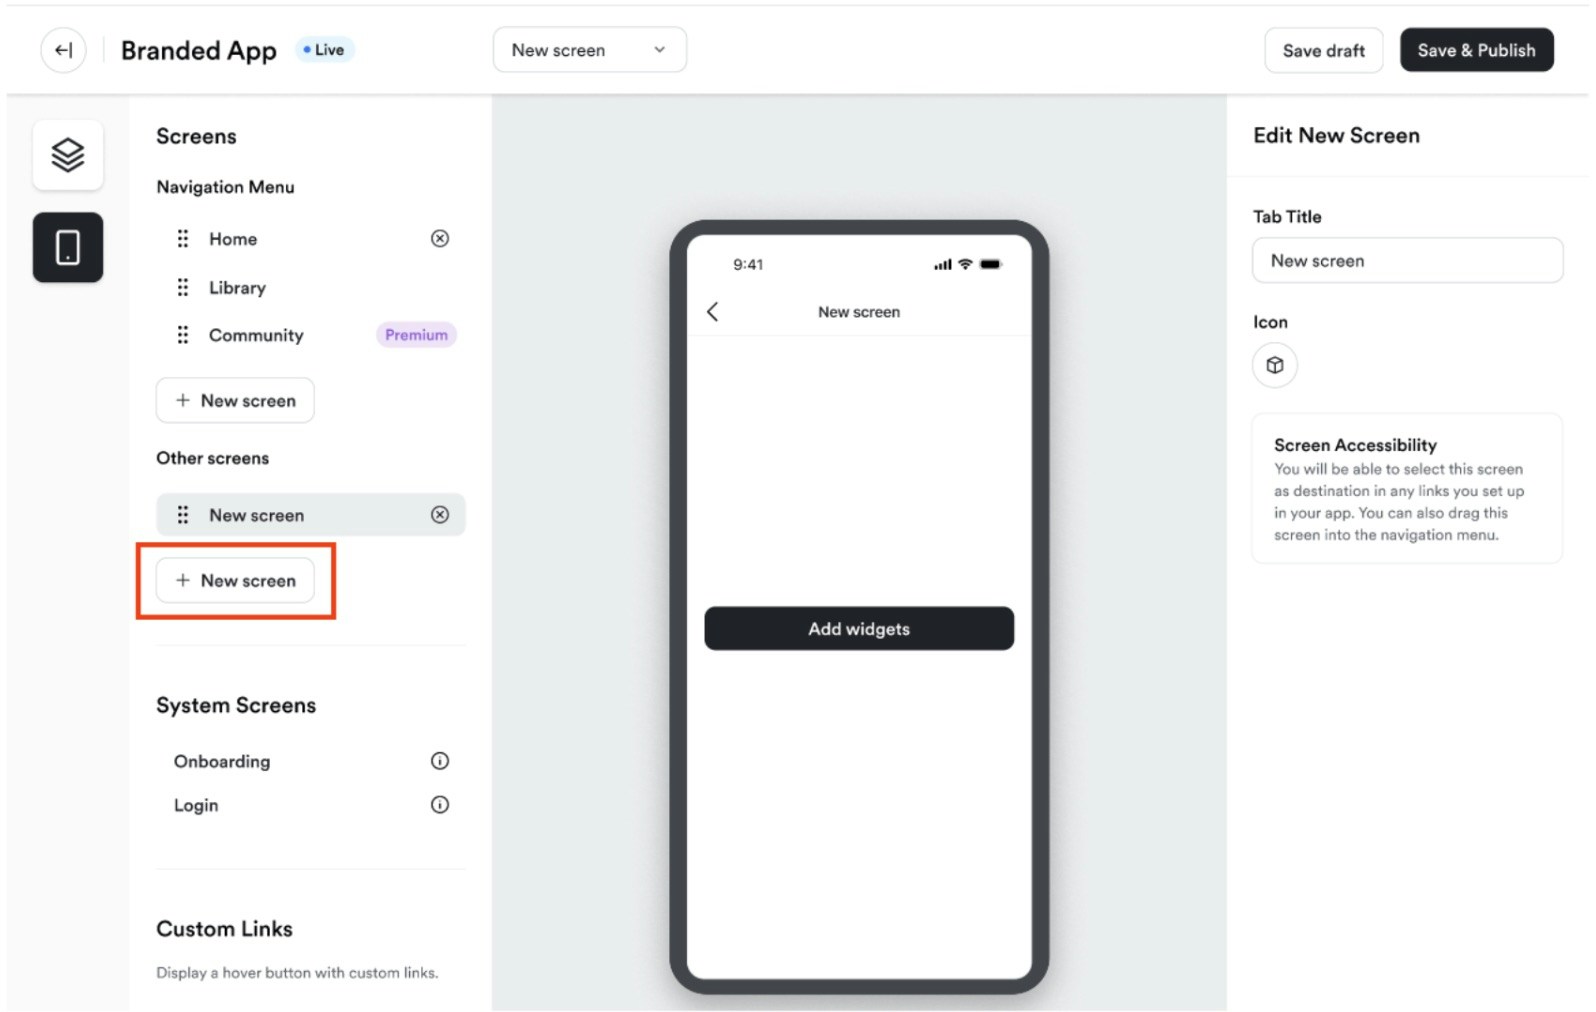 Here's how you can use "other" screens effectively:
1. **Create Hidden Landing Pages:** Build a landing page that's only accessible via a button link. Once the user clicks the button, they'll be directed to this screen, offering them a unique experience that isn't visible from the app's main navigation.
2. **Add Widgets to Other Screens:** You can customize these other screens with all the available widgets (like images or buttons). Use these screens to showcase specific promotions or custom offers, and point users to them via strategically placed buttons or actions.
3. **Utilize "Other" Screens as Lead Magnets:** Create screens that provide value, such as free previews or exclusive content, and direct users to them through button links or gallery widget actions. This approach allows you to capture leads or create engagement without making the content permanently visible in the app's navigation.
4. **Future Content Planning:** If you're preparing screens, you can start building the content on "other" screens now and then move them to the main navigation once you're ready to launch.
By using "other" screens strategically, you can expand the flexibility and functionality of the app, enabling you to test, plan, and offer customized content at your own pace while keeping the user experience smooth and engaging.
## Customize a screen
Once you've created a screen, customize it with widgets to enhance its functionality.
### Available screen widgets
**Product Widget**: Display featured courses, community access, or digital products.
**Button Widget**: Add call-to-action buttons that direct users to other screens, websites, or resources.
**Image Widget**: Upload visuals that can be static or linked to additional content.
**Gallery Widget**: Showcase multiple images in a slideshow or grid format.
**Text Widget**: Insert text sections for descriptions, welcome messages, or important announcements.
**Video Widget**: Embed videos with customizable preview images to engage users.
**Embed Widget**: Paste in any HTML code to display additional content.
**Note:**
We recommend the following criteria for media content: Video resolution should not exceed 1280x720 px or 720x1280 px if vertical and image files should not exceed 2MB.
### Edit screen content
To modify an existing screen:
1. Select the **Screen** you want to edit from the Screens tab.
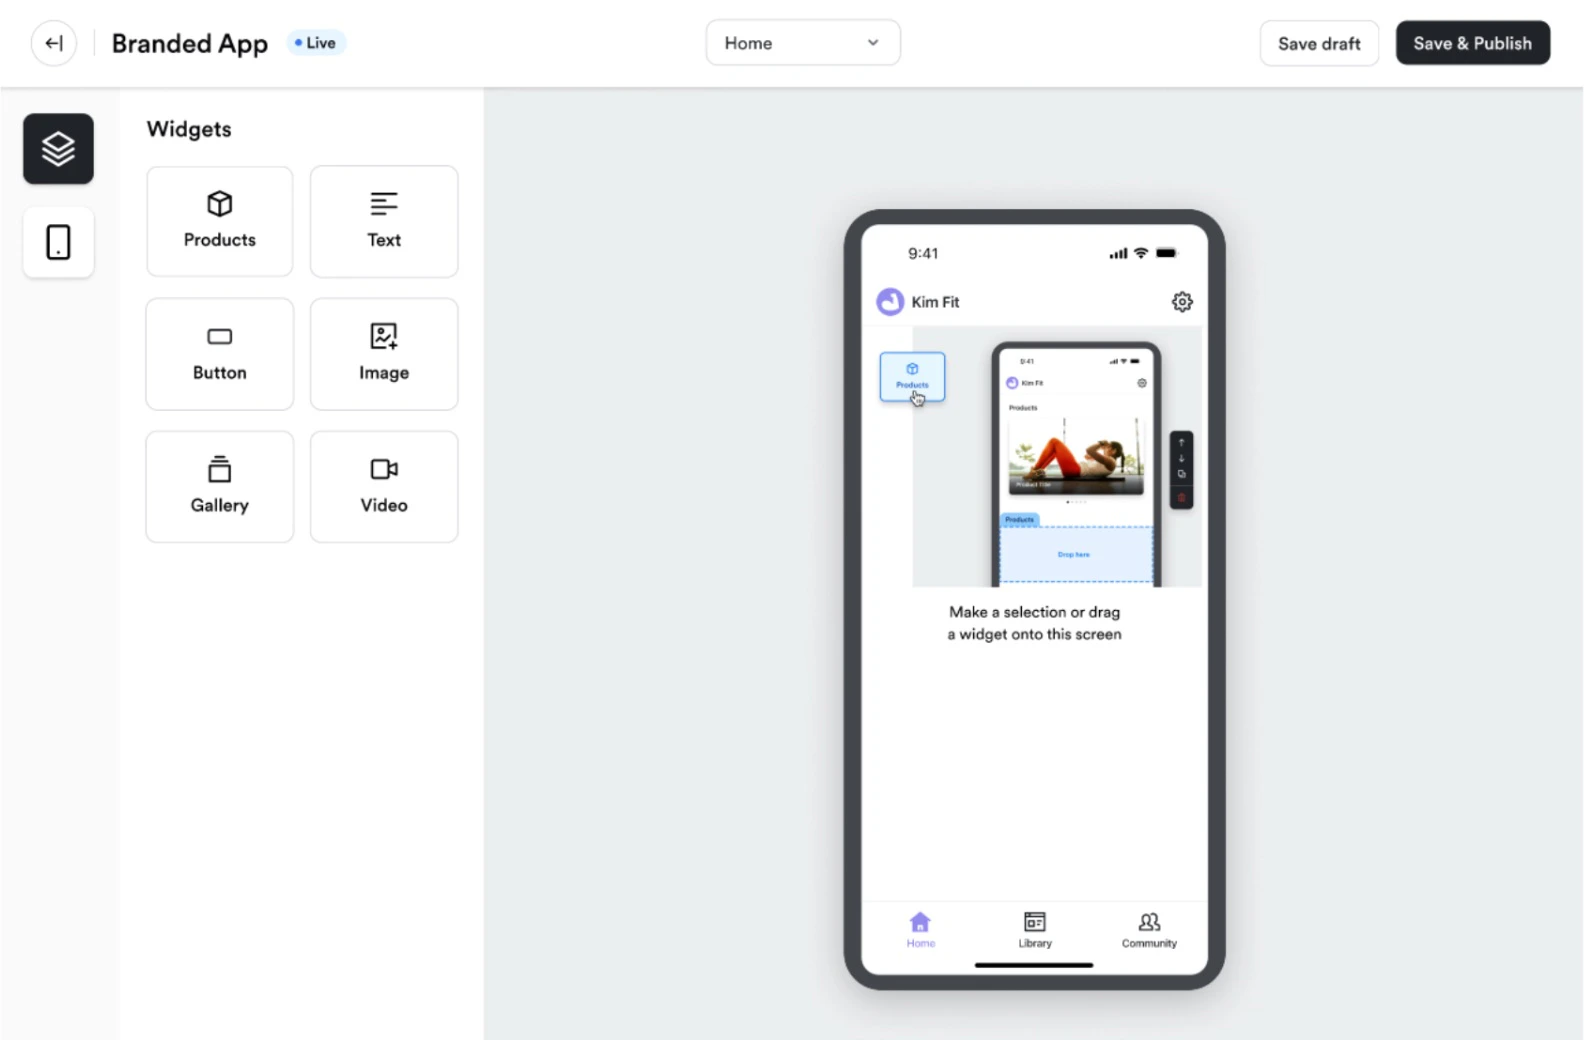
2. Click **Add Widgets** to open the editor.
3. Add or adjust widgets by dragging and dropping them onto the screen layout.
4. Configure each widget by updating text, images, links, or videos as needed.
5. Click **Save & Publish** to make changes live in the app:
Here's how you can use "other" screens effectively:
1. **Create Hidden Landing Pages:** Build a landing page that's only accessible via a button link. Once the user clicks the button, they'll be directed to this screen, offering them a unique experience that isn't visible from the app's main navigation.
2. **Add Widgets to Other Screens:** You can customize these other screens with all the available widgets (like images or buttons). Use these screens to showcase specific promotions or custom offers, and point users to them via strategically placed buttons or actions.
3. **Utilize "Other" Screens as Lead Magnets:** Create screens that provide value, such as free previews or exclusive content, and direct users to them through button links or gallery widget actions. This approach allows you to capture leads or create engagement without making the content permanently visible in the app's navigation.
4. **Future Content Planning:** If you're preparing screens, you can start building the content on "other" screens now and then move them to the main navigation once you're ready to launch.
By using "other" screens strategically, you can expand the flexibility and functionality of the app, enabling you to test, plan, and offer customized content at your own pace while keeping the user experience smooth and engaging.
## Customize a screen
Once you've created a screen, customize it with widgets to enhance its functionality.
### Available screen widgets
**Product Widget**: Display featured courses, community access, or digital products.
**Button Widget**: Add call-to-action buttons that direct users to other screens, websites, or resources.
**Image Widget**: Upload visuals that can be static or linked to additional content.
**Gallery Widget**: Showcase multiple images in a slideshow or grid format.
**Text Widget**: Insert text sections for descriptions, welcome messages, or important announcements.
**Video Widget**: Embed videos with customizable preview images to engage users.
**Embed Widget**: Paste in any HTML code to display additional content.
**Note:**
We recommend the following criteria for media content: Video resolution should not exceed 1280x720 px or 720x1280 px if vertical and image files should not exceed 2MB.
### Edit screen content
To modify an existing screen:
1. Select the **Screen** you want to edit from the Screens tab.
2. Click **Add Widgets** to open the editor.
3. Add or adjust widgets by dragging and dropping them onto the screen layout.
4. Configure each widget by updating text, images, links, or videos as needed.
5. Click **Save & Publish** to make changes live in the app:
 ### Reorder and manage screens
#### Reorder screens
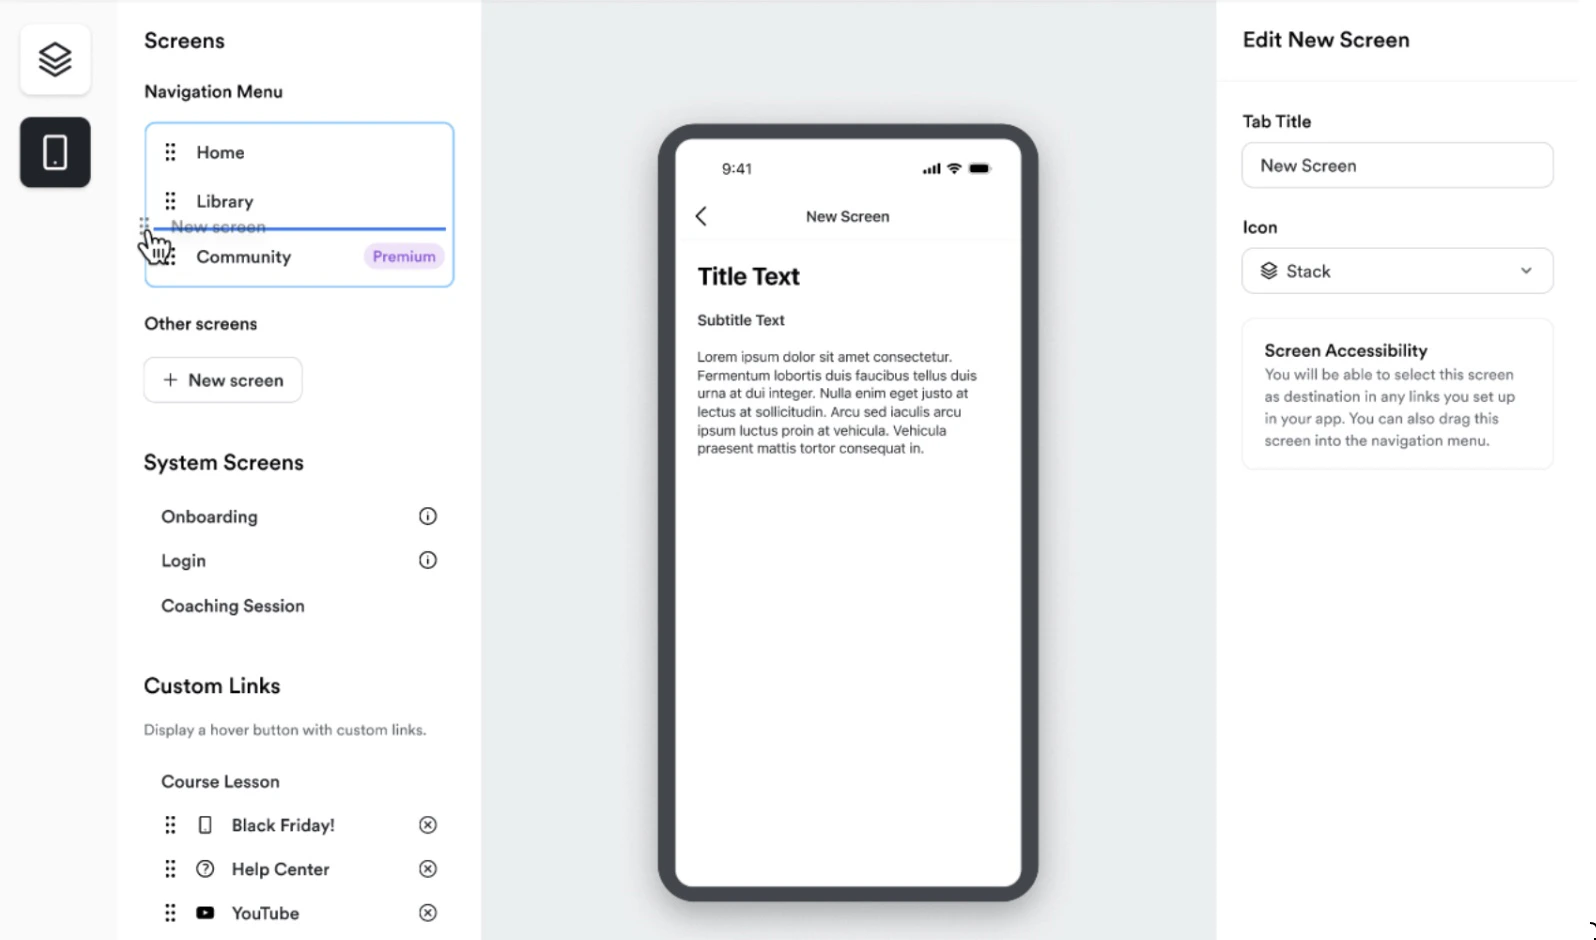
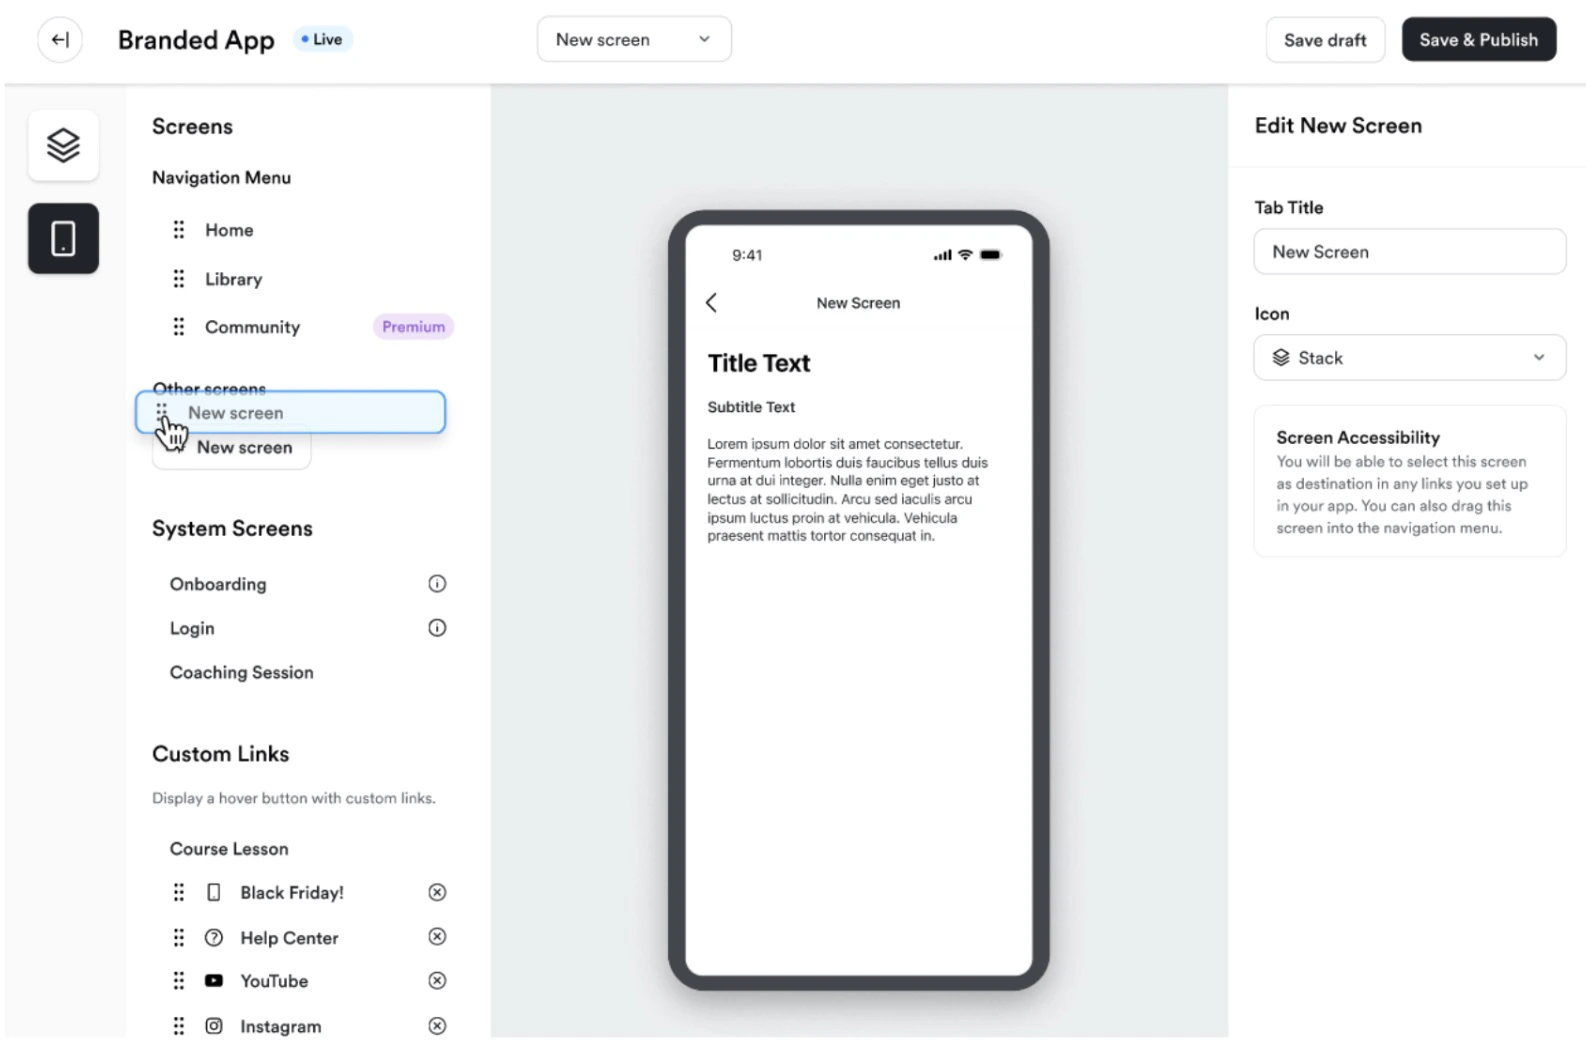
Drag and drop screens in the dashboard to adjust their order. This determines how they appear in the app's navigation:
### Reorder and manage screens
#### Reorder screens
Drag and drop screens in the dashboard to adjust their order. This determines how they appear in the app's navigation:
 #### Delete screens
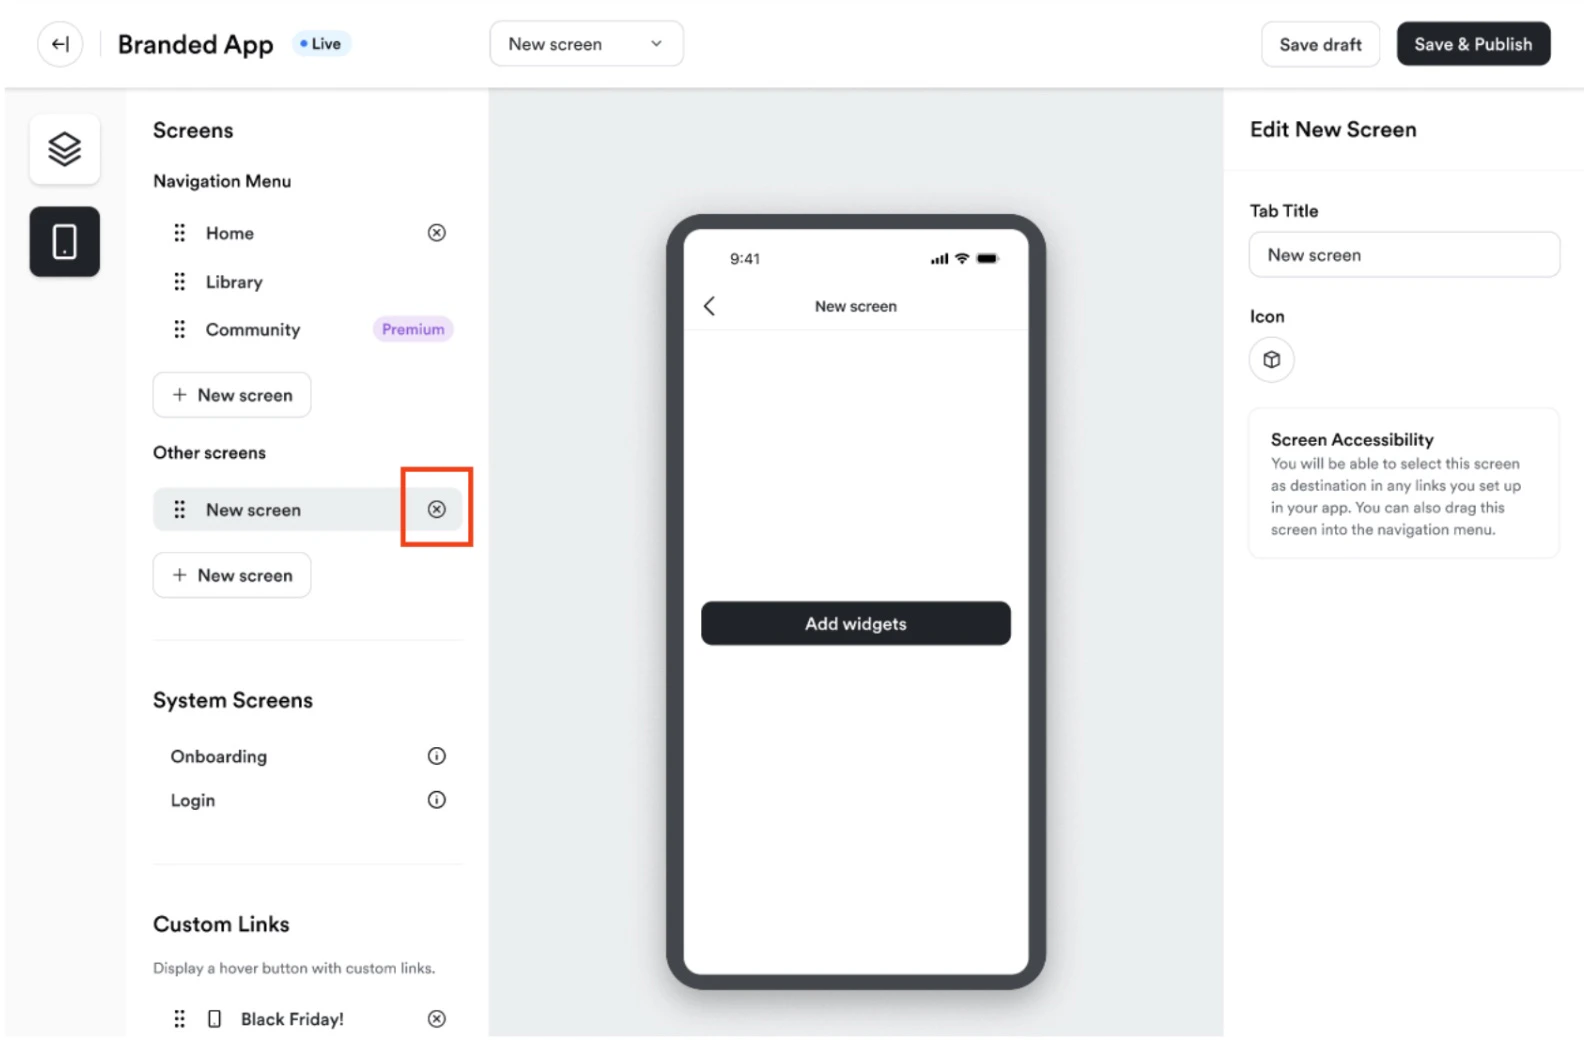
Click the **X** icon next to a screen to remove it from the app:
#### Delete screens
Click the **X** icon next to a screen to remove it from the app:
 ## Customize navigation
Change the order of bottom navigation tabs, customize the navigation names and icons, and customize the screens displayed in the navigation tabs.
### Reorder navigation tabs
1. Select **Branded Mobile App** from your Kajabi dashboard.
You should see your app Design settings if you've fully completed your [app setup](/articles/mobile-apps/branded-app/how-do-i-get-started-creating-my-own-branded-app).
2. Select the **Design** tab.
3. Click **Customize**.
4. Select the **Screens** tab from the top-left corner.
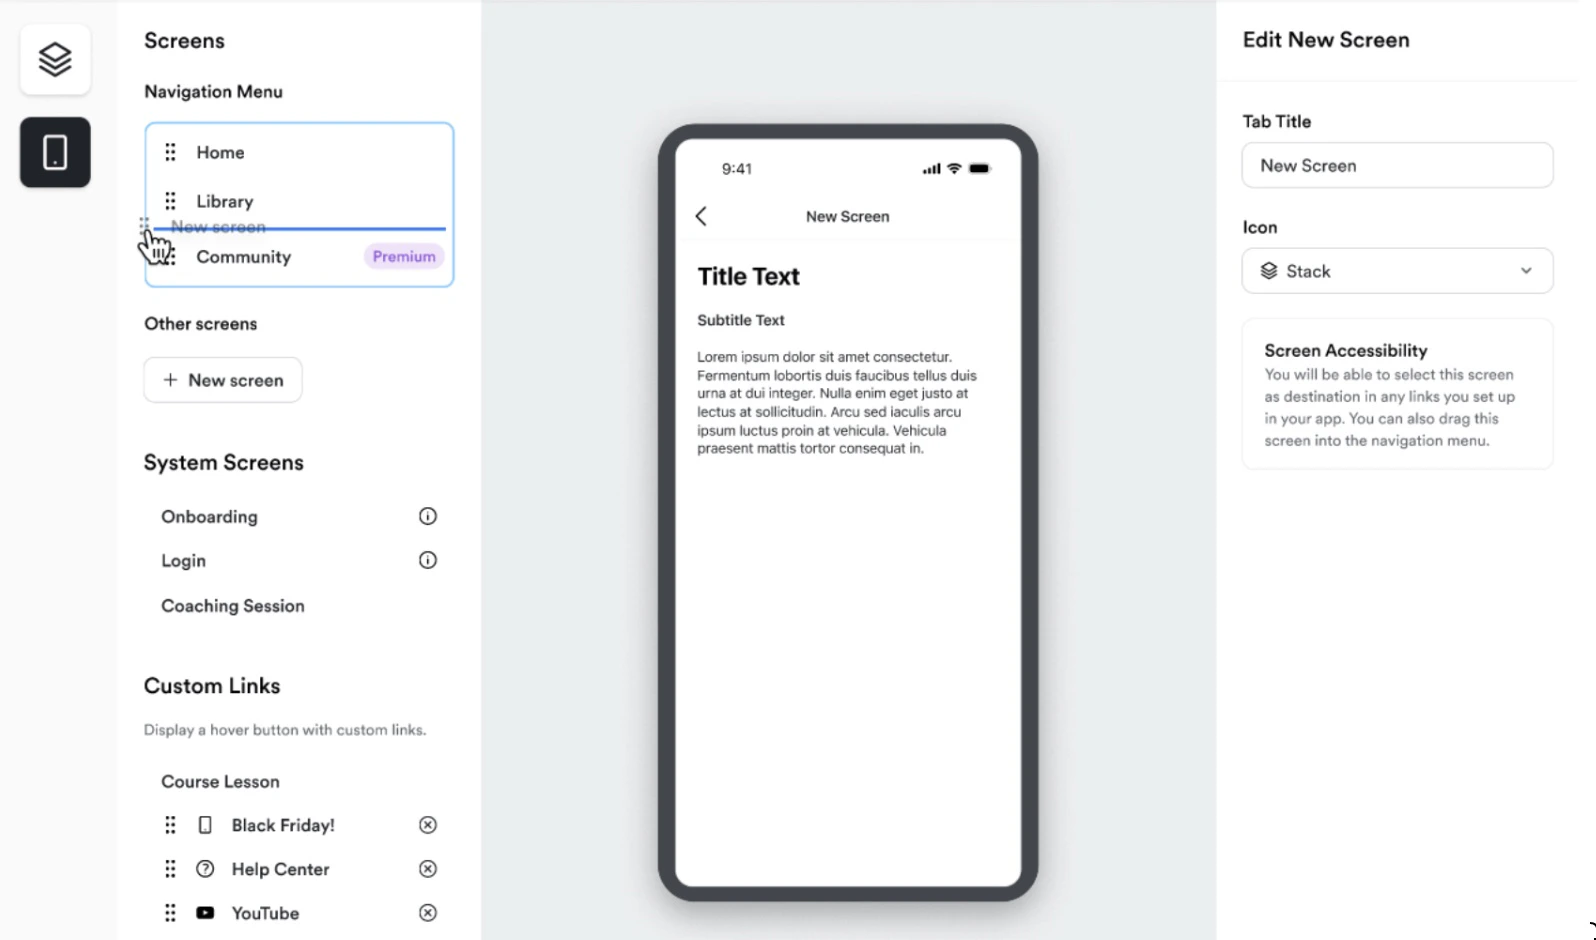
5. Then, under **Navigation Menu** drag and drop the screens that you want to be displayed in the bottom navigation tabs.
6. Click **Save & Publish** to make changes live in the app:
## Customize navigation
Change the order of bottom navigation tabs, customize the navigation names and icons, and customize the screens displayed in the navigation tabs.
### Reorder navigation tabs
1. Select **Branded Mobile App** from your Kajabi dashboard.
You should see your app Design settings if you've fully completed your [app setup](/articles/mobile-apps/branded-app/how-do-i-get-started-creating-my-own-branded-app).
2. Select the **Design** tab.
3. Click **Customize**.
4. Select the **Screens** tab from the top-left corner.
5. Then, under **Navigation Menu** drag and drop the screens that you want to be displayed in the bottom navigation tabs.
6. Click **Save & Publish** to make changes live in the app:
 ### Rename and customize navigation tab icons
1. Select **Branded Mobile App** from your Kajabi dashboard.
You should see your app Design settings if you've fully completed your [app setup](/articles/mobile-apps/branded-app/how-do-i-get-started-creating-my-own-branded-app).
2. Select the **Design** tab.
3. Click **Customize**.
4. Select the **Screens** tab from the top-left corner.
5. Then, under **Navigation Menu** select the screen you want to customize.
6. On the right, you can enter a custom Tab Title and select the desired icon from Kajabi's icon library:
### Rename and customize navigation tab icons
1. Select **Branded Mobile App** from your Kajabi dashboard.
You should see your app Design settings if you've fully completed your [app setup](/articles/mobile-apps/branded-app/how-do-i-get-started-creating-my-own-branded-app).
2. Select the **Design** tab.
3. Click **Customize**.
4. Select the **Screens** tab from the top-left corner.
5. Then, under **Navigation Menu** select the screen you want to customize.
6. On the right, you can enter a custom Tab Title and select the desired icon from Kajabi's icon library: