> ## Documentation Index
> Fetch the complete documentation index at: https://help.kajabi.com/llms.txt
> Use this file to discover all available pages before exploring further.
# Verify a website for Google Play Console
> Add a TXT record to DNS settings to verify domain ownership for a Google Developer account.
**Website verification** is a common issue with Google Developer accounts when the connected site is not verified. To resolve this, you need to add the TXT record provided by Google to the organization's DNS settings.
## Google Play Console account
1. [Log into the Google Play Console account](https://play.google.com/console/)
If website verification is required for the Developer account, a notification will appear.
2. Click the **View Details** button to proceed:
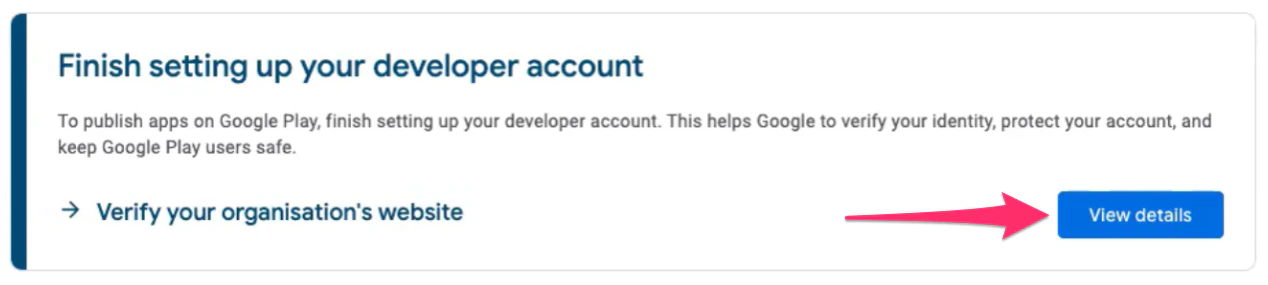 You will be redirected to a page providing detailed instructions on how to complete the website verification process.
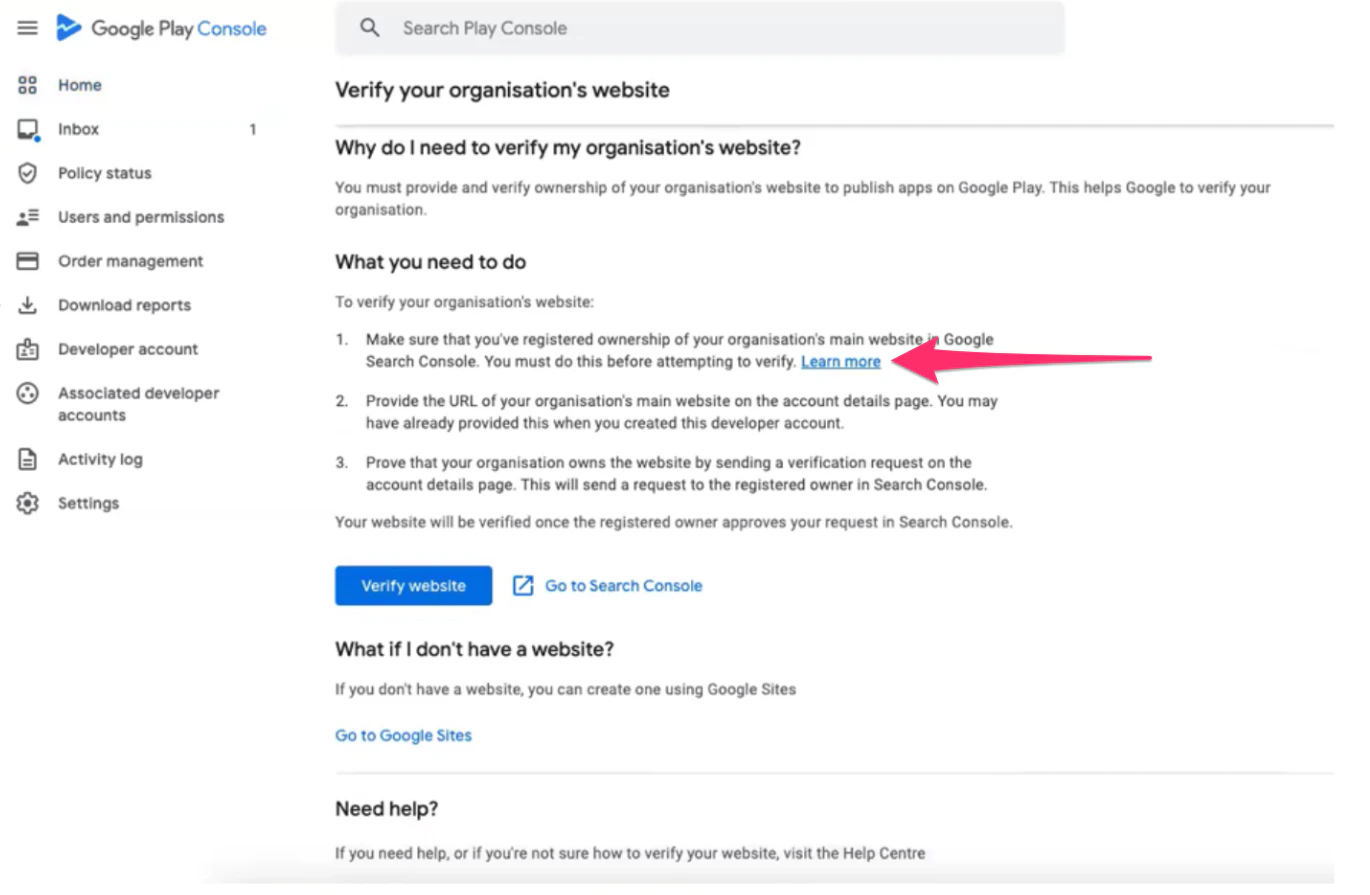
3. Click the blue link labeled **Learn More** to access further guidance:
You will be redirected to a page providing detailed instructions on how to complete the website verification process.
3. Click the blue link labeled **Learn More** to access further guidance:
 You will be taken to a page where you can add a website property.
4. Scroll down to find the option **Add a new Property**
5. Then, under the first step, click the blue text link labeled **Click Here** to proceed
You will be taken to a page where you can add a website property.
4. Scroll down to find the option **Add a new Property**
5. Then, under the first step, click the blue text link labeled **Click Here** to proceed
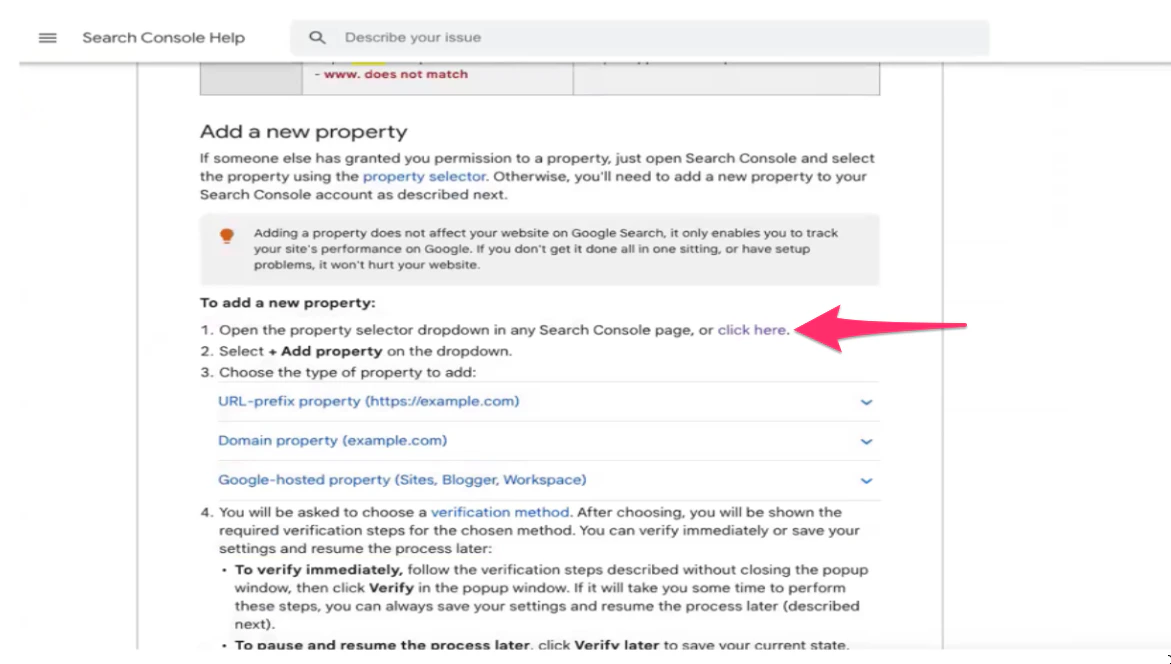 6. You will be redirected to **Google Search Console** where you will be prompted to select a property type
7. Locate the designated field where you need to enter the custom domain
## Kajabi account
To enter the custom domain, you will need to open a web browser window or tab and log into the [Kajabi account](https://kajabi.com/login).
Then, navigate to the Domain settings:
1. Navigate to **Settings** from the Kajabi Dashboard:
6. You will be redirected to **Google Search Console** where you will be prompted to select a property type
7. Locate the designated field where you need to enter the custom domain
## Kajabi account
To enter the custom domain, you will need to open a web browser window or tab and log into the [Kajabi account](https://kajabi.com/login).
Then, navigate to the Domain settings:
1. Navigate to **Settings** from the Kajabi Dashboard:
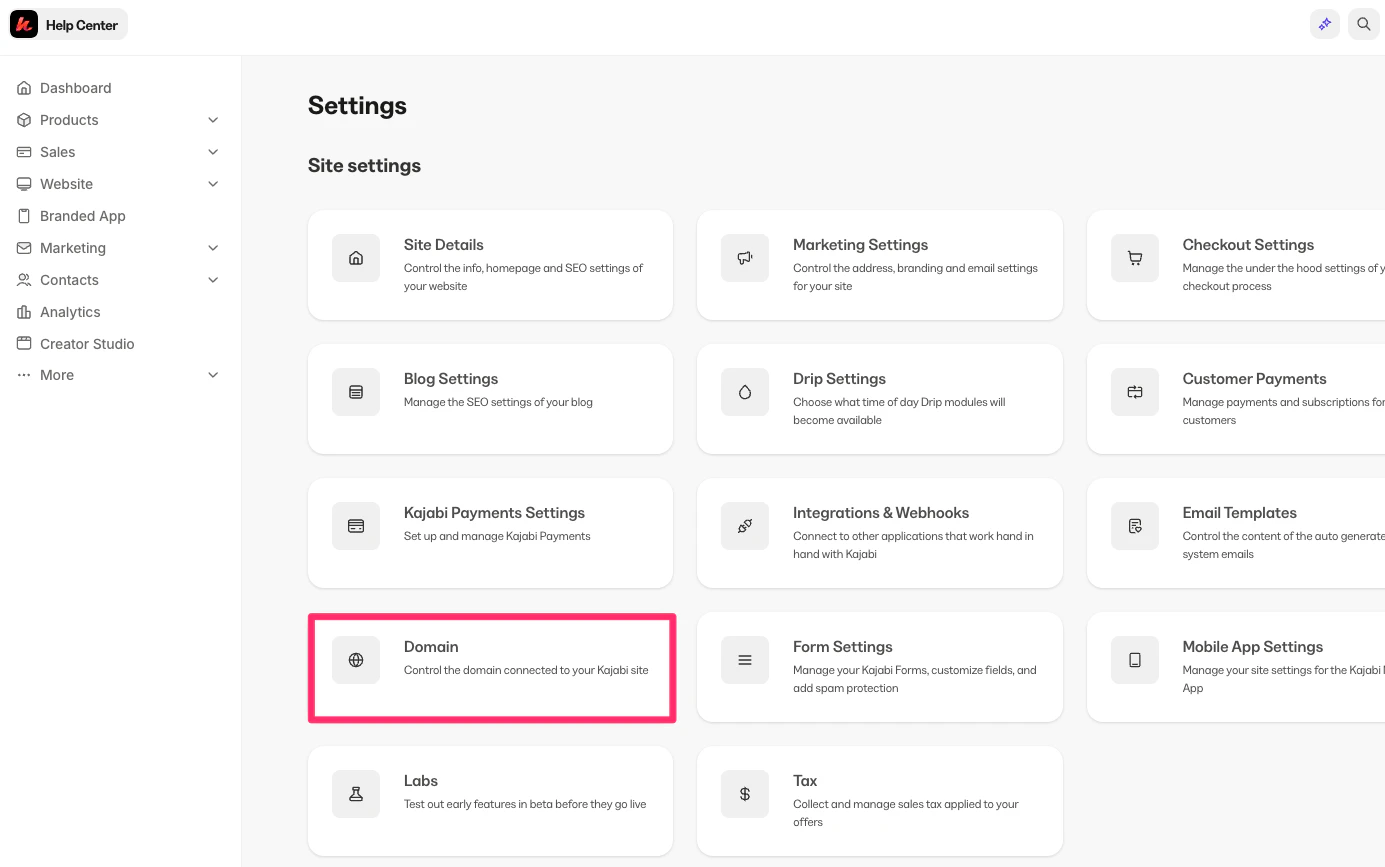
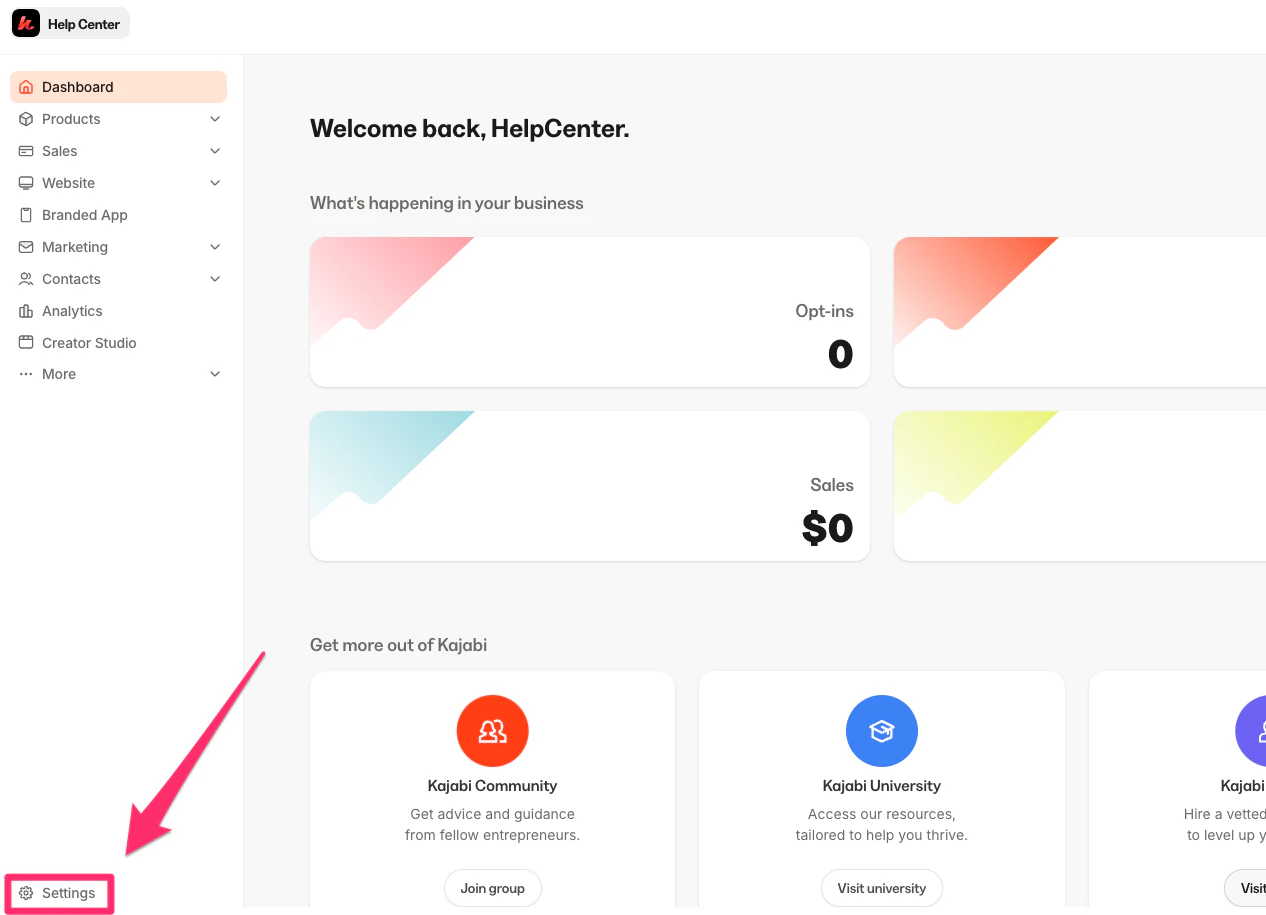 2. Within the **Settings** menu and select **Domain**:
 Now, you will need to copy the custom domain:
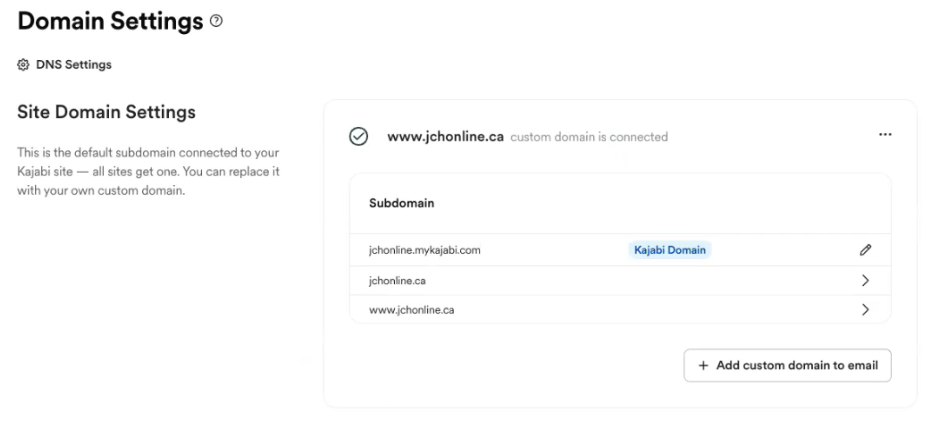
3. Identify the custom domain in the Domain settings
4. Be sure to include "www" when copying the custom domain:
Now, you will need to copy the custom domain:
3. Identify the custom domain in the Domain settings
4. Be sure to include "www" when copying the custom domain:
 ## Verify domain ownership via DNS record
1. Paste the custom domain into the custom domain field:
## Verify domain ownership via DNS record
1. Paste the custom domain into the custom domain field:
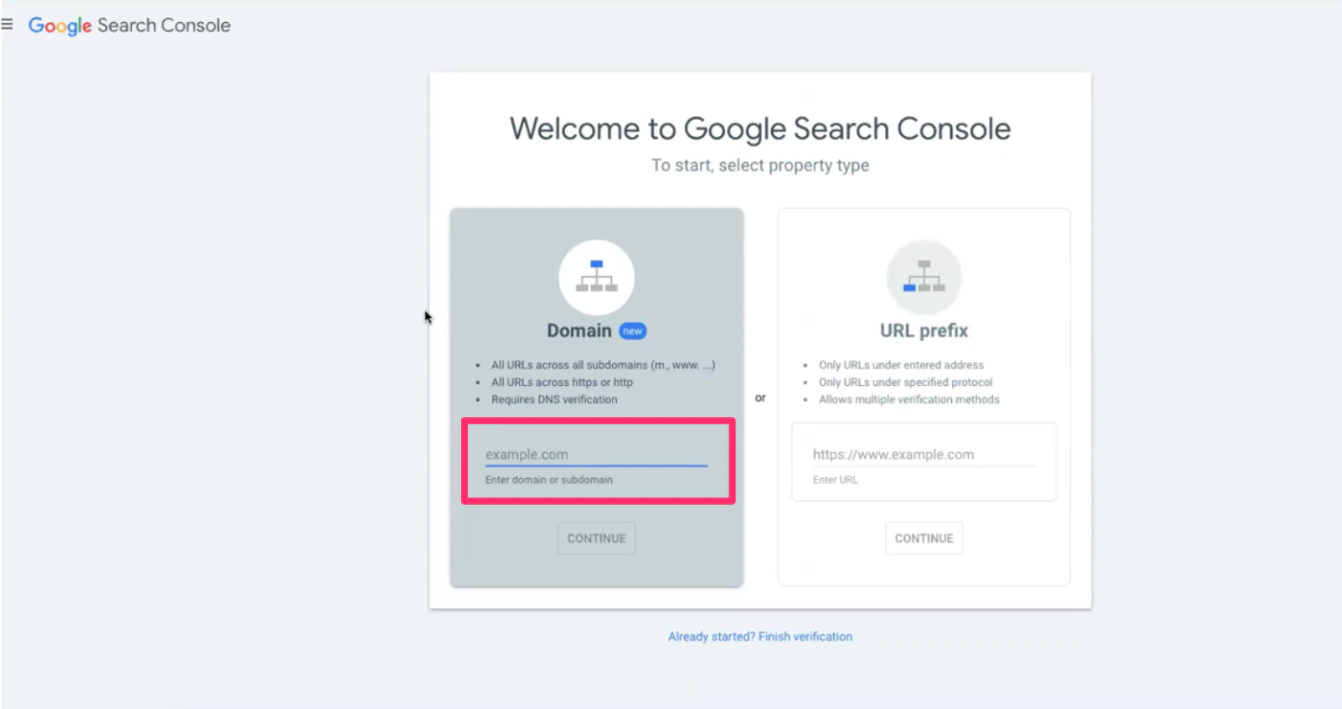 After entering the domain you can proceed to verification.
2. Click **Continue** to initiate the domain verification process
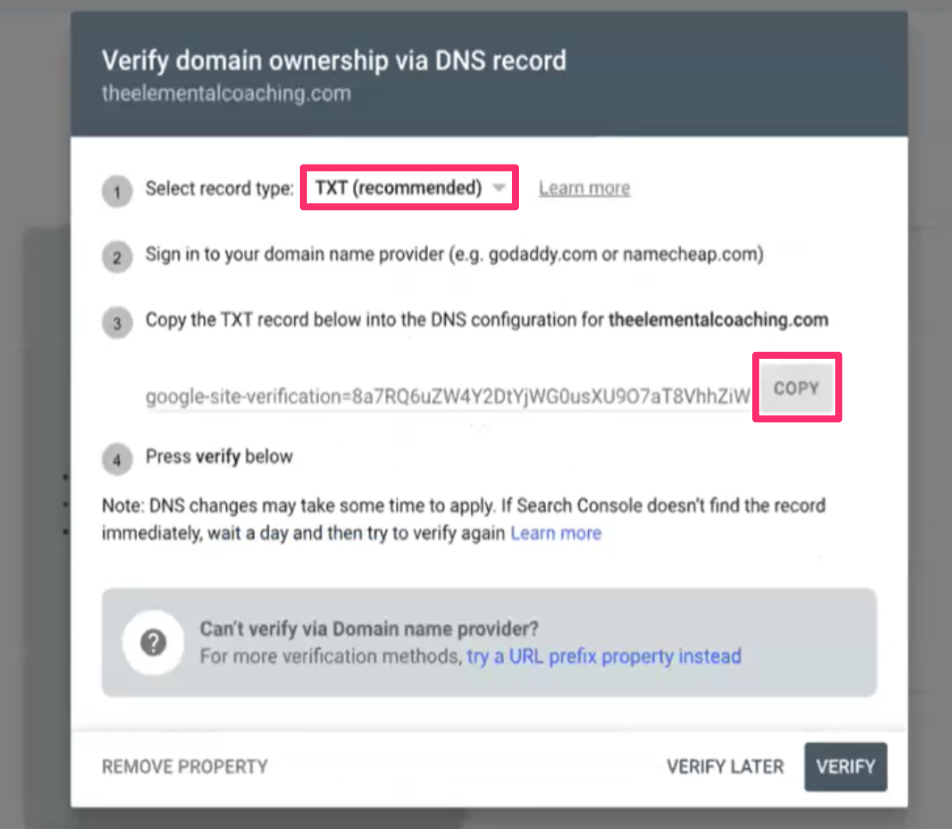
A pop-up window will appear prompting you to verify domain ownership through a DNS record:
After entering the domain you can proceed to verification.
2. Click **Continue** to initiate the domain verification process
A pop-up window will appear prompting you to verify domain ownership through a DNS record:
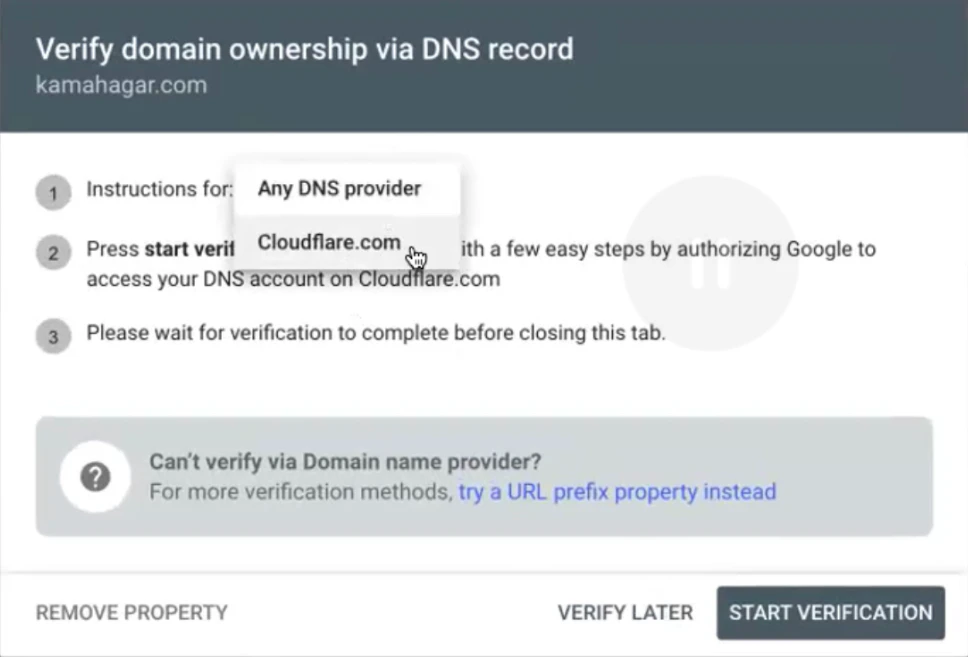 3. In the first step of the pop-up, select TXT from the dropdown menu
4. Then, copy the **TXT record** provided in the third step for later use:
3. In the first step of the pop-up, select TXT from the dropdown menu
4. Then, copy the **TXT record** provided in the third step for later use:
 ### If you manage domain settings in Kajabi
You will need to access the DNS Settings in Kajabi:
1. Return to the Kajabi account
2. Navigate to the **Domain Settings**
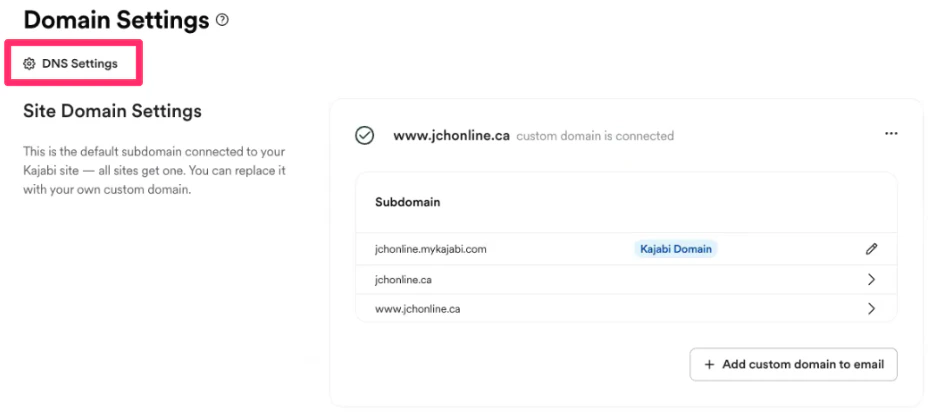
3. Then, select **DNS Settings**:
### If you manage domain settings in Kajabi
You will need to access the DNS Settings in Kajabi:
1. Return to the Kajabi account
2. Navigate to the **Domain Settings**
3. Then, select **DNS Settings**:
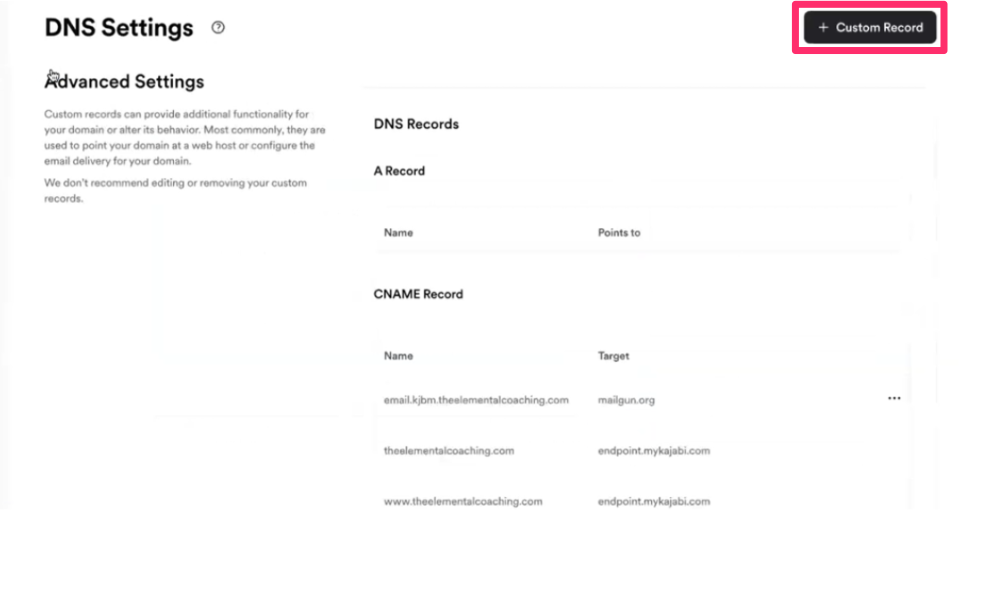
 4. Click **+ Custom Record**
5. Select **TXT Record**:
4. Click **+ Custom Record**
5. Select **TXT Record**:
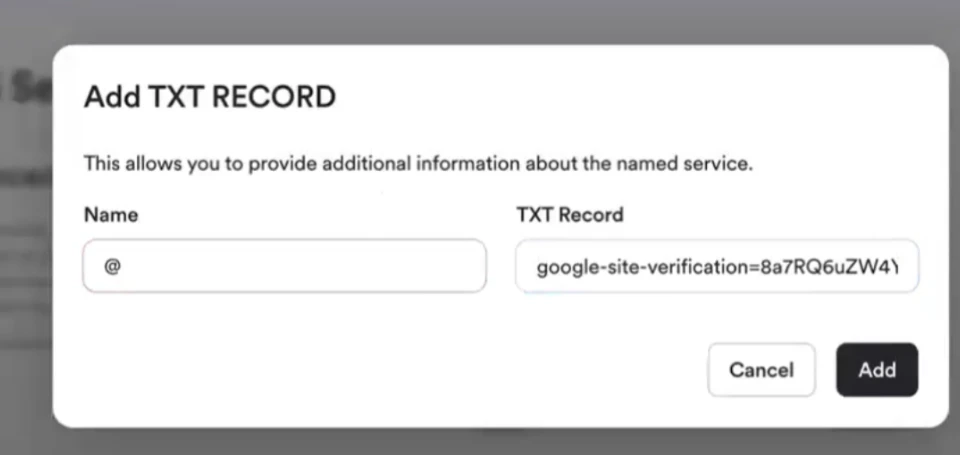
 Add the copied TXT Record by inputting the following details:
* **Name:** "@"
* **TXT Record Value:** Paste the TXT record you copied from Google Search Console:
Add the copied TXT Record by inputting the following details:
* **Name:** "@"
* **TXT Record Value:** Paste the TXT record you copied from Google Search Console:
 6. Click **Add** after entering the above details
7. Navigate back to Google Search Console to the Verify domain ownership pop-up
## Verify website in Google Play Console
You will then need to return to the Google Play Console tab.
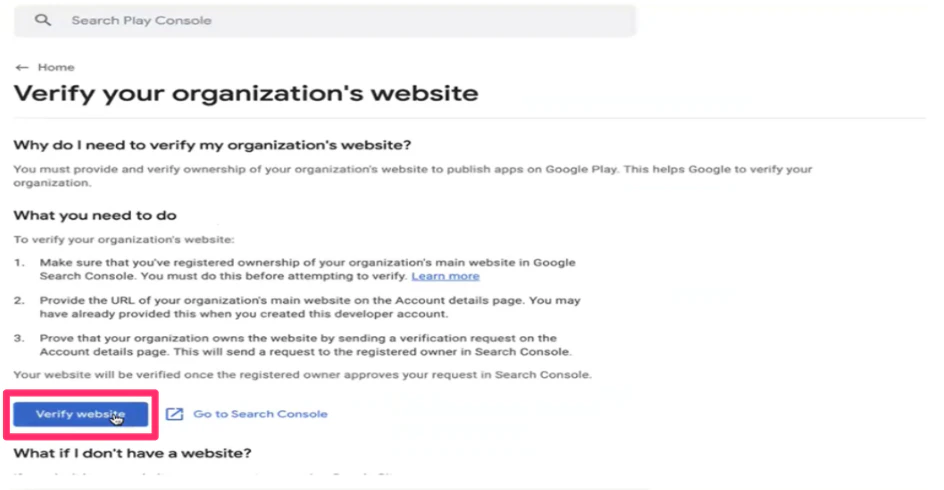
1. Click **Verify Website** to proceed:
6. Click **Add** after entering the above details
7. Navigate back to Google Search Console to the Verify domain ownership pop-up
## Verify website in Google Play Console
You will then need to return to the Google Play Console tab.
1. Click **Verify Website** to proceed:
 After verification, you will be redirected to the Account Details page.
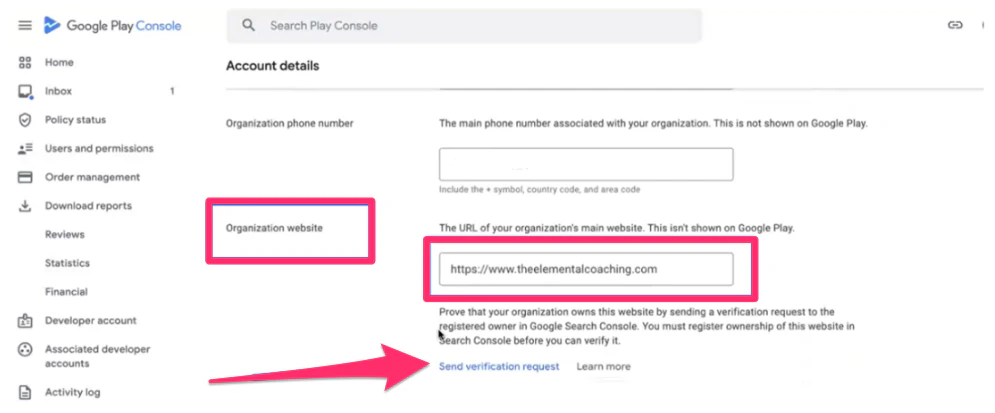
2. Scroll down to the **Organization Website** section and confirm that the custom domain is listed
3. Then, click **Send Verification Request** to finalize the process:
After verification, you will be redirected to the Account Details page.
2. Scroll down to the **Organization Website** section and confirm that the custom domain is listed
3. Then, click **Send Verification Request** to finalize the process:
 **Note:**
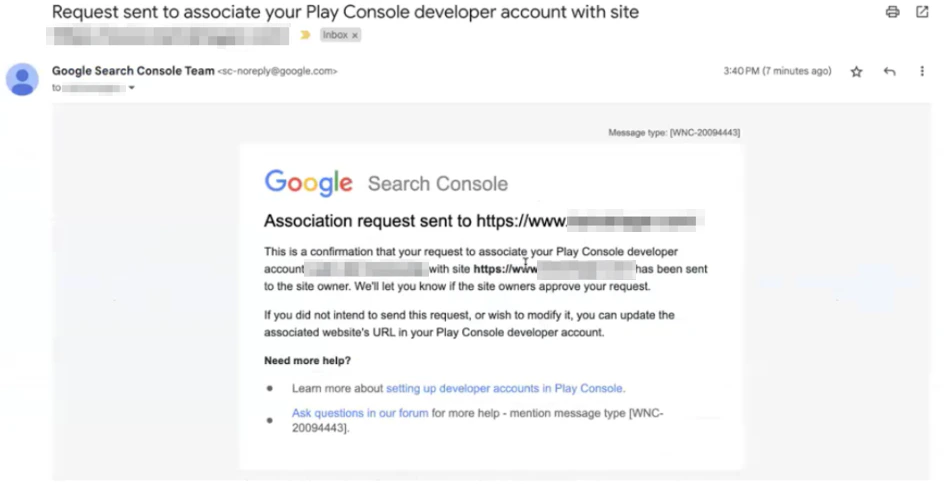
While the verification process may often complete instantly, there are instances when an email will be sent to the Developer account email address requesting you to verify the domain from there. In such cases, you will need to return to Google Search Console and repeat the domain verification steps. This scenario is particularly common for custom domains that utilize Path B in Kajabi. Below is a sample email you may receive regarding this verification:
**Note:**
While the verification process may often complete instantly, there are instances when an email will be sent to the Developer account email address requesting you to verify the domain from there. In such cases, you will need to return to Google Search Console and repeat the domain verification steps. This scenario is particularly common for custom domains that utilize Path B in Kajabi. Below is a sample email you may receive regarding this verification:
 ## Confirmation of website verification
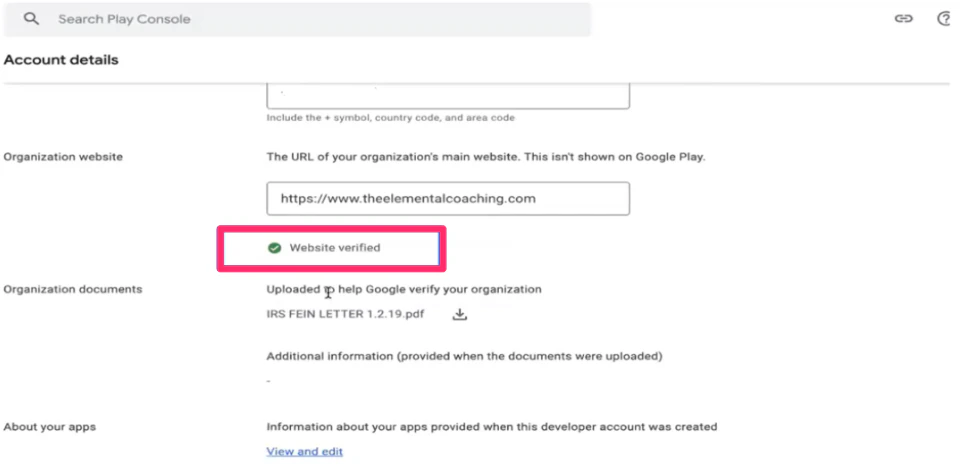
Once the website is verified, a confirmation message will appear on the Account details page under the Organization Website section:
## Confirmation of website verification
Once the website is verified, a confirmation message will appear on the Account details page under the Organization Website section:
 Now you can return to the homepage of the Google Play Console.
The notification for website verification should now be cleared, indicating successful verification.
## If domain settings are managed through a domain provider
After obtaining the TXT record, you will need to add the TXT record to the domain provider's DNS Records.
**Note:**
Refer to the domain provider's help resources for adding TXT records.
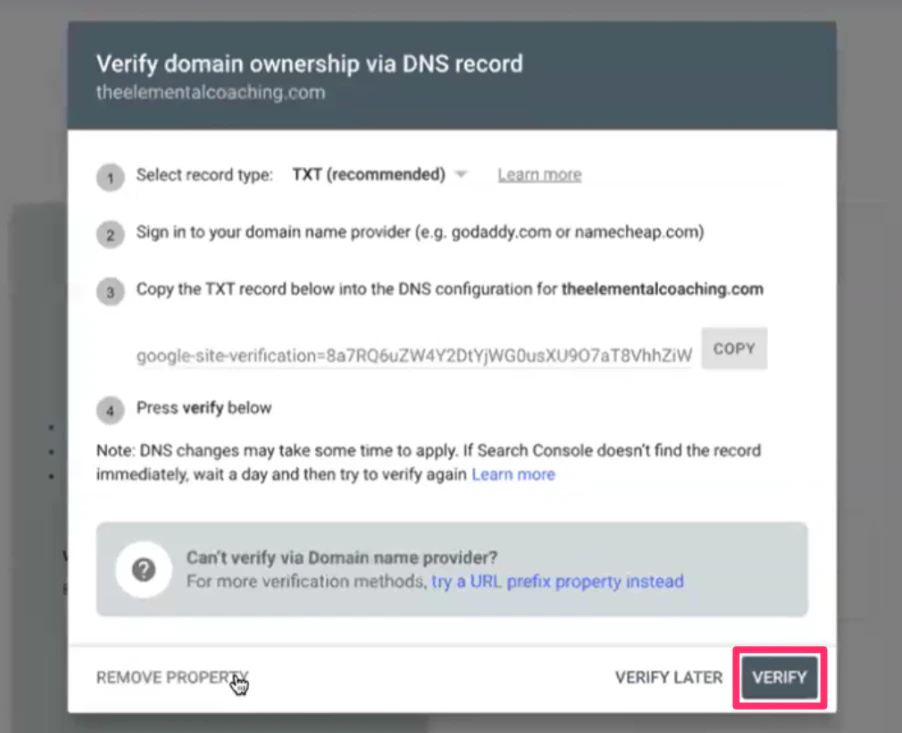
1. Navigate back to the **Verify domain ownership via DNS record** tab
2. Click **Verify**:
Now you can return to the homepage of the Google Play Console.
The notification for website verification should now be cleared, indicating successful verification.
## If domain settings are managed through a domain provider
After obtaining the TXT record, you will need to add the TXT record to the domain provider's DNS Records.
**Note:**
Refer to the domain provider's help resources for adding TXT records.
1. Navigate back to the **Verify domain ownership via DNS record** tab
2. Click **Verify**:
 Then follow the verification steps above to complete the process.