> ## Documentation Index
> Fetch the complete documentation index at: https://help.kajabi.com/llms.txt
> Use this file to discover all available pages before exploring further.
# Set up scheduling in Backstage
> Let Backstage clients book, reschedule, and cancel meetings using your connected calendar and availability.
**Scheduling** in Backstage lets your clients book time with you directly, instead of sending clients to an outside tool. Create a meeting record for your client, set your availability, and if you like, connect your calendar. Then, your clients can schedule a meeting by picking from your open times.
## Before you begin
Before clients can schedule meetings, make sure the following are in place:
* Your plan includes Backstage
* You have set your availability, either at the site level or for a specific Backstage
* You have created a meeting record for your client(s)
* (Optional) You have connected your calendar (Google, Microsoft Outlook, Microsoft Office 365, or Apple) so your availability stays in sync
**Note:**
Clients can only book meetings themselves if you have set your availability and (optionally) connected a third-party calendar. Until then, you can schedule meetings for them yourself.
## Set your availability
Your **availability** lives in your site-level scheduling settings and applies across all products on your site that use scheduling. You configure your hours once instead of setting them up separately for each product.
From the **Scheduling** settings page you can:
* Set your **business hours**, the windows when clients can book
* Connect or manage your calendar integration
* Set the **booking window**, how far in advance clients can book (defaults to 4 weeks)
* Set a **minimum booking notice**, the least amount of lead time before a booking
* Set **buffer time** before and after meetings
* Choose your session start-time increments
**To update availability at the site level:**
1. From the Dashboard, select **Settings**.
2. Under **Site settings**, select **Scheduling**.
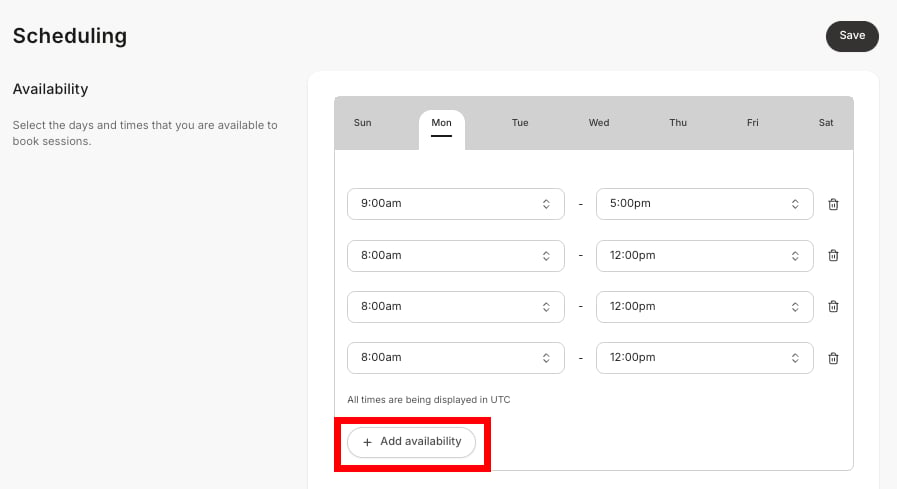
3. Under **Availability**, click **+ Add availability** to set one or more blocks of time you are available for each day (i.e. 8:00 AM to 12:00 PM, 1:00 PM to 2:00 PM, etc.) that do not overlap:
 4. Choose a default **Start time increment** between 5 and 60 minutes. When a client opens your booking calendar, they see a list of selectable start times:
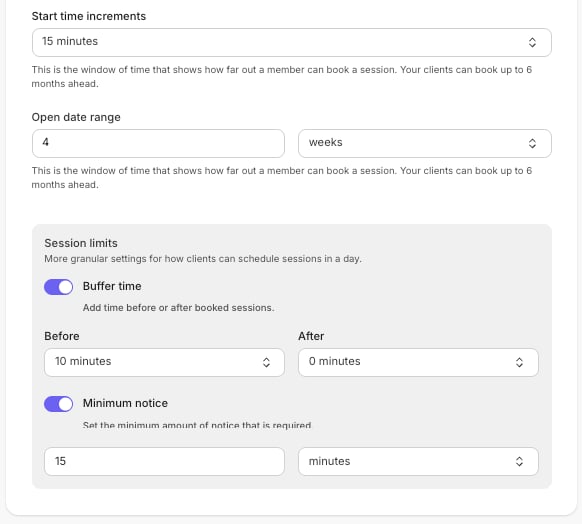 This controls the gap between those options. For example:
* 15 minutes → Clients can book starting at 9:00, 9:15, 9:30, 9:45…
* 30 minutes → Clients see 9:00, 9:30, 10:00…
* 60 minutes → Availability is only on the hour: 9:00, 10:00, 11:00…
5. Choose the **Open date range** in days, weeks, or months. This is the window of time that shows how far out a client can book a session. Clients can book up to 6 months ahead.
6. Under **Session limits**, update more granular settings for how clients can schedule sessions in a day. **Buffer time** is time you add before and/or after booked sessions, and **Minimum notice** is the minimum amount of time you require to accept a booked session.
7. To remove a time block, click the **trash can**.
8. Click **Save** to apply your changes.
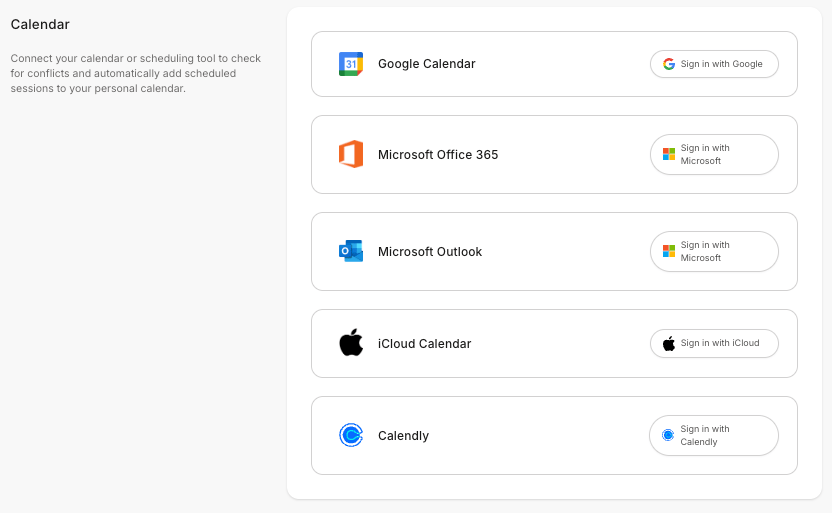
Optionally, connect your calendar or scheduling tool from the second half of this page to check for conflicts and automatically add scheduled sessions to your personal calendar:
This controls the gap between those options. For example:
* 15 minutes → Clients can book starting at 9:00, 9:15, 9:30, 9:45…
* 30 minutes → Clients see 9:00, 9:30, 10:00…
* 60 minutes → Availability is only on the hour: 9:00, 10:00, 11:00…
5. Choose the **Open date range** in days, weeks, or months. This is the window of time that shows how far out a client can book a session. Clients can book up to 6 months ahead.
6. Under **Session limits**, update more granular settings for how clients can schedule sessions in a day. **Buffer time** is time you add before and/or after booked sessions, and **Minimum notice** is the minimum amount of time you require to accept a booked session.
7. To remove a time block, click the **trash can**.
8. Click **Save** to apply your changes.
Optionally, connect your calendar or scheduling tool from the second half of this page to check for conflicts and automatically add scheduled sessions to your personal calendar:
 ## **Customize scheduling for Backstage**
Your site-level availability applies everywhere by default. To use different hours or limits for Backstage:
1. From the Dashboard, select **Backstage**.
2. Click the **Settings** tab.
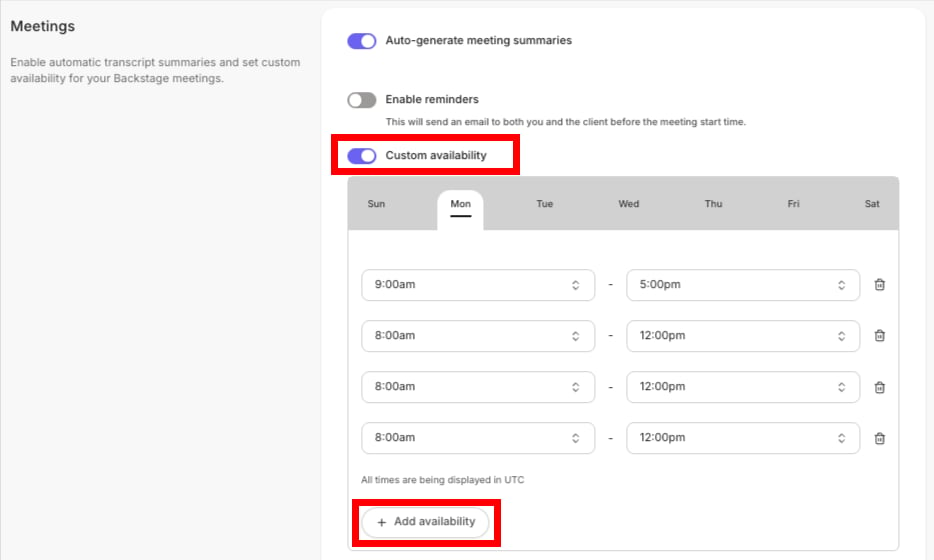
3. Under **Meetings**, toggle on **Custom availability**.
4. As with site-level availability settings, use the **+ Add availability** button to set time blocks and modify date ranges, time increments, and session limits.
5. Click **Save** to apply your changes:
## **Customize scheduling for Backstage**
Your site-level availability applies everywhere by default. To use different hours or limits for Backstage:
1. From the Dashboard, select **Backstage**.
2. Click the **Settings** tab.
3. Under **Meetings**, toggle on **Custom availability**.
4. As with site-level availability settings, use the **+ Add availability** button to set time blocks and modify date ranges, time increments, and session limits.
5. Click **Save** to apply your changes:
 ## **Create a meeting**
When you create a **meeting** in Backstage, you set the details yourself:
1. From the Dashboard, select **Backstage**.
2. Click the **Clients** tab and click a **Member Name**.
3. Click the **Meetings** tab and click **New meeting**.
4. Enter a **Title** and select the **Scheduled at time** and **Timezone**.
5. Select a **Location**, either Kajabi Live Video or enter a custom one.
6. Set the **Duration** (minutes). Session durations start at 5 minutes and increase in 5-minute increments, with a default of 30 minutes.
7. Click **Save**:
## **Create a meeting**
When you create a **meeting** in Backstage, you set the details yourself:
1. From the Dashboard, select **Backstage**.
2. Click the **Clients** tab and click a **Member Name**.
3. Click the **Meetings** tab and click **New meeting**.
4. Enter a **Title** and select the **Scheduled at time** and **Timezone**.
5. Select a **Location**, either Kajabi Live Video or enter a custom one.
6. Set the **Duration** (minutes). Session durations start at 5 minutes and increase in 5-minute increments, with a default of 30 minutes.
7. Click **Save**:
-1.png?fit=max&auto=format&n=POlkEbAq_VeBAggQ&q=85&s=1666305ffecc96c077146a16d17e0e05 "Screenshot 2026 07 14 At 8 30 07 PM (3) 1") 8. You can also schedule a meeting with a client from the Backstage Overview tab - just click **Schedule** next to a client name.
## **Reschedule or cancel a meeting**
You can reschedule or cancel a meeting that is already scheduled.
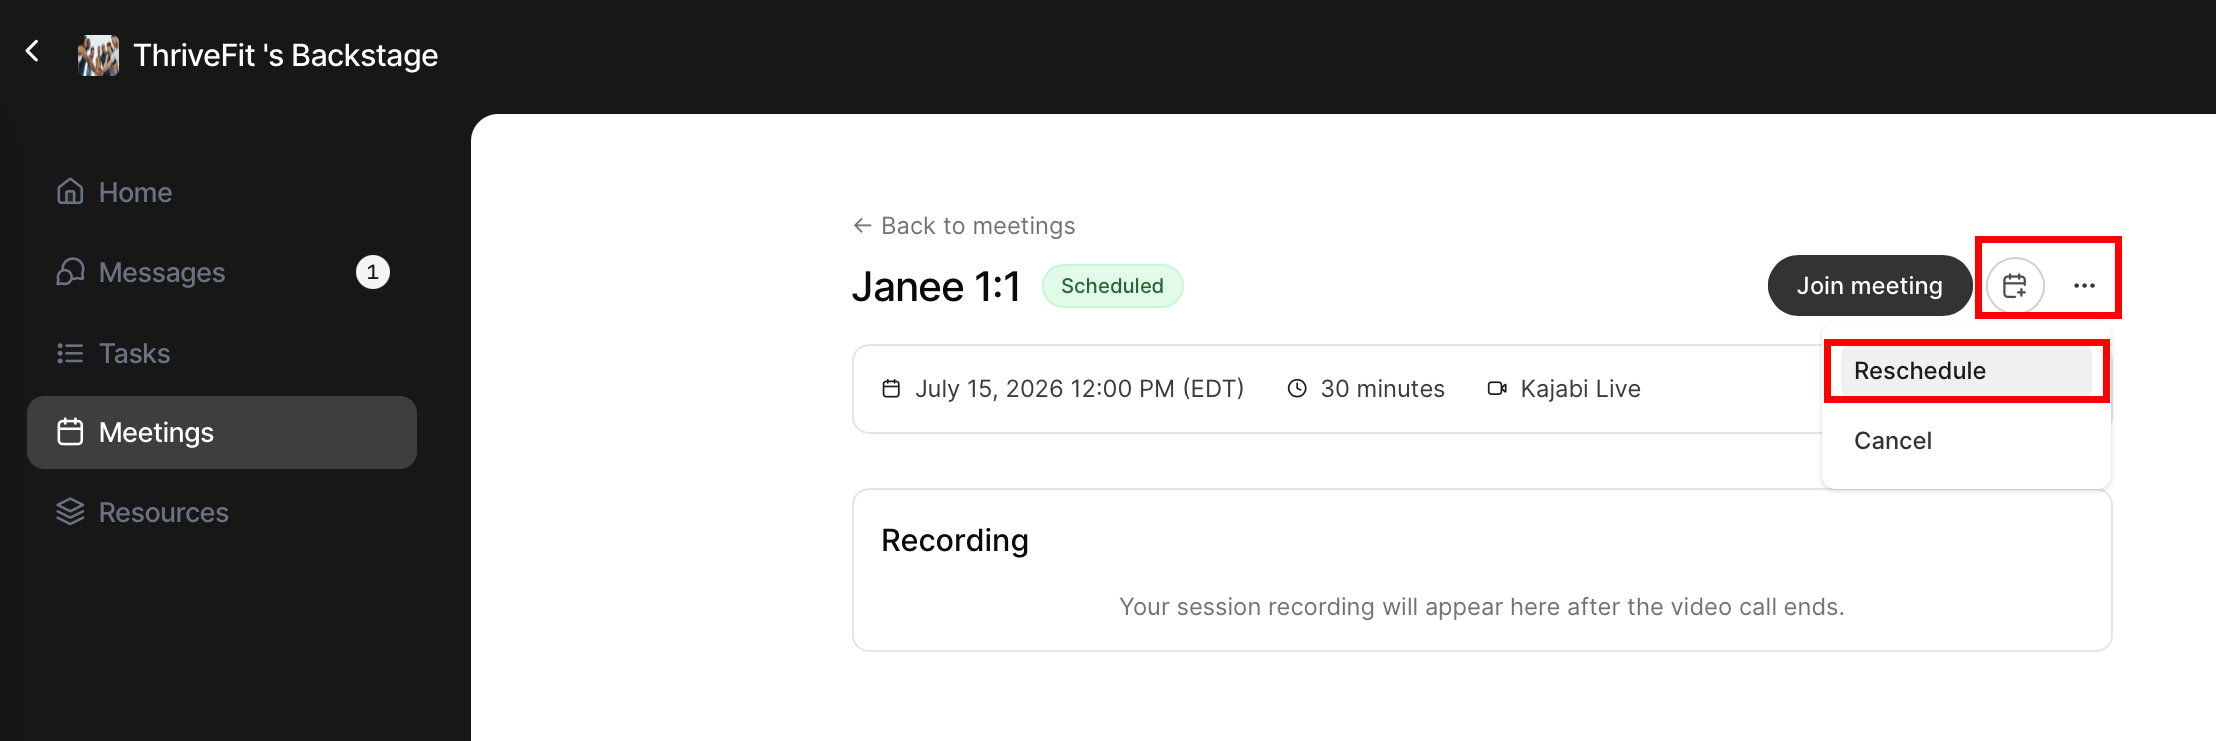
1. To reschedule, from the client’s **Meetings** tab, click the **more actions (...) menu** next to a meeting listing, and select **Reschedule**.
8. You can also schedule a meeting with a client from the Backstage Overview tab - just click **Schedule** next to a client name.
## **Reschedule or cancel a meeting**
You can reschedule or cancel a meeting that is already scheduled.
1. To reschedule, from the client’s **Meetings** tab, click the **more actions (...) menu** next to a meeting listing, and select **Reschedule**.
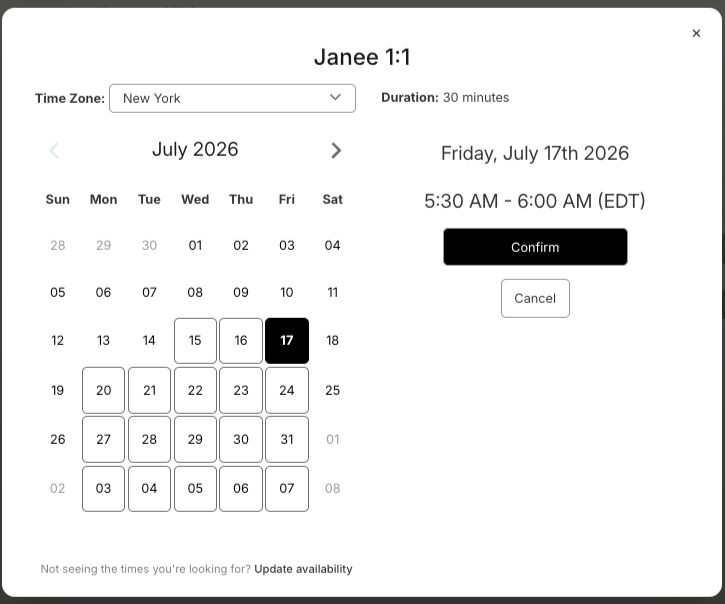
.png?fit=max&auto=format&n=POlkEbAq_VeBAggQ&q=85&s=de041a0ddd44fee5b028e33ac680f7e9) 2. Choose a new date and time. If you do not see times needed, click **Update availability**.
3. Click **Confirm**. Then, click **Ok**. Rescheduling updates the event on your connected calendar automatically:
2. Choose a new date and time. If you do not see times needed, click **Update availability**.
3. Click **Confirm**. Then, click **Ok**. Rescheduling updates the event on your connected calendar automatically:
 4. To cancel a meeting, select **Cancel** from the client’s **more actions (...) menu** on their **Meetings** tab.
5. Click **Cancel**, and then **Ok**.
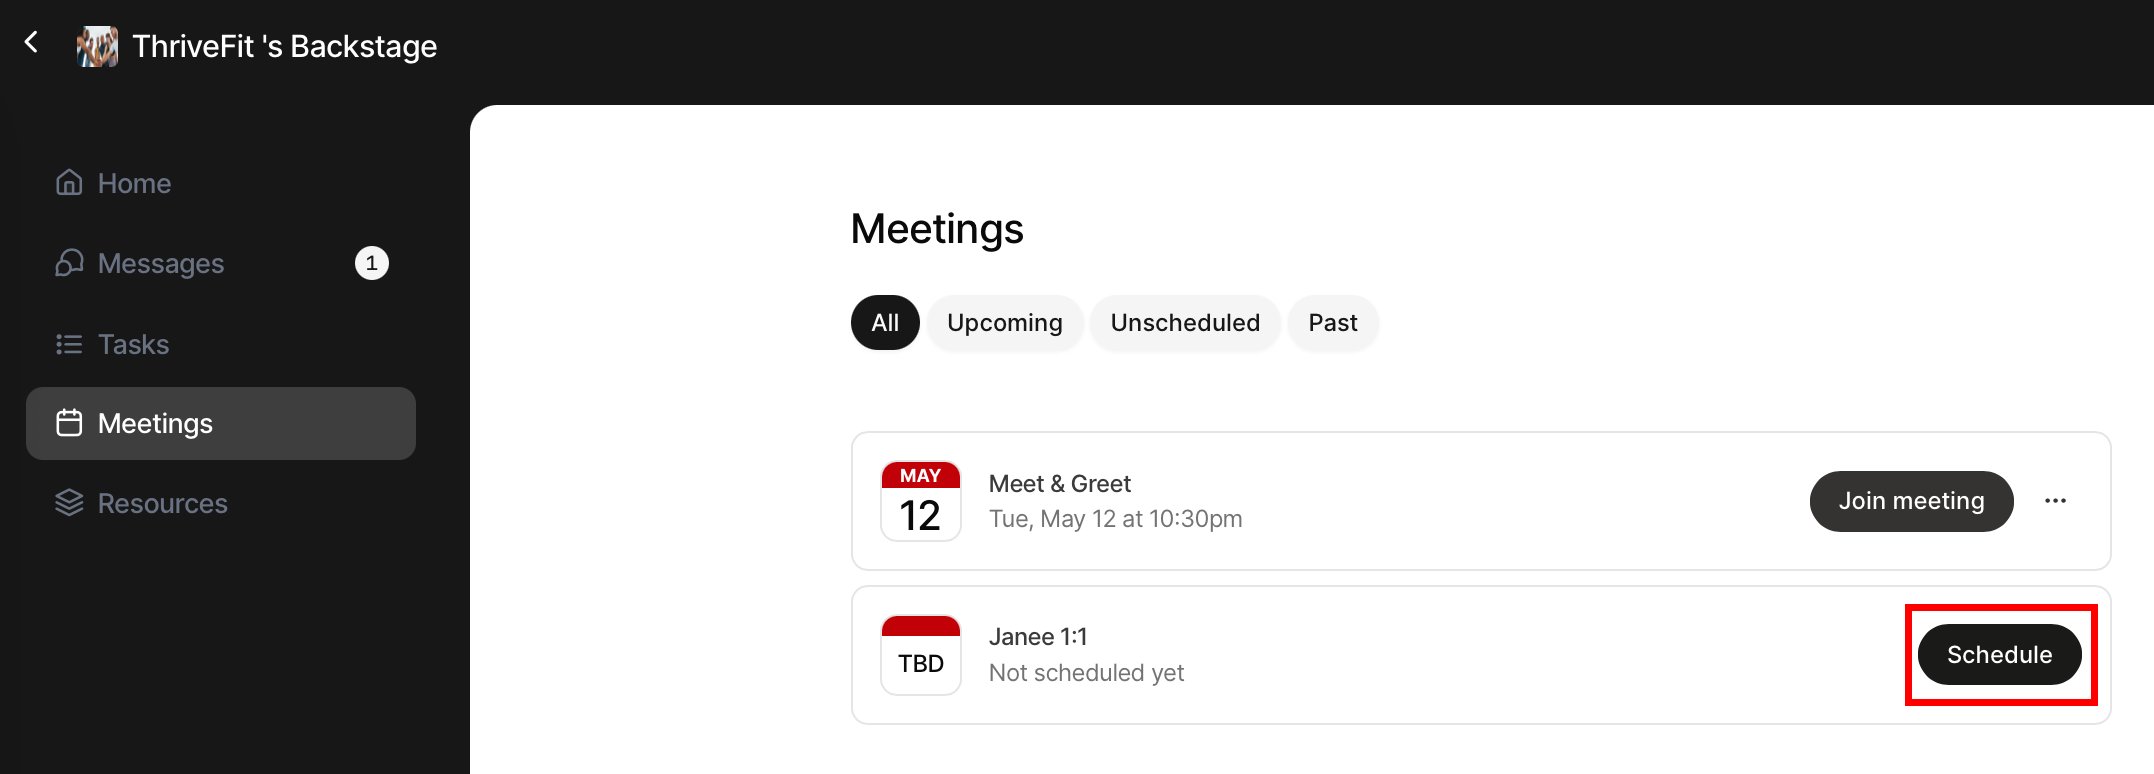
6. The meeting listing will now read **Not scheduled**. Click **Schedule** to schedule a new meeting with the client.
## **What your clients can do**
Once you have set up scheduling, clients manage their own meetings from Backstage. They can also click a **calendar icon** to connect their own third-party calendar.
### **As a client, book, reschedule, or cancel a meeting**
4. To cancel a meeting, select **Cancel** from the client’s **more actions (...) menu** on their **Meetings** tab.
5. Click **Cancel**, and then **Ok**.
6. The meeting listing will now read **Not scheduled**. Click **Schedule** to schedule a new meeting with the client.
## **What your clients can do**
Once you have set up scheduling, clients manage their own meetings from Backstage. They can also click a **calendar icon** to connect their own third-party calendar.
### **As a client, book, reschedule, or cancel a meeting**
 From the client’s **Backstage Home** or **Meetings** tab, they can:
* **Book an open time for an unscheduled meeting**
From the client’s **Backstage Home** or **Meetings** tab, they can:
* **Book an open time for an unscheduled meeting**
Click **Schedule.** Clients see your real-time availability, and choose from your open times.
* **Reschedule a meeting to another available time**
Click the **more actions (...) menu** on a meeting listing and select **Reschedule**.
* **Cancel a meeting**
Click the **more actions (...) menu** on a meeting listing and select **Cancel**.
 ### **Find meetings by status**
The client **Meetings** list has filter tabs: **All** (the default), **Upcoming**, **Unscheduled**, and **Past**.
### **Add a meeting to a calendar**
Clients can add a Backstage meeting to an external calendar by clicking the **calendar icon** at the top of the meeting **Details** page. Supported calendars are Apple Calendar, Google Calendar, Office 365, Outlook, [Outlook.com](http://Outlook.com), and Yahoo Calendar.
## **Meeting reminders**
Backstage can send reminder emails before a meeting to both you and your client.
### **Find meetings by status**
The client **Meetings** list has filter tabs: **All** (the default), **Upcoming**, **Unscheduled**, and **Past**.
### **Add a meeting to a calendar**
Clients can add a Backstage meeting to an external calendar by clicking the **calendar icon** at the top of the meeting **Details** page. Supported calendars are Apple Calendar, Google Calendar, Office 365, Outlook, [Outlook.com](http://Outlook.com), and Yahoo Calendar.
## **Meeting reminders**
Backstage can send reminder emails before a meeting to both you and your client.
 **To set up reminders:**
1. From the Dashboard, click **Backstage**.
2. Click the **Settings** tab.
3. Under the **Meetings** section, toggle on **Enable reminders**.
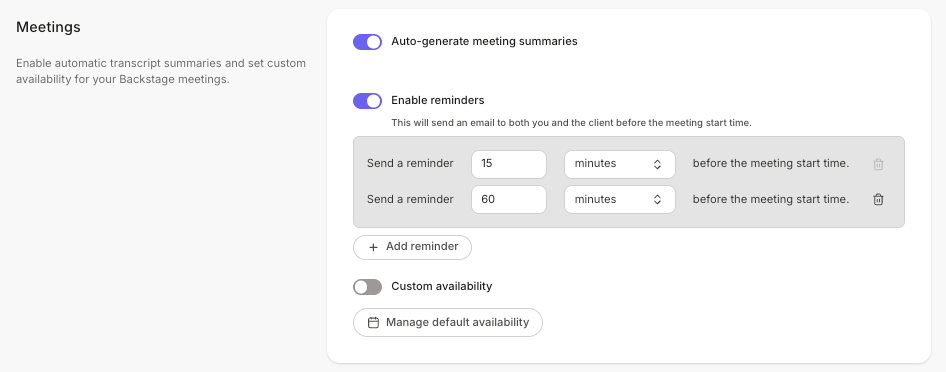
4. By default, Backstage sends a single reminder 15 minutes before the meeting. You can adjust the reminder schedule to fit your needs. Add multiple reminders by clicking **+ Add reminder**, and click the **trash can** to remove one.
## **FAQs**
### **Do my clients need their own calendar tool to book a meeting?**
No. Clients book directly in Backstage from your available times. They do not need Calendly, Acuity, or any external tool.
### **Can I still schedule meetings for my clients myself?**
Yes. You can create and schedule meetings yourself, or create a meeting without a time and let the client book it.
### **Does scheduling in Backstage require Kajabi Coaching?**
No. Backstage scheduling works on its own and does not require a Coaching product.
### **Which calendars can I connect?**
You can connect Google, Microsoft Outlook, Microsoft Office 365, and Apple calendars.
### What happens when a client's Backstage access expires or is revoked?
If a client's access to Backstage expires or is revoked, they keep read-only access to their Backstage content. They can view their history, but they can no longer send messages.
**To set up reminders:**
1. From the Dashboard, click **Backstage**.
2. Click the **Settings** tab.
3. Under the **Meetings** section, toggle on **Enable reminders**.
4. By default, Backstage sends a single reminder 15 minutes before the meeting. You can adjust the reminder schedule to fit your needs. Add multiple reminders by clicking **+ Add reminder**, and click the **trash can** to remove one.
## **FAQs**
### **Do my clients need their own calendar tool to book a meeting?**
No. Clients book directly in Backstage from your available times. They do not need Calendly, Acuity, or any external tool.
### **Can I still schedule meetings for my clients myself?**
Yes. You can create and schedule meetings yourself, or create a meeting without a time and let the client book it.
### **Does scheduling in Backstage require Kajabi Coaching?**
No. Backstage scheduling works on its own and does not require a Coaching product.
### **Which calendars can I connect?**
You can connect Google, Microsoft Outlook, Microsoft Office 365, and Apple calendars.
### What happens when a client's Backstage access expires or is revoked?
If a client's access to Backstage expires or is revoked, they keep read-only access to their Backstage content. They can view their history, but they can no longer send messages.