> ## Documentation Index
> Fetch the complete documentation index at: https://help.kajabi.com/llms.txt
> Use this file to discover all available pages before exploring further.
# Connect the Kajabi Scheduler to a Coaching program
> Easily manage availability and book coaching sessions.
**Kajabi Scheduler** helps you more easily set appointments and meet with Coaching clients. Allow clients to book sessions around your set availability and meet through any method of your choice, including Kajabi's [built-in live video](http://../../products/coaching/how-to-create-a-live-video-session).
## Add Kajabi Scheduler to a new Coaching program
Set up your Kajabi Scheduler with a new or existing Coaching Program.
1. [Create a new Coaching program](https://help.kajabi.com/articles/products/coaching/how-to-create-a-coaching-product#how-the-coaching-product-works). Choose **1:1 Coaching** or **Group Coaching** and add any program details.
2. Select **Kajabi Scheduler** as the **Scheduling preference**.
3. Choose a **Location.** Select **Kajabi live video**, or select **Custom** and enter a video conference URL or other physical or virtual location details.
4. Set the **Session Duration** (up to 6 hours).
5. Click **Continue** to finish setting up your program.
**Note:** Once the Session Duration is set during the Coaching program creation process, all the times for each session will remain the same. You can later adjust the duration in the **Settings** tab, as described below.
### Add Kajabi Scheduler to an existing Coaching program
1. From the Dashboard, open **Products**, then click **Coaching**.
2. Select the **Programs** tab, then click the title of a Coaching **Program**.
3. Open the **Settings** tab, and navigate to the **Scheduling** section.
4. Select **Kajabi** as the **Scheduling preference**.
5. Choose a **Location.** Select **Kajabi live video**, or select **Custom location** and enter a video conference URL or other location details.
6. Set the **Session Duration** (up to 6 hours).
7. Toggle on **Enable reminders** to send an email to both you and the client before the session start time. Choose a number and minutes, hours, or days. Click **+Add reminder** to add additional email reminders for different intervals.
8. Click **Save**.
## Manage availability
Set your availability to help your clients schedule their sessions.
By default, your availability window for all Coaching sessions is set as 9:00 AM to 5:00 PM in your local time zone with 15-minute start time increments, and clients can book up to 4 weeks in advance. These values can be changed for all Coaching programs, or you may customize individual programs.
**Note:** Your availability will default to your local time zone. [Learn to adjust your time zone in your Account Details](../../account-settings/my-kajabi/change-your-account-details).
### Set general availability
These availability settings apply to all of your Coaching programs, unless they are overwritten by custom settings.
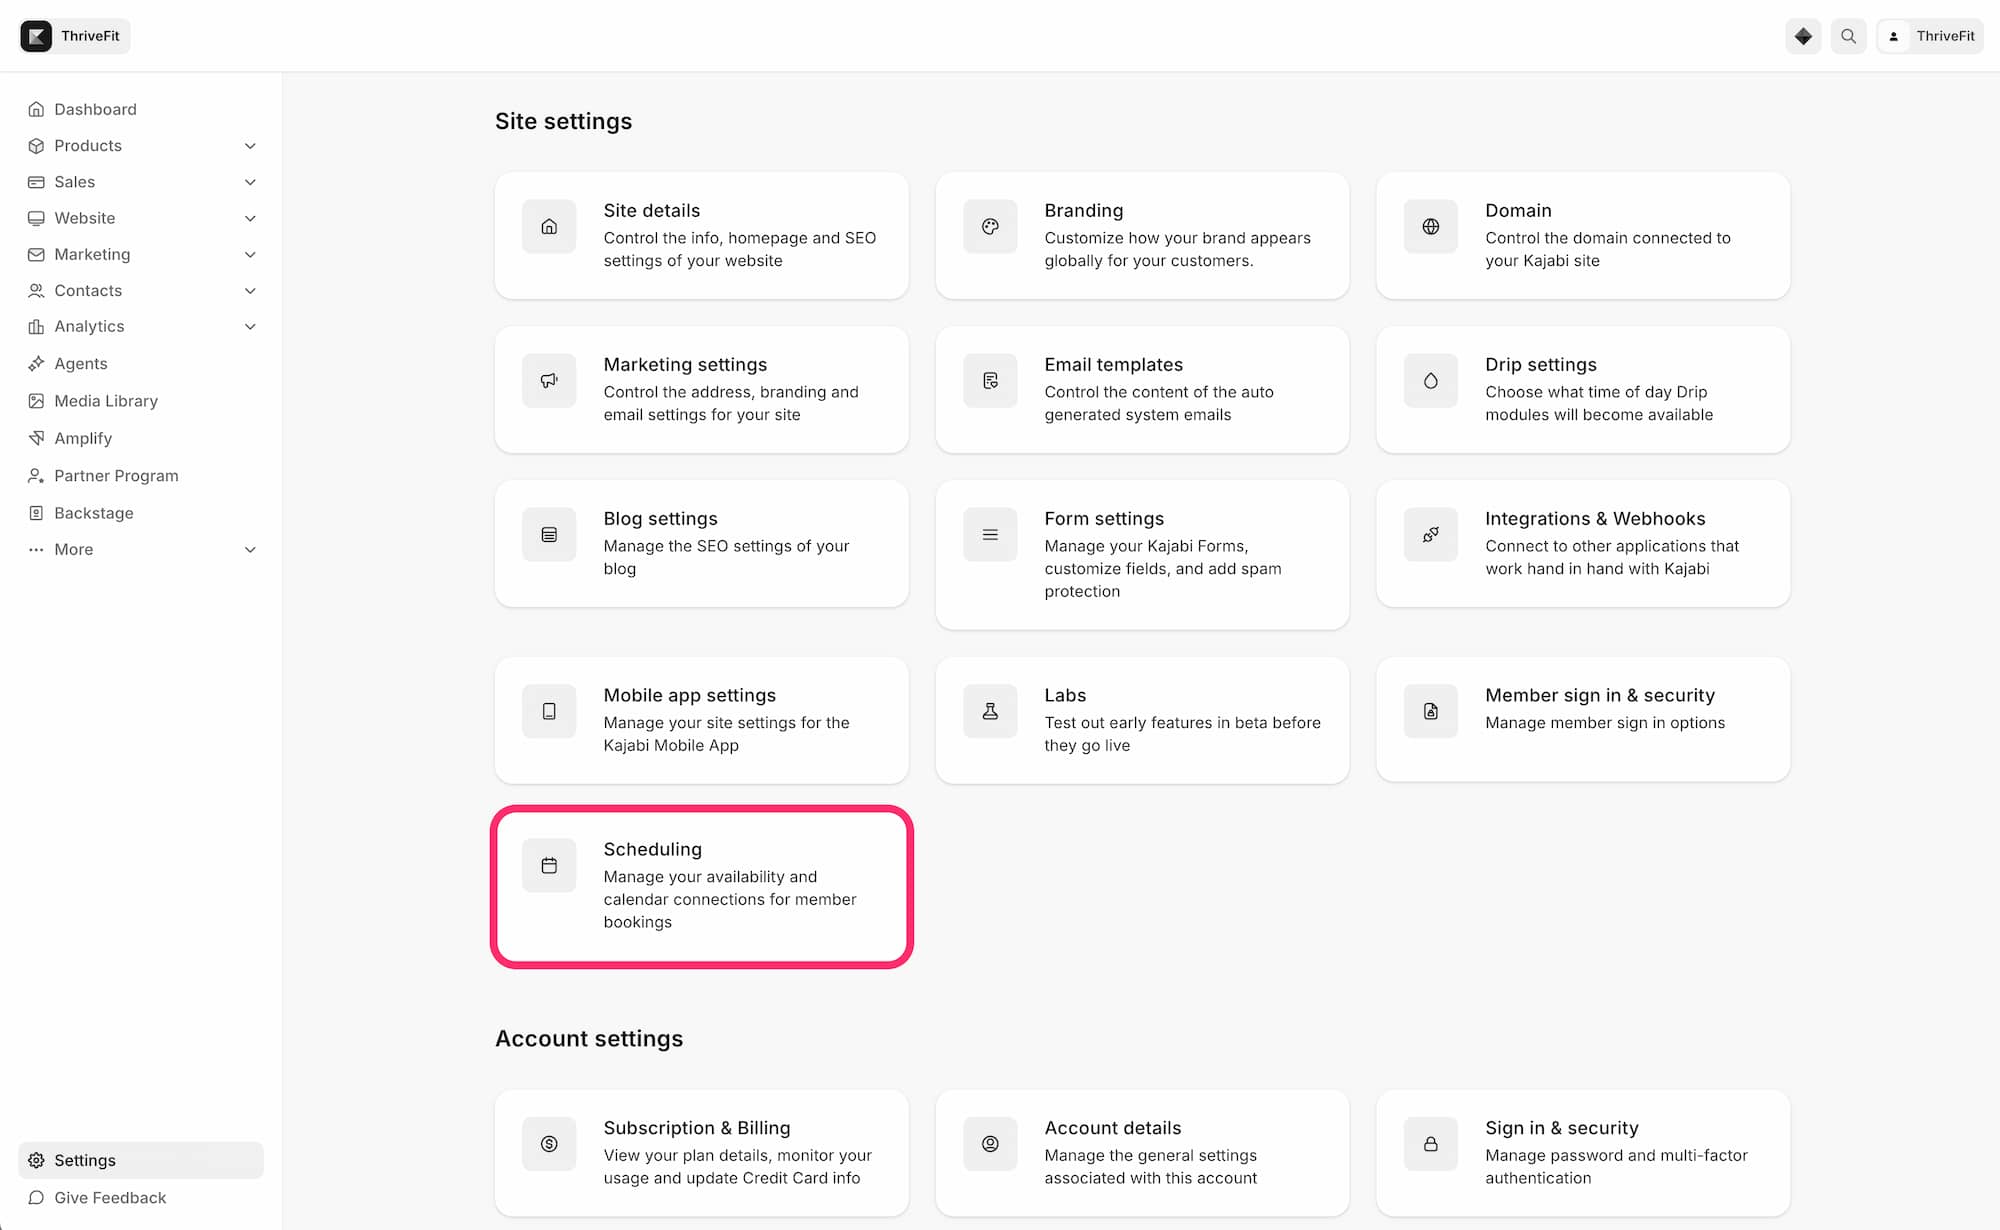
1. From your Dashboard, go to **Settings**, under Site settings, click **Scheduling.**
 2. Under **Availability**, set one or more blocks of time you are available for each day (i.e. 8:00 AM to 12:00 PM, 1:00 PM to 2:00 PM, etc.) that do not overlap.
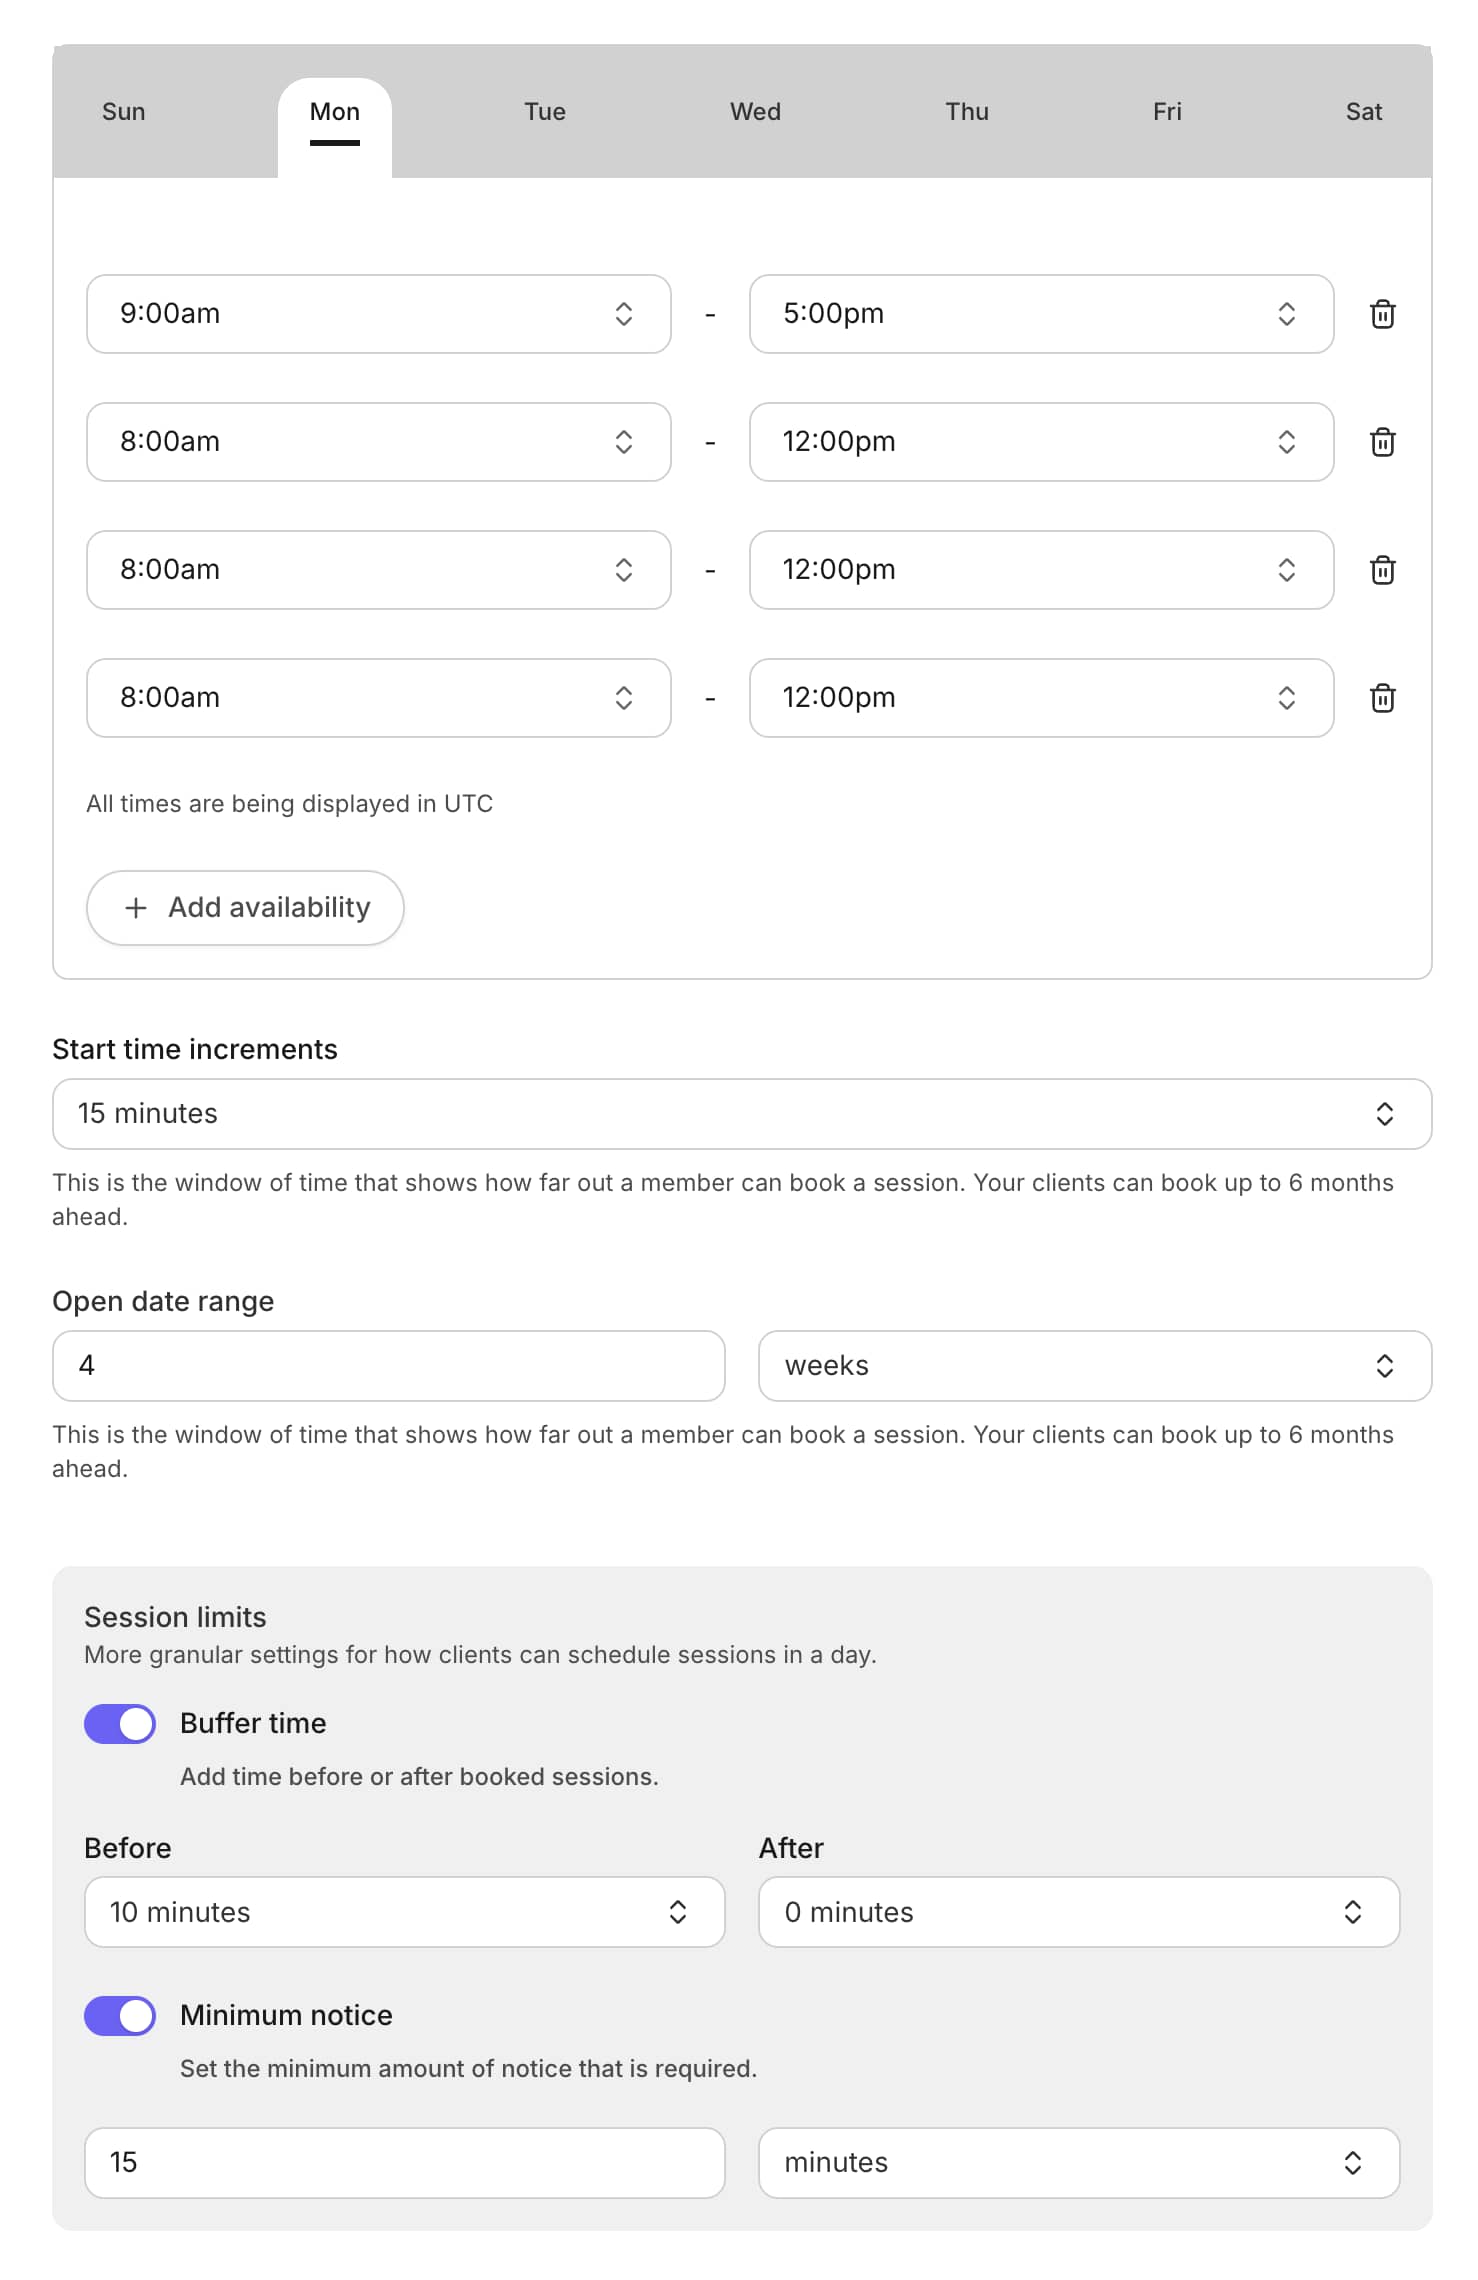 3. Choose a default **Start time increment** between 5 and 60 minutes. When a client opens your booking calendar, they see a list of selectable start times. This controls the gap between those options. For example:
* 15 minutes → Clients can book starting at 9:00, 9:15, 9:30, 9:45…
* 30 minutes → Clients see 9:00, 9:30, 10:00…
* 60 minutes → Availability is only on the hour: 9:00, 10:00, 11:00…
4. Choose the **Open date range** in days, weeks, or months. This is the window of time that shows how far out a client can book a session. Clients can book up to 6 months ahead.
5. Under **Session limits**, update more granular settings for how clients can schedule sessions in a day. **Buffer time** is time you add before and/or after booked sessions, and **Minimum notice** is the minimum amount of time you require to accept a booked session.
6. Click **Save** to apply your changes.
### Set custom availability for a Coaching program
You can also set a buffer between sessions to avoid a client booking a session too soon to prepare for.
1. From your Dashboard, go to **Products**, then click **Coaching**.
2. Select a Coaching program under the **Programs** tab, click **Settings** from the top menu.
3. In the **Scheduling** section, select Kajabi as the scheduler in the dropdown. This will enable the **Availability** subsection.
3. Choose a default **Start time increment** between 5 and 60 minutes. When a client opens your booking calendar, they see a list of selectable start times. This controls the gap between those options. For example:
* 15 minutes → Clients can book starting at 9:00, 9:15, 9:30, 9:45…
* 30 minutes → Clients see 9:00, 9:30, 10:00…
* 60 minutes → Availability is only on the hour: 9:00, 10:00, 11:00…
4. Choose the **Open date range** in days, weeks, or months. This is the window of time that shows how far out a client can book a session. Clients can book up to 6 months ahead.
5. Under **Session limits**, update more granular settings for how clients can schedule sessions in a day. **Buffer time** is time you add before and/or after booked sessions, and **Minimum notice** is the minimum amount of time you require to accept a booked session.
6. Click **Save** to apply your changes.
### Set custom availability for a Coaching program
You can also set a buffer between sessions to avoid a client booking a session too soon to prepare for.
1. From your Dashboard, go to **Products**, then click **Coaching**.
2. Select a Coaching program under the **Programs** tab, click **Settings** from the top menu.
3. In the **Scheduling** section, select Kajabi as the scheduler in the dropdown. This will enable the **Availability** subsection.
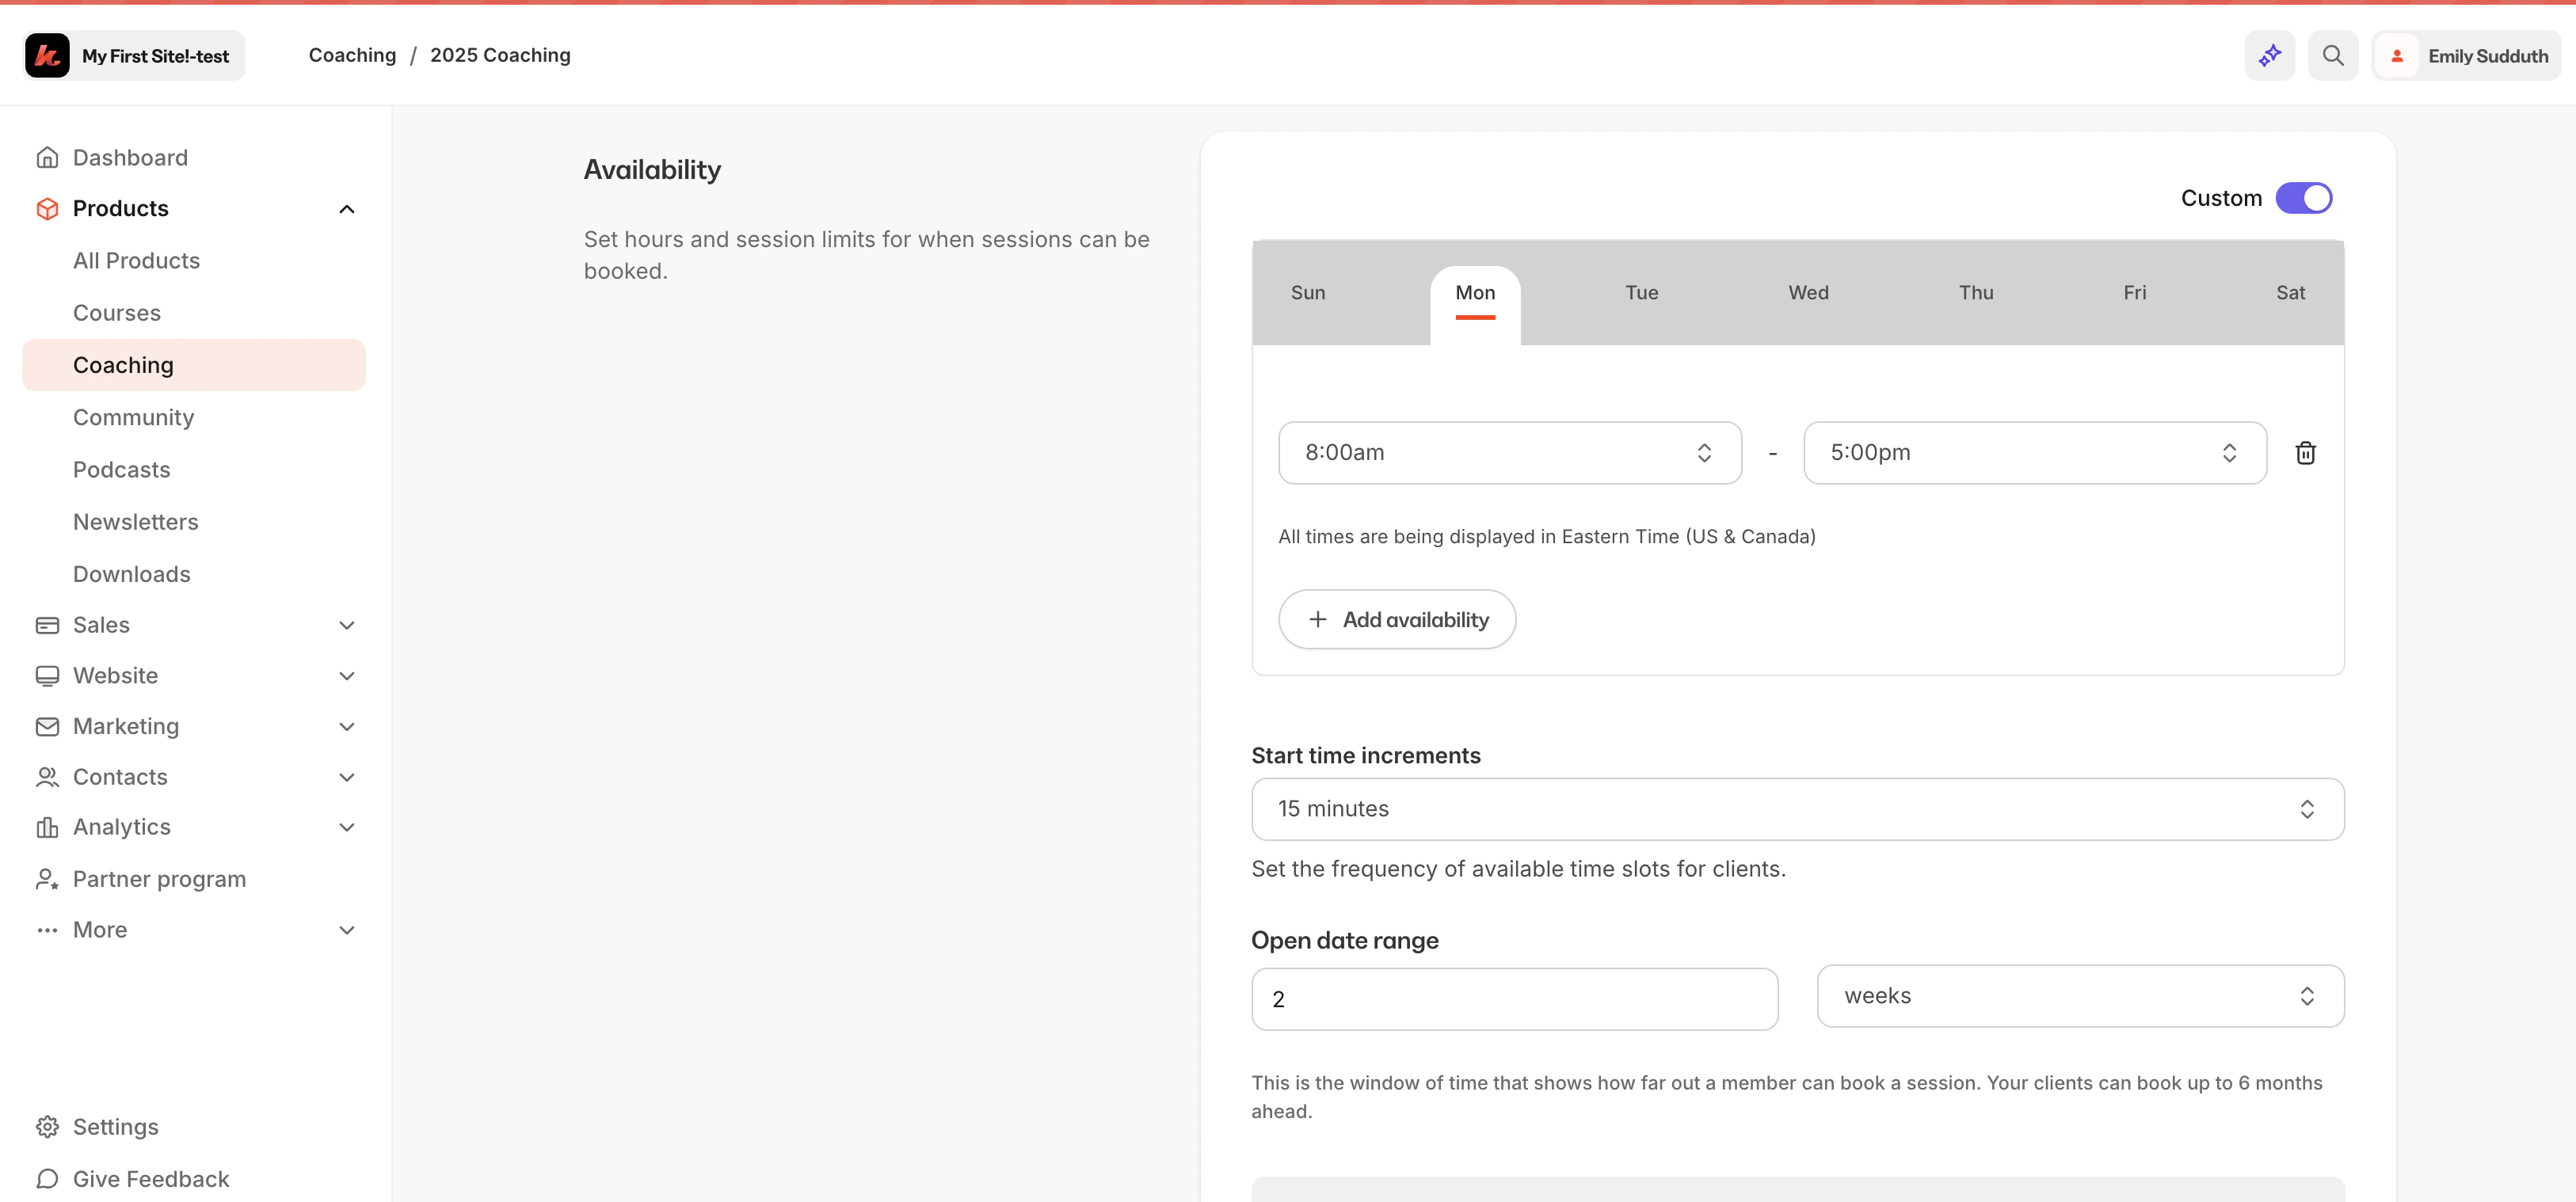
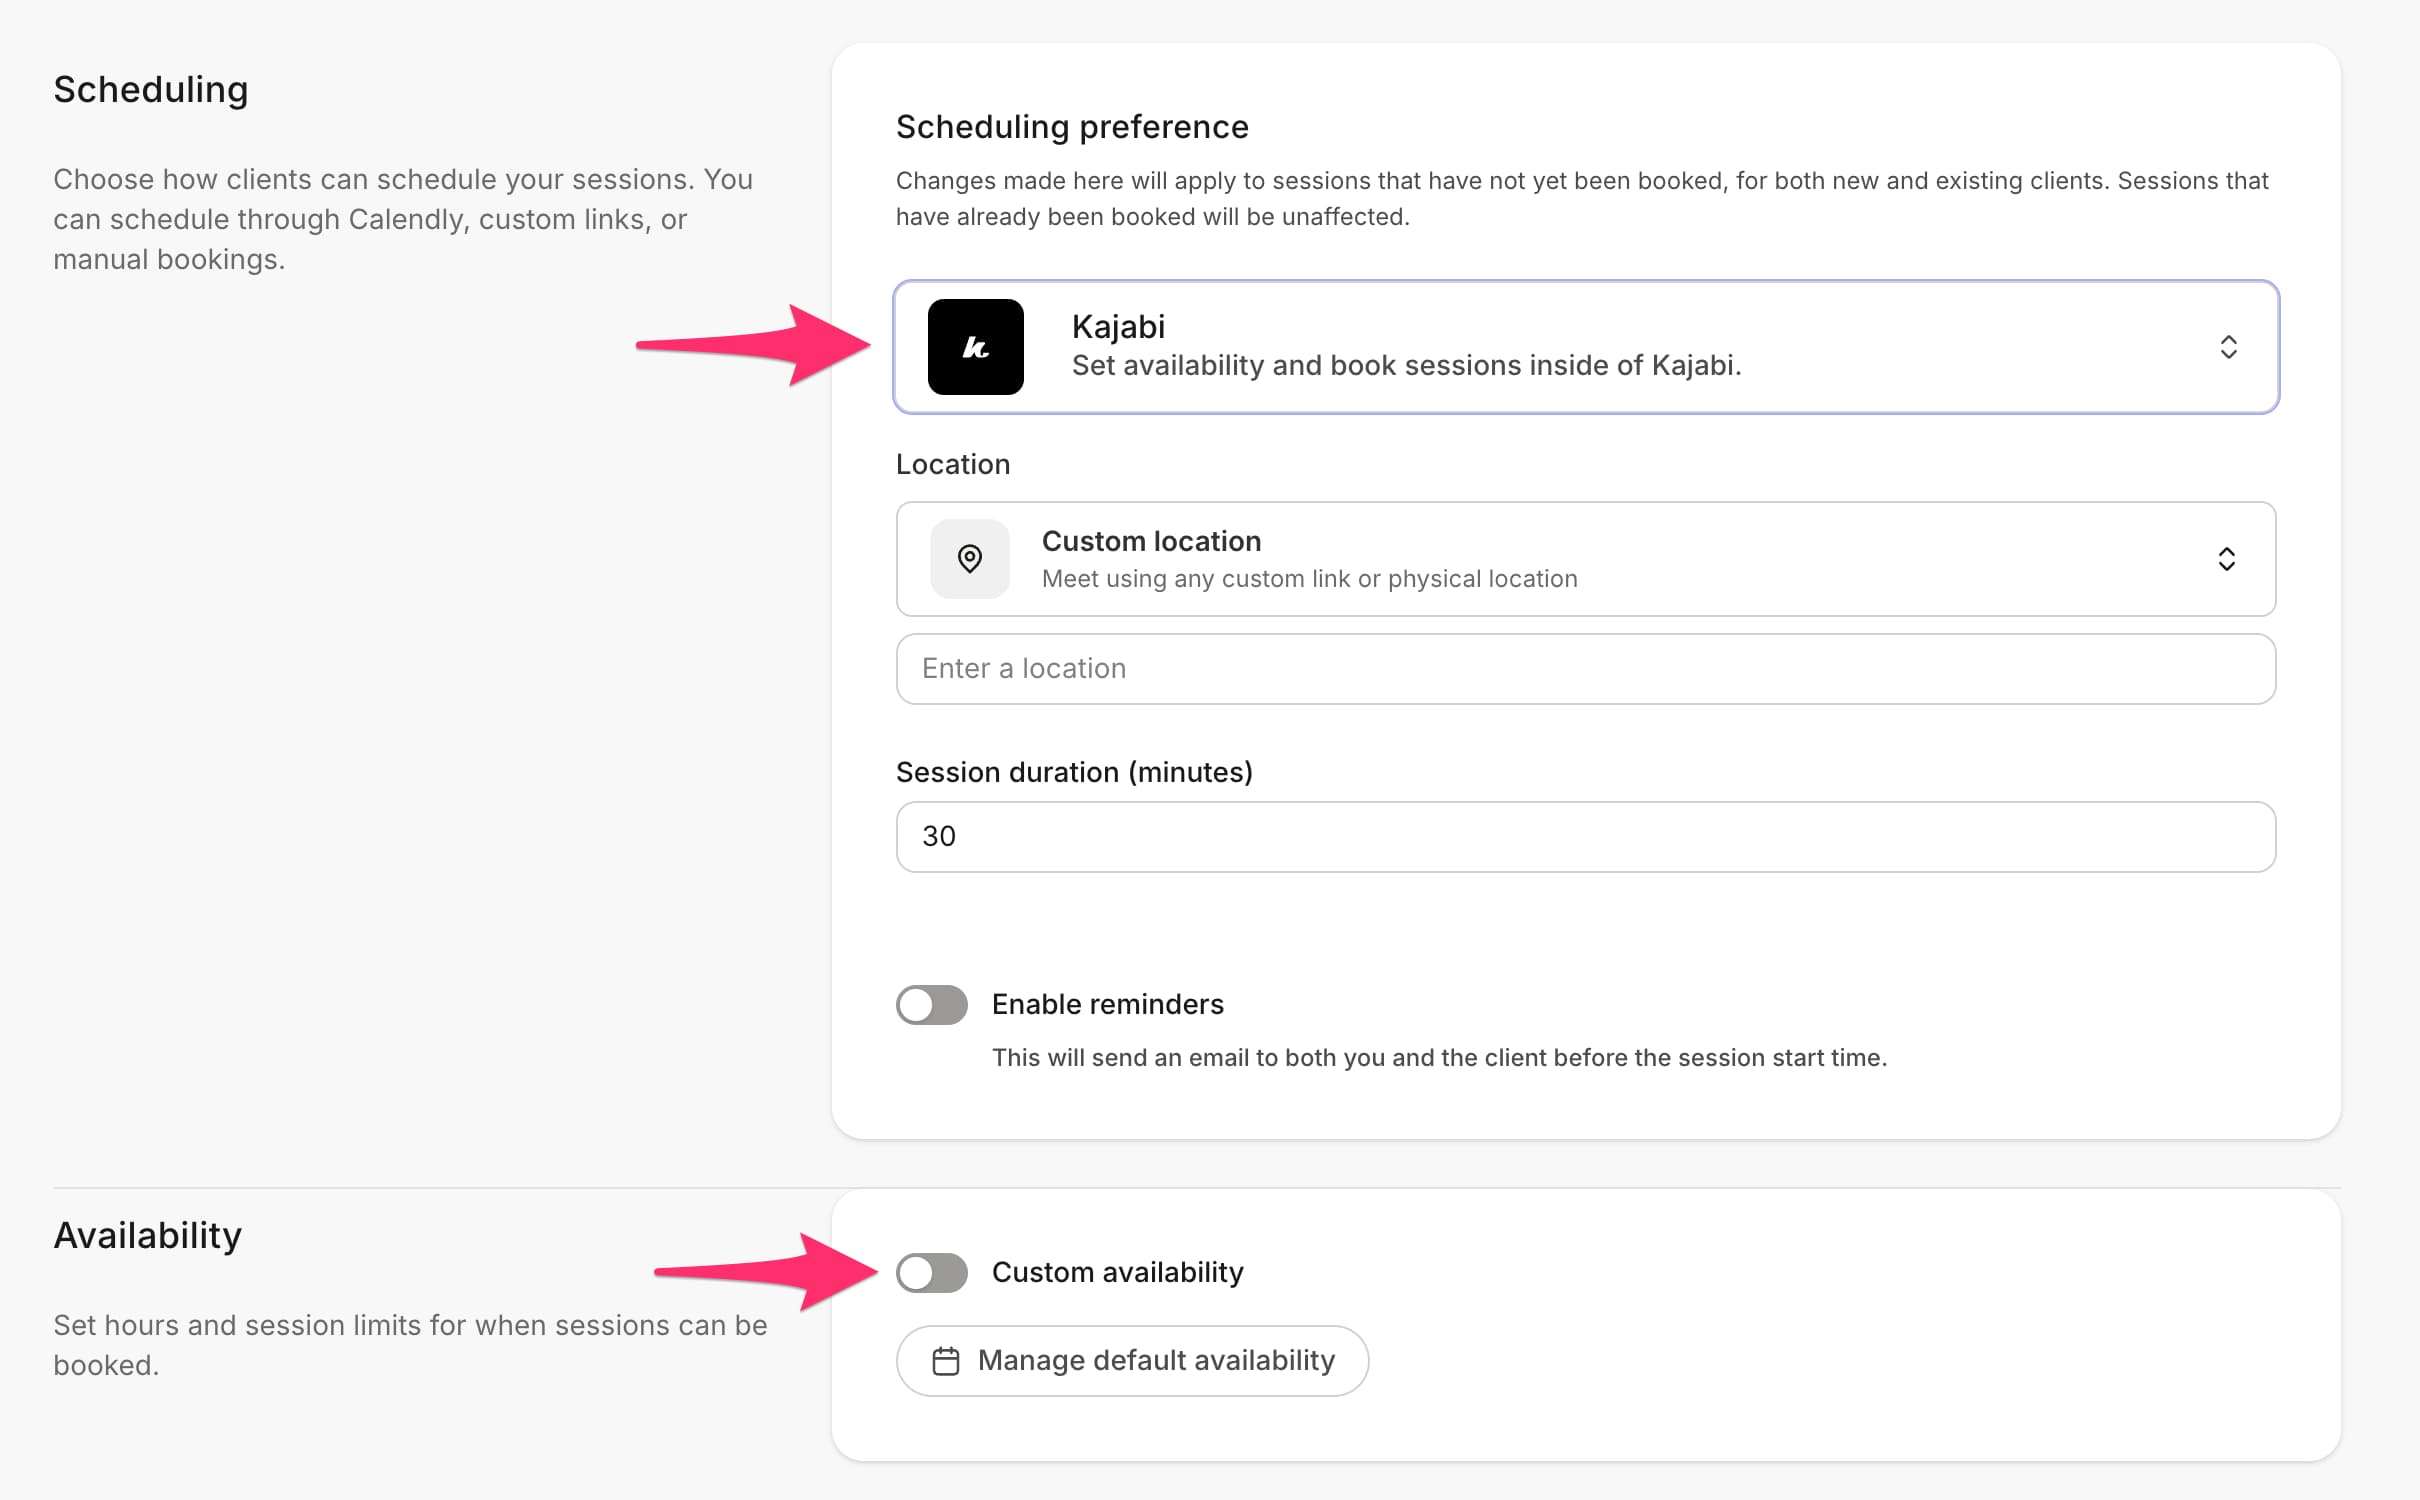 4. Toggle \*\*Custom availability. \*\*
5. Set your **Start time increments** and **Open date range**.
6. To add a buffer between sessions, set **Buffer time** in the **Session limits** section.
7. Click **Save** to save your preferences.
**Note:** If you are experiencing scheduling issues, double-check that your availability was set up correctly. If you are still encountering issues, reach out to [our support team](../../resources/support/how-to-contact-kajabi-support).
## Program level overrides
The Kajabi Scheduler can override your default scheduling availability for both 1:1 and Group Coaching.
* **1:1 Coaching:** Create custom availability to prioritize your higher ticket programs. Offering a VIP tier for your 1:1 Coaching Program? Consider offering extended booking windows so your VIPs get first crack at scheduling.
* **Group Coaching:** Override your global availability to allow for scheduling group sessions. If you want the ability to book your group sessions outside of your standard coaching availability hours, you can enable wider time windows to book sessions for your group.
### Set custom scheduling options for a program
1. From your Dashboard, open **Products**, then click **Coaching**.
2. Select the **Program** for which you would like to customize availability.
3. Navigate to the **Settings** tab.
4. Toggle \*\*Custom availability. \*\*
5. Set your **Start time increments** and **Open date range**.
6. To add a buffer between sessions, set **Buffer time** in the **Session limits** section.
7. Click **Save** to save your preferences.
**Note:** If you are experiencing scheduling issues, double-check that your availability was set up correctly. If you are still encountering issues, reach out to [our support team](../../resources/support/how-to-contact-kajabi-support).
## Program level overrides
The Kajabi Scheduler can override your default scheduling availability for both 1:1 and Group Coaching.
* **1:1 Coaching:** Create custom availability to prioritize your higher ticket programs. Offering a VIP tier for your 1:1 Coaching Program? Consider offering extended booking windows so your VIPs get first crack at scheduling.
* **Group Coaching:** Override your global availability to allow for scheduling group sessions. If you want the ability to book your group sessions outside of your standard coaching availability hours, you can enable wider time windows to book sessions for your group.
### Set custom scheduling options for a program
1. From your Dashboard, open **Products**, then click **Coaching**.
2. Select the **Program** for which you would like to customize availability.
3. Navigate to the **Settings** tab.
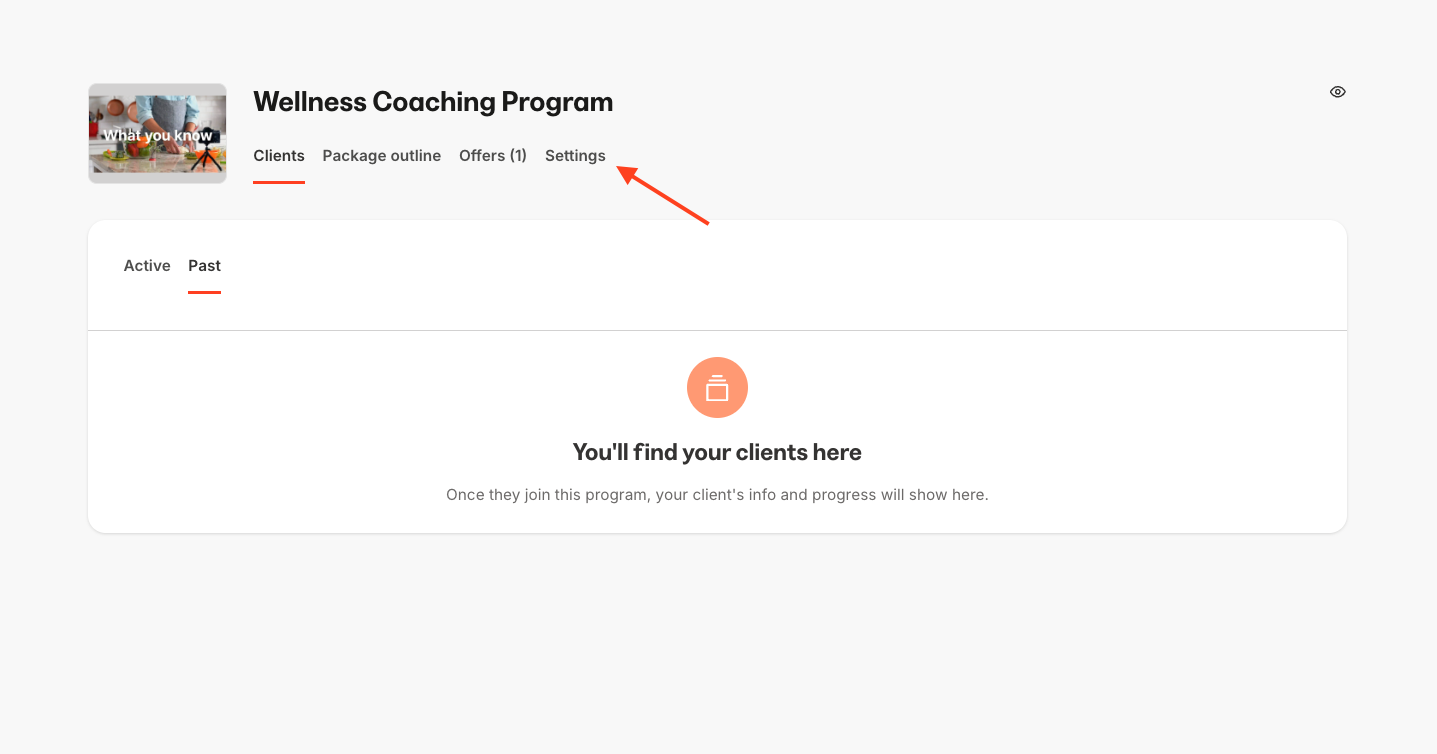 4. Scroll down to the **Availability** section and toggle on **Override**.
5. Set custom hours and session limits for the specific Program you're editing.
**Note:** The **Availability** override section only appears when the program's scheduling preference is set to the Kajabi Scheduler.
4. Scroll down to the **Availability** section and toggle on **Override**.
5. Set custom hours and session limits for the specific Program you're editing.
**Note:** The **Availability** override section only appears when the program's scheduling preference is set to the Kajabi Scheduler.
 ## Connect a third-party calendar
**Important:** When you add a third-party calendar integration, all previously scheduled Coaching sessions will sync to your integrated calendar. If you already have sessions scheduled, you'll need to manually check for and fix any double-bookings that occur after integrating calendars.
Kajabi uses **Cronofy** for third-party calendar integrations. You can connect Google Calendar, Microsoft Outlook, or Microsoft Office 365 so that coaching sessions are added to your calendar automatically. Once connected:
* Coaching sessions can be scheduled 200 days in advance
* Sessions can be scheduled in 15-minute intervals and based upon defined session length
Connect or reconnect a calendar from **Coaching** > **Settings**. All calendar controls live under Settings. If a connected calendar needs to be reconnected, a **Reauthorize** banner appears in Settings.
For step-by-step instructions, including connecting more than one calendar, see [Integrate 3rd party calendars with the Kajabi Scheduler](../../products/coaching/how-to-integrate-multiple-3rd-party-calendars-with-the-kajabi-scheduler).
**Tip:** Create a Coaching-specific calendar on Google so that your sessions do not overlap with personal or work calendar events on your primary calendar.
**Note:** Only one third-party calendar can be connected at a time. If you have a calendar integrated and wish to switch to a different one, you must first disconnect that calendar from your account before changing to the new one.
## Connect a third-party calendar
**Important:** When you add a third-party calendar integration, all previously scheduled Coaching sessions will sync to your integrated calendar. If you already have sessions scheduled, you'll need to manually check for and fix any double-bookings that occur after integrating calendars.
Kajabi uses **Cronofy** for third-party calendar integrations. You can connect Google Calendar, Microsoft Outlook, or Microsoft Office 365 so that coaching sessions are added to your calendar automatically. Once connected:
* Coaching sessions can be scheduled 200 days in advance
* Sessions can be scheduled in 15-minute intervals and based upon defined session length
Connect or reconnect a calendar from **Coaching** > **Settings**. All calendar controls live under Settings. If a connected calendar needs to be reconnected, a **Reauthorize** banner appears in Settings.
For step-by-step instructions, including connecting more than one calendar, see [Integrate 3rd party calendars with the Kajabi Scheduler](../../products/coaching/how-to-integrate-multiple-3rd-party-calendars-with-the-kajabi-scheduler).
**Tip:** Create a Coaching-specific calendar on Google so that your sessions do not overlap with personal or work calendar events on your primary calendar.
**Note:** Only one third-party calendar can be connected at a time. If you have a calendar integrated and wish to switch to a different one, you must first disconnect that calendar from your account before changing to the new one.