> ## Documentation Index
> Fetch the complete documentation index at: https://help.kajabi.com/llms.txt
> Use this file to discover all available pages before exploring further.
# Create a live video session
> Meet with Coaching clients face-to-face using Kajabi's built-in live video, Kajabi Live.
Meet with your coaching clients face-to-face directly from Kajabi using **built-in live video**. No third-party video tools required.
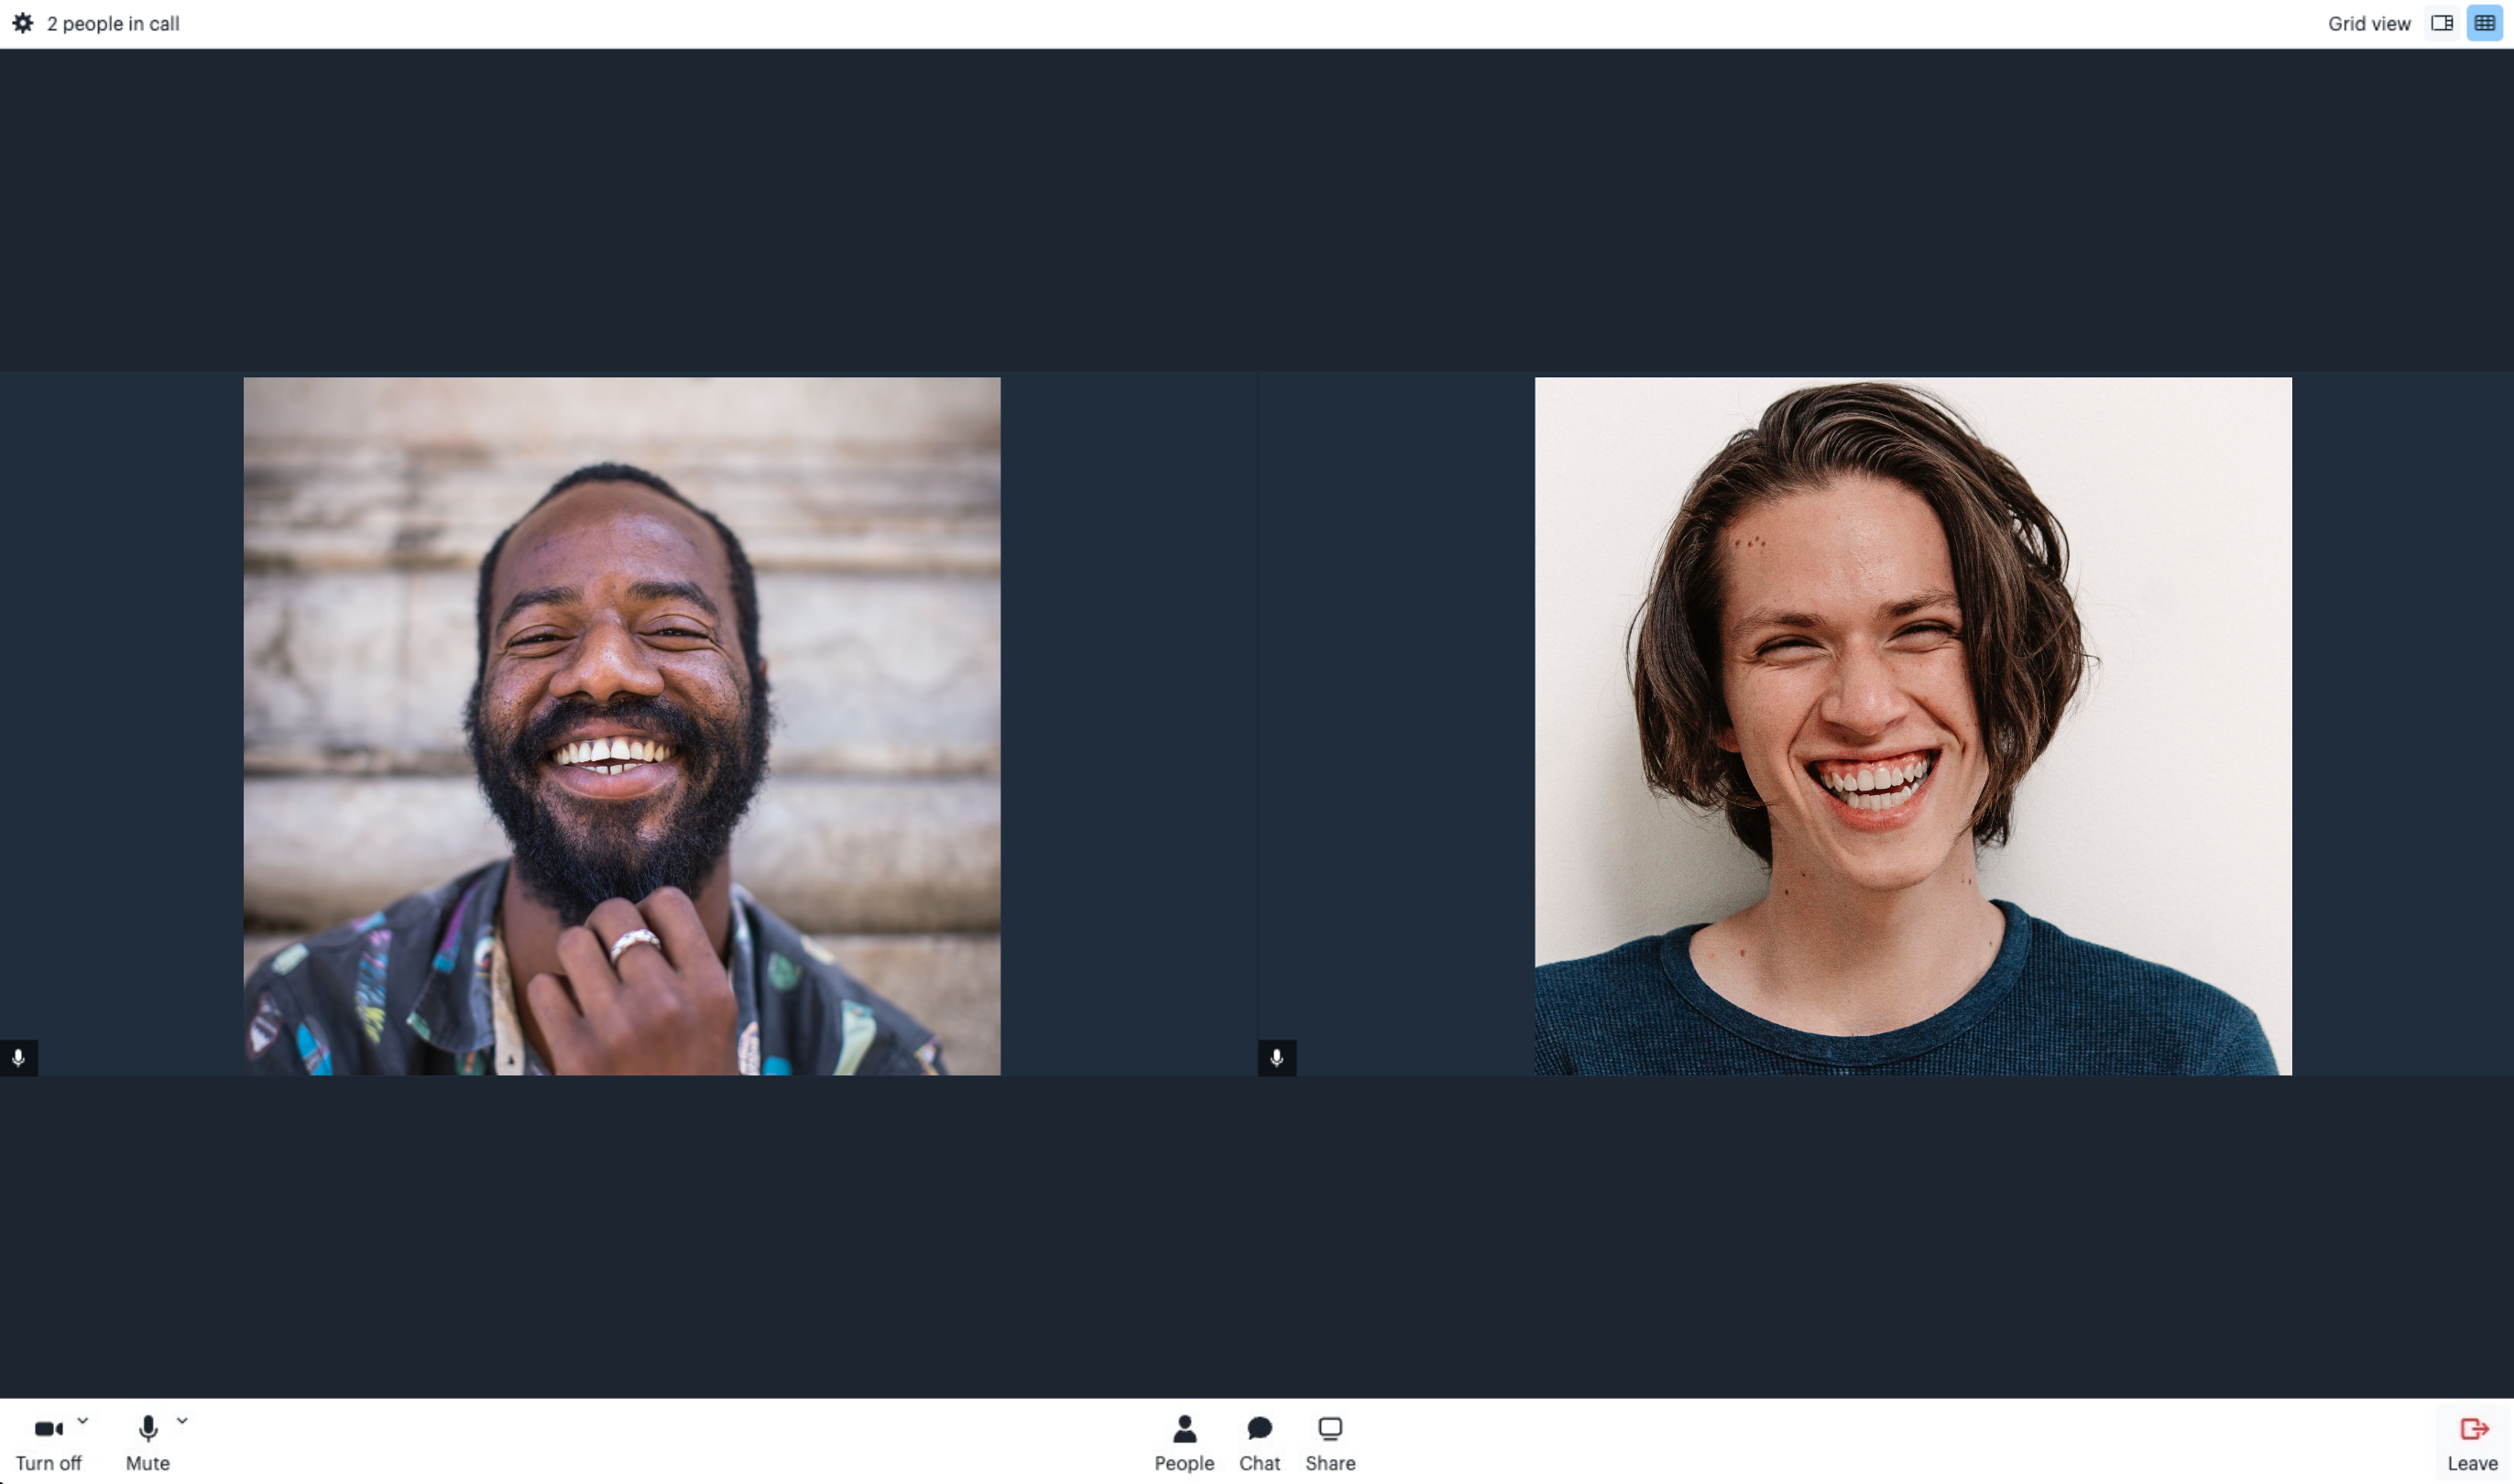 Kajabi's Live Video is available with Course Products, manually scheduled coaching programs, and Coaching Products using Kajabi Scheduler. If you have connected Calendly or a custom link to help you schedule your program, you will not be able to Go Live with Kajabi.
To be eligible to use the Built-in Live Video feature, you can set up your Coaching Product or edit an existing Coaching Product with the Kajabi Scheduler or as a manually scheduled program.
## Client experience
With the combined power of Course Products and Coaching Products along with Kajabi's Built-in Live Video, your clients can experience an engaging, interactive program developed to meet their needs and help you deliver value during your video sessions.
The Coaching and Course Products are Product types that Kajabi offers to help you develop a world-class online presence. With Products, your customers can purchase the connected Offer to access your carefully curated program.
[Learn about what happens when a customer purchases an Offer](../../sales/offers/what-happens-when-a-customer-purchases-my-offer).
After your customer has purchased your Offer, they can access their purchased product from their Library.
If you have set up the Coaching Product to schedule manually, you will need to schedule each session manually for each coaching client.
When the date and time of your coaching session arrive, your client can enter their product and click **Join Session**:
Kajabi's Live Video is available with Course Products, manually scheduled coaching programs, and Coaching Products using Kajabi Scheduler. If you have connected Calendly or a custom link to help you schedule your program, you will not be able to Go Live with Kajabi.
To be eligible to use the Built-in Live Video feature, you can set up your Coaching Product or edit an existing Coaching Product with the Kajabi Scheduler or as a manually scheduled program.
## Client experience
With the combined power of Course Products and Coaching Products along with Kajabi's Built-in Live Video, your clients can experience an engaging, interactive program developed to meet their needs and help you deliver value during your video sessions.
The Coaching and Course Products are Product types that Kajabi offers to help you develop a world-class online presence. With Products, your customers can purchase the connected Offer to access your carefully curated program.
[Learn about what happens when a customer purchases an Offer](../../sales/offers/what-happens-when-a-customer-purchases-my-offer).
After your customer has purchased your Offer, they can access their purchased product from their Library.
If you have set up the Coaching Product to schedule manually, you will need to schedule each session manually for each coaching client.
When the date and time of your coaching session arrive, your client can enter their product and click **Join Session**:
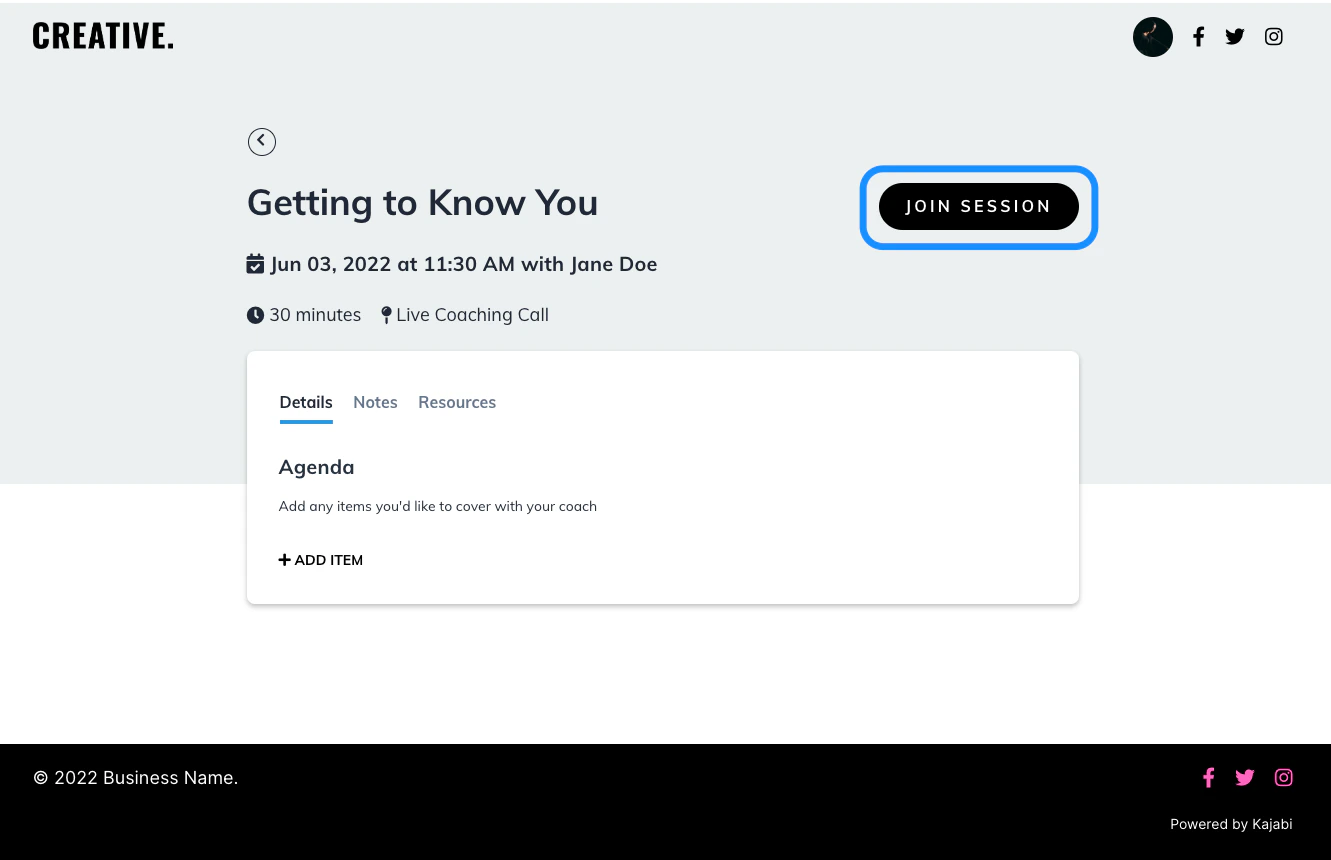 During the live video session, your client will have video settings that they can update to adjust their camera, microphone, sound, video quality, and background effects. [Learn more about each setting](#live-session-settings).
## **Add to Calendar for Coaching Sessions**
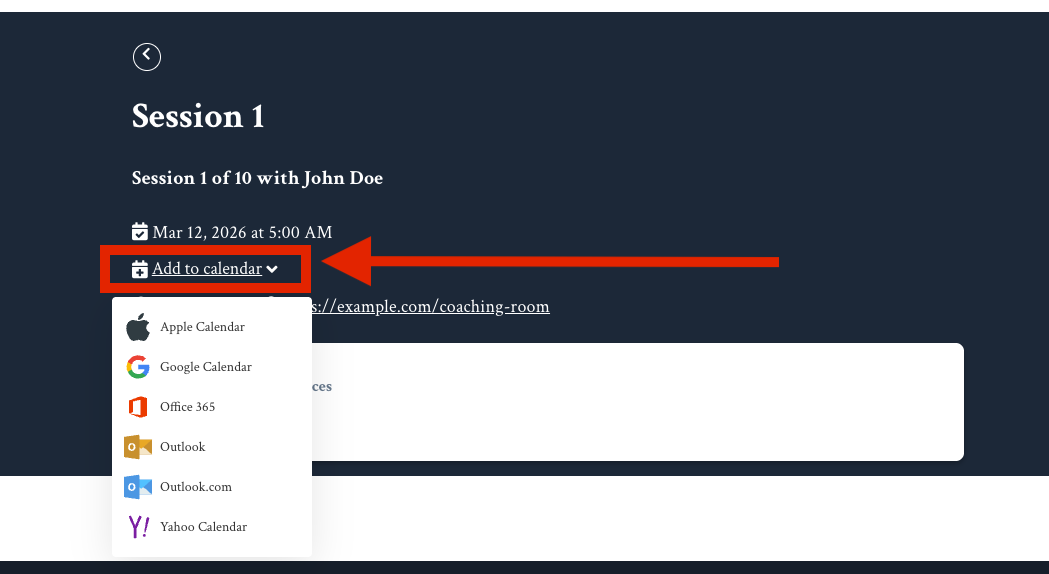
The "Add to Calendar" feature lets members save upcoming coaching sessions to their personal calendar. Calendar links are automatically included in confirmation emails and displayed on member-facing pages.
During the live video session, your client will have video settings that they can update to adjust their camera, microphone, sound, video quality, and background effects. [Learn more about each setting](#live-session-settings).
## **Add to Calendar for Coaching Sessions**
The "Add to Calendar" feature lets members save upcoming coaching sessions to their personal calendar. Calendar links are automatically included in confirmation emails and displayed on member-facing pages.
 ### **Where Members See Calendar Links**
* **Coaching session emails** — Links appear alongside the existing ICS attachment
* **Member-facing coaching pages** — Links are displayed on the session detail view
### **How Calendar Links Work**
Each calendar link contains a secure, time-limited token tied to the coaching session.
**Important:**
* Calendar links expire after **1 year** from generation
* This feature is separate from Cronofy calendar sync, which handles coach availability and session booking. "Add to Calendar" is for members saving confirmed sessions to their personal calendar
## Create a Coaching program with built-in live video
1. Open the **Products** tab from your Dashboard
2. Select **Coaching**
3. Click **+ New Coaching Program** to create your first Coaching Program
4. Click **Get Started**
5. Select **Single session** or **Package**
* [**Single session**](../../products/coaching/how-to-offer-a-single-coaching-session): single coaching session
* [**Package**](../../products/coaching/differences-between-a-11-coaching-program-and-group-coaching): coaching program with multiple sessions
6. Complete the prompt to include:
* Title of the program
* Coach name (optional)
* Description of the program
7. Click **Continue**
8. Select your scheduling preference:
* Select **Manual booking** or **Kajabi**
* Enter your Location (e.g., Built-in live video)
* Enter the Duration of every session
9. Click **Continue** to continue customizing your Coaching Program
### Change to manual booking
1. Open the **Products** tab from your Dashboard
2. Click **Coaching**
3. Select the **Coaching Program** that you wish to use
4. Open **Settings** from the top menu of your Program
5. Navigate to **Scheduling**
6. Select **Manual booking** or **Kajabi**
* Enter your Location (e.g., Built-in live video)
* Enter the Duration of every session
7. Scroll to the top or bottom of the Settings page and click **Save**
### **Where Members See Calendar Links**
* **Coaching session emails** — Links appear alongside the existing ICS attachment
* **Member-facing coaching pages** — Links are displayed on the session detail view
### **How Calendar Links Work**
Each calendar link contains a secure, time-limited token tied to the coaching session.
**Important:**
* Calendar links expire after **1 year** from generation
* This feature is separate from Cronofy calendar sync, which handles coach availability and session booking. "Add to Calendar" is for members saving confirmed sessions to their personal calendar
## Create a Coaching program with built-in live video
1. Open the **Products** tab from your Dashboard
2. Select **Coaching**
3. Click **+ New Coaching Program** to create your first Coaching Program
4. Click **Get Started**
5. Select **Single session** or **Package**
* [**Single session**](../../products/coaching/how-to-offer-a-single-coaching-session): single coaching session
* [**Package**](../../products/coaching/differences-between-a-11-coaching-program-and-group-coaching): coaching program with multiple sessions
6. Complete the prompt to include:
* Title of the program
* Coach name (optional)
* Description of the program
7. Click **Continue**
8. Select your scheduling preference:
* Select **Manual booking** or **Kajabi**
* Enter your Location (e.g., Built-in live video)
* Enter the Duration of every session
9. Click **Continue** to continue customizing your Coaching Program
### Change to manual booking
1. Open the **Products** tab from your Dashboard
2. Click **Coaching**
3. Select the **Coaching Program** that you wish to use
4. Open **Settings** from the top menu of your Program
5. Navigate to **Scheduling**
6. Select **Manual booking** or **Kajabi**
* Enter your Location (e.g., Built-in live video)
* Enter the Duration of every session
7. Scroll to the top or bottom of the Settings page and click **Save**
### Manual scheduling
Manual scheduling requires you to manually schedule each coaching session for each coaching client:
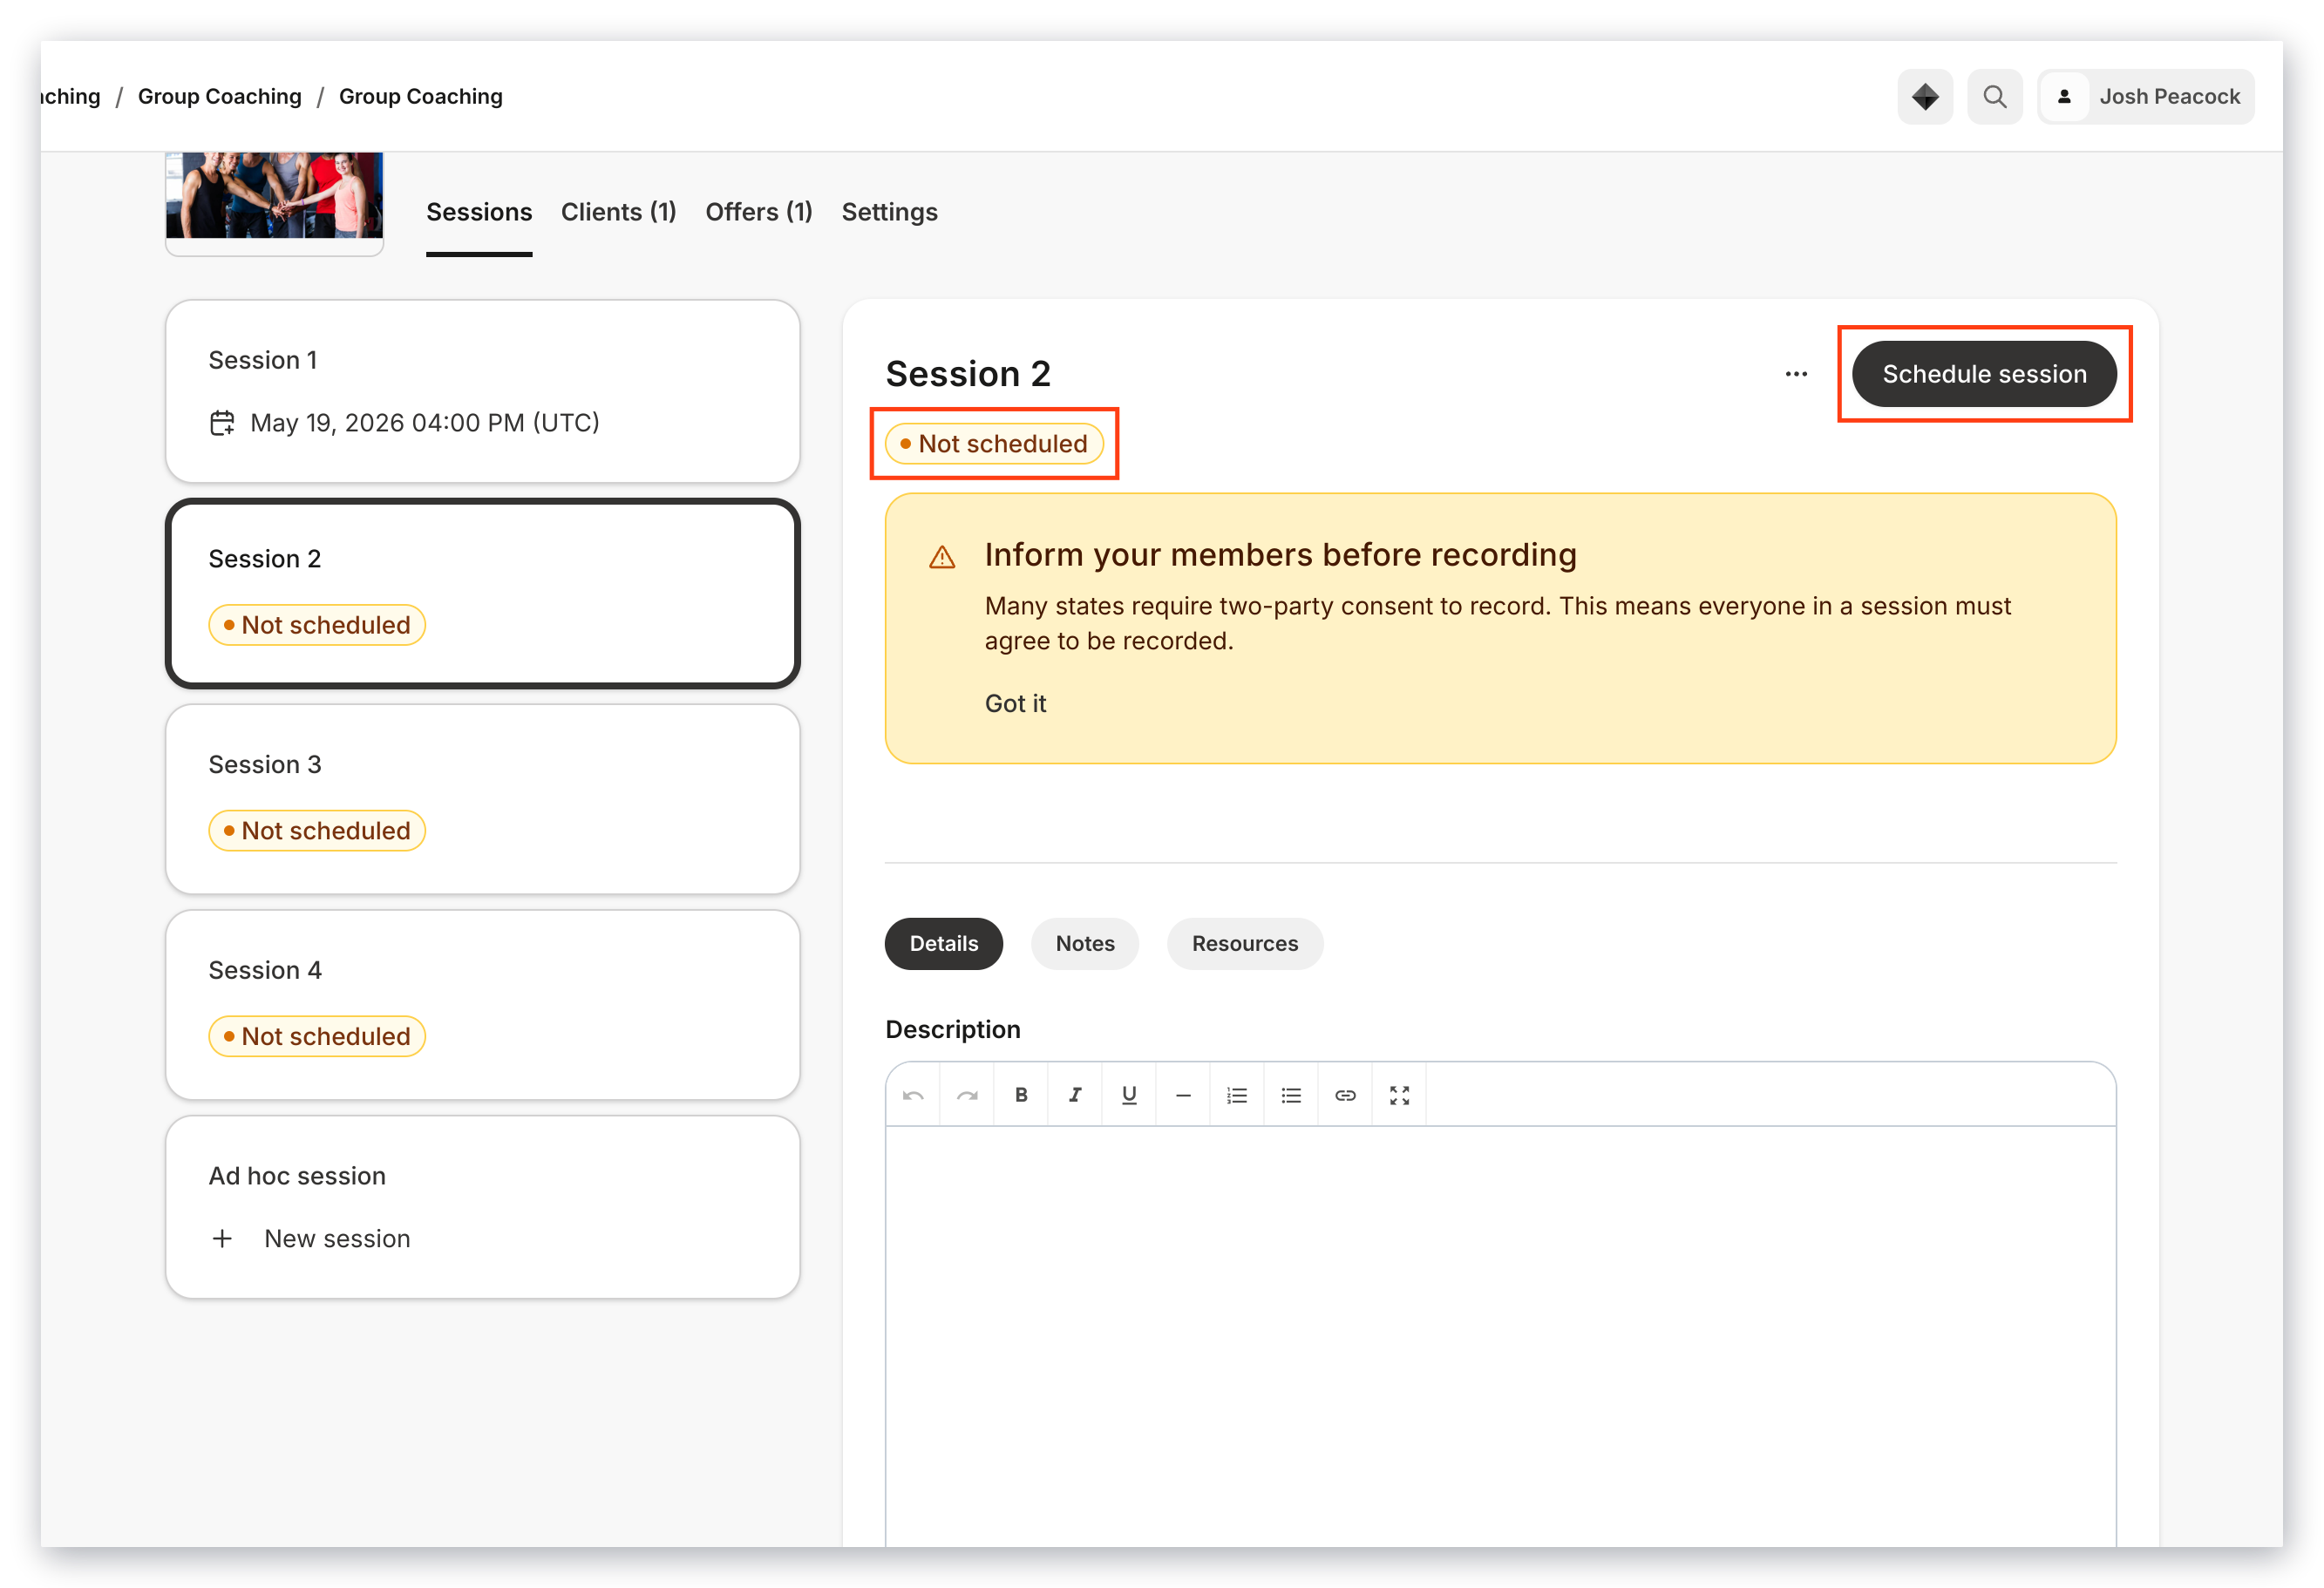 ### Manually schedule a session
1. Open the **Products** tab from your Dashboard
2. Click **Coaching**
3. Select the **Coaching Program** that you wish to use
4. Click the **client** that you want to schedule
5. Open the **session**
6. Click **Schedule Session**
### Manually schedule a session
1. Open the **Products** tab from your Dashboard
2. Click **Coaching**
3. Select the **Coaching Program** that you wish to use
4. Click the **client** that you want to schedule
5. Open the **session**
6. Click **Schedule Session**
## Start a live session
1. Open the **Products** tab from your Dashboard
2. Click **Coaching**
3. Select the **Coaching Program with manual booking**
4. Select the **client** you are meeting
5. Click into your **session**
6. Navigate to the top right corner of the page to click **Go Live**
**Note:** Set your Coaching Program to manual booking, or you will not have the option to go live within your Coaching Sessions. [Learn to create a Coaching Product with manual booking](#manual-scheduling).
## Live session settings
As an admin, you can adjust various settings to control your live video session. Use these settings to change your camera, mic, and video settings and your participant(s) settings.
### Camera settings
Turn your camera on or off with the camera setting. Use the dropdown to select the camera used for your live video.
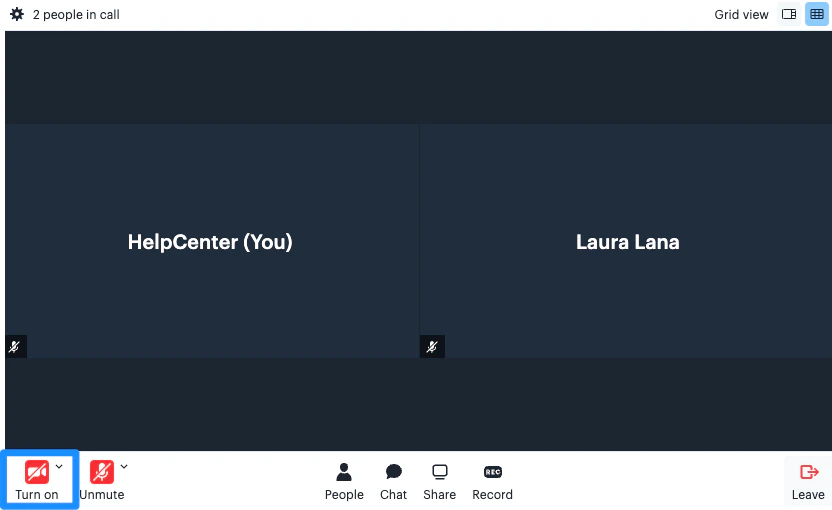 **Tip:** Some web cameras are not supported by every browser. If you encounter any difficulty selecting your camera from the live video camera list, try switching to a different browser (for example, if you're using Safari try Google Chrome instead).
### Mic settings
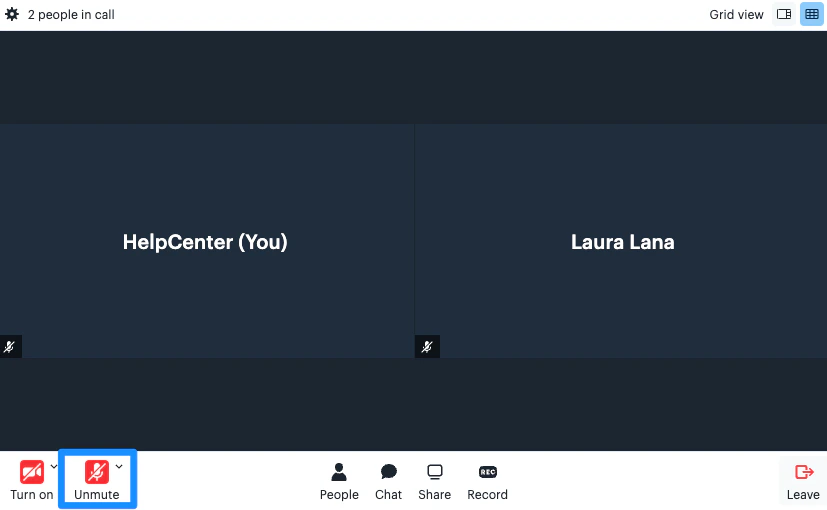
Turn your microphone on or off with the microphone setting. Use the dropdown to select the microphone used for your live video.
**Tip:** Some web cameras are not supported by every browser. If you encounter any difficulty selecting your camera from the live video camera list, try switching to a different browser (for example, if you're using Safari try Google Chrome instead).
### Mic settings
Turn your microphone on or off with the microphone setting. Use the dropdown to select the microphone used for your live video.
 ### Effects
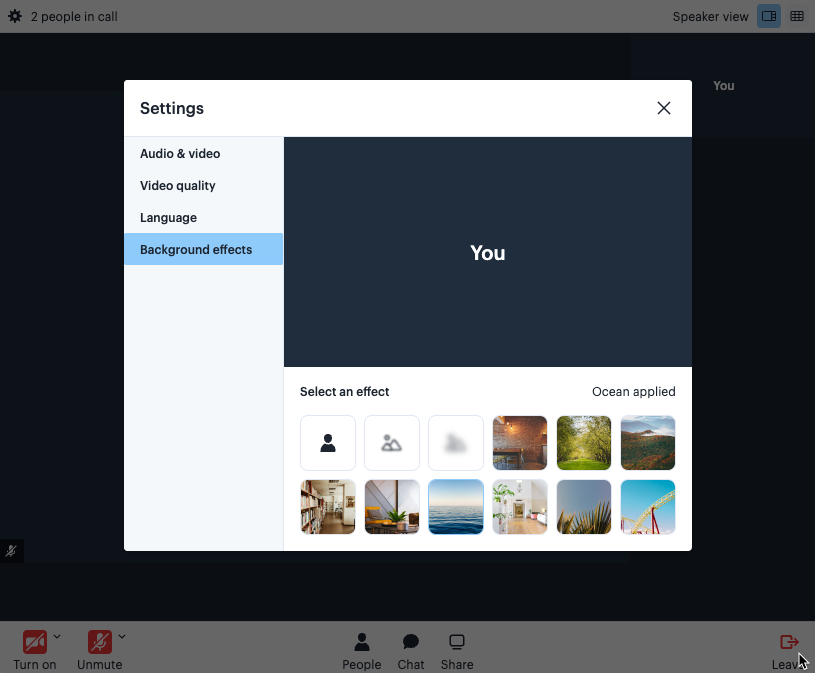
Background Effects - Apply background effects to your live video.
### Effects
Background Effects - Apply background effects to your live video.
 ### More settings
Access more settings in the top corner of your live video session:
### More settings
Access more settings in the top corner of your live video session:
* **Audio & Video** - Select the camera, microphone, and speakers used for your live video session
* **Video Quality** - Select the video quality that's best for your network
* Auto (High quality) - quality automatically adjusts based on your network conditions
* High quality - Video is always set to the highest quality possible
* Low quality - Video may be pixelated; best for slow connections
* Bandwidth saver - Your camera is turned off. This setting is best for mobile or poor connections. You will receive low-quality videos from others
* **Language** - Change the language for your call
* **Background Effects** - Apply background effects to your live video
### Change the view
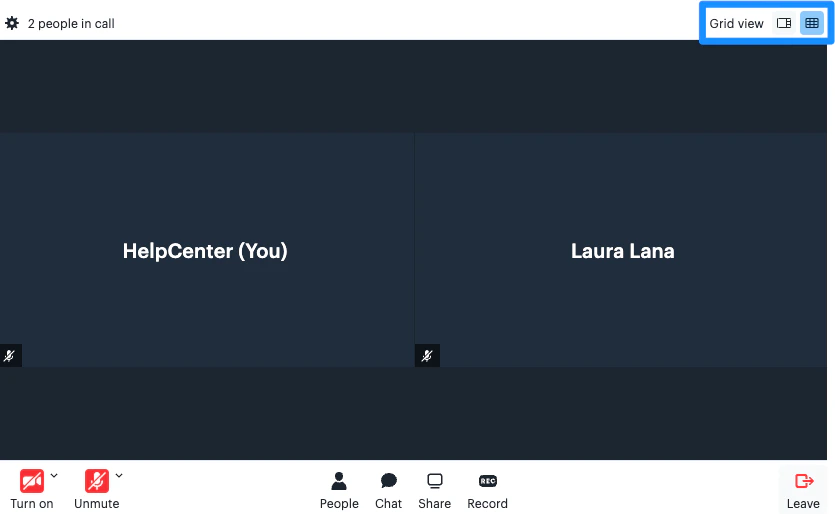
In the top right corner of your live video, you can select how you wish to view your call:
* Speaker view
* Grid view
 ### View live video participants
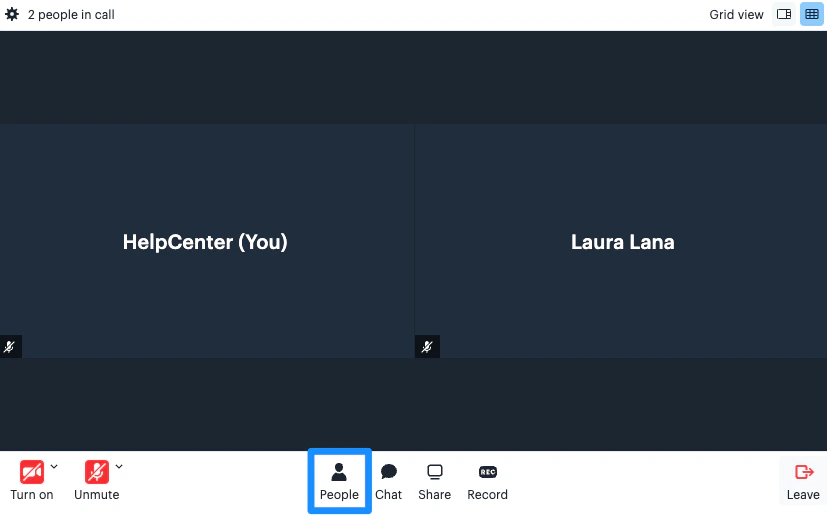
View the participants that have joined your call by selecting **People** located at the bottom of your live video session.
### View live video participants
View the participants that have joined your call by selecting **People** located at the bottom of your live video session.
 ### Open a live video chat
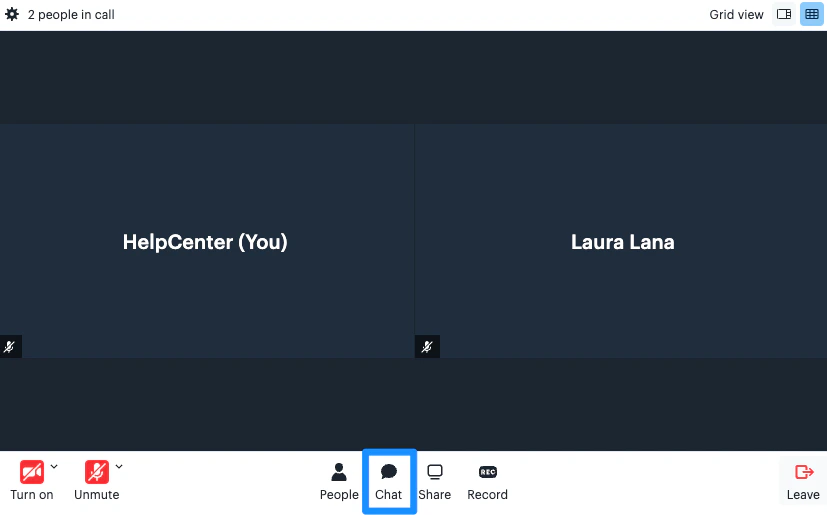
Converse with your participants through live video chat by clicking the **Chat** icon located at the bottom of your live video session.
### Open a live video chat
Converse with your participants through live video chat by clicking the **Chat** icon located at the bottom of your live video session.
 ### Share a screen
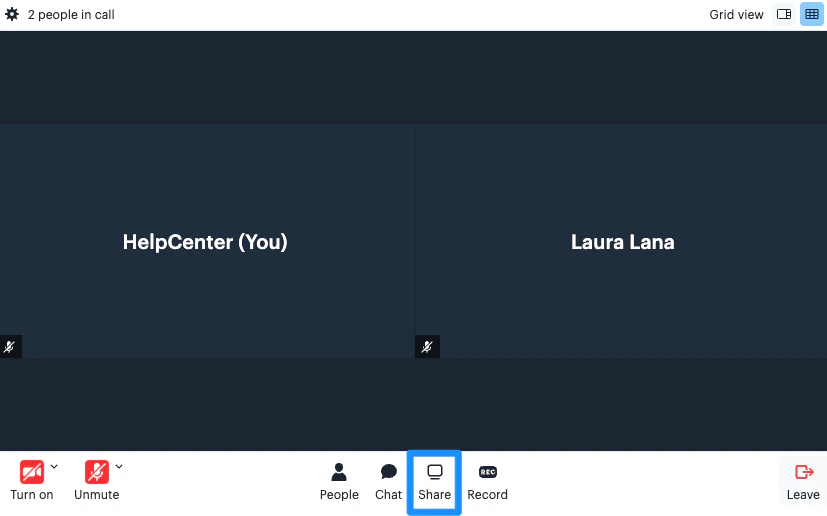
Share your screen with your live video participants by clicking the **Share** icon located at the bottom of your live video session.
### Share a screen
Share your screen with your live video participants by clicking the **Share** icon located at the bottom of your live video session.
 ### Record video
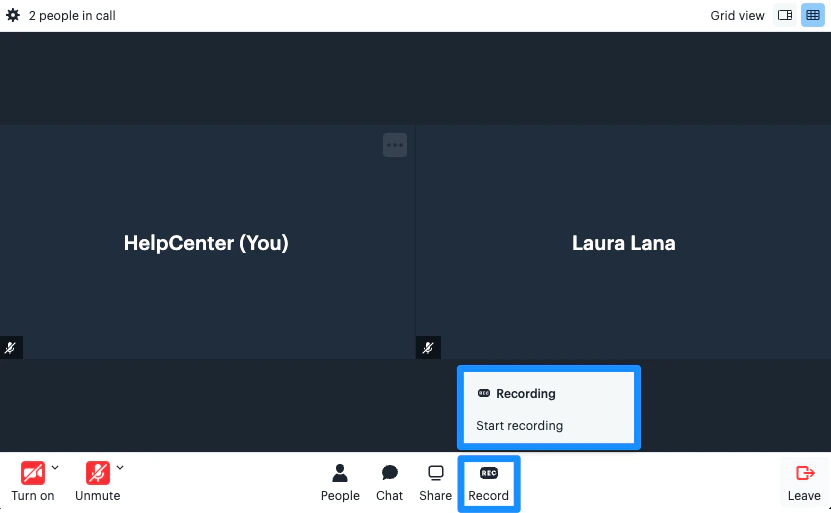
Record your live video session to share with your coaching client or keep for your records. Your recorded session link will be emailed to the email associated with your Kajabi account.
Access and download your recorded session from your coaching portal. [Learn more about recording sessions](#record-a-session).
### Record video
Record your live video session to share with your coaching client or keep for your records. Your recorded session link will be emailed to the email associated with your Kajabi account.
Access and download your recorded session from your coaching portal. [Learn more about recording sessions](#record-a-session).
 **Note:** Breakout rooms cannot be recorded. If you record your session before starting a breakout session, the recording will be stopped as soon as you start a breakout session. If you wish to resume recording after your breakout session, you will need to click **Record** to begin a new recording. Your recordings will be uploaded and shared as separate files. If you have set up your Course Product to create a lesson for your recording, the recordings will create separate lessons for each file.
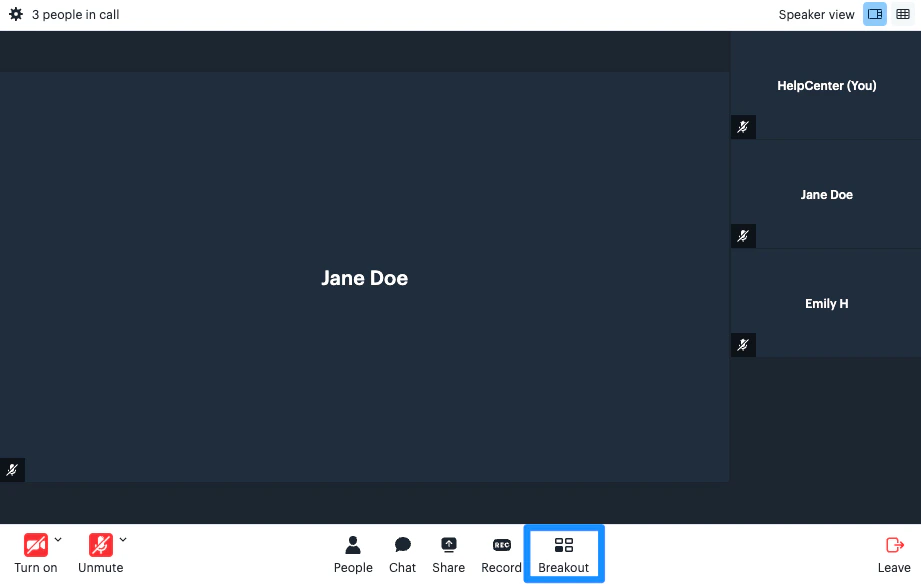
### Create a breakout session
Encourage individual participation within a small-group discussion by creating a breakout session during your live video session in your Course and Coaching Products. [Learn more about breakout sessions](../../products/coaching/how-to-create-breakout-sessions-with-kajabi-live).
**Note:** Breakout rooms cannot be recorded. If you record your session before starting a breakout session, the recording will be stopped as soon as you start a breakout session. If you wish to resume recording after your breakout session, you will need to click **Record** to begin a new recording. Your recordings will be uploaded and shared as separate files. If you have set up your Course Product to create a lesson for your recording, the recordings will create separate lessons for each file.
### Create a breakout session
Encourage individual participation within a small-group discussion by creating a breakout session during your live video session in your Course and Coaching Products. [Learn more about breakout sessions](../../products/coaching/how-to-create-breakout-sessions-with-kajabi-live).
 ### Leave the call
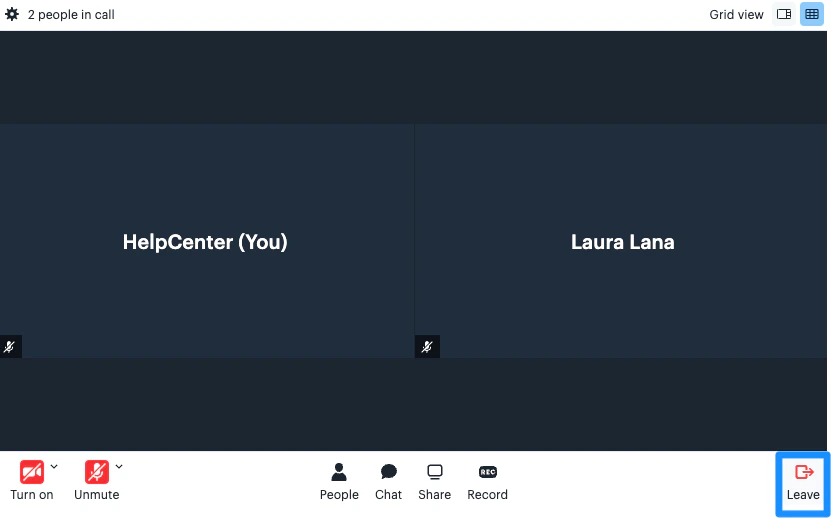
Click **Leave** in the bottom corner of your live video session to end your call.
### Leave the call
Click **Leave** in the bottom corner of your live video session to end your call.
 ## Control participant settings
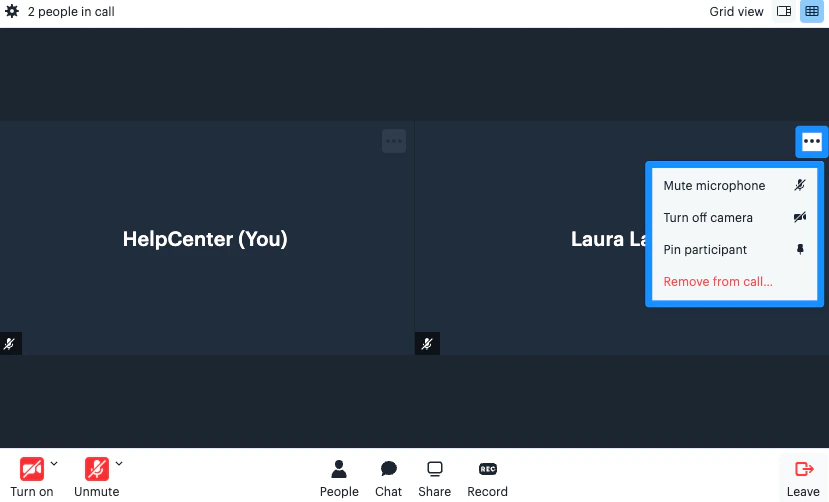
After a participant joins the live video session, you can click on their floating "more settings" icon to mute, turn off their camera, pin the participant, and remove the participant from your call.
## Control participant settings
After a participant joins the live video session, you can click on their floating "more settings" icon to mute, turn off their camera, pin the participant, and remove the participant from your call.
 ## Record a session
Record your live video session and access your recording directly from your Course or Coaching Product.
Recording a Kajabi Live video session automatically saves your recording to your Past Recordings section located in your Course Settings and within your Coaching Sessions.
1. Open the **Products** tab from your Dashboard
2. Click **Coaching**
3. Select the **Coaching Program with manual booking**
4. Select the **client** you are meeting
5. Click into your **session**
6. Navigate to the top right corner of the page to click **Go Live**
7. Select your desired session settings
8. Click **Join**
9. Click **Record** at the bottom of your session in the settings panel
## Record a session
Record your live video session and access your recording directly from your Course or Coaching Product.
Recording a Kajabi Live video session automatically saves your recording to your Past Recordings section located in your Course Settings and within your Coaching Sessions.
1. Open the **Products** tab from your Dashboard
2. Click **Coaching**
3. Select the **Coaching Program with manual booking**
4. Select the **client** you are meeting
5. Click into your **session**
6. Navigate to the top right corner of the page to click **Go Live**
7. Select your desired session settings
8. Click **Join**
9. Click **Record** at the bottom of your session in the settings panel
**Note:** Breakout rooms cannot be recorded. If you record your session before starting a breakout session, the recording will be stopped as soon as you start a breakout session. If you wish to resume recording after your breakout session, you will need to click **Record** to begin a new recording. Your recordings will be uploaded and shared as separate files. If you have set up your Course Product to create a lesson for your recording, the recordings will create separate lessons for each file.