> ## Documentation Index
> Fetch the complete documentation index at: https://help.kajabi.com/llms.txt
> Use this file to discover all available pages before exploring further.
# Community Settings - Customization
> Configure the Global Feed, rename features, adjust branding, customize reactions, and change other settings.
The **Customization** tab in Community Settings gives you control over how your Community looks, feels, and communicates with members. From here, you can configure the Global Feed, rename features to match your brand language, apply branded colors, customize emoji reactions, set a default home page, adjust communication preferences, and update member and moderator aliases.
**To open Community Customization settings:**
1. In the Community, click the **ellipsis icon (...)** next to the Community search bar.
2. Then, select **Community Settings**.
3. In the left sidebar, select **Customization**.
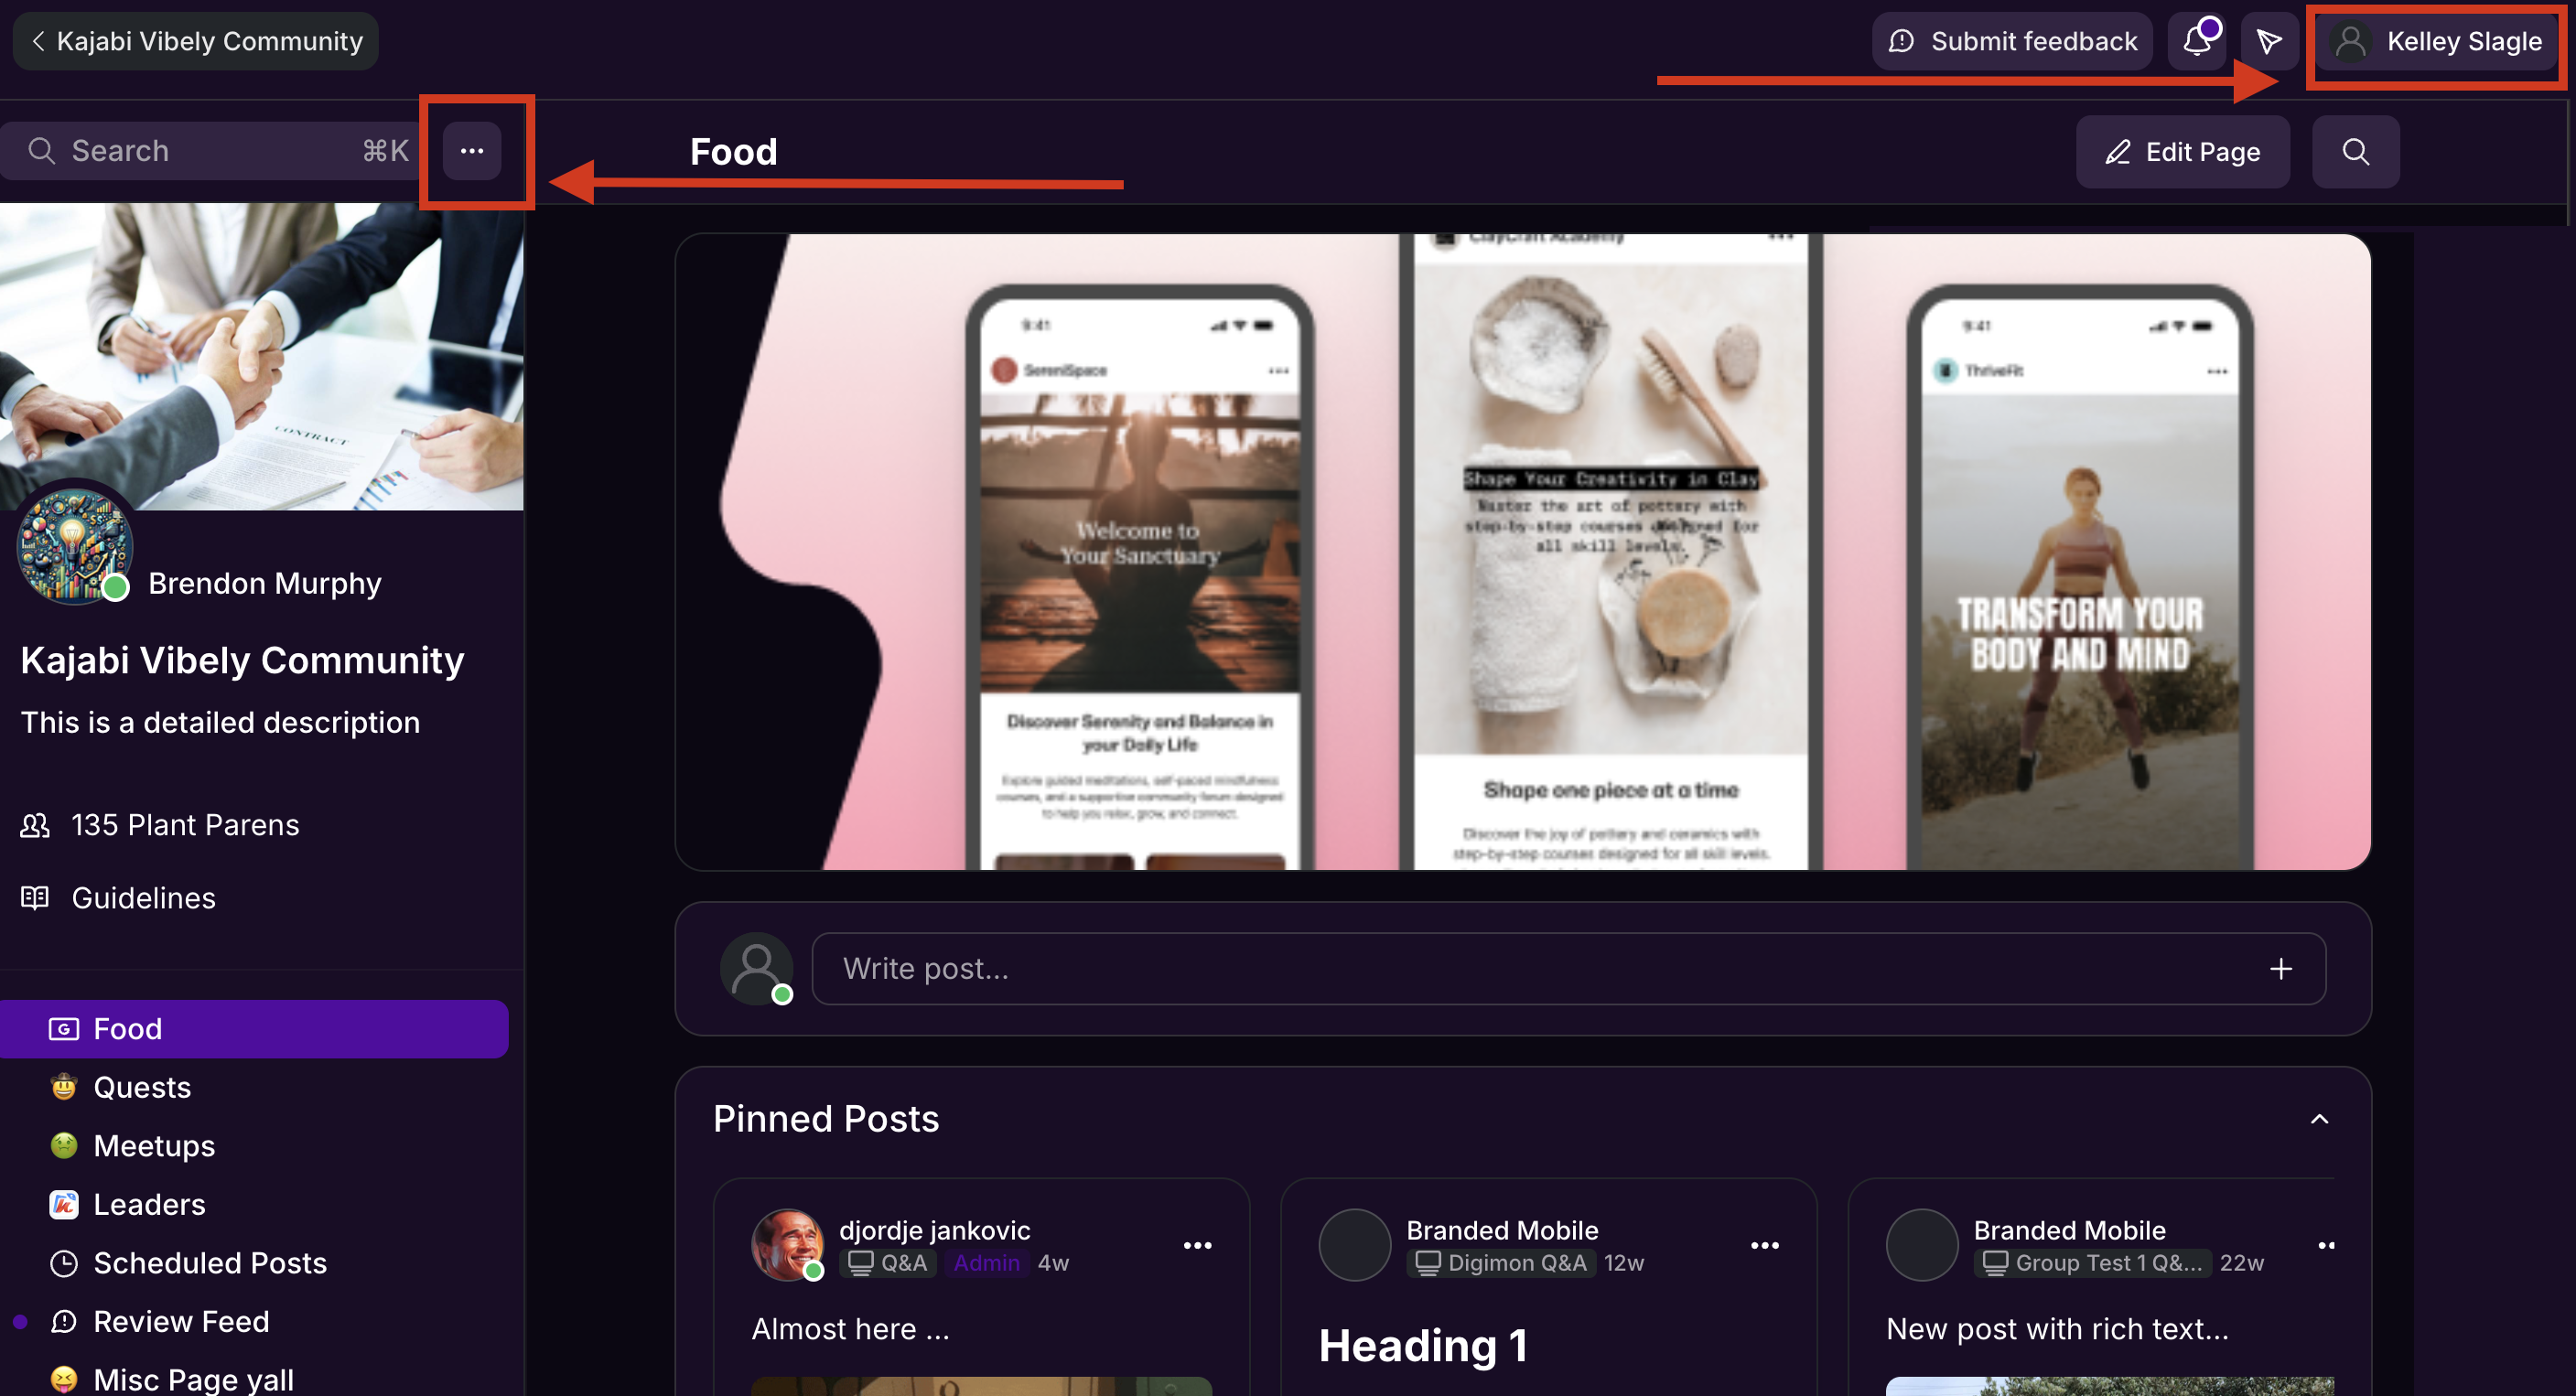 **Note:** You can also access Community Settings by clicking the **profile icon** in the top-right navigation bar.
## Global Feed
The Community **Global Feed** provides a central place to browse activity, and displays all posts from feed-type Channels you have access to.
**Note:** You can also access Community Settings by clicking the **profile icon** in the top-right navigation bar.
## Global Feed
The Community **Global Feed** provides a central place to browse activity, and displays all posts from feed-type Channels you have access to.
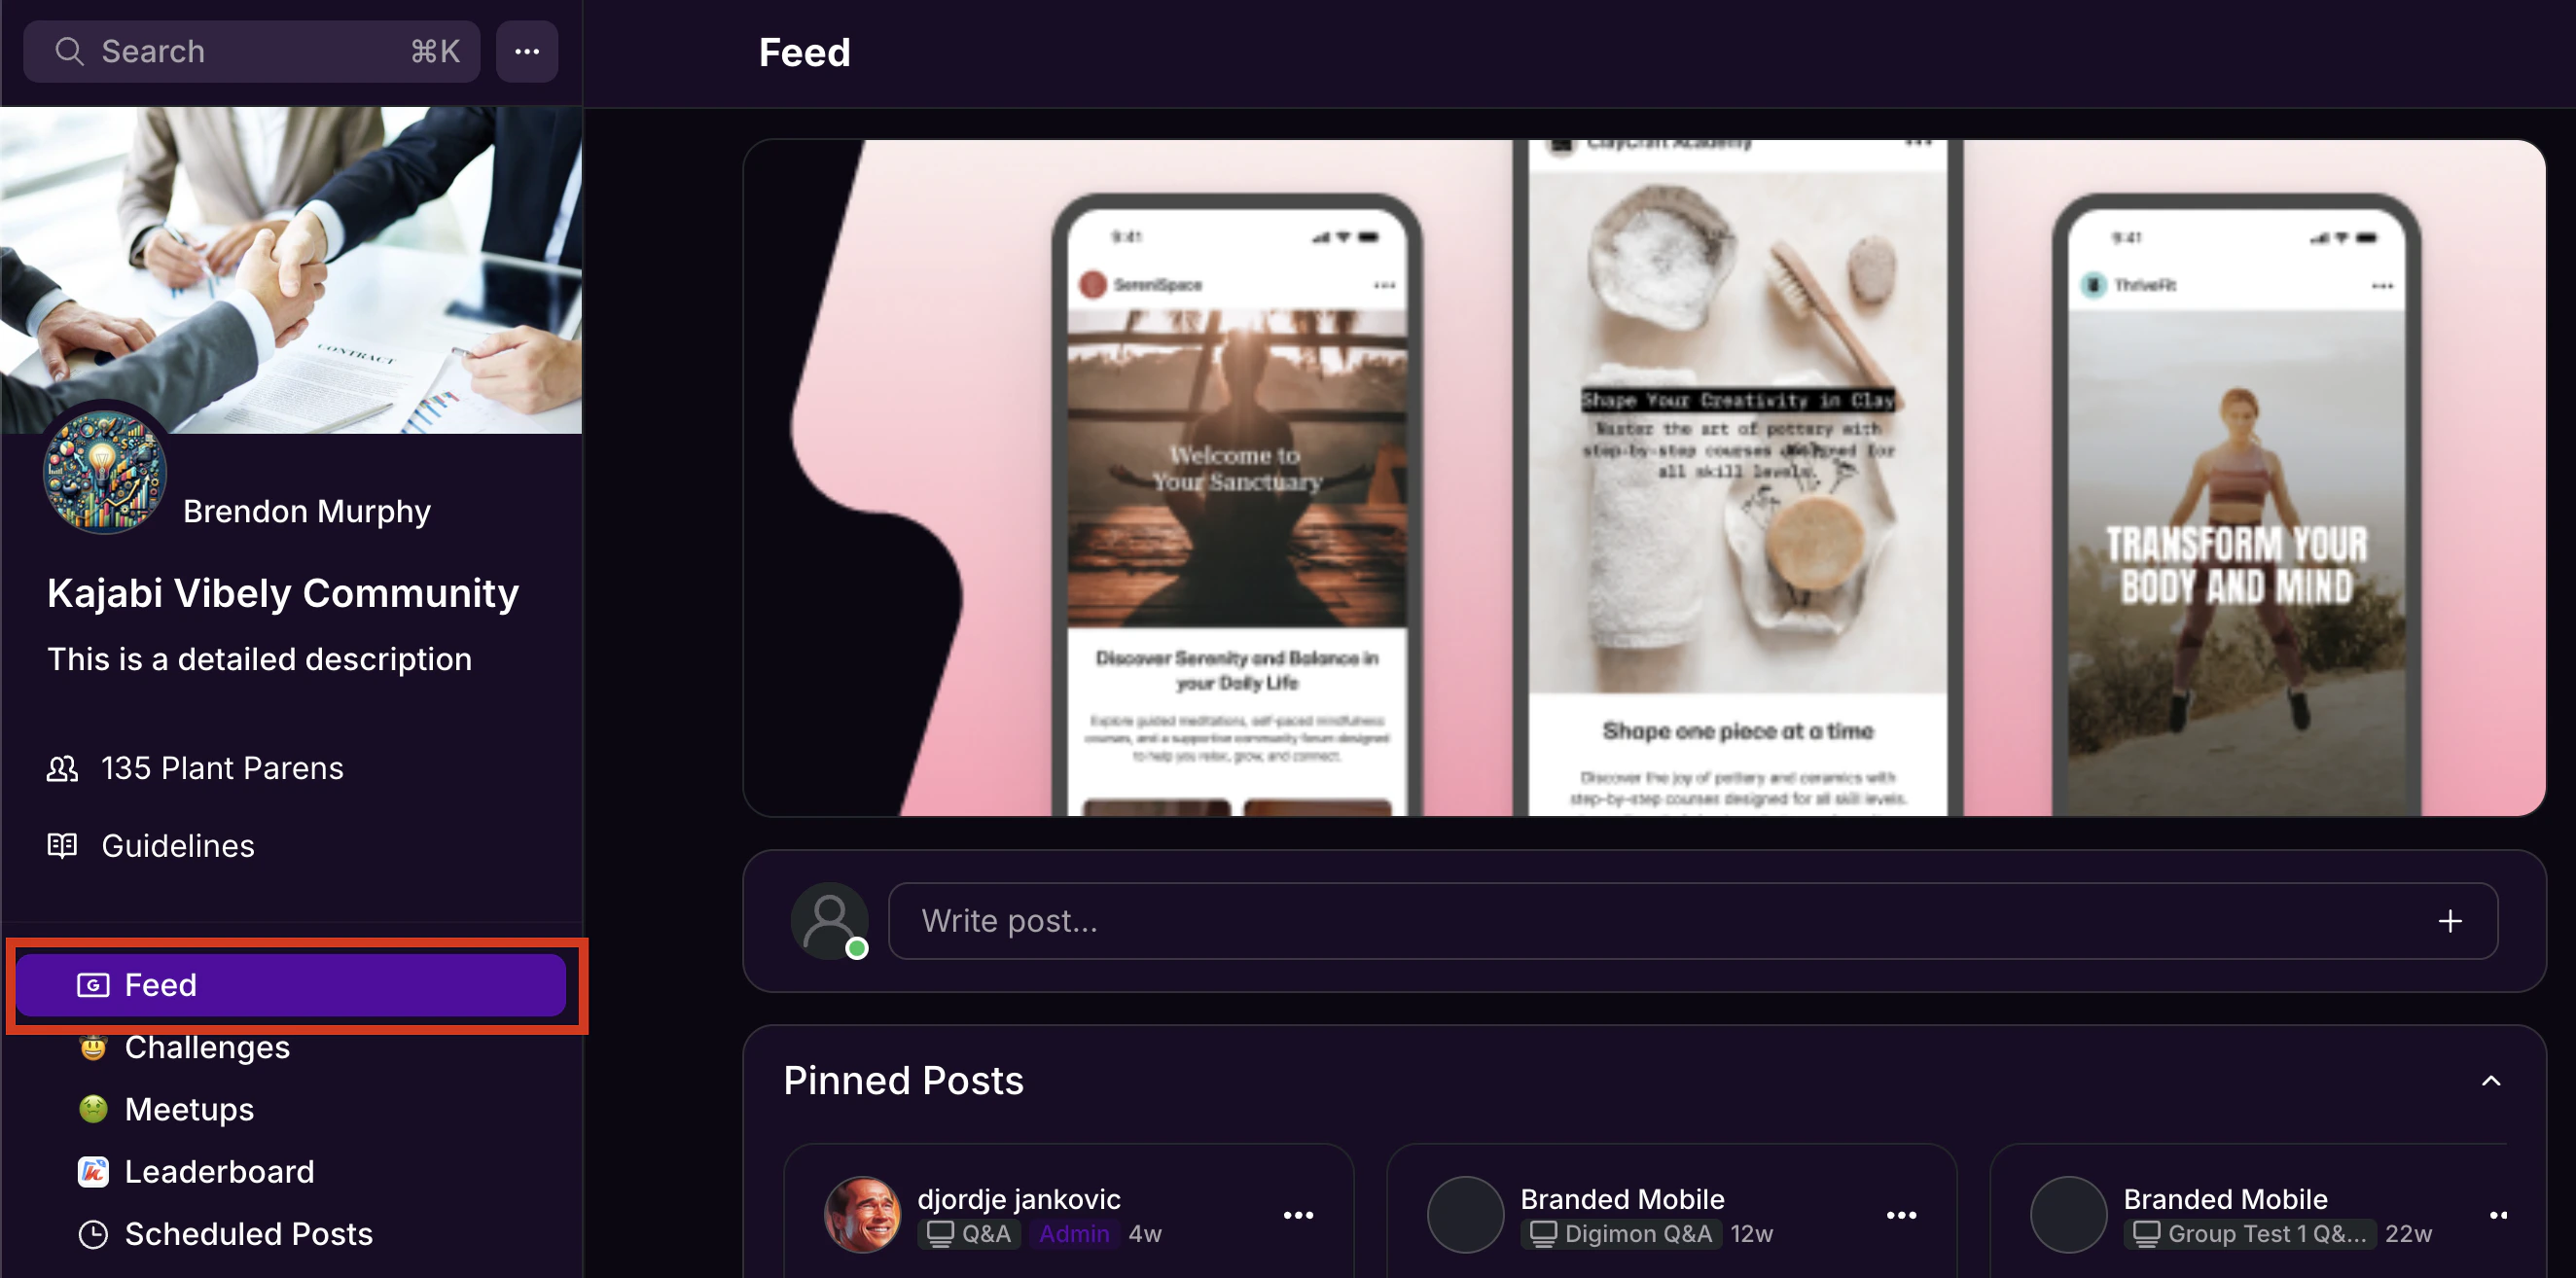 **Note:** Chat messages do not appear in the Global Feed on the Feed page.
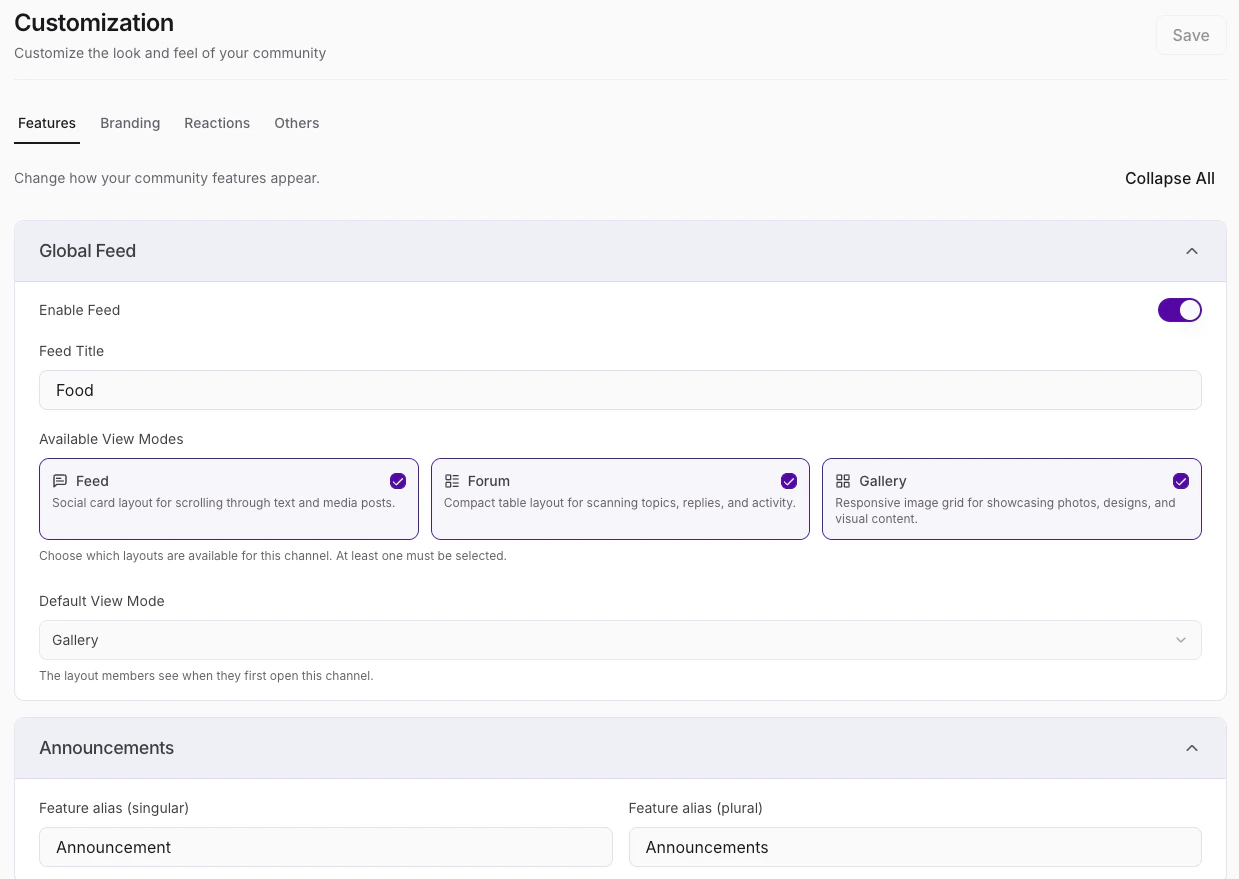
**To disable/enable the Global Feed, rename it, or manage its available layouts:**
1. Click the **ellipsis icon (...)** next to the Community search bar, then select **Community Settings**.
2. Select **Customization**.
3. Select the **Features** tab and navigate to the **Global Feed** section.
4. The Global Feed is enabled by default. To disable it, toggle off **Enable Feed.**
5. To begin customization of the Global Feed, edit the **Feed Title**.
6. You can select one or more **View Modes**, or layouts, that are available for the Channel. Community members are able to choose between the modes you select.
* **Feed** (Default) - A social card layout for scrolling through text and media posts.
* **Forum** - A compact table layout for scanning topics, replies, and activity.
* **Gallery** - A responsive image grid for showcasing photos, designs, and visual content.
7. Then, select the **Default View Mode** that members see when they first open the Channel.
8. Click **Save** to apply changes.
**Note:** Chat messages do not appear in the Global Feed on the Feed page.
**To disable/enable the Global Feed, rename it, or manage its available layouts:**
1. Click the **ellipsis icon (...)** next to the Community search bar, then select **Community Settings**.
2. Select **Customization**.
3. Select the **Features** tab and navigate to the **Global Feed** section.
4. The Global Feed is enabled by default. To disable it, toggle off **Enable Feed.**
5. To begin customization of the Global Feed, edit the **Feed Title**.
6. You can select one or more **View Modes**, or layouts, that are available for the Channel. Community members are able to choose between the modes you select.
* **Feed** (Default) - A social card layout for scrolling through text and media posts.
* **Forum** - A compact table layout for scanning topics, replies, and activity.
* **Gallery** - A responsive image grid for showcasing photos, designs, and visual content.
7. Then, select the **Default View Mode** that members see when they first open the Channel.
8. Click **Save** to apply changes.
 ## Rename and change feature aliases
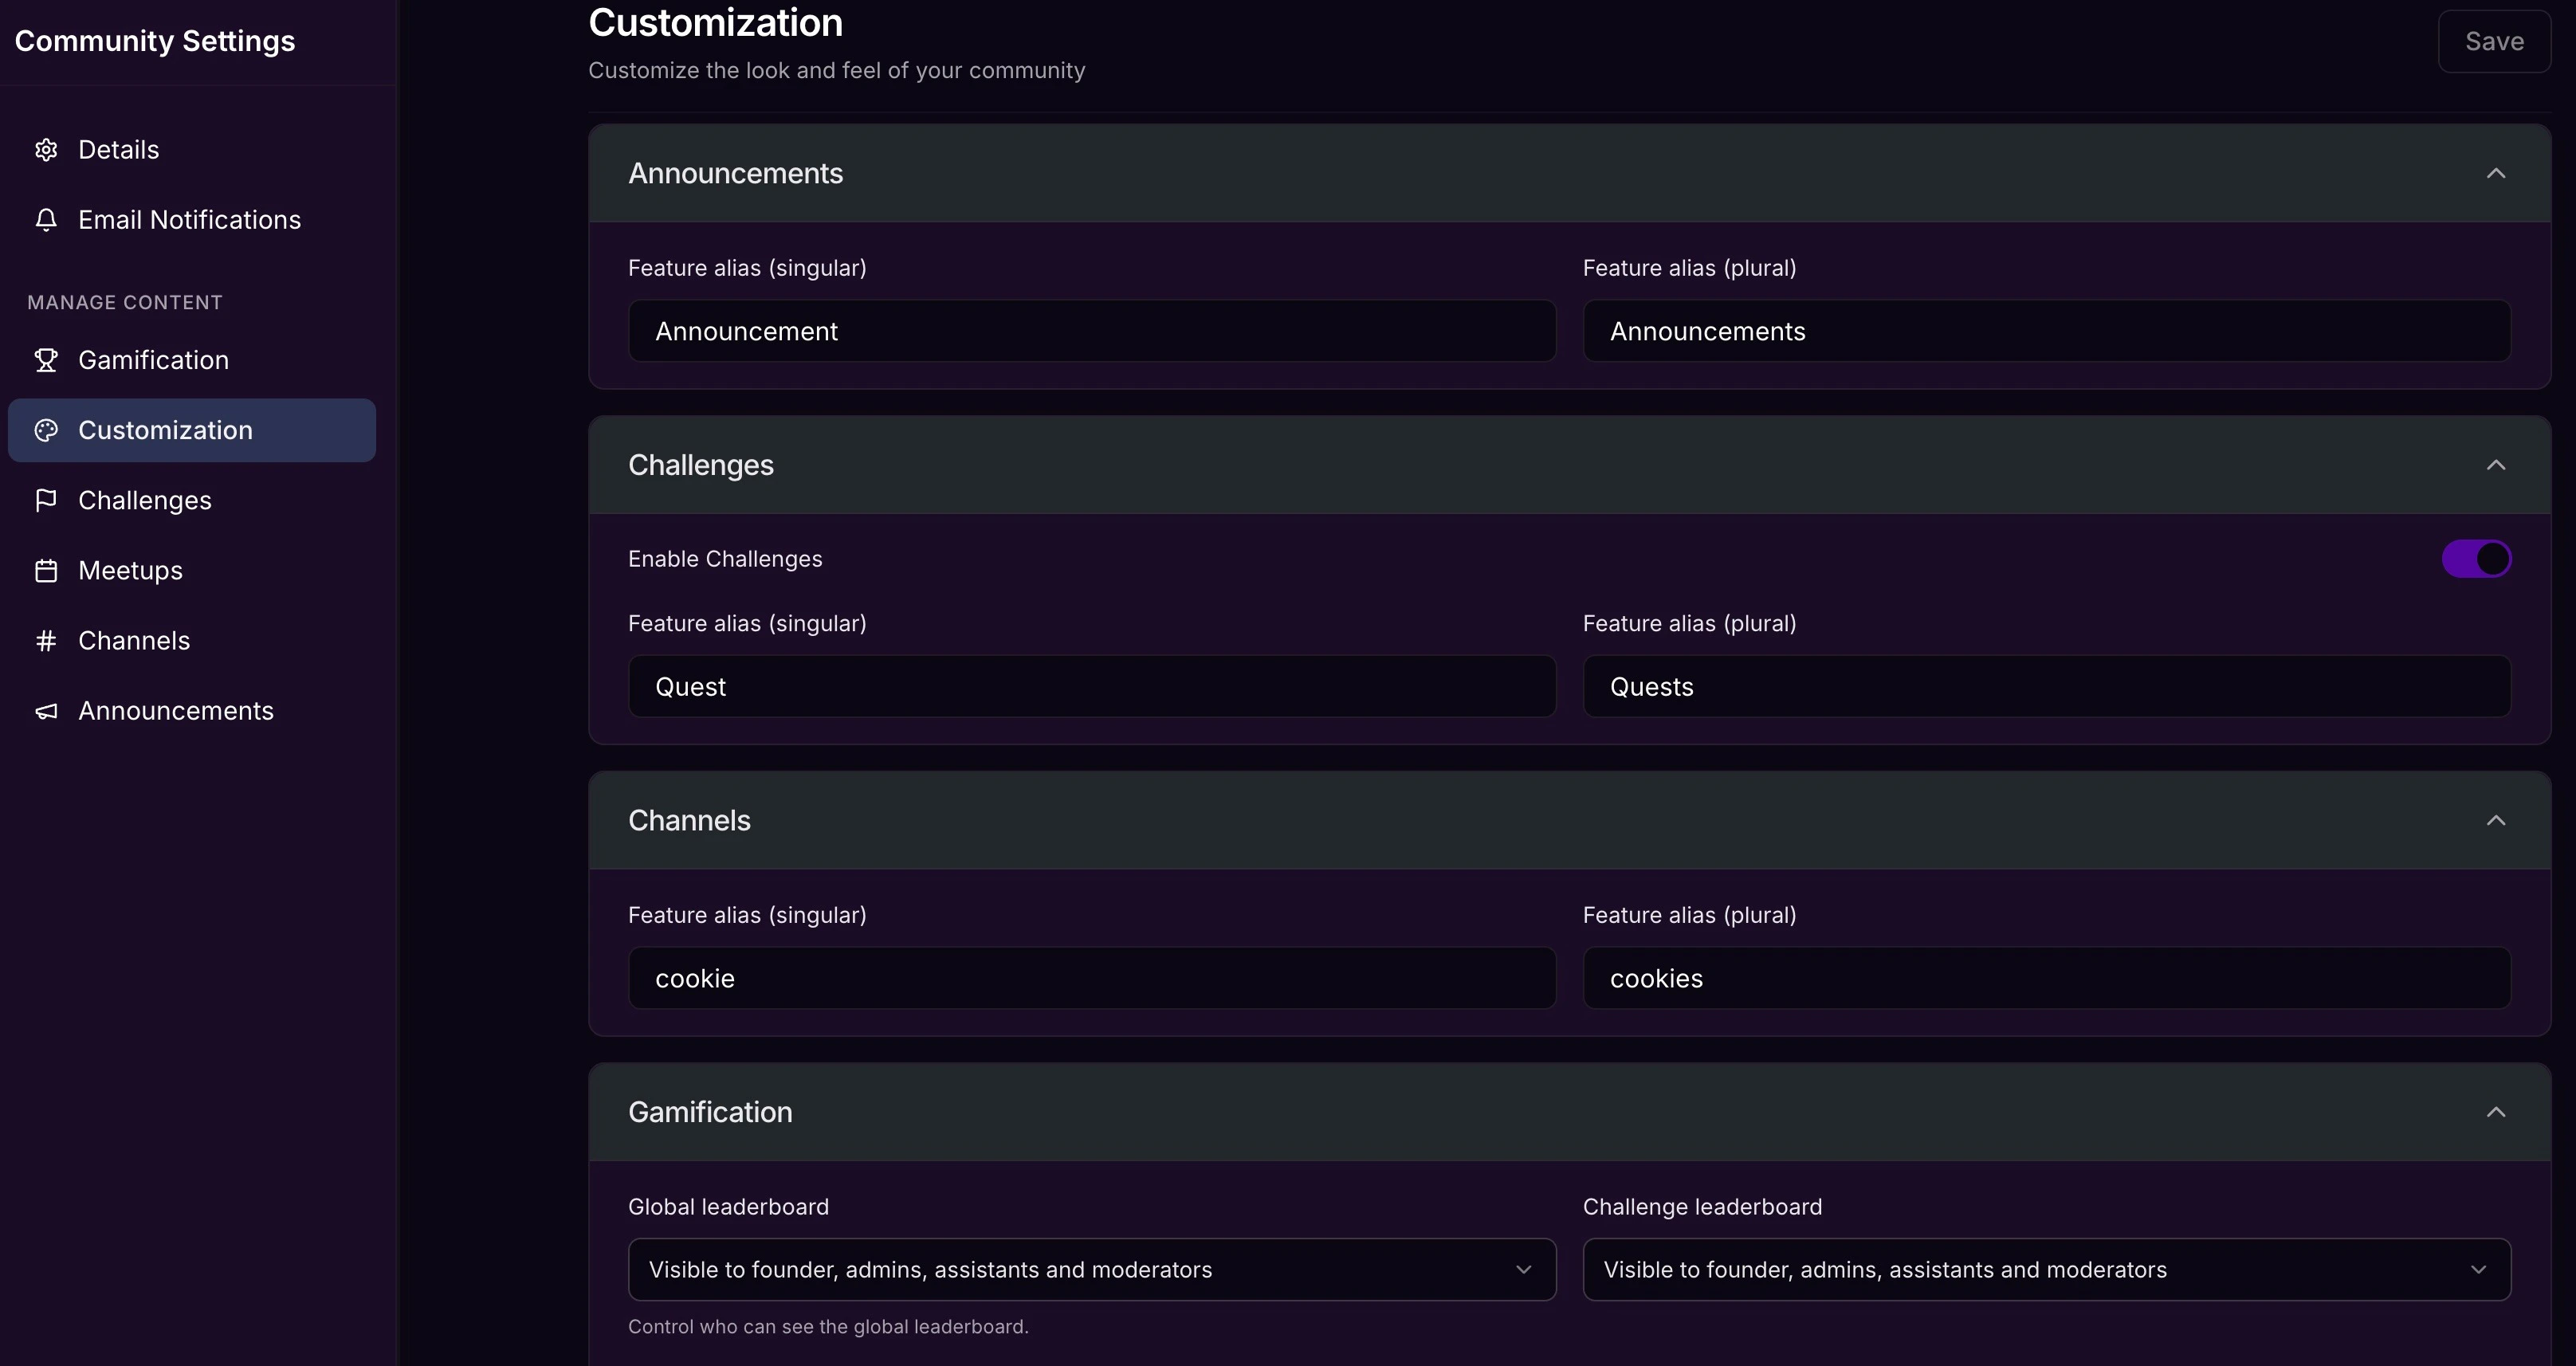
Match your business brand and language with your Community by **renaming** key features. This helps create a more cohesive experience that resonates with your members.
You may rename the following Community features:
* Challenges
* Meetups
* Channels
* Live Rooms
* Announcements
* Leaderboards
For example, you could rename Channels to "Groups" or "Crews," or change "Challenges" to "Competitions" to best fit your needs.
**Note:** Renaming Community features updates feature names across the entire Kajabi app, including desktop, mobile, and notifications. Any URLs also update to reflect the name change. However, original feature names still display for Admins in Community Settings. Member-facing settings do not contain original feature names.
**To rename a Community feature:**
1. Click the **ellipsis icon (...)** next to the Community search bar, then select **Community Settings**.
2. Click **Customization**.
3. Locate the feature you wish to rename and open the dropdown.
4. Enter a **Feature alias** for both plural and singular.
5. Click **Save** to apply changes.
## Rename and change feature aliases
Match your business brand and language with your Community by **renaming** key features. This helps create a more cohesive experience that resonates with your members.
You may rename the following Community features:
* Challenges
* Meetups
* Channels
* Live Rooms
* Announcements
* Leaderboards
For example, you could rename Channels to "Groups" or "Crews," or change "Challenges" to "Competitions" to best fit your needs.
**Note:** Renaming Community features updates feature names across the entire Kajabi app, including desktop, mobile, and notifications. Any URLs also update to reflect the name change. However, original feature names still display for Admins in Community Settings. Member-facing settings do not contain original feature names.
**To rename a Community feature:**
1. Click the **ellipsis icon (...)** next to the Community search bar, then select **Community Settings**.
2. Click **Customization**.
3. Locate the feature you wish to rename and open the dropdown.
4. Enter a **Feature alias** for both plural and singular.
5. Click **Save** to apply changes.
 ## Customize branding
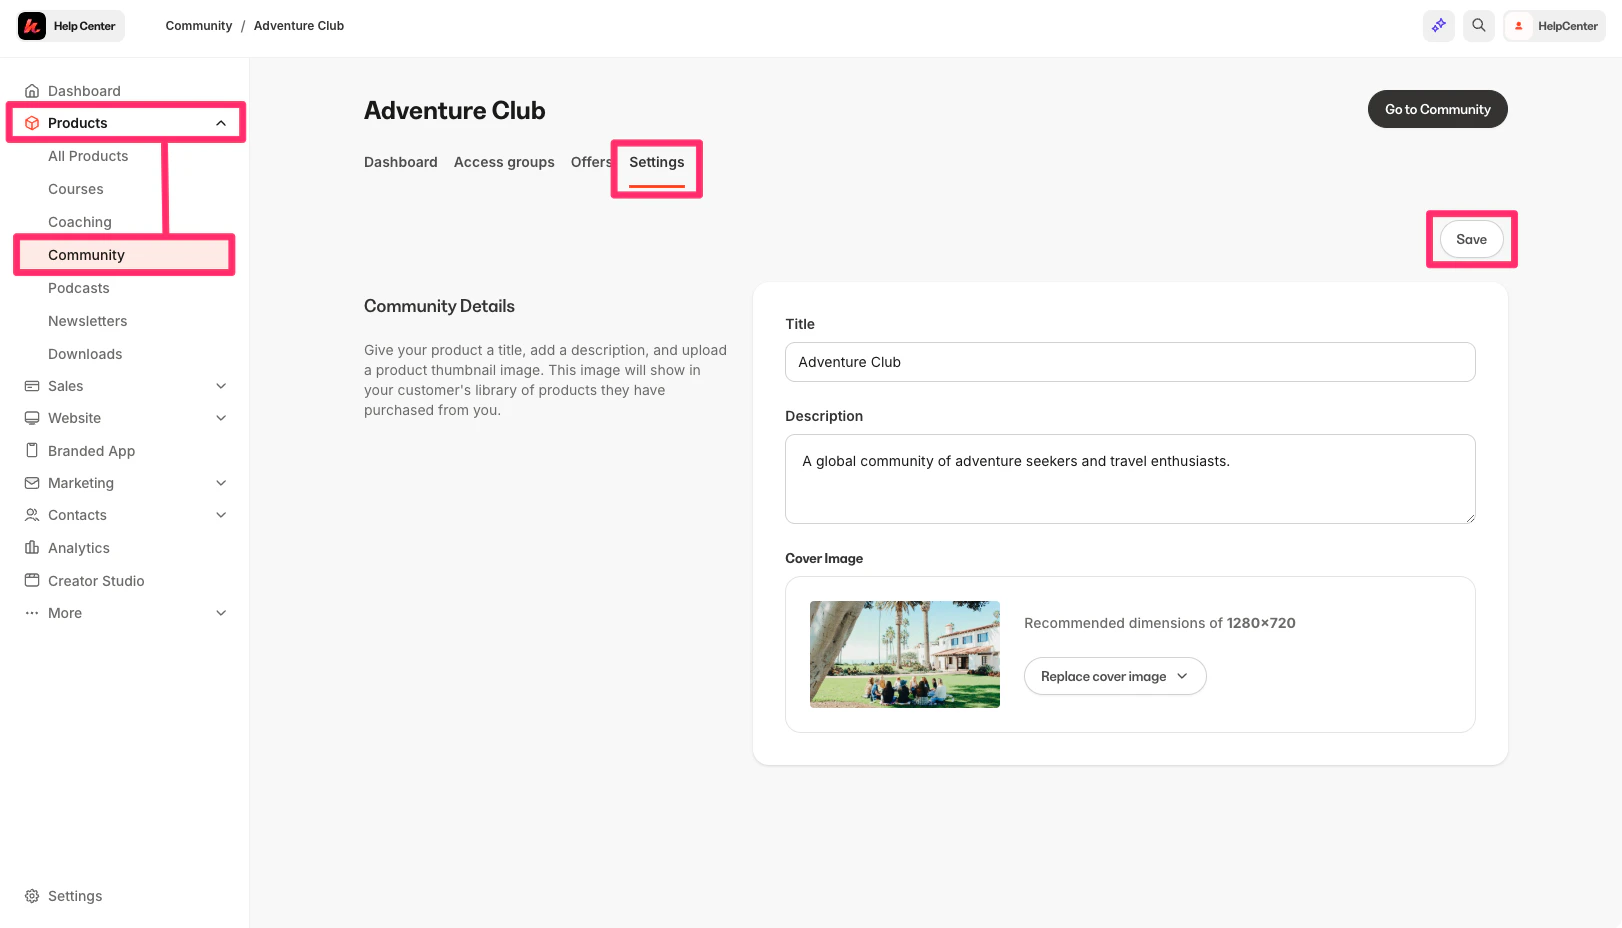
The Community **Title**, **Description**, and **Cover Image** are managed through the **Community Product** settings in the Kajabi app. These elements shape how members discover and experience a Community from the moment they arrive.
**To update the Community Title, Description, or Cover Image:**
1. From the Kajabi dashboard, click **Products**, then **Community**.
2. Navigate to the **Settings** tab.
3. Update the **Title**, **Description**, and/or **Cover Image** as needed.
4. Click **Save** to apply changes.
## Customize branding
The Community **Title**, **Description**, and **Cover Image** are managed through the **Community Product** settings in the Kajabi app. These elements shape how members discover and experience a Community from the moment they arrive.
**To update the Community Title, Description, or Cover Image:**
1. From the Kajabi dashboard, click **Products**, then **Community**.
2. Navigate to the **Settings** tab.
3. Update the **Title**, **Description**, and/or **Cover Image** as needed.
4. Click **Save** to apply changes.
 ## Customize reactions
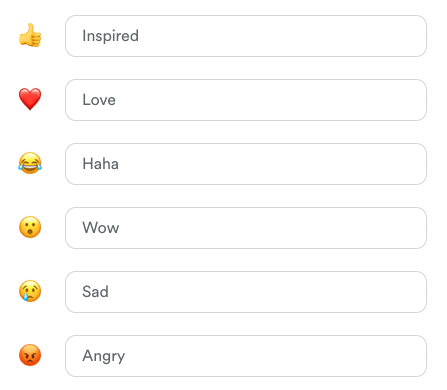
**Custom reactions** are labeled emojis you and your Community members can use to react to feed-style Channel posts, Comments on Posts, and Challenge entries. Customize the label for each emoji to match your brand's voice and tone.
## Customize reactions
**Custom reactions** are labeled emojis you and your Community members can use to react to feed-style Channel posts, Comments on Posts, and Challenge entries. Customize the label for each emoji to match your brand's voice and tone.
 1. Click the **ellipsis icon (...)** next to the Community search bar, then select **Community Settings**.
2. Select **Customization**.
3. Select the **Reactions** tab.
4. Use the text input field next to each **emoji** to edit its label.
5. View how an emoji looks by scrolling your cursor over each emoji in the **Preview** box just below it.
6. Click **Save**.
**Note:** Only the thumbs-up emoji can be used to react to Challenge entries. However, the custom label assigned to this emoji appears alongside it in all locations (Channel posts/comments and Challenge entries).
### Apply a reaction
Reactions can be applied to feed-style Channel posts, Challenge entries (thumbs-up emoji only), and comments on a Channel post.
**To add a reaction to a Channel post or comment using the web app:**
1. Navigate to the post or comment that you want to react to.
2. Place the cursor over the **Inspired (thumbs-up)** button. A small popup appears displaying available emojis to choose from.
3. Scroll the cursor over each emoji to preview its label in a tooltip.
4. Select the **emoji**.
**Note:** If you change your mind or accidentally select the wrong reaction, place your cursor back over the **reaction button**. The popup menu reappears and you can choose a different emoji. Or, click the **reaction button** to remove your reaction.
## Community Home page
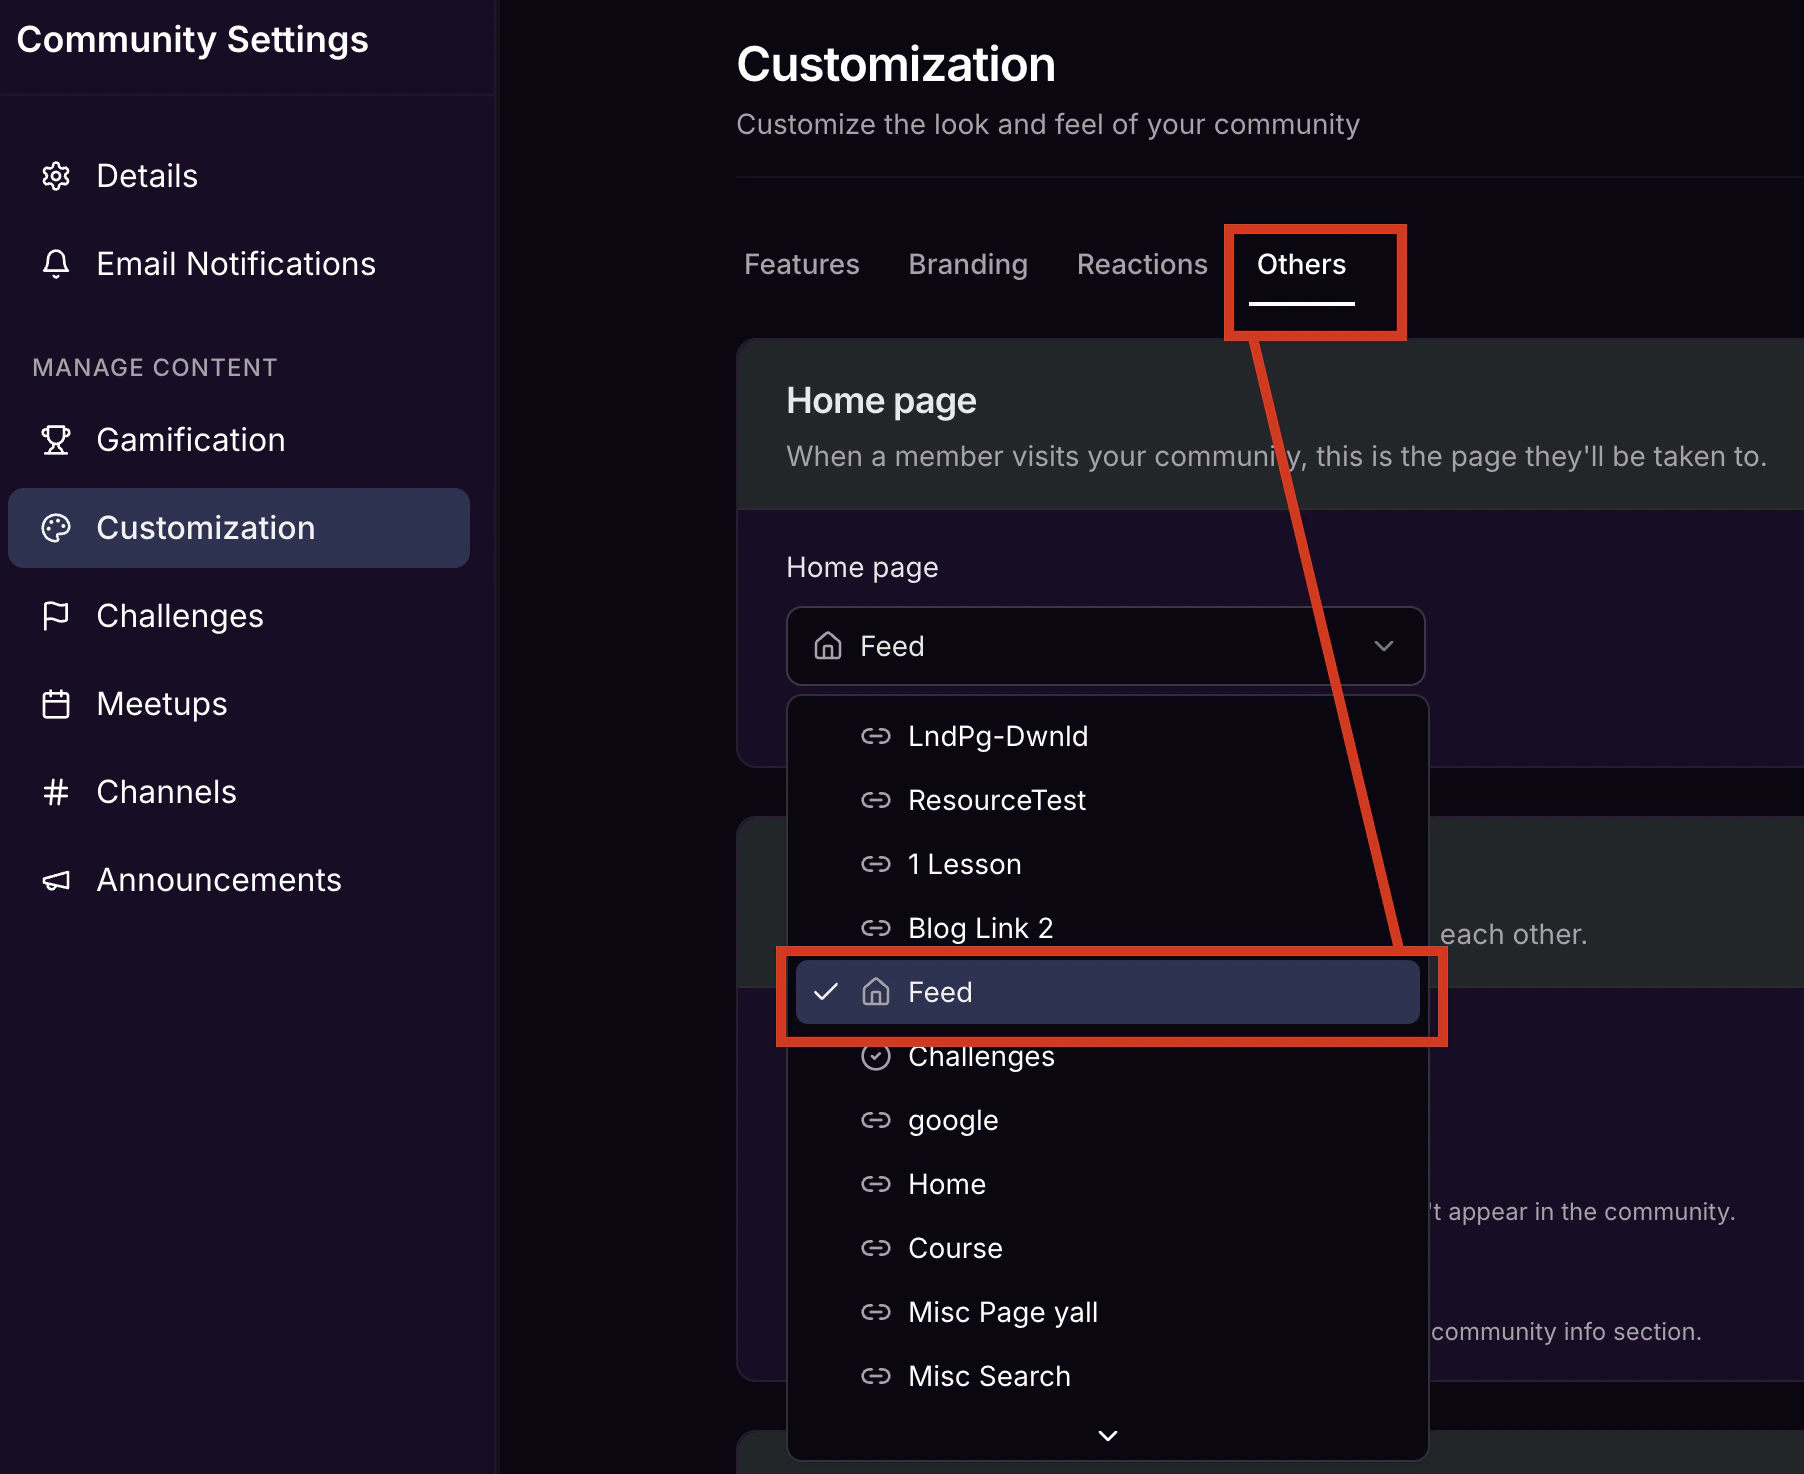
Choose which page your members land on when they visit your Community. By default, this is set to your Global Feed.
1. Click the **ellipsis icon** **(...)** next to the Community search bar, then, select **Community Settings**.Select **Customization** from the left navigation menu.
2. Navigate to the **Others** tab.
3. Use the dropdown under **Home page** to select the desired option (for example, **Feed**).
4. Click **Save**.
1. Click the **ellipsis icon (...)** next to the Community search bar, then select **Community Settings**.
2. Select **Customization**.
3. Select the **Reactions** tab.
4. Use the text input field next to each **emoji** to edit its label.
5. View how an emoji looks by scrolling your cursor over each emoji in the **Preview** box just below it.
6. Click **Save**.
**Note:** Only the thumbs-up emoji can be used to react to Challenge entries. However, the custom label assigned to this emoji appears alongside it in all locations (Channel posts/comments and Challenge entries).
### Apply a reaction
Reactions can be applied to feed-style Channel posts, Challenge entries (thumbs-up emoji only), and comments on a Channel post.
**To add a reaction to a Channel post or comment using the web app:**
1. Navigate to the post or comment that you want to react to.
2. Place the cursor over the **Inspired (thumbs-up)** button. A small popup appears displaying available emojis to choose from.
3. Scroll the cursor over each emoji to preview its label in a tooltip.
4. Select the **emoji**.
**Note:** If you change your mind or accidentally select the wrong reaction, place your cursor back over the **reaction button**. The popup menu reappears and you can choose a different emoji. Or, click the **reaction button** to remove your reaction.
## Community Home page
Choose which page your members land on when they visit your Community. By default, this is set to your Global Feed.
1. Click the **ellipsis icon** **(...)** next to the Community search bar, then, select **Community Settings**.Select **Customization** from the left navigation menu.
2. Navigate to the **Others** tab.
3. Use the dropdown under **Home page** to select the desired option (for example, **Feed**).
4. Click **Save**.
 ## Communication settings
Adjust how members interact and what information is visible within your Community. These settings are found under the **Others** tab in **Customization**.
### Direct messaging with founder
Allow or deny Community members' access to start direct messages with the Community Account Owner. Any existing conversations remain open.
1. Click the **ellipsis icon** **(...)** next to the Community search bar, then, select **Community Settings**.
2. Select **Customization** in the left sidebar.
3. Navigate to the **Others** tab.
4. Toggle **Direct messaging with founder** on or off under the **Communication** section.
## Communication settings
Adjust how members interact and what information is visible within your Community. These settings are found under the **Others** tab in **Customization**.
### Direct messaging with founder
Allow or deny Community members' access to start direct messages with the Community Account Owner. Any existing conversations remain open.
1. Click the **ellipsis icon** **(...)** next to the Community search bar, then, select **Community Settings**.
2. Select **Customization** in the left sidebar.
3. Navigate to the **Others** tab.
4. Toggle **Direct messaging with founder** on or off under the **Communication** section.
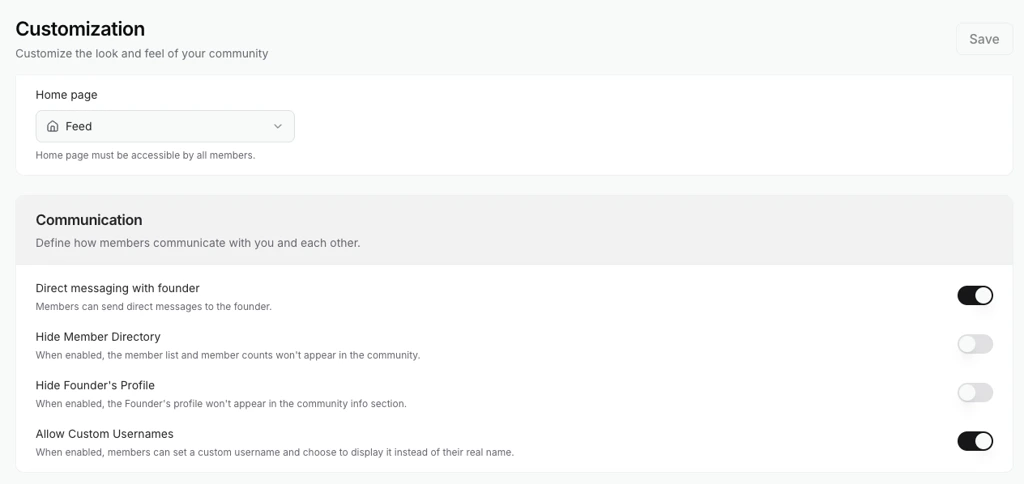 ### Hide Member Directory
Control whether the Member Directory is visible to your Community members.
1. Click the **ellipsis icon** **(...)** next to the Community search bar, then, select **Community Settings**.
2. Select **Customization** in the left sidebar.
3. Navigate to the **Others** tab.
4. Under the **Communication** section, select your desired setting for **Hide Member Directory**.
5. Click **Save** to apply your changes.
### Hide Founder's Profile
Choose whether to allow your Community members to view the Community leader's name and profile photo.
1. Click the **ellipsis icon** **(...)** next to the Community search bar, then, select **Community Settings**.
2. Select **Customization** in the left sidebar.
3. Navigate to the **Others** tab.
4. Under the **Communication** section, select your desired setting for **Hide Founder's Profile**.
5. Click **Save** to apply your changes.
### Allow custom usernames
Choose whether to allow Community members to create their own usernames for use in a Community.
Members may set a **username** and choose whether to display it instead of their real name throughout a Community. They can [set their username directly from their Profile page](https://help.kajabi.com/articles/products/community/how-to-edit-your-community-profile), at the top of the Bio card:
### Hide Member Directory
Control whether the Member Directory is visible to your Community members.
1. Click the **ellipsis icon** **(...)** next to the Community search bar, then, select **Community Settings**.
2. Select **Customization** in the left sidebar.
3. Navigate to the **Others** tab.
4. Under the **Communication** section, select your desired setting for **Hide Member Directory**.
5. Click **Save** to apply your changes.
### Hide Founder's Profile
Choose whether to allow your Community members to view the Community leader's name and profile photo.
1. Click the **ellipsis icon** **(...)** next to the Community search bar, then, select **Community Settings**.
2. Select **Customization** in the left sidebar.
3. Navigate to the **Others** tab.
4. Under the **Communication** section, select your desired setting for **Hide Founder's Profile**.
5. Click **Save** to apply your changes.
### Allow custom usernames
Choose whether to allow Community members to create their own usernames for use in a Community.
Members may set a **username** and choose whether to display it instead of their real name throughout a Community. They can [set their username directly from their Profile page](https://help.kajabi.com/articles/products/community/how-to-edit-your-community-profile), at the top of the Bio card:
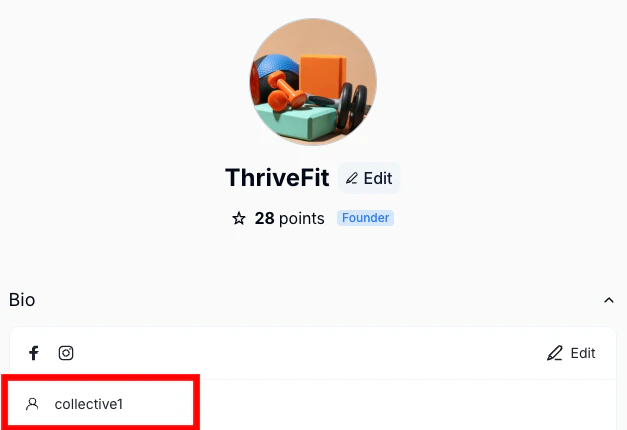 \
When enabled, the username replaces their real name everywhere it appears: Profile header, Posts, Comments, @mentions, and member lists.
* Usernames are "per community", meaning a member can use a different username in each community they belong to.
* Each username must be unique within its community, and follows the same length constraints as the **Name** field.
* The **@mention** search works with both real names and usernames, so other members can find and tag someone regardless of which name they're displaying.
* When disabled, the custom **username** field is hidden from members and real names are always used — even if a member had previously set a username.
1. Click the **ellipsis icon** **(...)** next to the Community search bar, then, select **Community Settings**.
2. Select **Customization** in the left sidebar.
3. Navigate to the **Others** tab.
4. Under the **Communication** section, select your desired setting for **Allow Custom Usernames**.
5. Click **Save** to apply your changes.
## Member and Moderator aliases
Under **Customization**, you can change how you refer to your **Members** and **Moderators** within the Community.
1. Click the **ellipsis icon** **(...)** next to the Community search bar, then, select **Community Settings**.
2. Select **Customization** in the left sidebar.
3. Navigate to the **Others** tab.
\
When enabled, the username replaces their real name everywhere it appears: Profile header, Posts, Comments, @mentions, and member lists.
* Usernames are "per community", meaning a member can use a different username in each community they belong to.
* Each username must be unique within its community, and follows the same length constraints as the **Name** field.
* The **@mention** search works with both real names and usernames, so other members can find and tag someone regardless of which name they're displaying.
* When disabled, the custom **username** field is hidden from members and real names are always used — even if a member had previously set a username.
1. Click the **ellipsis icon** **(...)** next to the Community search bar, then, select **Community Settings**.
2. Select **Customization** in the left sidebar.
3. Navigate to the **Others** tab.
4. Under the **Communication** section, select your desired setting for **Allow Custom Usernames**.
5. Click **Save** to apply your changes.
## Member and Moderator aliases
Under **Customization**, you can change how you refer to your **Members** and **Moderators** within the Community.
1. Click the **ellipsis icon** **(...)** next to the Community search bar, then, select **Community Settings**.
2. Select **Customization** in the left sidebar.
3. Navigate to the **Others** tab.
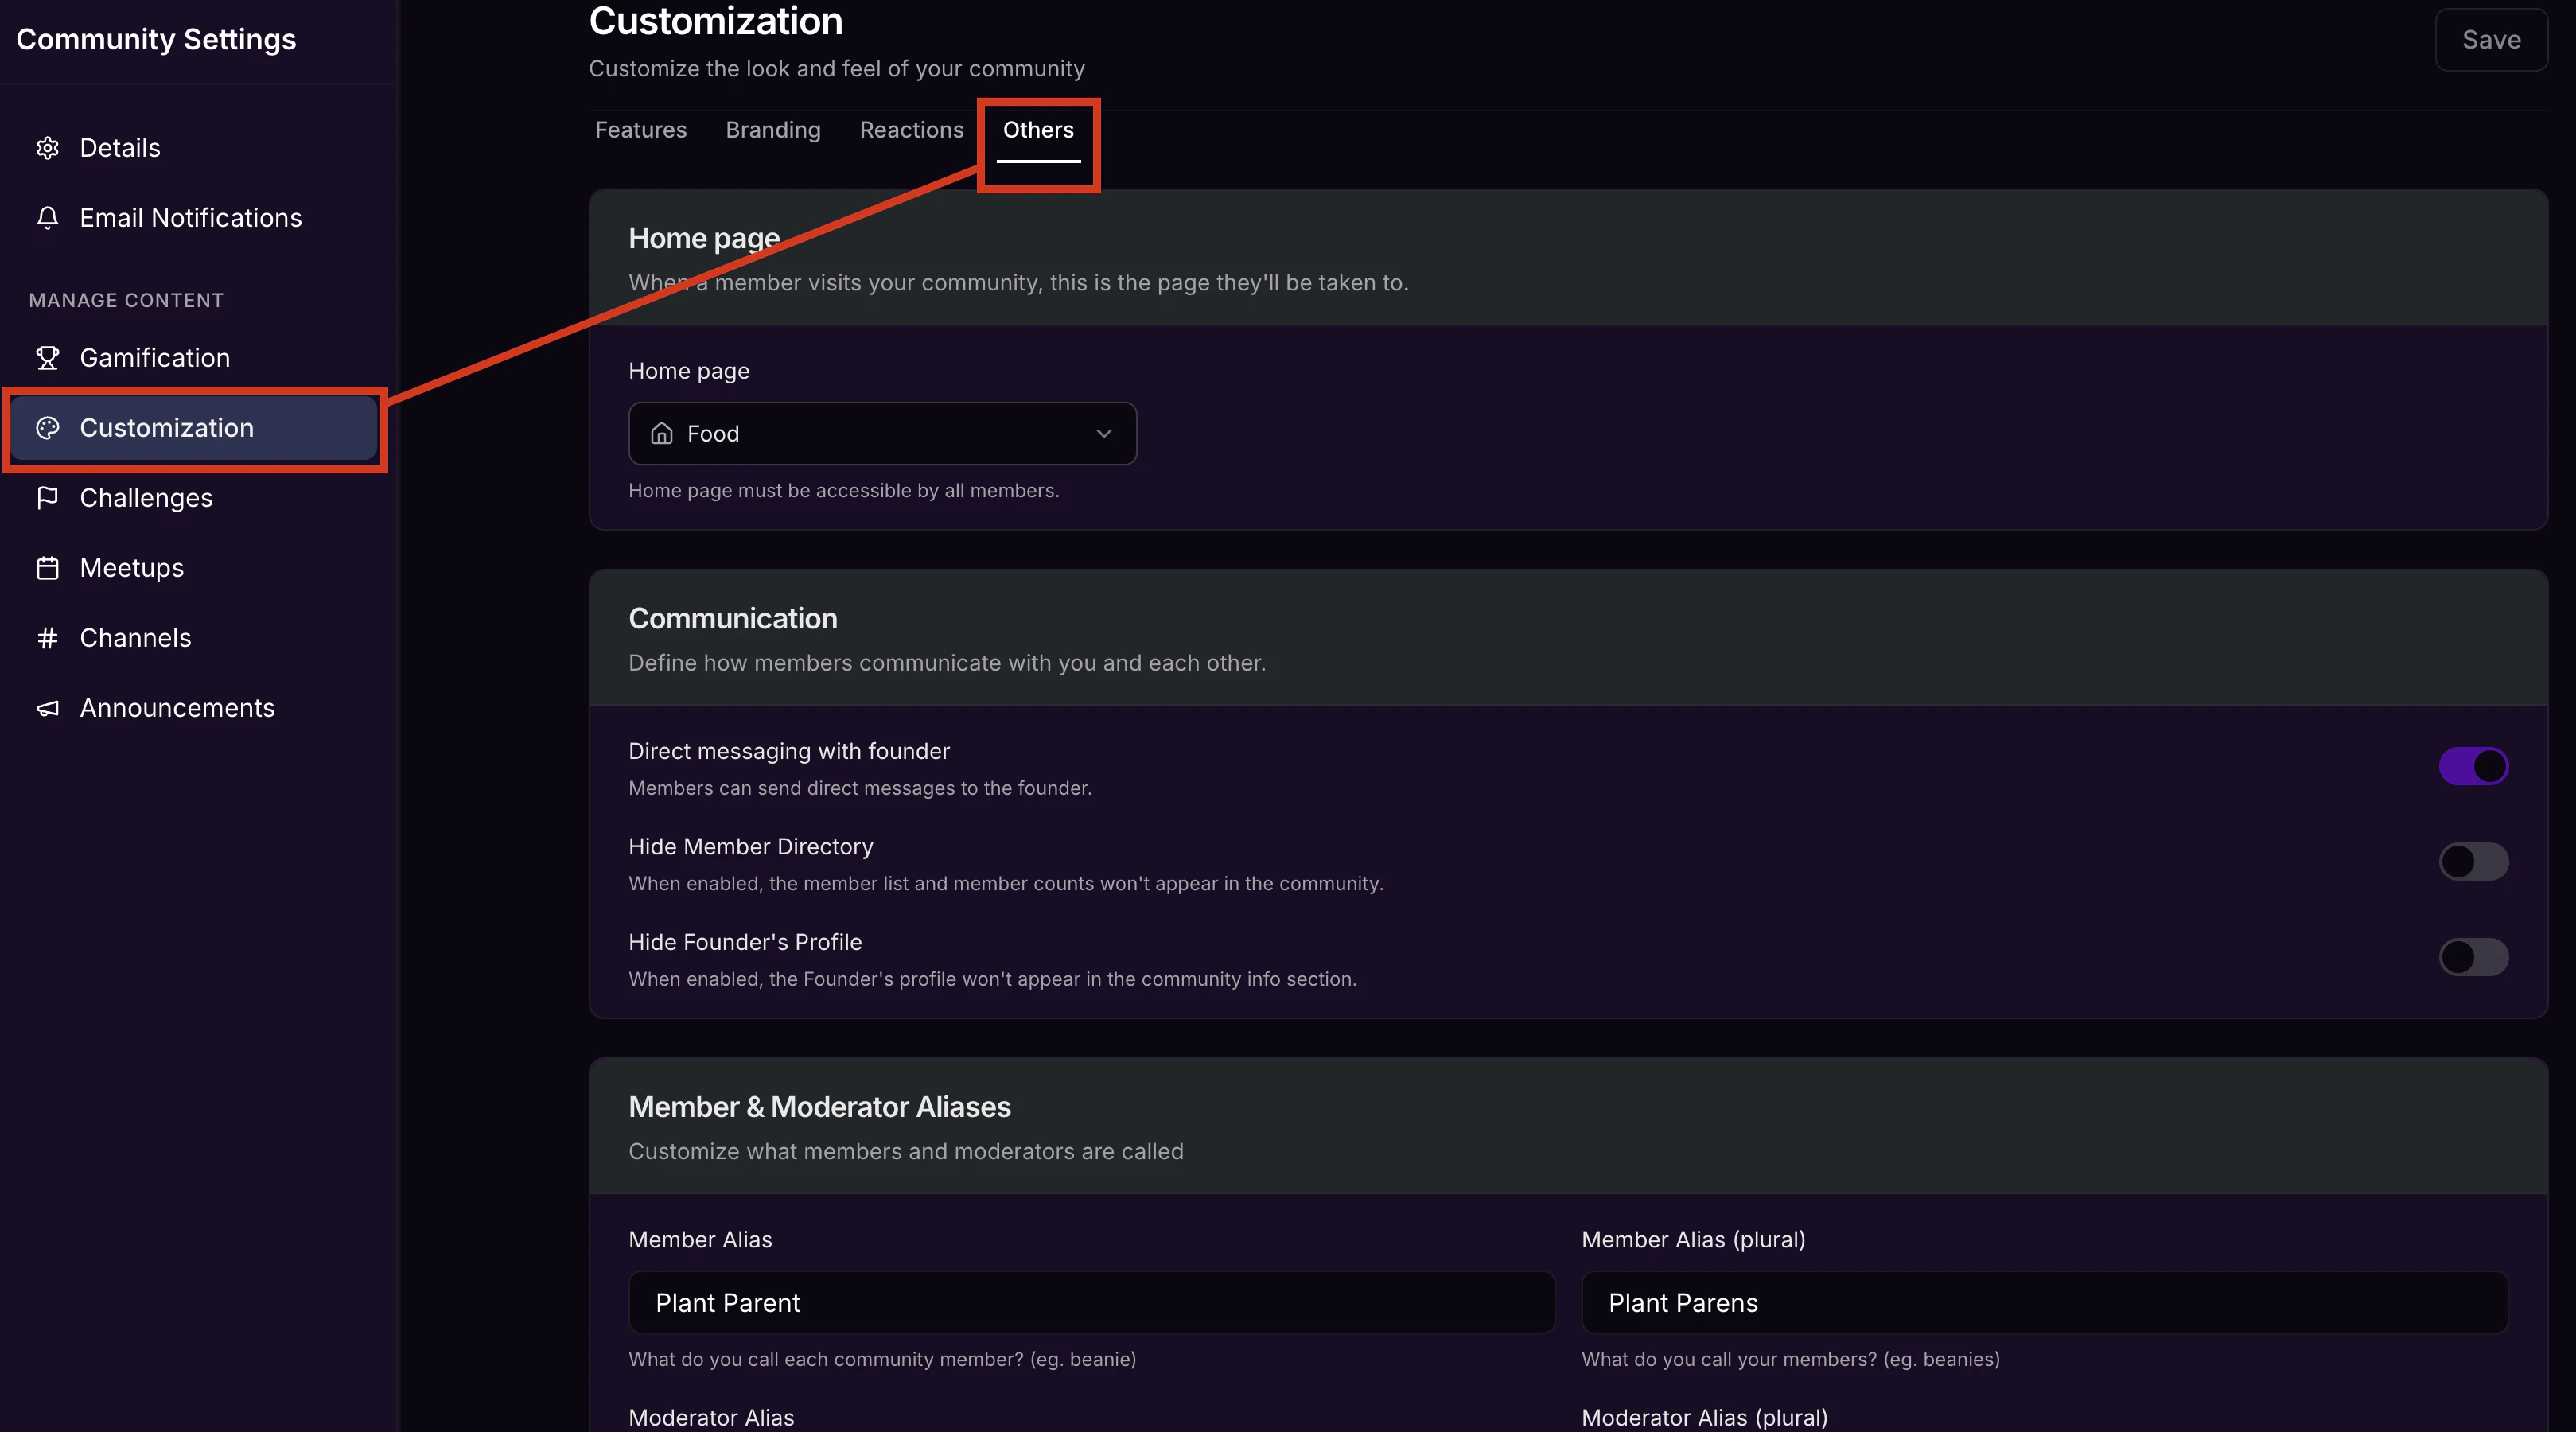 4. Scroll down and update aliases as desired by overwriting the default terms.
5. Click **Save**.
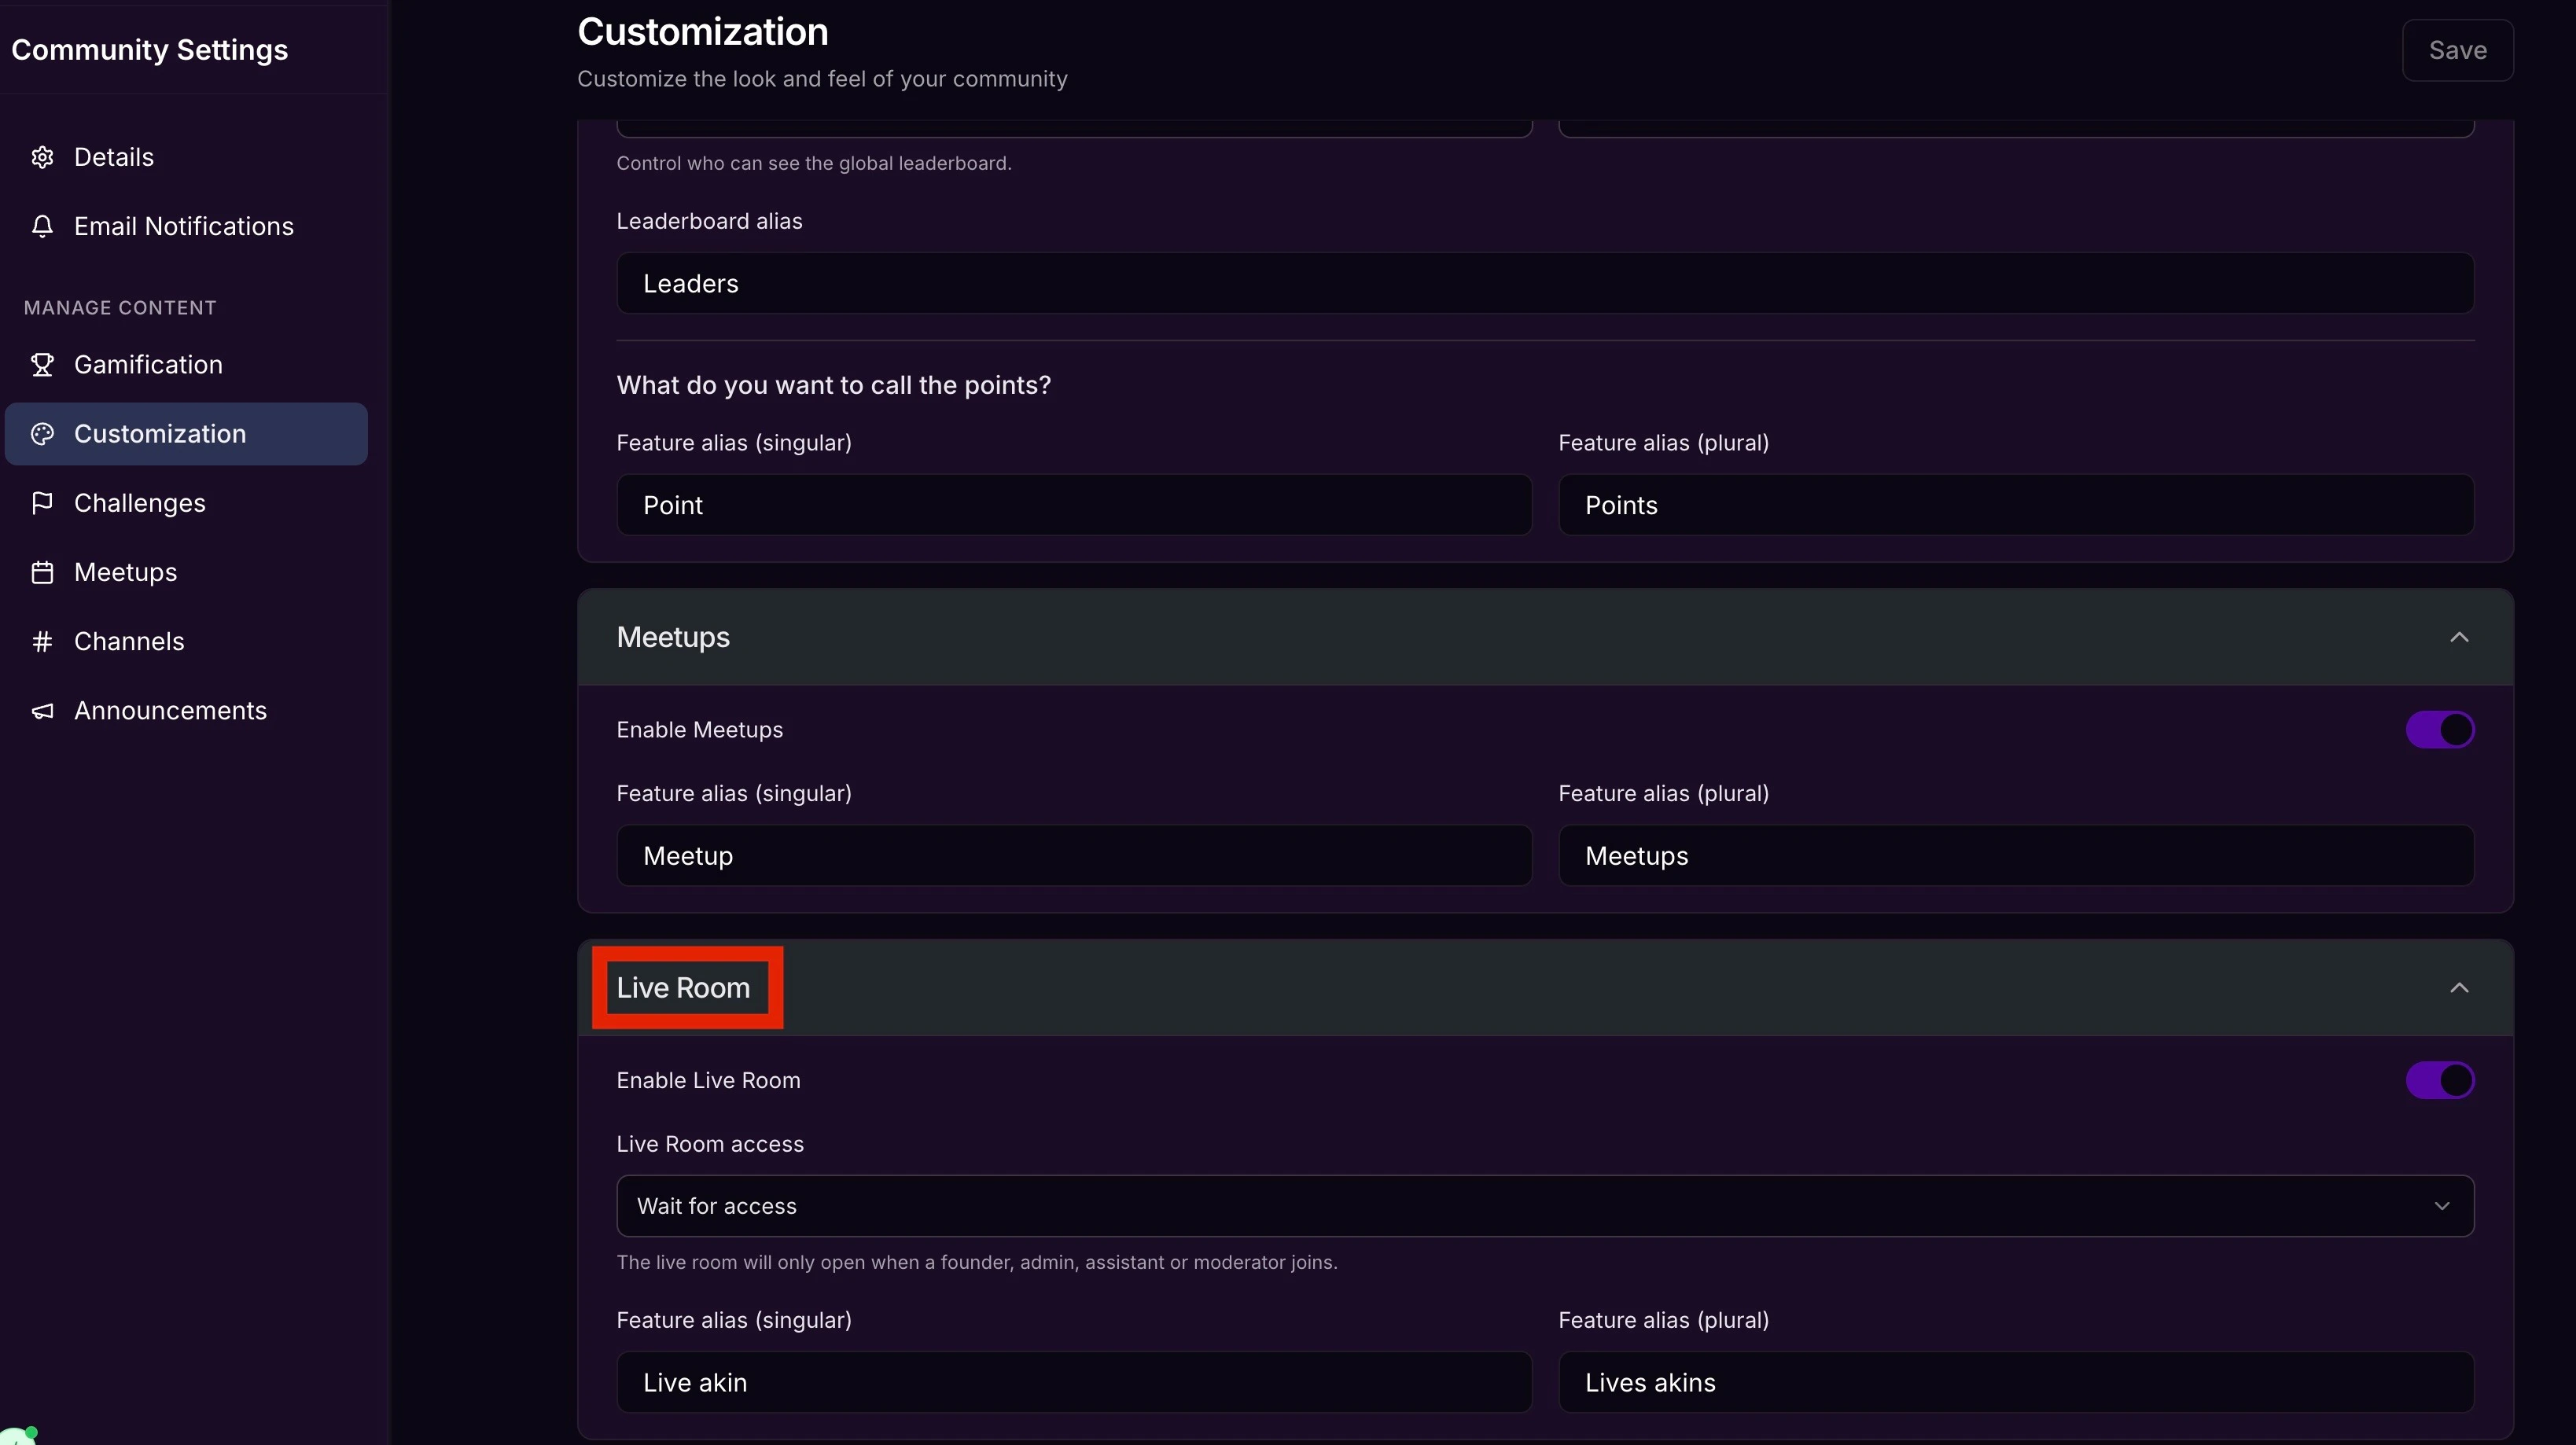
## Live Room access
Configure whether the **Live Room** stays open even when you did not start it (**Always open**), or restrict it so it only opens when a Leader, Admin, or Ambassador starts it (**Wait for access**).
1. Click the **ellipsis icon** **(...)** next to the Community search bar, then, select **Community Settings**.
2. Select **Customization** in the left sidebar.
3. Select your desired **Live Room access** setting.
4. Click **Save** to apply your changes.
4. Scroll down and update aliases as desired by overwriting the default terms.
5. Click **Save**.
## Live Room access
Configure whether the **Live Room** stays open even when you did not start it (**Always open**), or restrict it so it only opens when a Leader, Admin, or Ambassador starts it (**Wait for access**).
1. Click the **ellipsis icon** **(...)** next to the Community search bar, then, select **Community Settings**.
2. Select **Customization** in the left sidebar.
3. Select your desired **Live Room access** setting.
4. Click **Save** to apply your changes.