> ## Documentation Index
> Fetch the complete documentation index at: https://help.kajabi.com/llms.txt
> Use this file to discover all available pages before exploring further.
# Community Settings - Details
> Manage core settings including the Community URL, Title, Description, Guidelines, and Language
**Community Settings - Details** is where you manage the core identity of your Kajabi Community. From the **Details** page, update your Community's URL, its title and description, add social media links, and set guidelines for members. These settings shape how members discover and experience your Community from the moment they arrive. You may also update information for the Community using your profile information.
To access the **Details** page, open your Community and click the **ellipsis** **icon \[**...**]** next to the cover image, then select **Community Settings**. In the left sidebar, select **Details**.
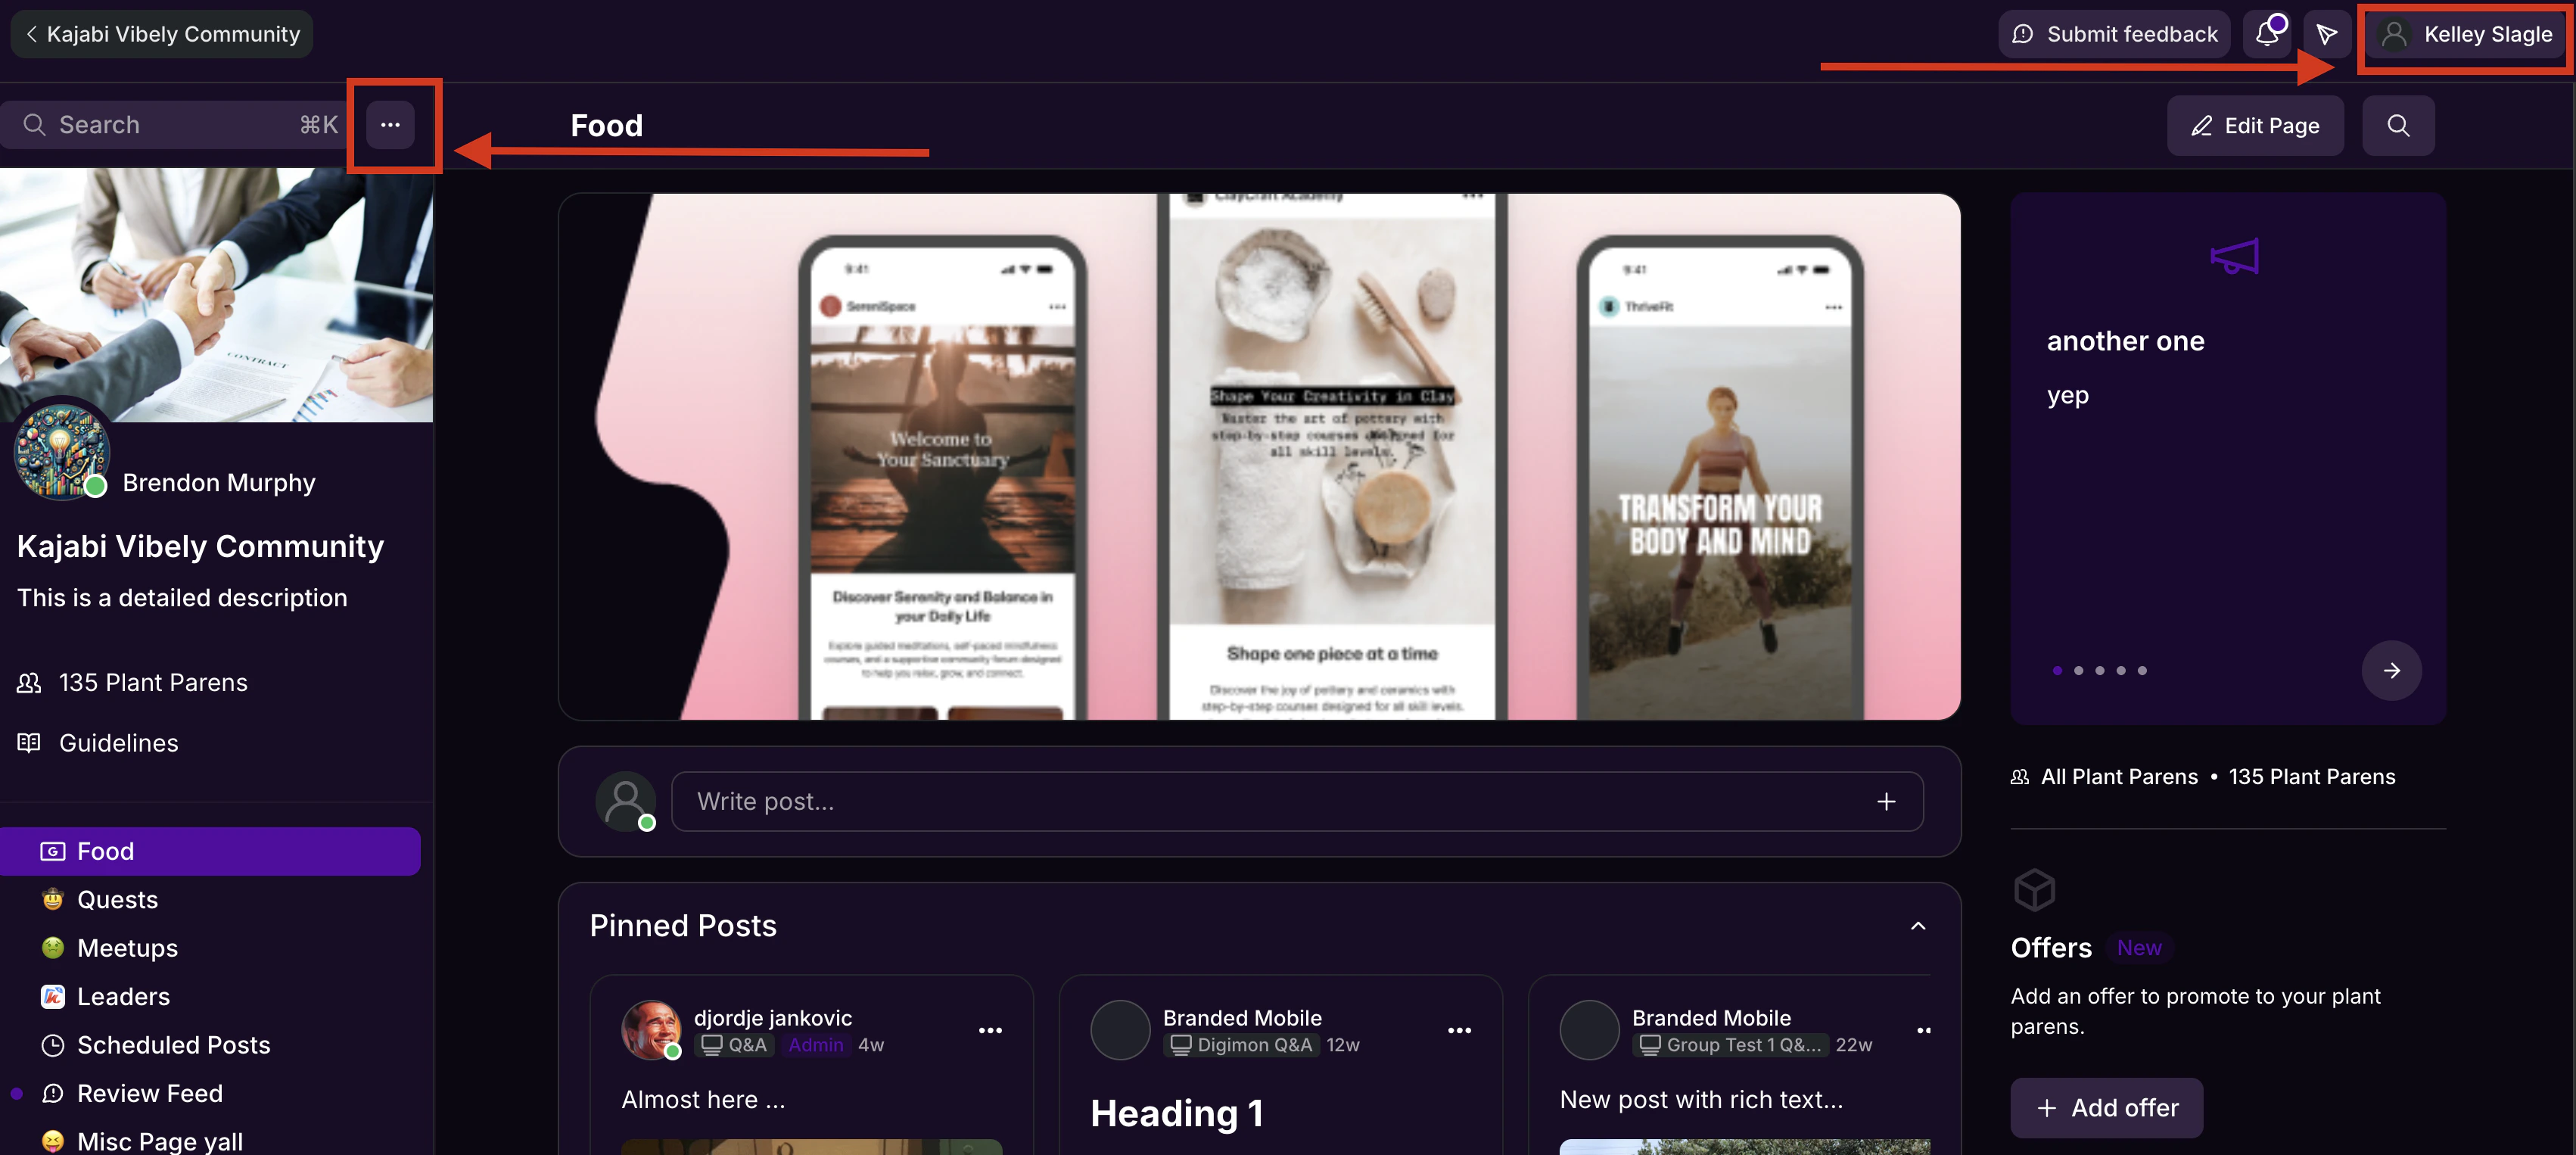 **Note:** You can also access Community Settings by clicking the **profile icon** in the top-right navigation bar.
## Community URL and URL slug
The **Community URL** can be customized to reflect your brand. Updating the **URL slug** builds brand recognition and makes it easier for members to find your Community.
1. Click the **ellipsis** **icon \[**...**]** next to the Community **cover image**, then select **Community Settings**.
2. Select **Details** in the left sidebar.
3. Under **Basic Information**, navigate to the **URL Slug** field.
4. Enter the desired URL slug and click **Save**.
**Note:** You can also access Community Settings by clicking the **profile icon** in the top-right navigation bar.
## Community URL and URL slug
The **Community URL** can be customized to reflect your brand. Updating the **URL slug** builds brand recognition and makes it easier for members to find your Community.
1. Click the **ellipsis** **icon \[**...**]** next to the Community **cover image**, then select **Community Settings**.
2. Select **Details** in the left sidebar.
3. Under **Basic Information**, navigate to the **URL Slug** field.
4. Enter the desired URL slug and click **Save**.
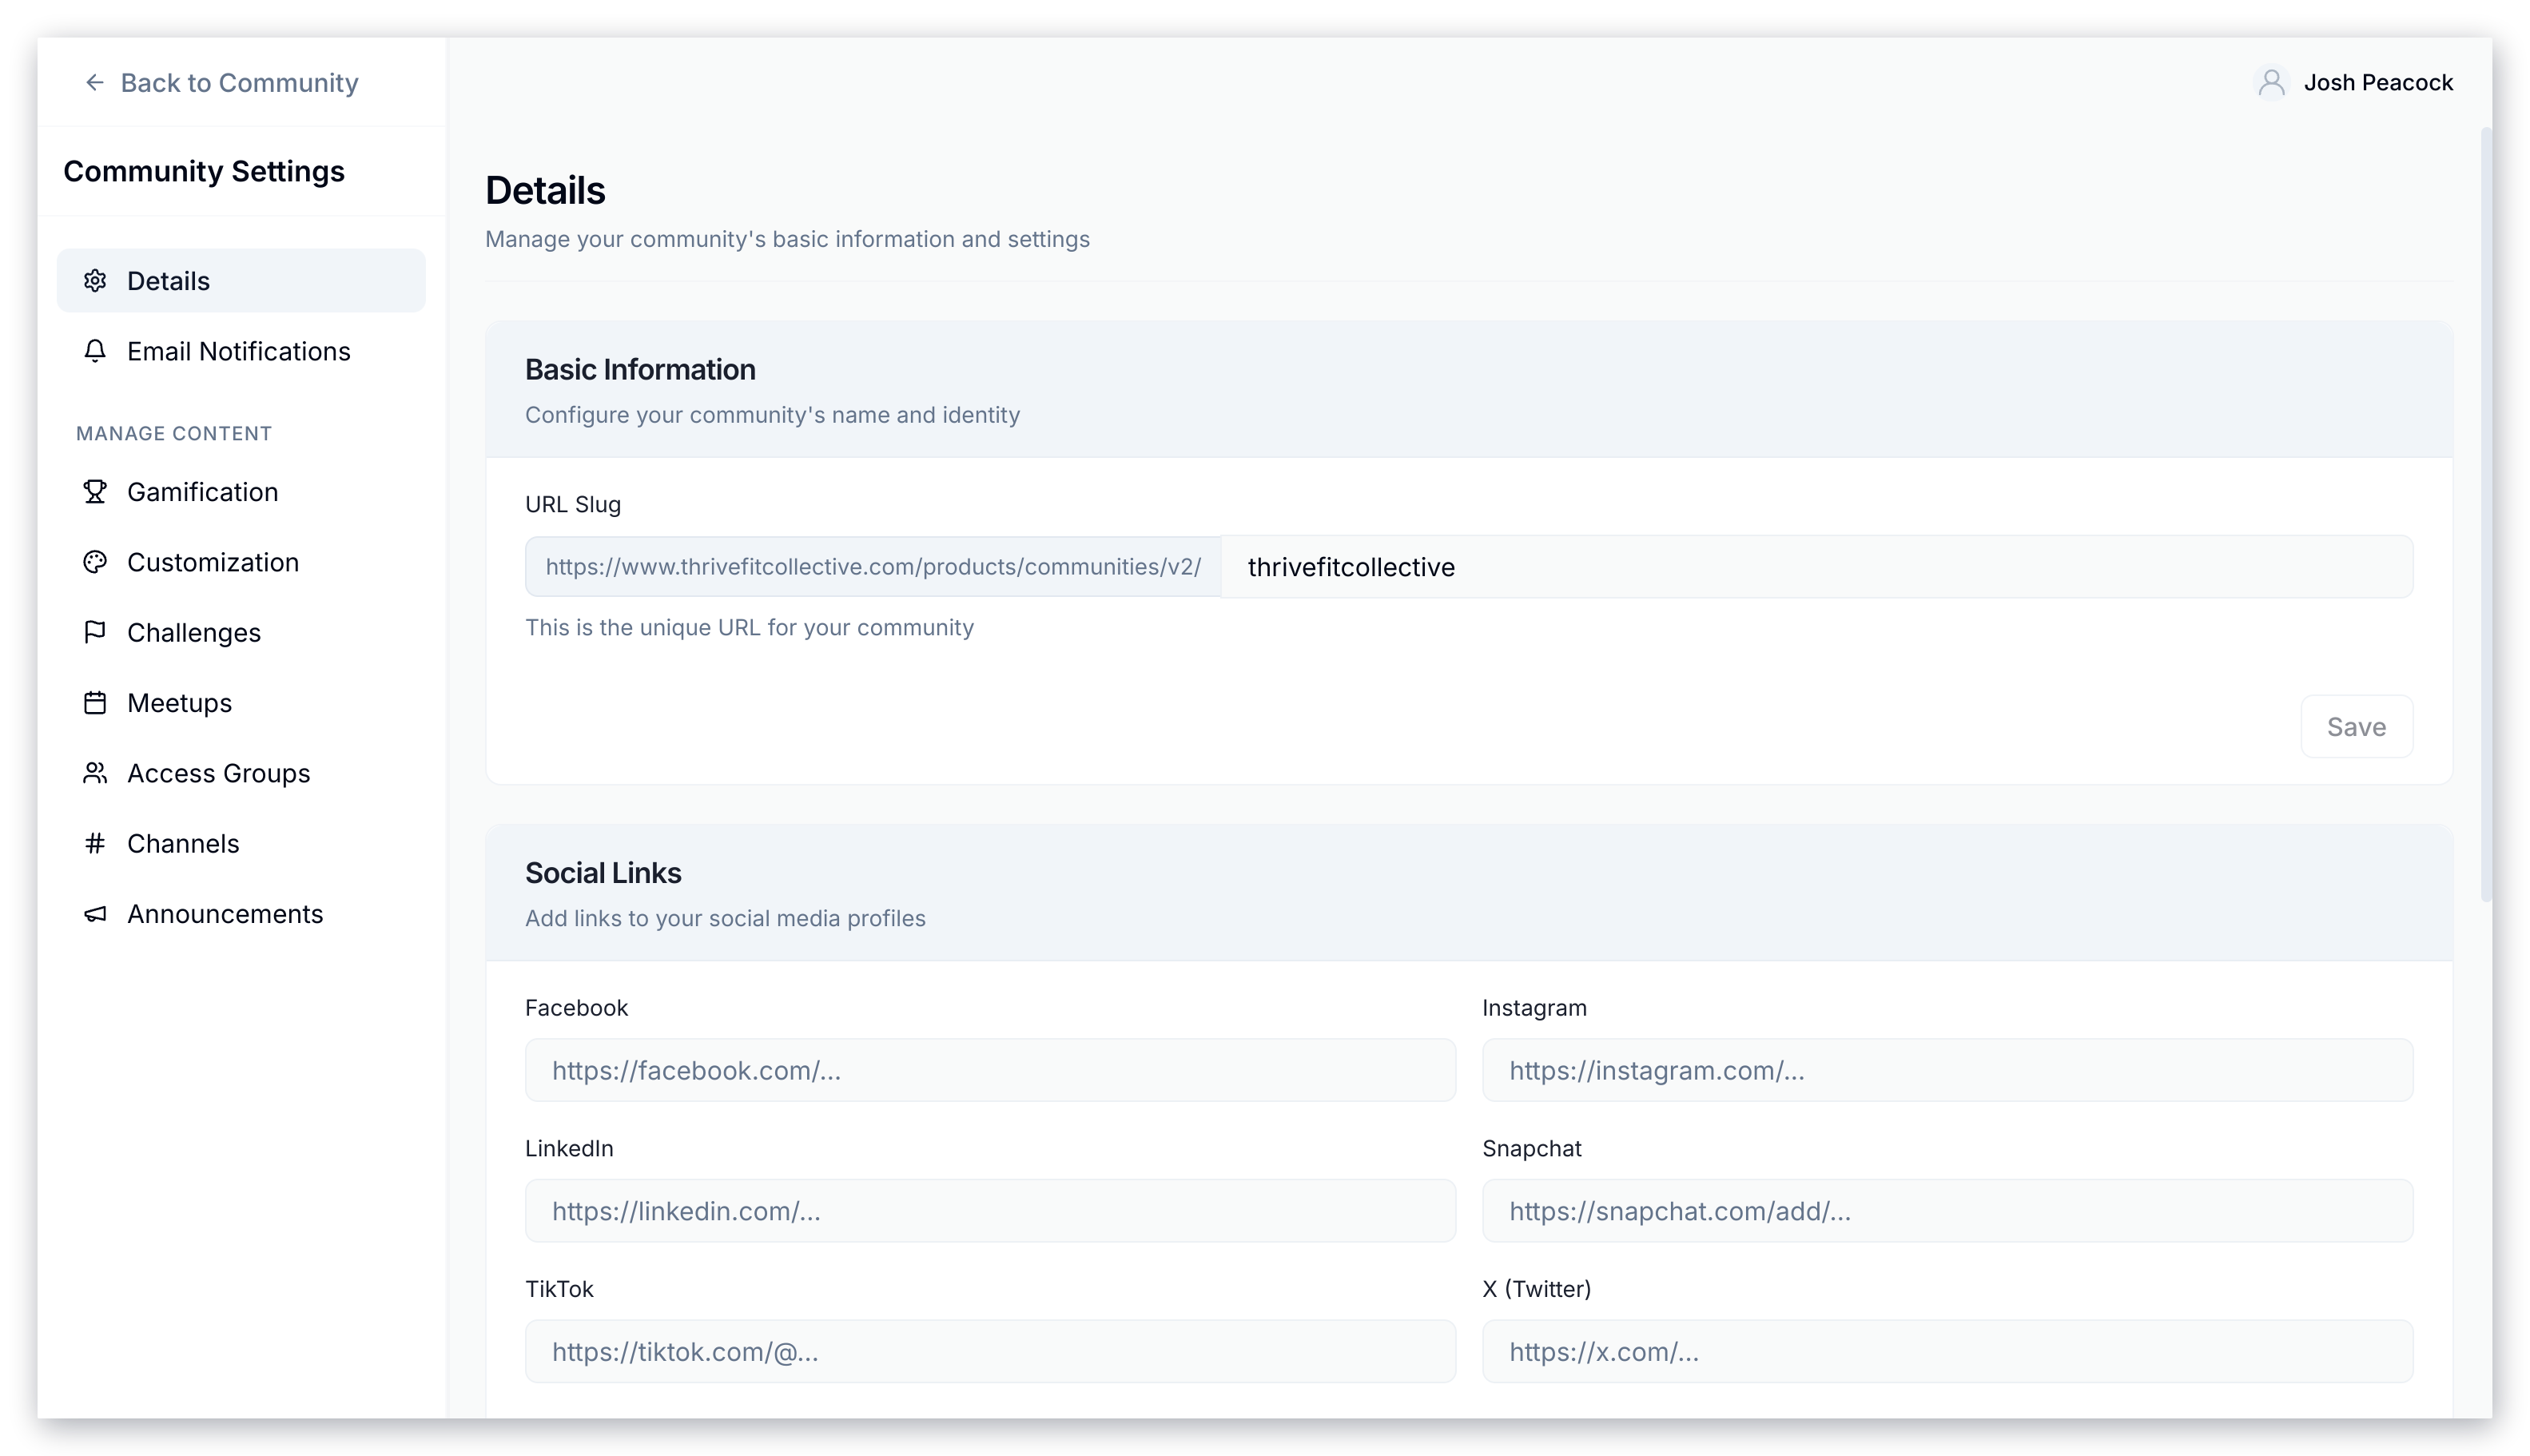 The URL slug displays at the end of your full Community URL:
* The **first section** of the URL is pulled from your site's domain
* The **last section** is the part you can customize via Community Settings
For example, `sitedomain.mykajabi.com/products/communites/v2/communityname` may be customized to be `sitedomain.mykajabi.com/products/communites/v2/kitchencommunity`, where "kitchencommunity" is the URL Slug.
## Update Community Title, Description, and Cover Image
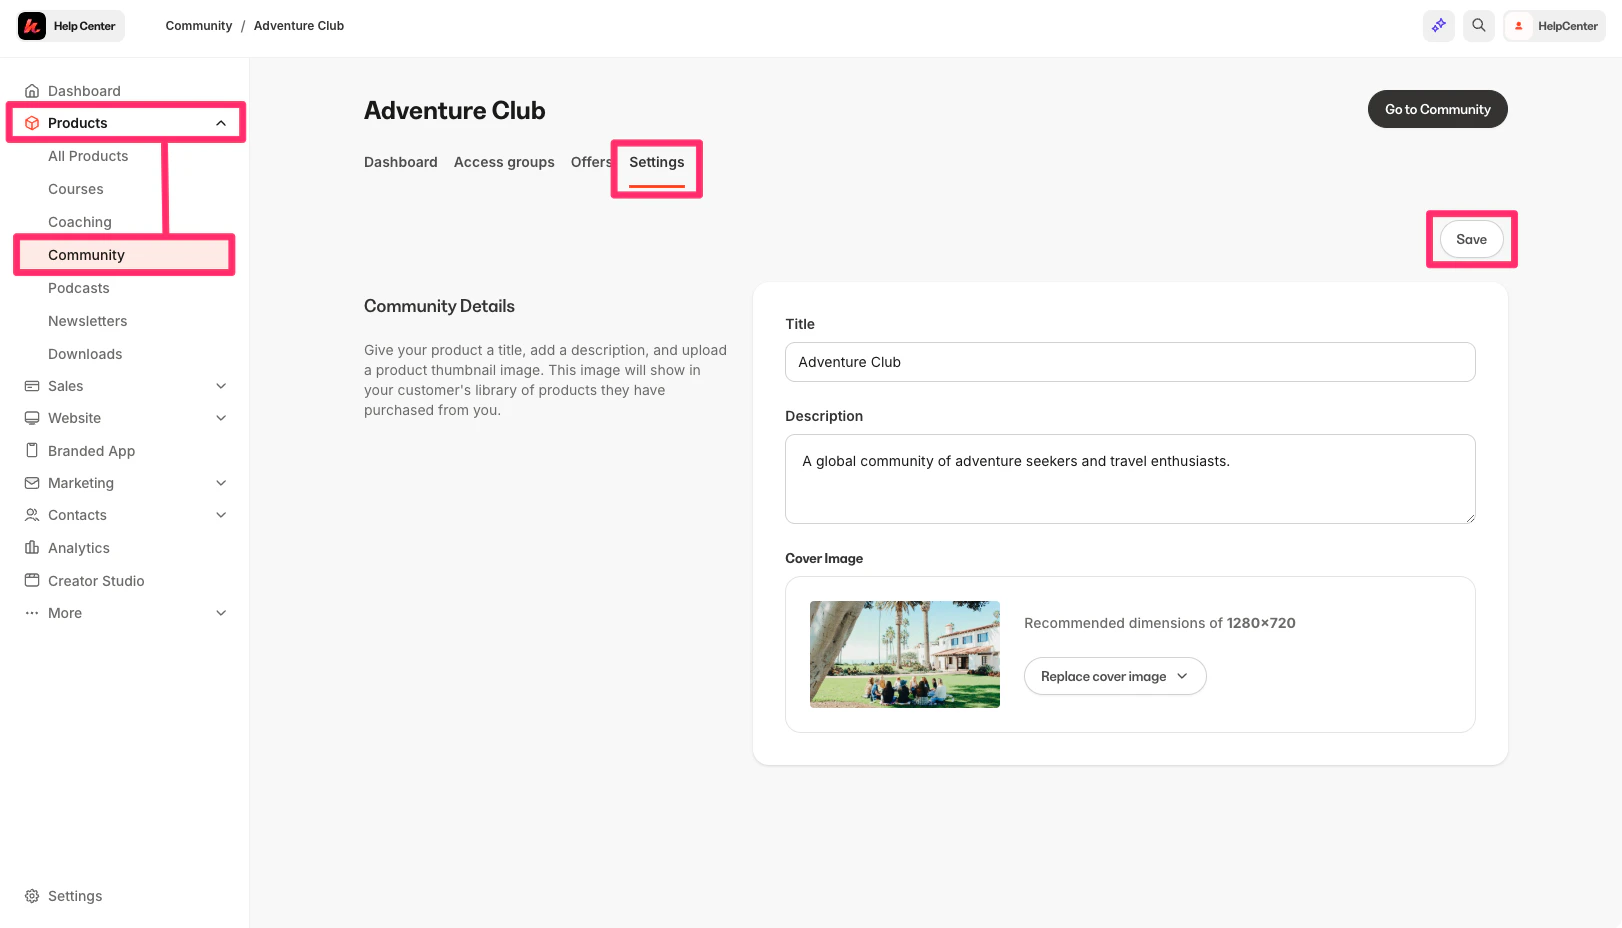
Your Community **Title**, **Description**, and **Cover Image** are managed through the **Community Product** settings in the Kajabi app.
1. Go to your **Kajabi Dashboard** and select **Products** from the left sidebar.
2. Select **Community**.
3. Click the **Settings** tab in the top menu.
4. Update the **Title**, **Description**, and/or **Cover Image** as desired.
5. Click **Save** to apply your changes.
The URL slug displays at the end of your full Community URL:
* The **first section** of the URL is pulled from your site's domain
* The **last section** is the part you can customize via Community Settings
For example, `sitedomain.mykajabi.com/products/communites/v2/communityname` may be customized to be `sitedomain.mykajabi.com/products/communites/v2/kitchencommunity`, where "kitchencommunity" is the URL Slug.
## Update Community Title, Description, and Cover Image
Your Community **Title**, **Description**, and **Cover Image** are managed through the **Community Product** settings in the Kajabi app.
1. Go to your **Kajabi Dashboard** and select **Products** from the left sidebar.
2. Select **Community**.
3. Click the **Settings** tab in the top menu.
4. Update the **Title**, **Description**, and/or **Cover Image** as desired.
5. Click **Save** to apply your changes.
 ## Community Social Links
Add icons to the Community sidebar that link to your TikTok, YouTube, Facebook, X (Twitter), Snapchat, and Shop accounts, as well as your personal website.
1. Click the **ellipsis** **icon \[**...**]** next to the Community **cover image**, then select **Community Settings**.
2. Select **Details** in the left sidebar.
3. Navigate to the **Social Links** section on the **Community Details** page.
4. Enter the social media account and website URLs in the associated Social Link fields.
5. Click **Save**.
6. Click **Back to community** to view the social links.
## Community Social Links
Add icons to the Community sidebar that link to your TikTok, YouTube, Facebook, X (Twitter), Snapchat, and Shop accounts, as well as your personal website.
1. Click the **ellipsis** **icon \[**...**]** next to the Community **cover image**, then select **Community Settings**.
2. Select **Details** in the left sidebar.
3. Navigate to the **Social Links** section on the **Community Details** page.
4. Enter the social media account and website URLs in the associated Social Link fields.
5. Click **Save**.
6. Click **Back to community** to view the social links.
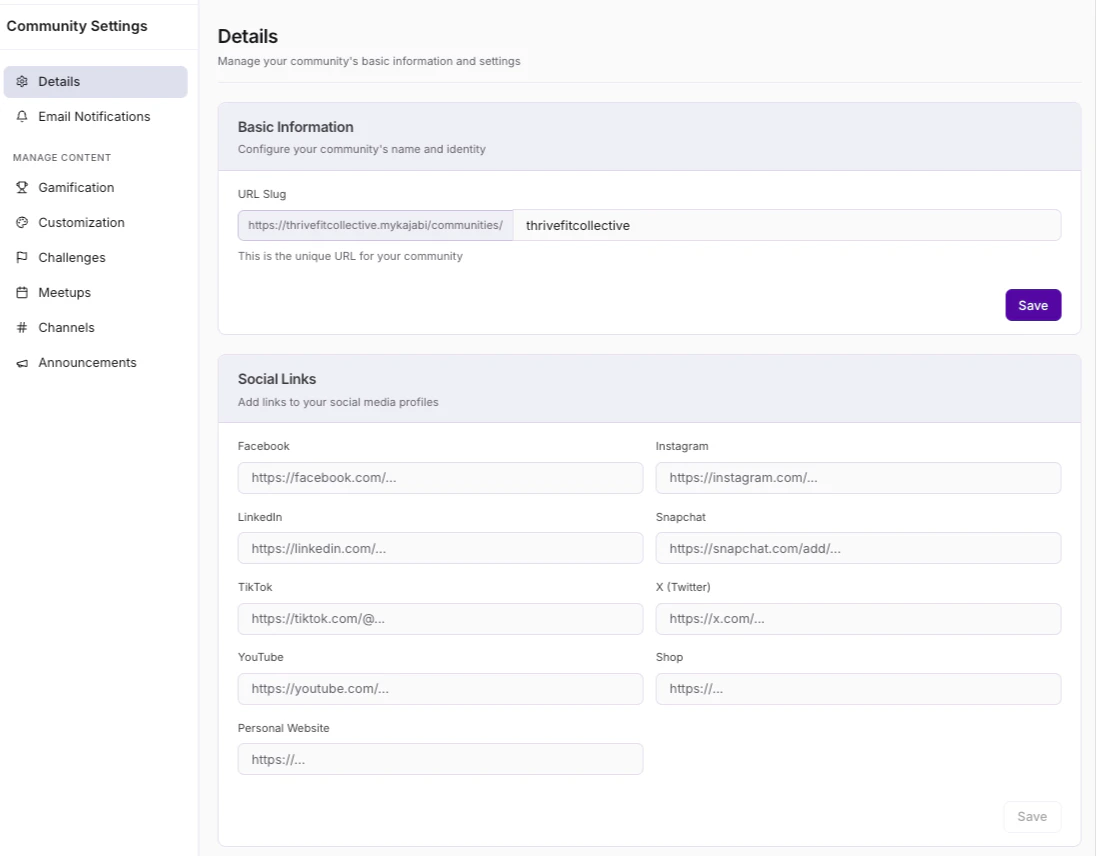 **Note:** Any Social Links added to the Community sidebar will also appear on your **User Profile** page.
## Community Guidelines
**Community Guidelines** detail your expectations for members' participation. These guidelines are presented to members to accept before they can join, and all members must re-accept them anytime the guidelines are edited.
1. Click the **ellipsis** **icon \[**...**]** next to the Community **cover photo**, then select **Community Settings**.
2. Select **Details** in the left sidebar.
3. Scroll down to the **Community Guidelines** section.
4. Click **Add guidelines**.
5. Add a **Title** and optional **Image**.
6. Under **Description**, add a welcome message for members and detail the guidelines you would like to implement.
7. Click **Save**.
8. Click **Back to community** to view the guidelines pop-up.
**Note:** The created guideline will also appear in the left sidebar.
## Update Founder Profile Photo
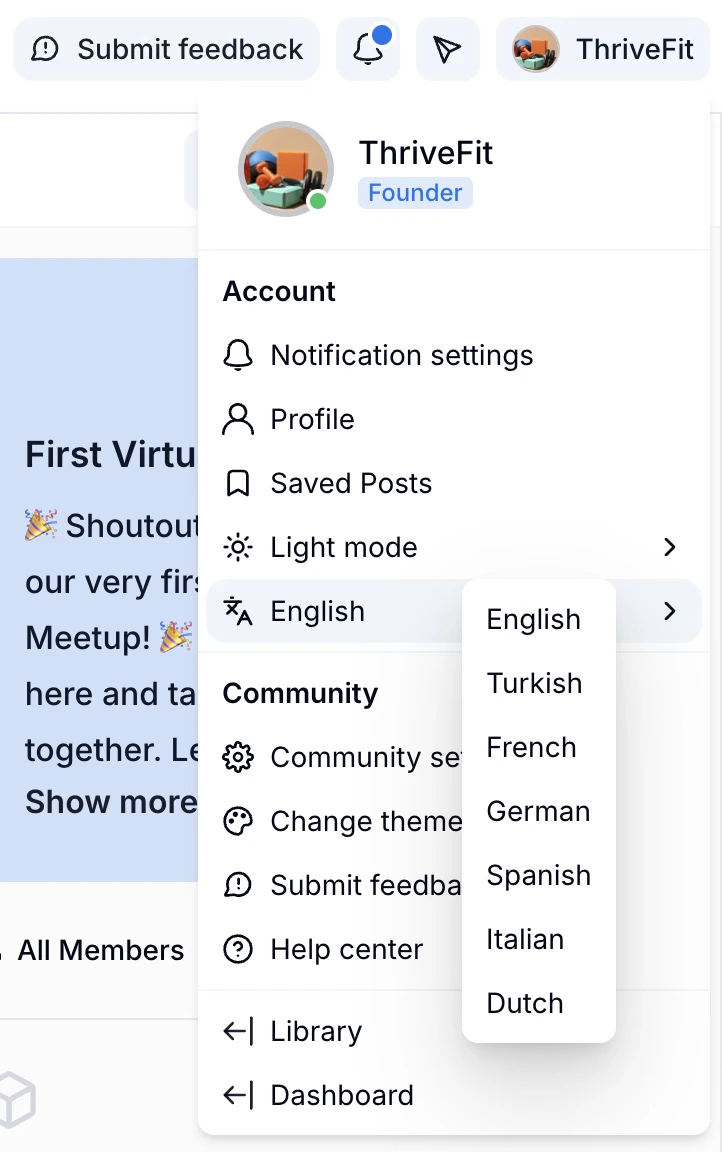
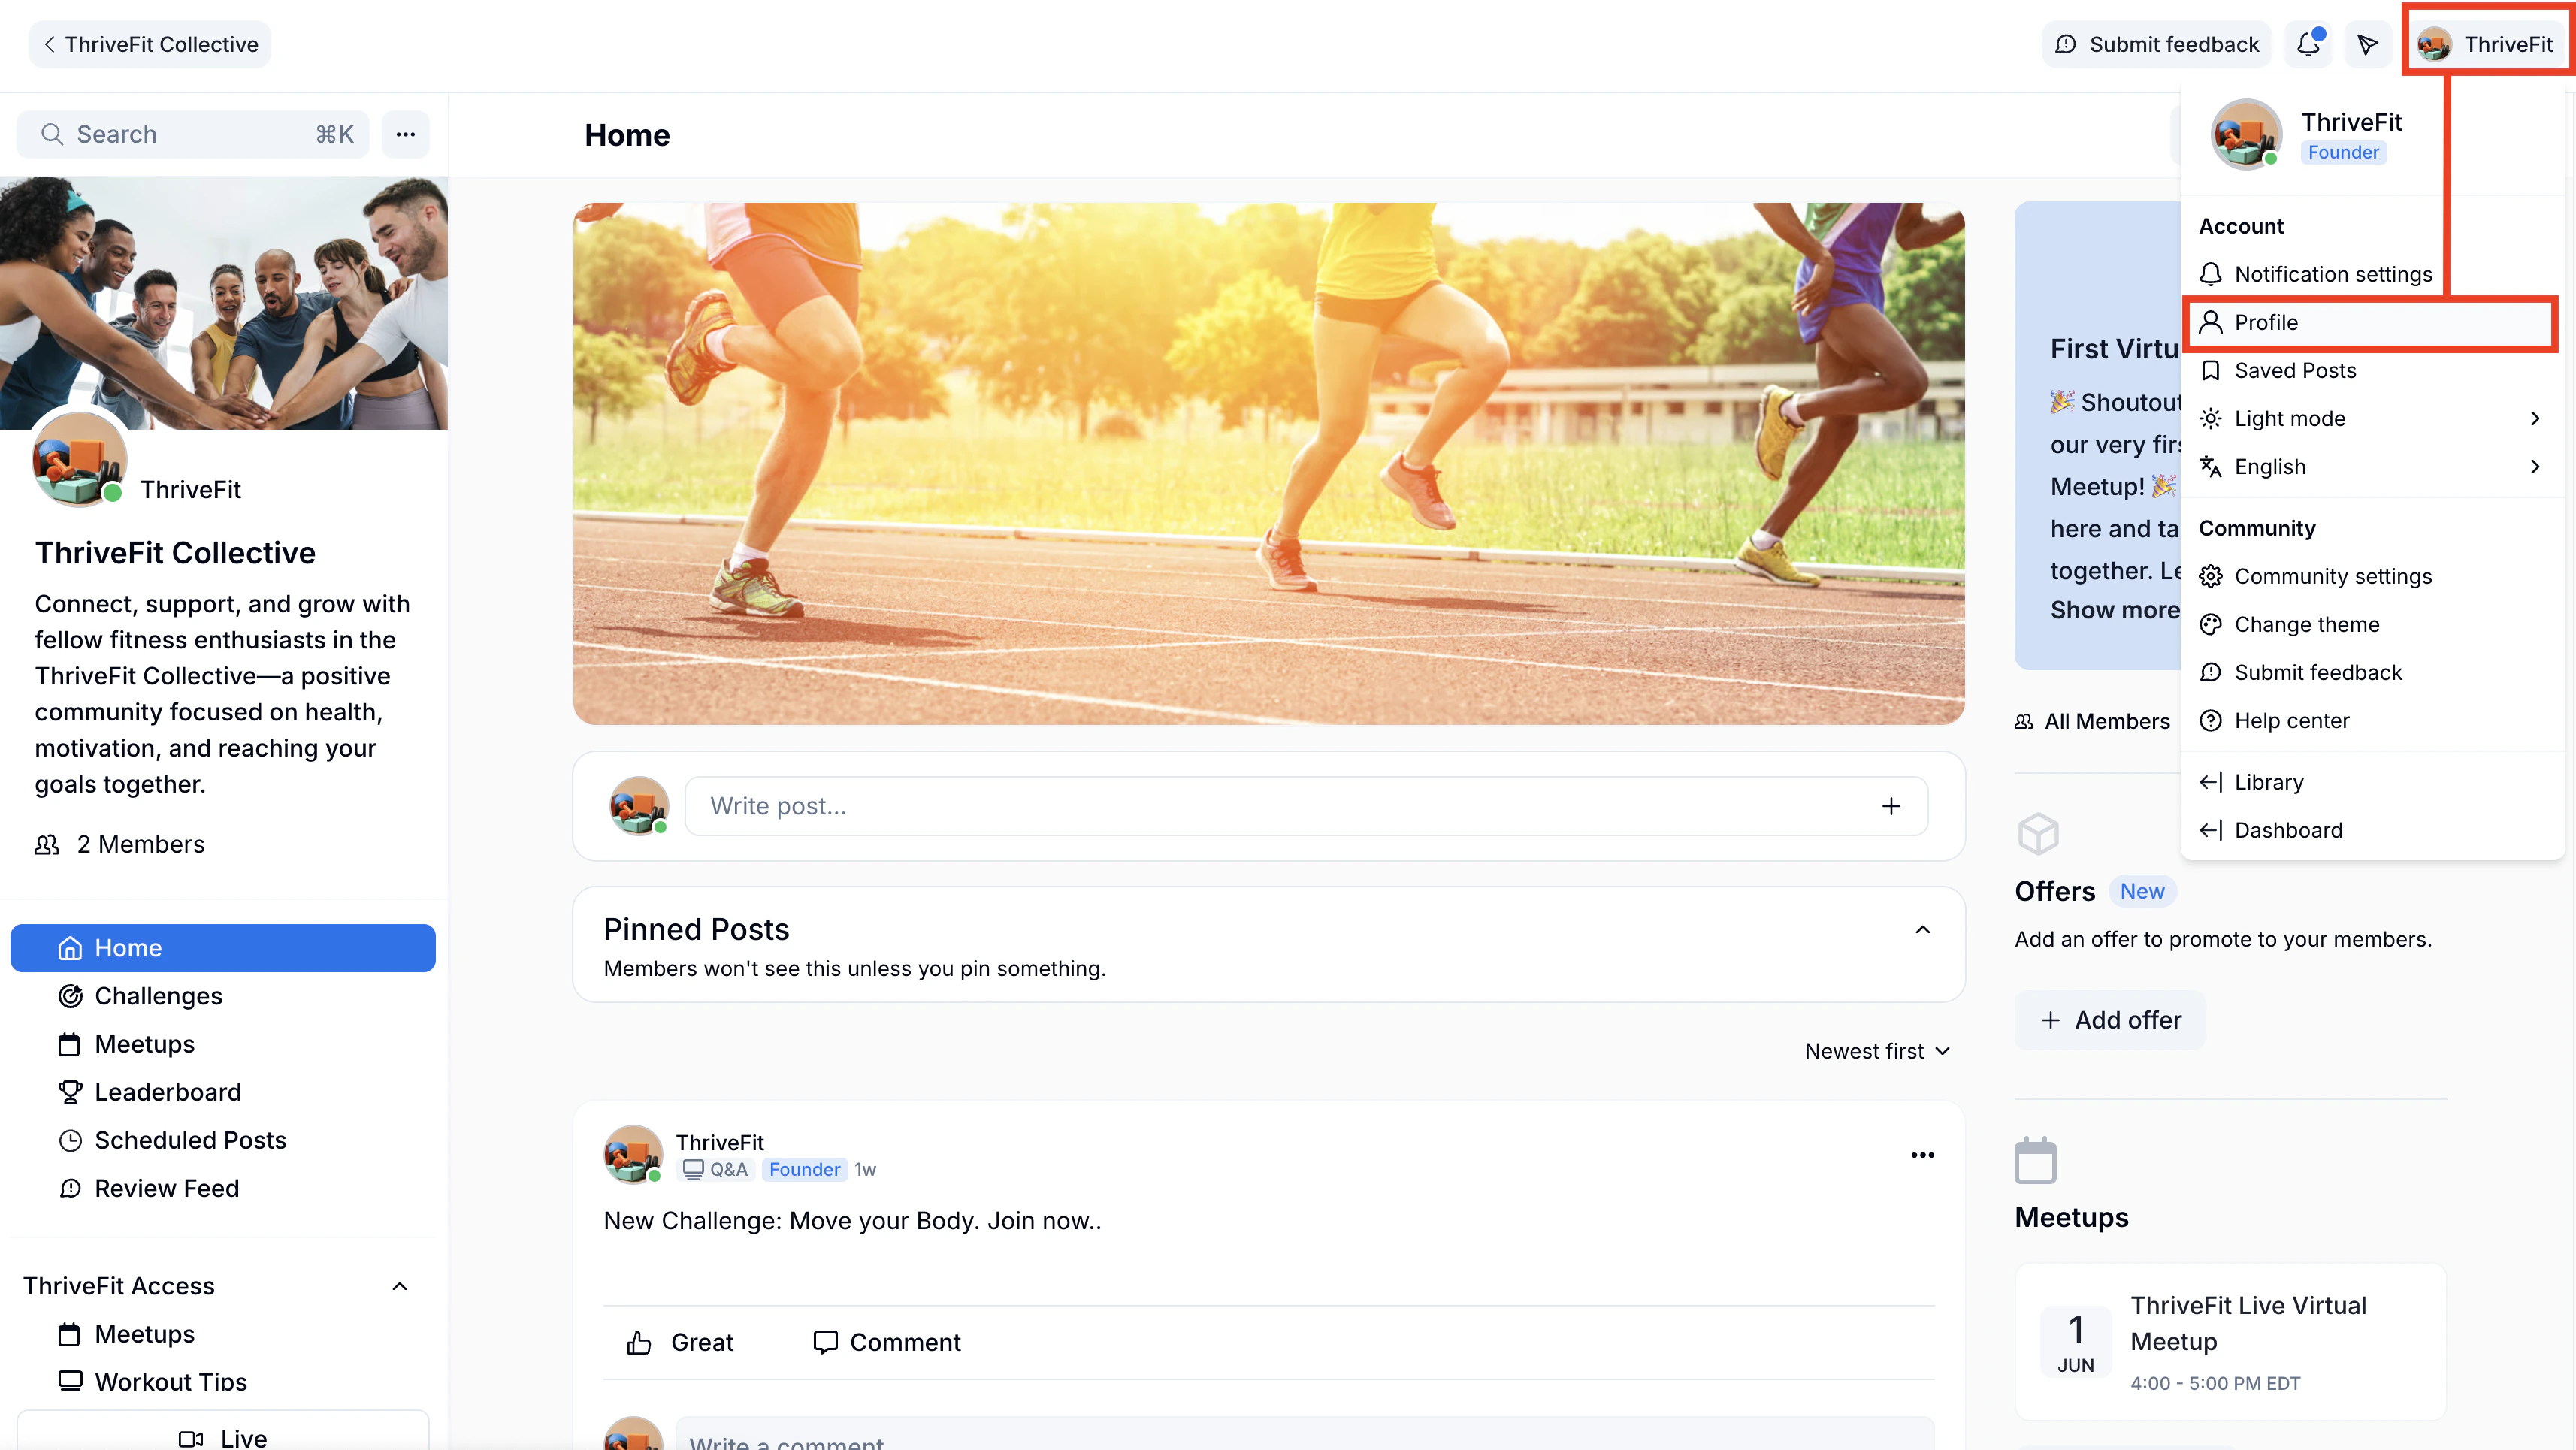
1. Click the **profile icon** at the top right of the Community to open the options menu.
2. Select **Profile**.
**Note:** Any Social Links added to the Community sidebar will also appear on your **User Profile** page.
## Community Guidelines
**Community Guidelines** detail your expectations for members' participation. These guidelines are presented to members to accept before they can join, and all members must re-accept them anytime the guidelines are edited.
1. Click the **ellipsis** **icon \[**...**]** next to the Community **cover photo**, then select **Community Settings**.
2. Select **Details** in the left sidebar.
3. Scroll down to the **Community Guidelines** section.
4. Click **Add guidelines**.
5. Add a **Title** and optional **Image**.
6. Under **Description**, add a welcome message for members and detail the guidelines you would like to implement.
7. Click **Save**.
8. Click **Back to community** to view the guidelines pop-up.
**Note:** The created guideline will also appear in the left sidebar.
## Update Founder Profile Photo
1. Click the **profile icon** at the top right of the Community to open the options menu.
2. Select **Profile**.
 3. Place your cursor over the **Profile Photo** and click **Change photo**.
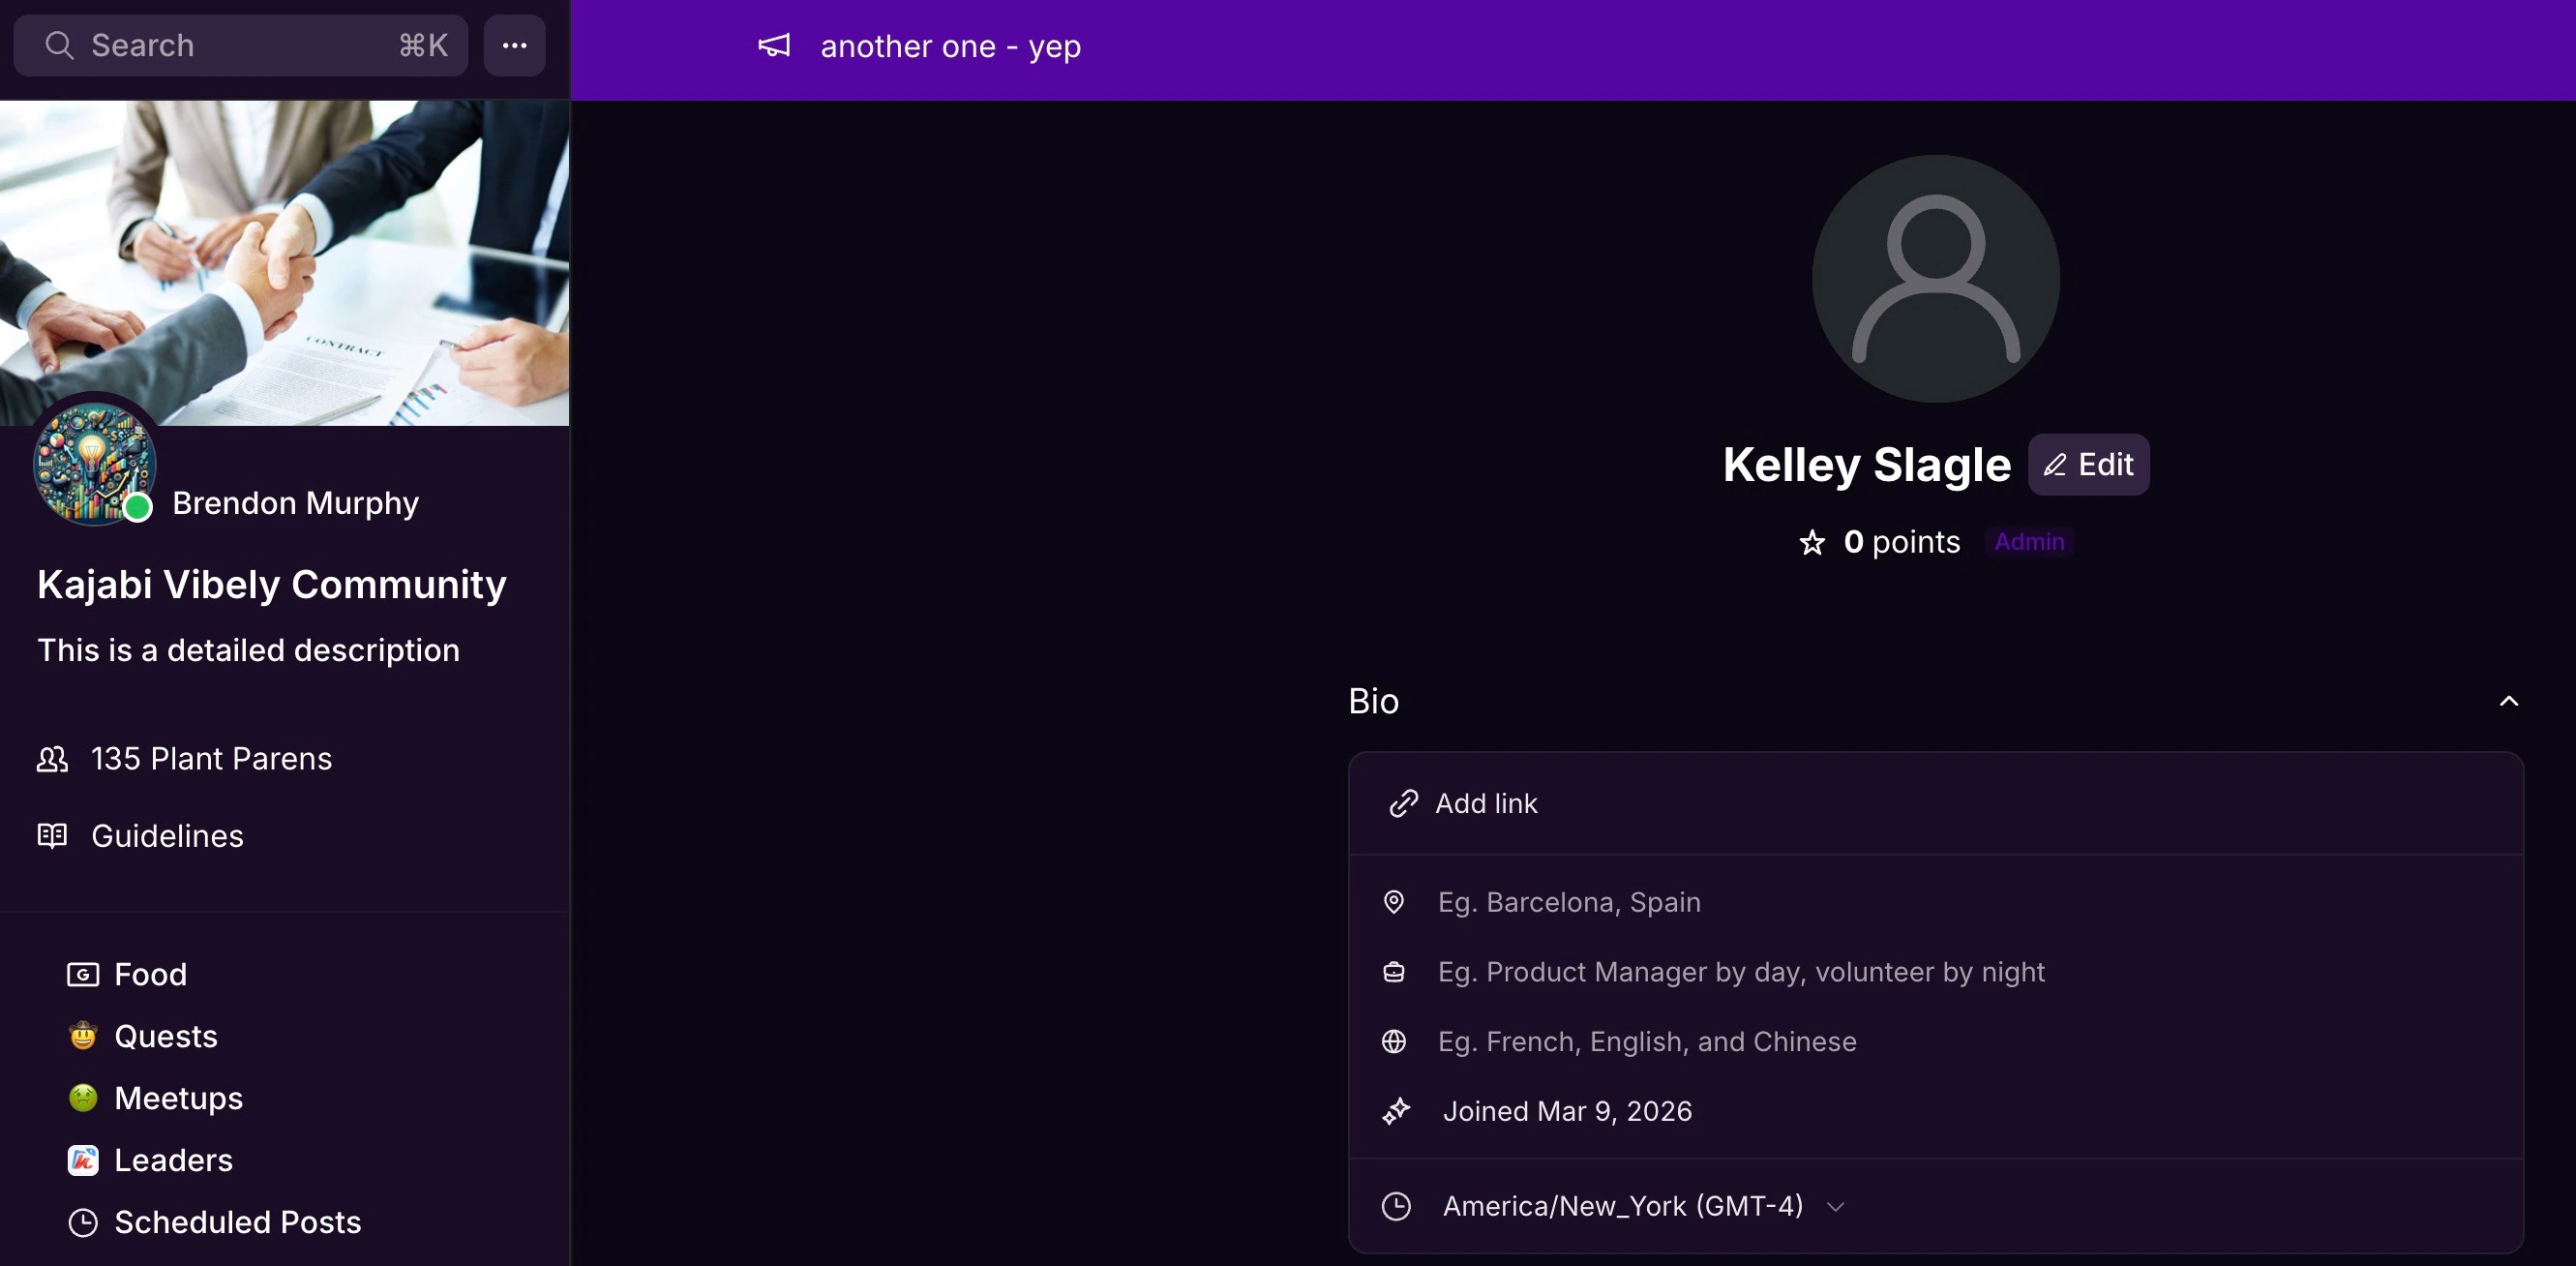 4. Select an image to upload.
5. Click **Save** to apply your changes.
## Update User Profile Name
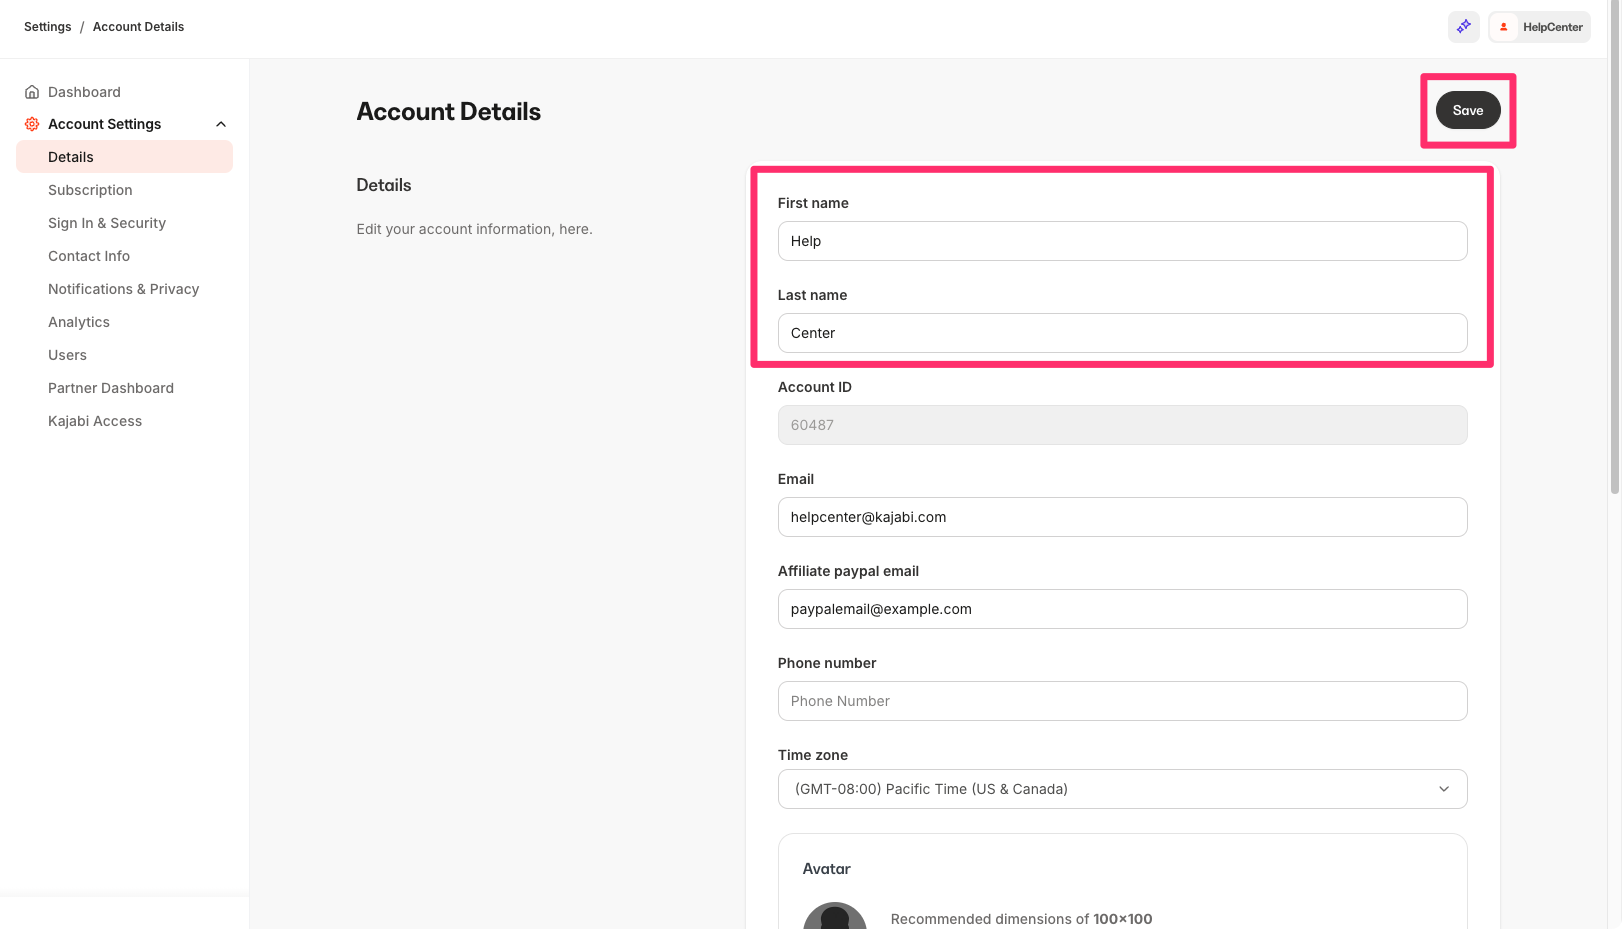
The **User Profile Name** that appears next to your personal Profile Photo in your Kajabi Community is automatically populated with your Kajabi **Account Name**. To update it, you need to change your name in **Account Settings** in the Kajabi app.
1. Go to your **Kajabi Dashboard** and click **Settings** in the lower left sidebar.
2. Scroll down to **Account Settings** and select **Account Details**.
4. Select an image to upload.
5. Click **Save** to apply your changes.
## Update User Profile Name
The **User Profile Name** that appears next to your personal Profile Photo in your Kajabi Community is automatically populated with your Kajabi **Account Name**. To update it, you need to change your name in **Account Settings** in the Kajabi app.
1. Go to your **Kajabi Dashboard** and click **Settings** in the lower left sidebar.
2. Scroll down to **Account Settings** and select **Account Details**.
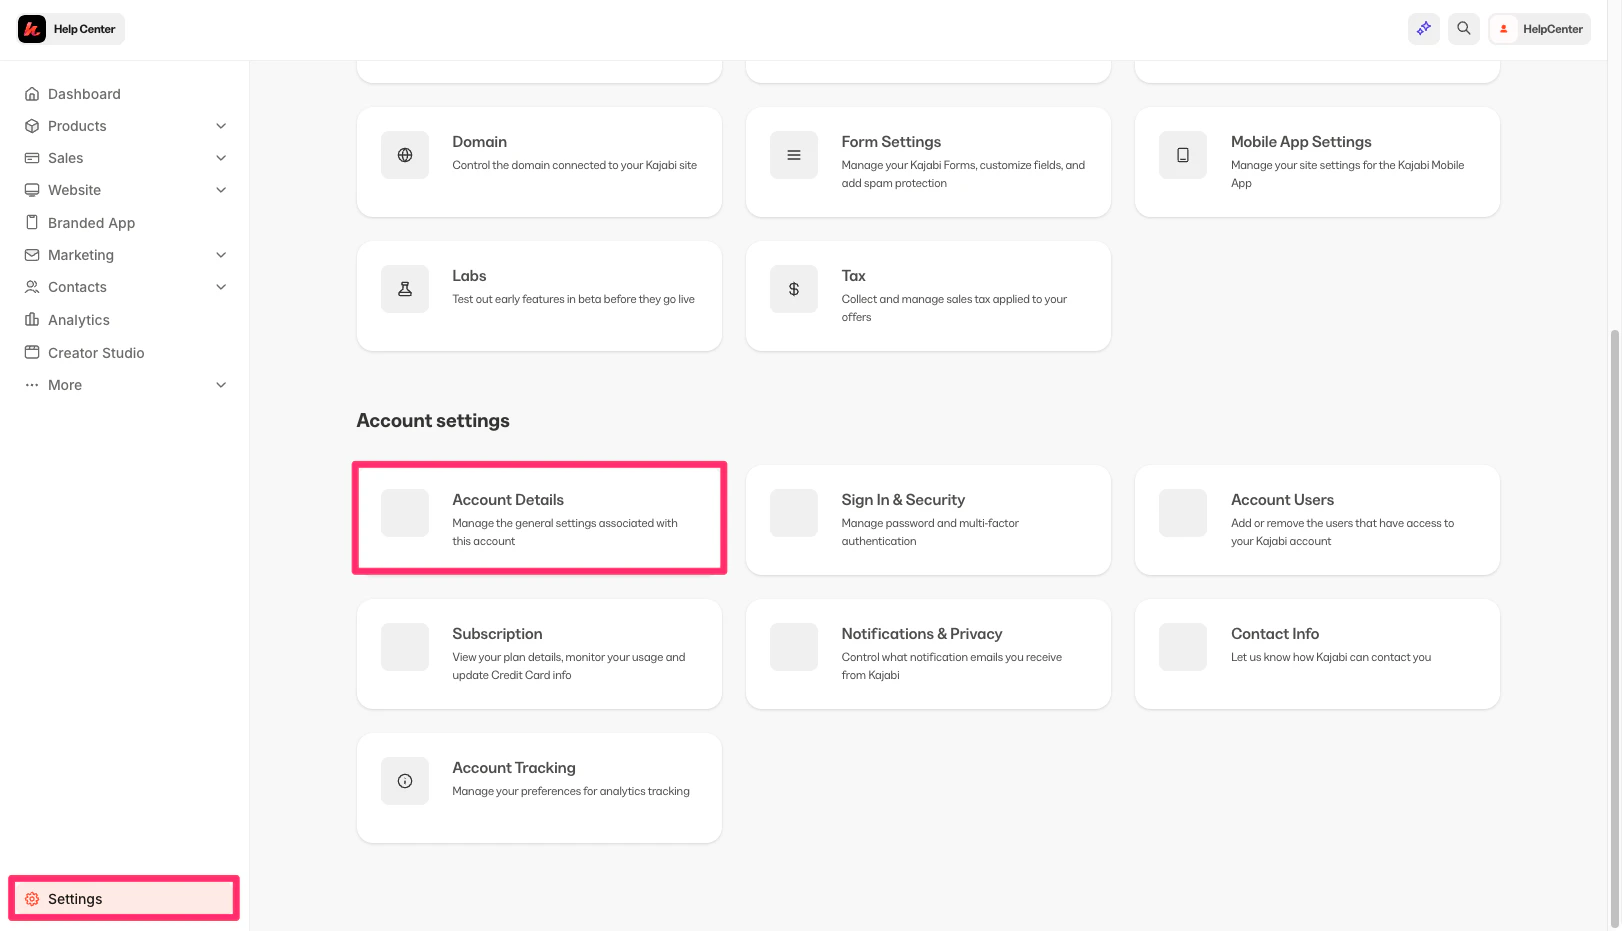 3. Update your **First name** and **Last name** as you wish them to appear in your profile.
4. Click **Save** to apply your changes.
3. Update your **First name** and **Last name** as you wish them to appear in your profile.
4. Click **Save** to apply your changes.
 ## Add social links to a User Profile
Social links on your User Profile page let members connect with you on other platforms.
1. Click the **profile icon** at the top right of the Community to open the options menu.
2. Select **Profile**.
3. Under **Bio**, click **Add link**.
4. Enter your social URLs in the **Social Link** fields that appear.
5. Click **Save** to apply your changes.
6. To view your changes, click **Back to community**, then click your **Profile Photo** in the sidebar to open your **Profile** page.
**Note:** Any Social Links you add to your User Profile page will also appear on your Community sidebar.
## Add Bio information
Share your personal interests, goals, and professional background on your User Profile page.
1. Click your **profile icon** at the top right to open the options menu.
2. Select **Profile**.
3. Under **Bio**, complete the relevant fields with personal information you wish to share, including your location, job, languages, join date, and timezone.
4. Use the prompts provided below **Bio** to write about your personal interests and goals.
5. Click **Save** to apply your changes.
6. To view your changes, click the **Community Title** in the top left to return to the **Kajabi Dashboard**, then click your name in the top right corner to open your **Profile**.
**Note:** If you don't immediately see your updates on your User Profile page, try refreshing your browser.
## Select preferred language
Community members can view posts and items in the Community in their preferred language.
**Note:** This setting changes the language for each individual Community member, not for all members.
1. Click the **profile icon** at the top right of the Community to open the options menu.
2. Click the **language selector** and choose a language from the dropdown.
3. Kajabi Communities can display in **English**, **Dutch**, **French**, **German**, **Italian**, **Spanish**, and **Turkish**.
## Add social links to a User Profile
Social links on your User Profile page let members connect with you on other platforms.
1. Click the **profile icon** at the top right of the Community to open the options menu.
2. Select **Profile**.
3. Under **Bio**, click **Add link**.
4. Enter your social URLs in the **Social Link** fields that appear.
5. Click **Save** to apply your changes.
6. To view your changes, click **Back to community**, then click your **Profile Photo** in the sidebar to open your **Profile** page.
**Note:** Any Social Links you add to your User Profile page will also appear on your Community sidebar.
## Add Bio information
Share your personal interests, goals, and professional background on your User Profile page.
1. Click your **profile icon** at the top right to open the options menu.
2. Select **Profile**.
3. Under **Bio**, complete the relevant fields with personal information you wish to share, including your location, job, languages, join date, and timezone.
4. Use the prompts provided below **Bio** to write about your personal interests and goals.
5. Click **Save** to apply your changes.
6. To view your changes, click the **Community Title** in the top left to return to the **Kajabi Dashboard**, then click your name in the top right corner to open your **Profile**.
**Note:** If you don't immediately see your updates on your User Profile page, try refreshing your browser.
## Select preferred language
Community members can view posts and items in the Community in their preferred language.
**Note:** This setting changes the language for each individual Community member, not for all members.
1. Click the **profile icon** at the top right of the Community to open the options menu.
2. Click the **language selector** and choose a language from the dropdown.
3. Kajabi Communities can display in **English**, **Dutch**, **French**, **German**, **Italian**, **Spanish**, and **Turkish**.