> ## Documentation Index
> Fetch the complete documentation index at: https://help.kajabi.com/llms.txt
> Use this file to discover all available pages before exploring further.
# Course quizzes
> Test customer knowledge with graded or non-graded quizzes.
Inside your course, you can test your customer's knowledge with **quizzes**.
When you create a quiz in your course, you'll be able to add multiple questions and choose from four different questions types (multiple choice, checkboxes, short answer, and file upload).
You can create graded or non-graded quiz questions, plus there is an auto-grading option available for multiple choice and checkbox questions.
You can require someone to get a passing grade on a quiz before [unlocking a Module](../../products/courses/course-modules).
## Create a quiz
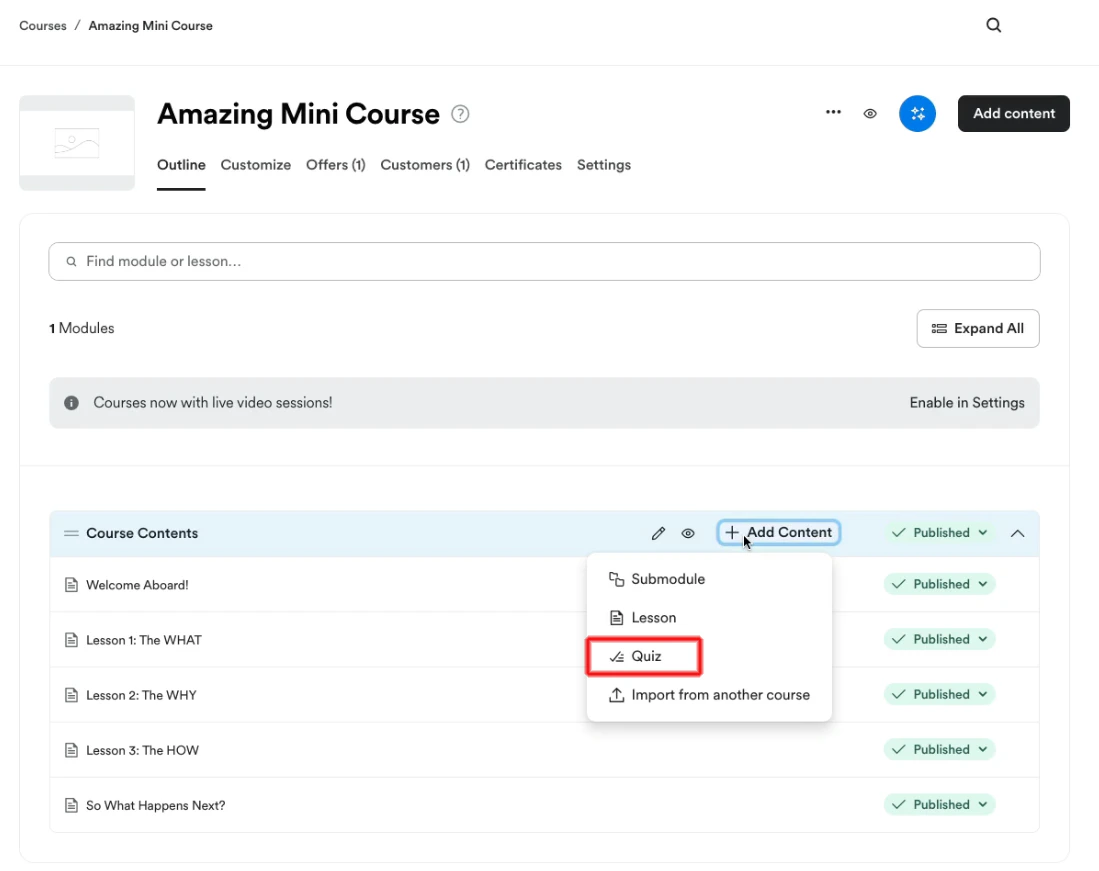
1. Go to [Products > Courses](https://app.kajabi.com/admin/last_site/courses) and click on your course
2. Click **Add content** next to the module or submodule you'd like this to be in
3. Choose **Quiz**
 ## Edit a quiz
1. Go to [Products > Courses](https://app.kajabi.com/admin/last_site/courses) and click on your course
2. Open the **Quiz** you wish to edit
3. You can edit the questions and settings
## Manage quiz questions
### Add a question
1. Go to [Products > Courses](https://app.kajabi.com/admin/last_site/courses) and click on your course
2. Open the **Quiz** you wish to edit
3. Click **Add question**
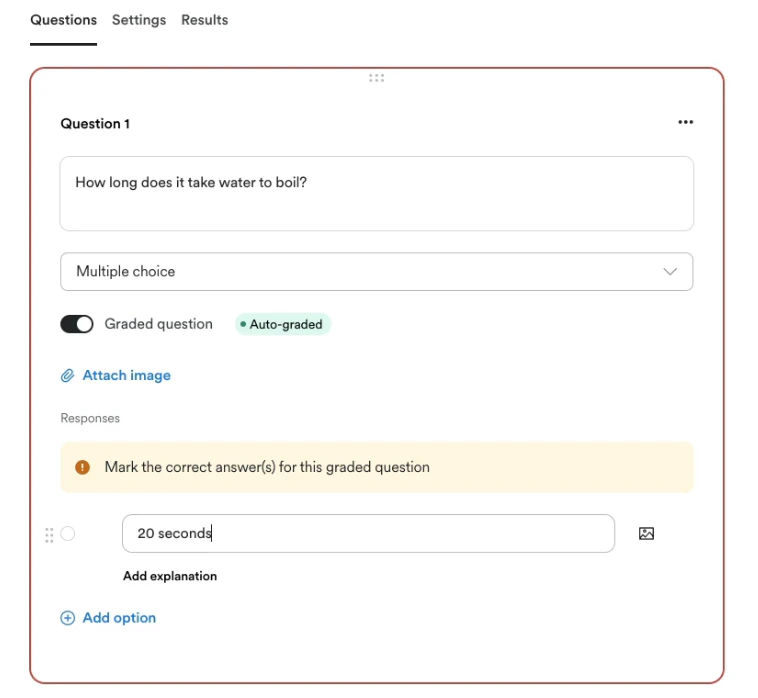
4. Enter a question
5. Choose a question type:
* **Multiple choice** - multiple options with one correct answer
* **Checkboxes** - multiple options with one or more correct answers
* **Short answer** - text field to enter an answer
* **File upload** - upload a file as an answer
6. Choose if the question will be graded
* Multiple choice and checkboxes can be automatically graded
* Short answer and file upload will need to be manually graded by your team
7. Attach an image to your question (optional)
8. If you selected **multiple choice** or **checkboxes**, click **Add option** to add the options customers can select
1. Mark the correct option(s) by clicking the circle next to the option
2. To add an explanation for the answer:
* Click **Add explanation** and click the save button. You can click the remove button later if you like.
3. Attach an image to your option (optional)
9. Click **Save**
**Note:** Graded questions will count towards the quiz score. Non-graded questions will not count towards the quiz score.
## Edit a quiz
1. Go to [Products > Courses](https://app.kajabi.com/admin/last_site/courses) and click on your course
2. Open the **Quiz** you wish to edit
3. You can edit the questions and settings
## Manage quiz questions
### Add a question
1. Go to [Products > Courses](https://app.kajabi.com/admin/last_site/courses) and click on your course
2. Open the **Quiz** you wish to edit
3. Click **Add question**
4. Enter a question
5. Choose a question type:
* **Multiple choice** - multiple options with one correct answer
* **Checkboxes** - multiple options with one or more correct answers
* **Short answer** - text field to enter an answer
* **File upload** - upload a file as an answer
6. Choose if the question will be graded
* Multiple choice and checkboxes can be automatically graded
* Short answer and file upload will need to be manually graded by your team
7. Attach an image to your question (optional)
8. If you selected **multiple choice** or **checkboxes**, click **Add option** to add the options customers can select
1. Mark the correct option(s) by clicking the circle next to the option
2. To add an explanation for the answer:
* Click **Add explanation** and click the save button. You can click the remove button later if you like.
3. Attach an image to your option (optional)
9. Click **Save**
**Note:** Graded questions will count towards the quiz score. Non-graded questions will not count towards the quiz score.
 ### Edit a question
1. Go to [Products > Courses](https://app.kajabi.com/admin/last_site/courses) and click on your course
2. Open the **Quiz** you wish to edit
3. Click on the **Question** you wish to edit
4. After editing your question, click **Save**
### Reorder questions
1. Go to [Products > Courses](https://app.kajabi.com/admin/last_site/courses) and click on your course
2. Open the **Quiz** you wish to edit
3. Hover your mouse over the top of the **Question** and drag it to your desired position
4. Click **Save**
### Edit a question
1. Go to [Products > Courses](https://app.kajabi.com/admin/last_site/courses) and click on your course
2. Open the **Quiz** you wish to edit
3. Click on the **Question** you wish to edit
4. After editing your question, click **Save**
### Reorder questions
1. Go to [Products > Courses](https://app.kajabi.com/admin/last_site/courses) and click on your course
2. Open the **Quiz** you wish to edit
3. Hover your mouse over the top of the **Question** and drag it to your desired position
4. Click **Save**
### Duplicate a question
1. Go to [Products > Courses](https://app.kajabi.com/admin/last_site/courses) and click on your course
2. Open the **Quiz** you wish to edit
3. Click the **3 dots menu (...)** on the question you want to duplicate
4. Click **Duplicate question**
5. After editing the question you duplicated, click **Save**
### Delete a question
1. Go to [Products > Courses](https://app.kajabi.com/admin/last_site/courses) and click on your course
2. Open the **Quiz** you wish to edit
3. Click the **3 dots menu (...)** on the question you want to delete
4. Click **Delete question**
5. Click **Delete**
### Edit an option
1. Go to [Products > Courses](https://app.kajabi.com/admin/last_site/courses) and click on your course
2. Open the **Quiz** you wish to edit
3. Click on the **Question** you wish to edit
4. After editing your option, click **Save**
### Reorder options
1. Go to [Products > Courses](https://app.kajabi.com/admin/last_site/courses) and click on your course
2. Open the **Quiz** you wish to edit
3. Click on the **Question** you wish to edit
4. Hover your mouse over the top of the **Option** and drag it to your desired position
5. Click **Save**
### Tag options
For questions that have multiple choice or checkboxes, you can **Tag** options. If the customer selects one of these options in your quiz, a Tag will be added to their contact profile. You can use this Tag for filters and automations. Learn more about [how Tags work](../../contacts/manage-your-contacts/tags-overview).
1. Go to [Products > Courses](https://app.kajabi.com/admin/last_site/courses) and click on your course
2. Open the **Quiz** you wish to edit
3. Click the **3 dots menu (...)** on the question you want to tag responses for
4. Click **Tag responses**
5. Next to each option, you can choose a **Tag** you want applied to the customer. You can also create a new tag. Then, click **Done**
* Only one tag can be applied to each option
6. Click **Save**
7. You can remove a tag later. After clicking **Tag responses** and opening a question, you can click on the **X** on the tag to remove it. Be sure to click **Done** and **Save** to save your changes.
### Delete an option
1. Go to [Products > Courses](https://app.kajabi.com/admin/last_site/courses) and click on your course
2. Open the **Quiz** you wish to edit
3. Click on the **Question** you wish to edit
4. Next to the option you want to remove, click the **Remove option** button
5. Click **Save**
## Settings
To edit your quiz settings:
1. Go to [Products > Courses](https://app.kajabi.com/admin/last_site/courses) and click on your course
2. Open the **Quiz** you wish to edit
3. Click **Settings**
### Details
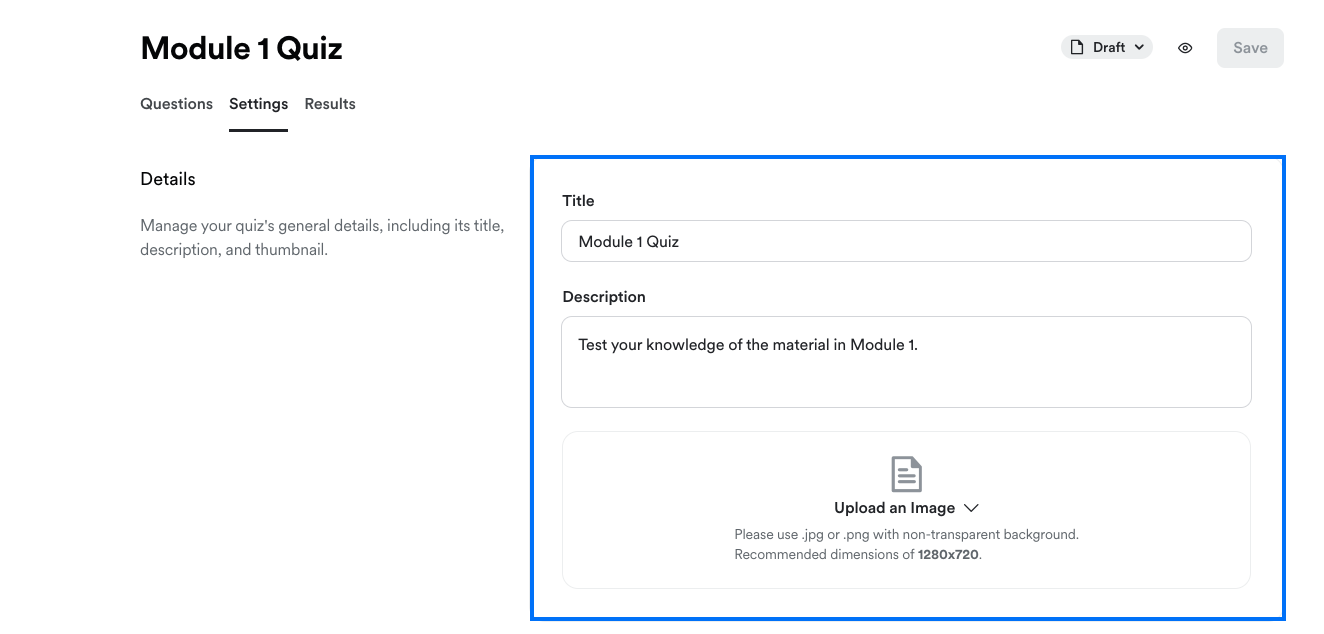
In the **Details** section, you can edit the **Title**, **Description**, and **Image** for your quiz.
 ### Grading
#### Set a passing grade
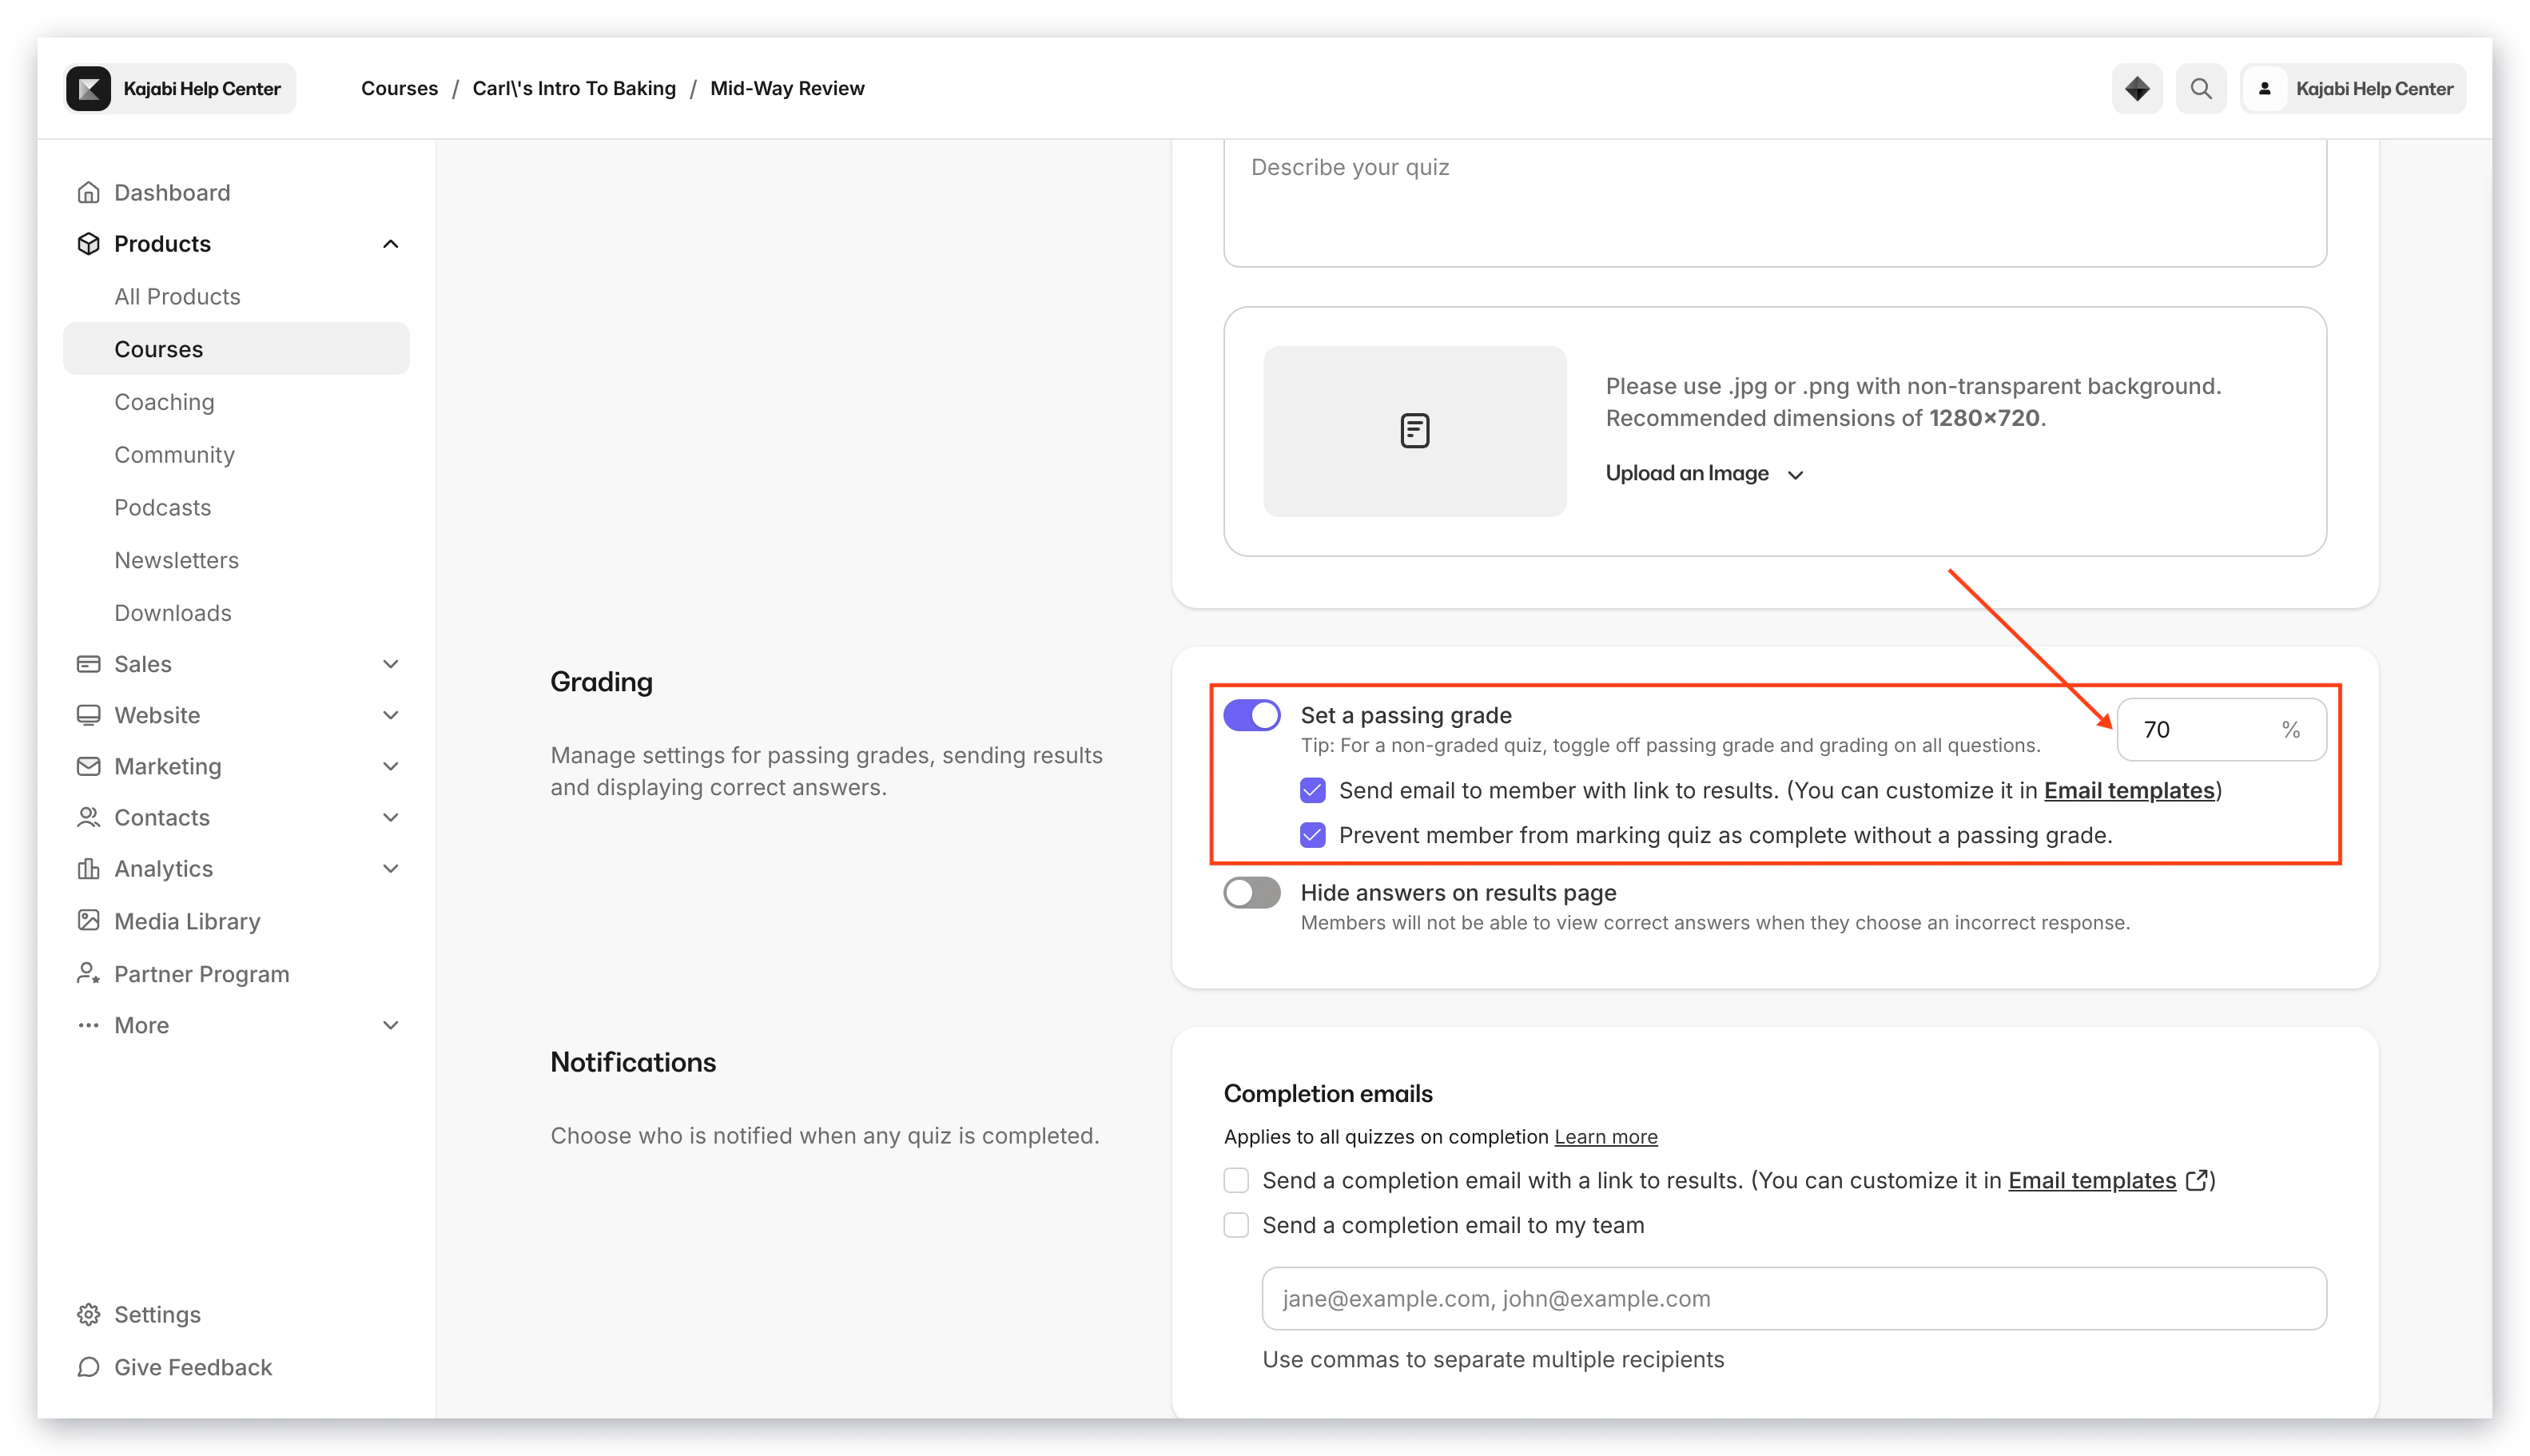
If **Set a passing grade** is enabled, you can set a percentage that will be considered a passing grade on your quiz. This passing grade will be in effect whether the quiz is automatically graded or manually graded. If this setting is disabled, quizzes will only be completed (no pass or fail).
There are two optional checkboxes you can select:
* **Send email to member with link to results**
* This will enable an automatic email to the member once you have finished grading the quiz. You can edit this email by going to [Settings > Email templates > Quiz Graded](https://app.kajabi.com/admin/last_site/email_templates/new?handle=quiz_graded).
* **Prevent member from marking quiz as complete without a passing grade**
* This will disable the "Mark as Complete" button until the quiz is passed. If you've locked a module until this quiz is completed, keep in mind that your customer will not be able to access this content until they've passed your quiz.
**Tip:** If you're creating a non-graded quiz, make sure to toggle off the "Set a passing grade" option. Also check that all of your quiz questions are marked as "Non-graded".
### Grading
#### Set a passing grade
If **Set a passing grade** is enabled, you can set a percentage that will be considered a passing grade on your quiz. This passing grade will be in effect whether the quiz is automatically graded or manually graded. If this setting is disabled, quizzes will only be completed (no pass or fail).
There are two optional checkboxes you can select:
* **Send email to member with link to results**
* This will enable an automatic email to the member once you have finished grading the quiz. You can edit this email by going to [Settings > Email templates > Quiz Graded](https://app.kajabi.com/admin/last_site/email_templates/new?handle=quiz_graded).
* **Prevent member from marking quiz as complete without a passing grade**
* This will disable the "Mark as Complete" button until the quiz is passed. If you've locked a module until this quiz is completed, keep in mind that your customer will not be able to access this content until they've passed your quiz.
**Tip:** If you're creating a non-graded quiz, make sure to toggle off the "Set a passing grade" option. Also check that all of your quiz questions are marked as "Non-graded".
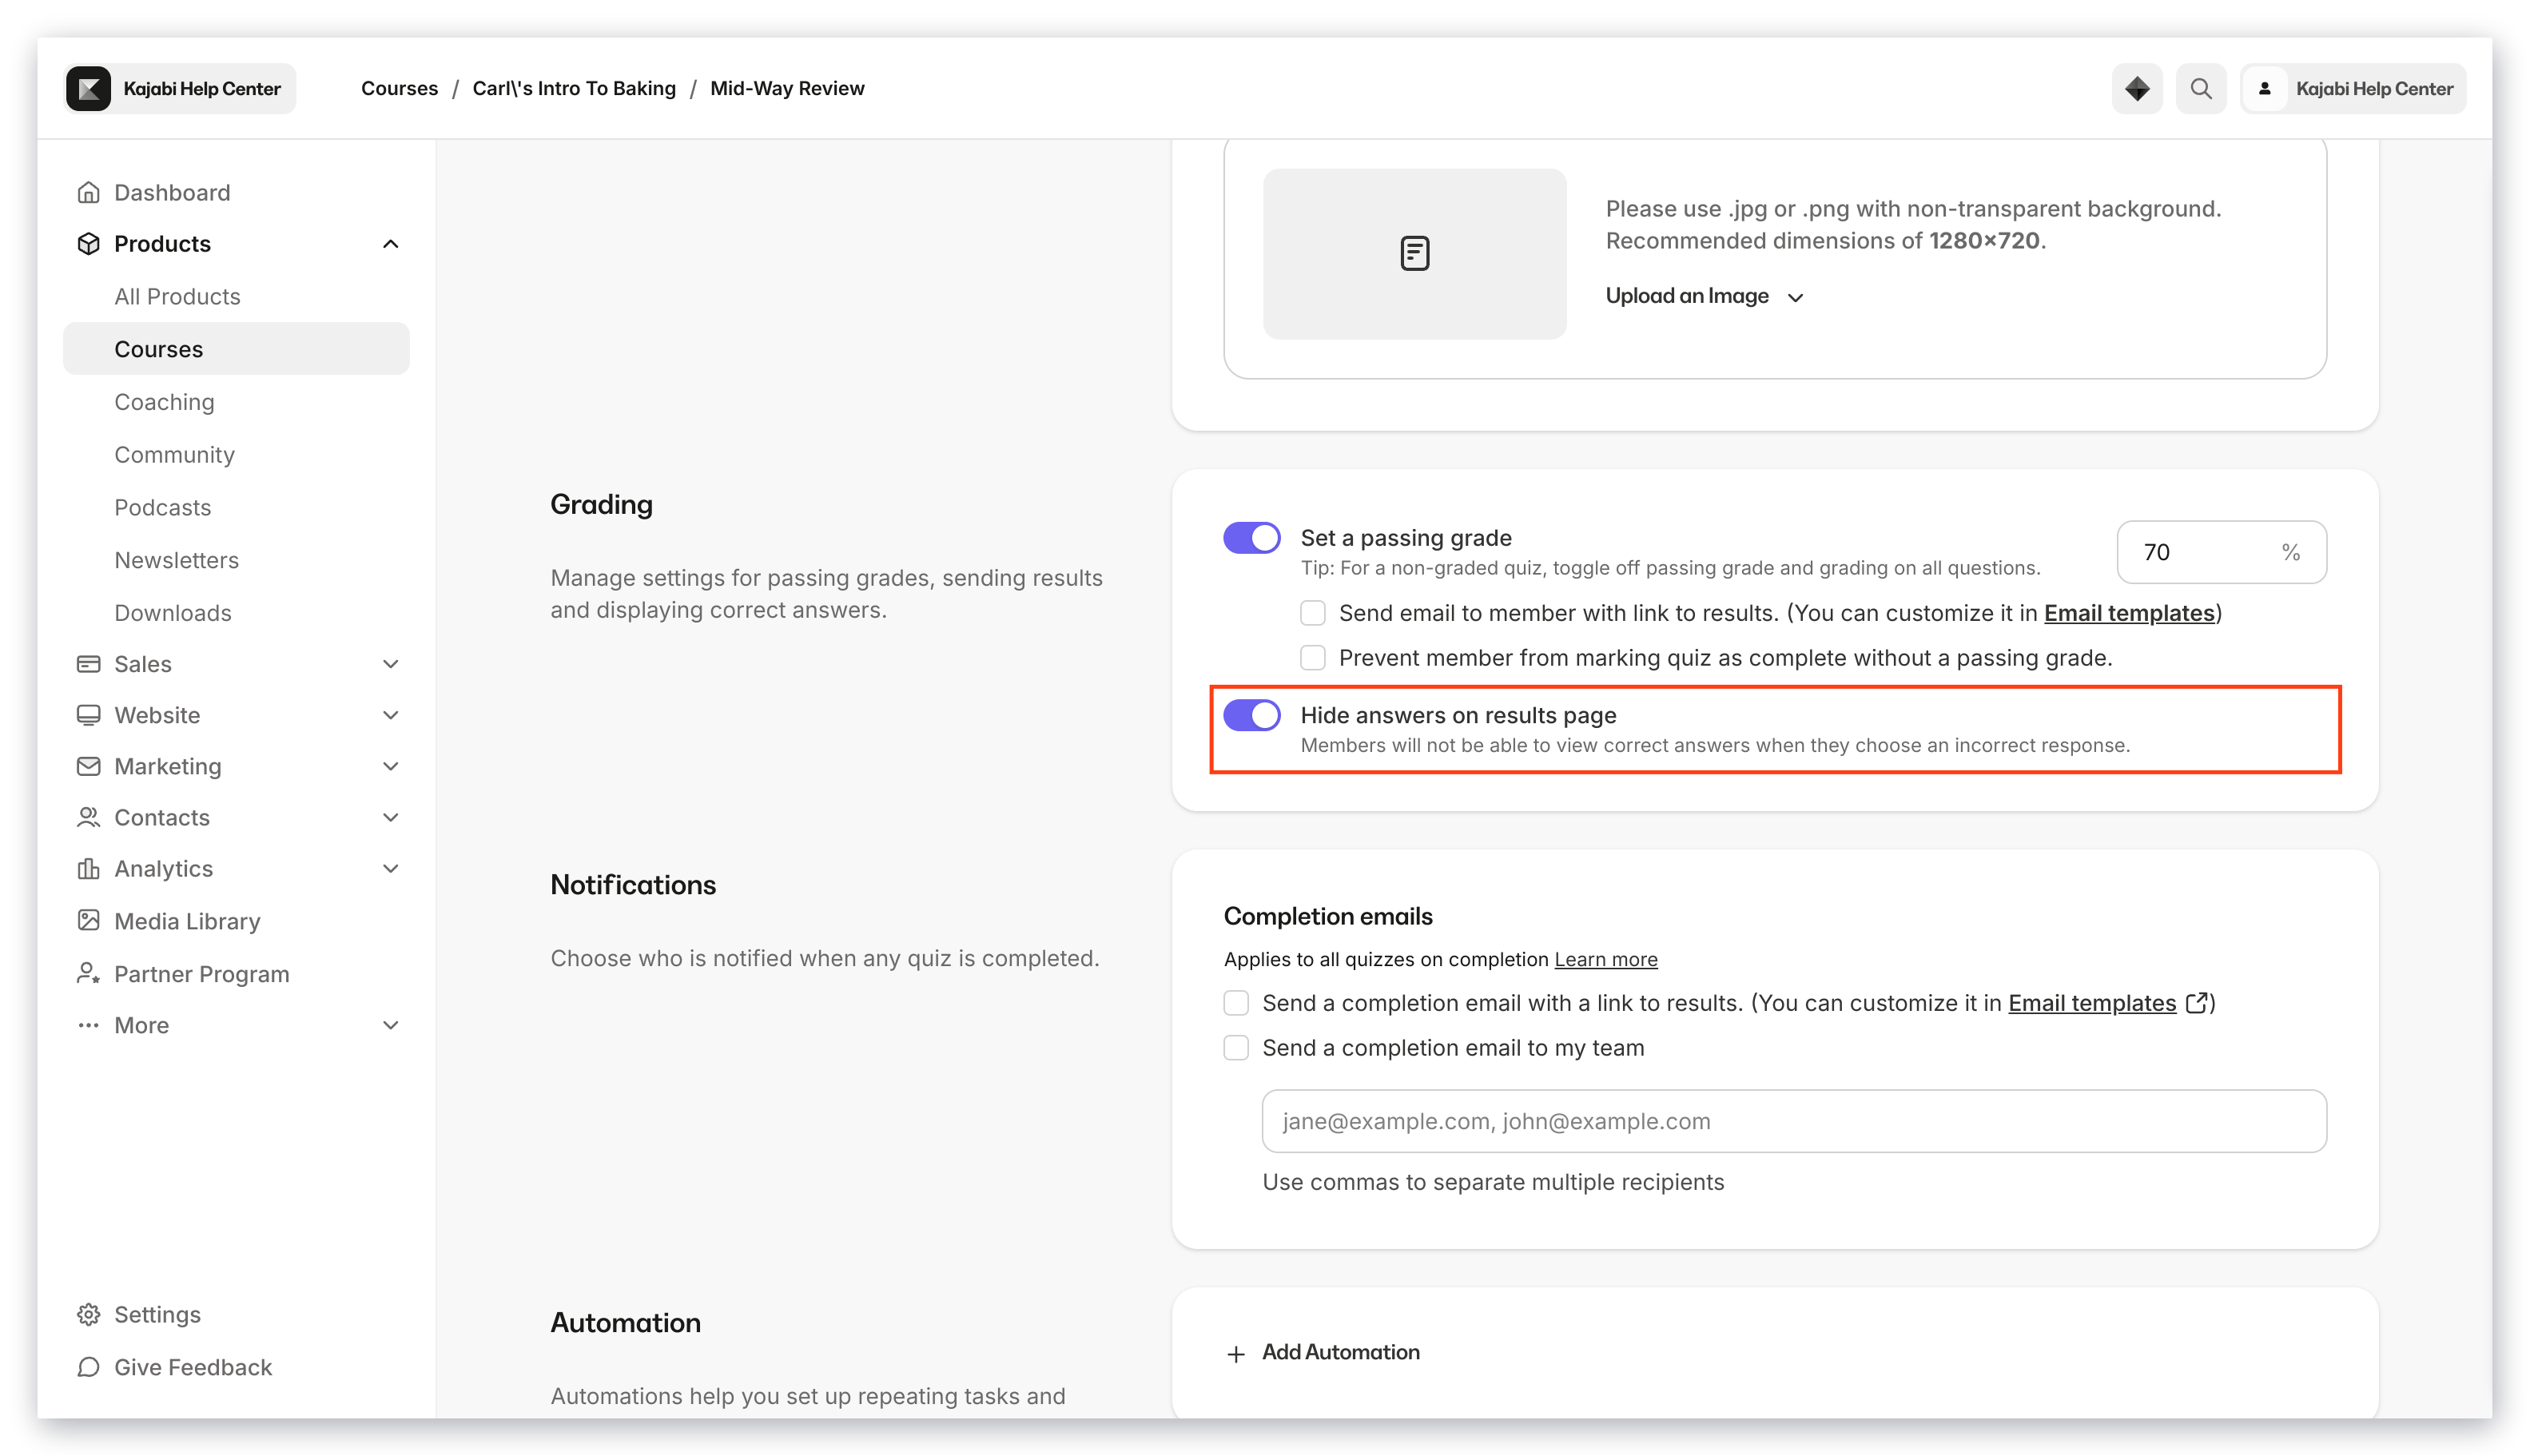
 #### Hide answers on results page
If **Hide answers on results page** is enabled, your customers will not be able to view the correct answer if they selected an incorrect answer.
#### Hide answers on results page
If **Hide answers on results page** is enabled, your customers will not be able to view the correct answer if they selected an incorrect answer.
 ### Notifications
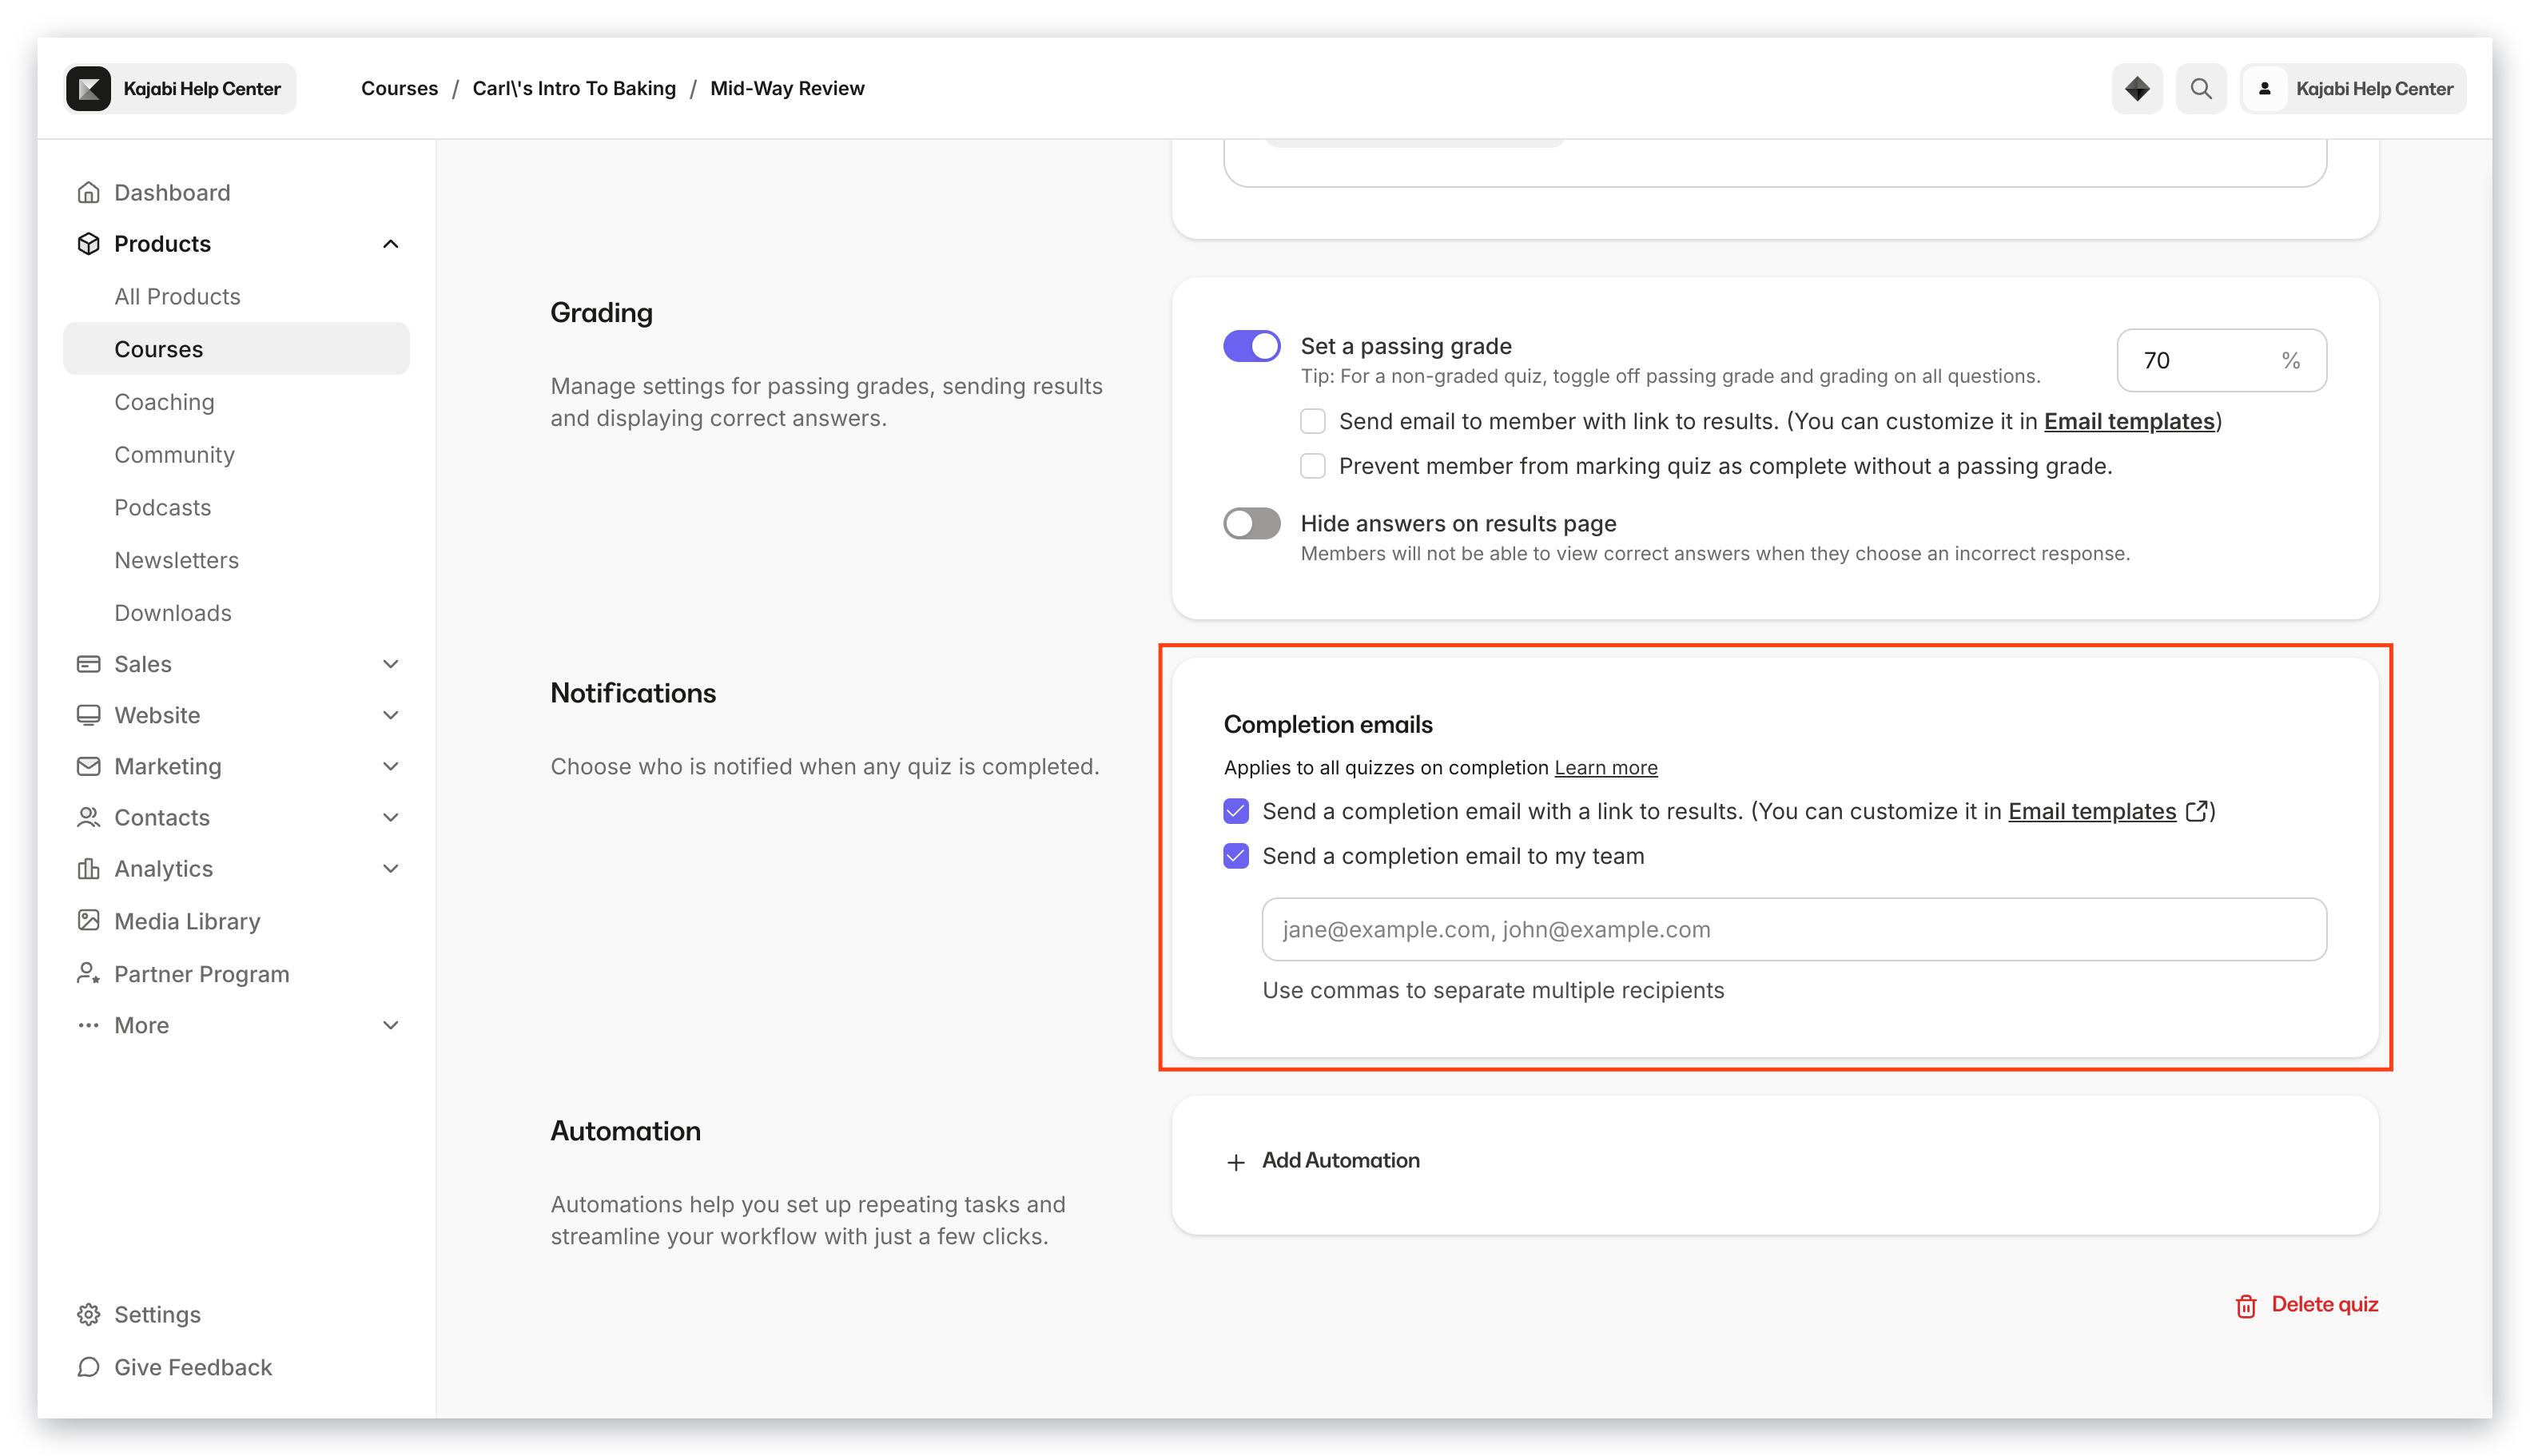
There are two optional email notifications you can send when a quiz is completed:
* **Send a completion email with a link to results**
* After a quiz is completed, an automatic email will be sent to the customer with a link to the results. You can edit this email by going to [Settings > Email templates > Quiz Completion](https://app.kajabi.com/admin/last_site/email_templates/new?handle=quiz_completion).
* Keep in mind if you are manually grading this quiz, they won't be able to view their results until you've completed the grading.
* **Send a completion email to my team**
* This will send an email notification to any of the email addresses you listed after a quiz has been completed.
### Notifications
There are two optional email notifications you can send when a quiz is completed:
* **Send a completion email with a link to results**
* After a quiz is completed, an automatic email will be sent to the customer with a link to the results. You can edit this email by going to [Settings > Email templates > Quiz Completion](https://app.kajabi.com/admin/last_site/email_templates/new?handle=quiz_completion).
* Keep in mind if you are manually grading this quiz, they won't be able to view their results until you've completed the grading.
* **Send a completion email to my team**
* This will send an email notification to any of the email addresses you listed after a quiz has been completed.
 ### Automation
Automations can be a powerful tool to automate processes within your site. Learn [how automations work](../../marketing/automations/automations-overview).
## Results
1. Go to [Products > Courses](https://app.kajabi.com/admin/last_site/courses) and click on your course
2. Open the **Quiz** you wish to view results for
3. Click **Results**
4. For detailed results, you can click **View grade** next to a result
* After clicking **View grade** next to a result, have the option to leave feedback for each answer and additional comments. Be sure to click **Update grade** so that this feedback is visible for your customer while viewing their results.
Quiz submission timestamps are displayed in your account's time zone. This can be updated by going to **Settings → Account Details → Time zone.**
### Manually grade a quiz
1. On the Results page, click **Grade quiz** next to a result
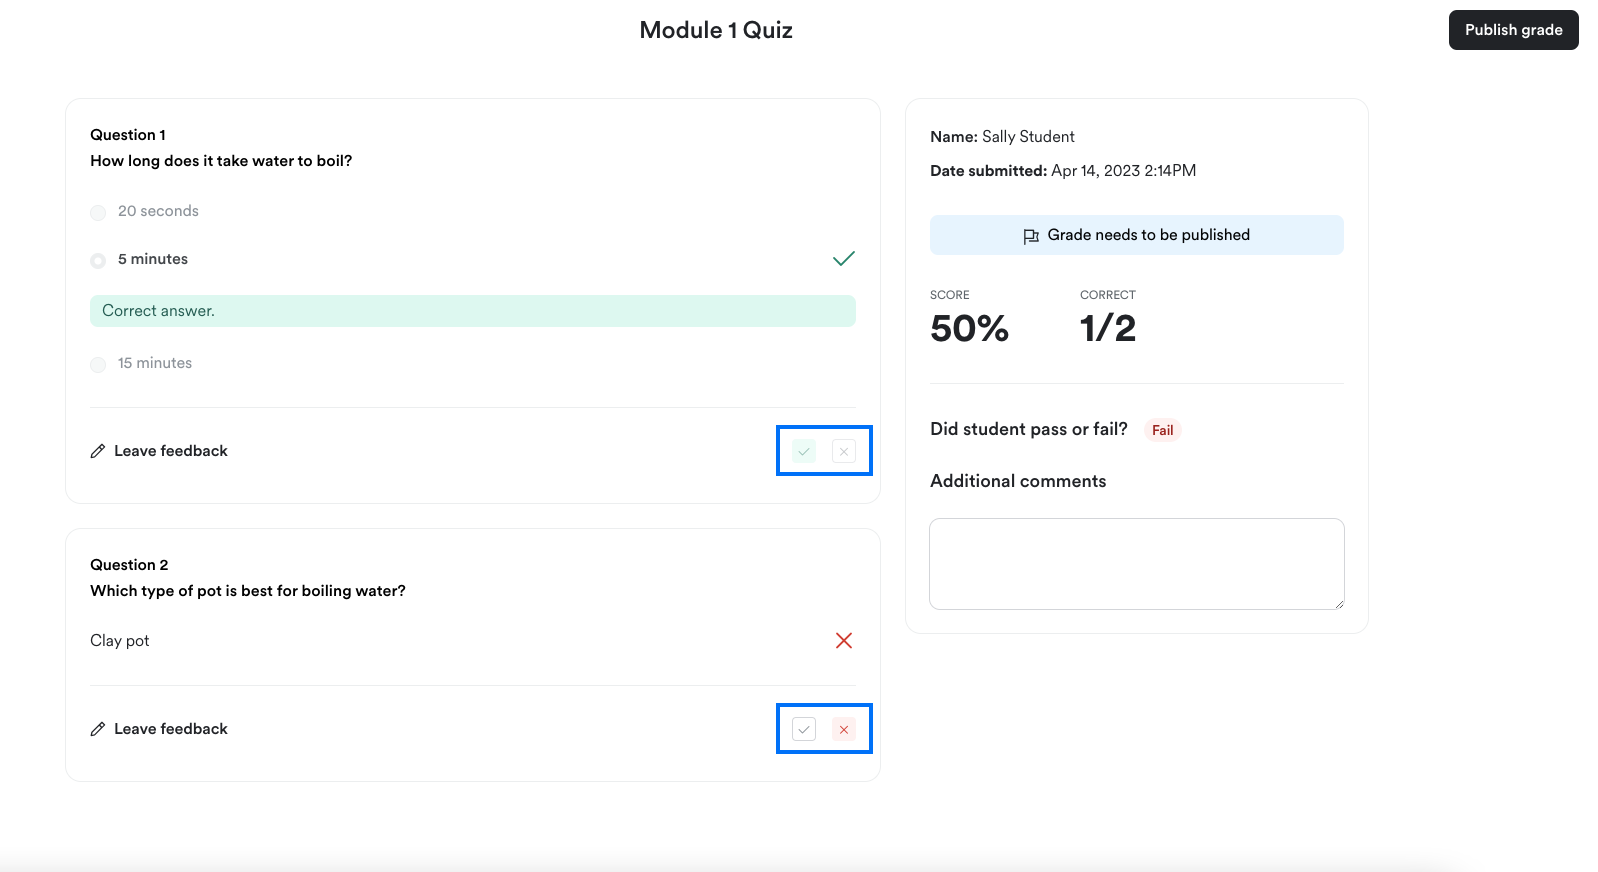
2. For each answer, mark the answer as correct or incorrect
* Optionally, you can leave feedback for each answer
* You won't be able to mark answers for questions that are automatically graded or non-graded
* Non-graded questions will not count towards the quiz score
### Automation
Automations can be a powerful tool to automate processes within your site. Learn [how automations work](../../marketing/automations/automations-overview).
## Results
1. Go to [Products > Courses](https://app.kajabi.com/admin/last_site/courses) and click on your course
2. Open the **Quiz** you wish to view results for
3. Click **Results**
4. For detailed results, you can click **View grade** next to a result
* After clicking **View grade** next to a result, have the option to leave feedback for each answer and additional comments. Be sure to click **Update grade** so that this feedback is visible for your customer while viewing their results.
Quiz submission timestamps are displayed in your account's time zone. This can be updated by going to **Settings → Account Details → Time zone.**
### Manually grade a quiz
1. On the Results page, click **Grade quiz** next to a result
2. For each answer, mark the answer as correct or incorrect
* Optionally, you can leave feedback for each answer
* You won't be able to mark answers for questions that are automatically graded or non-graded
* Non-graded questions will not count towards the quiz score
 * Optionally, you can provide additional comments
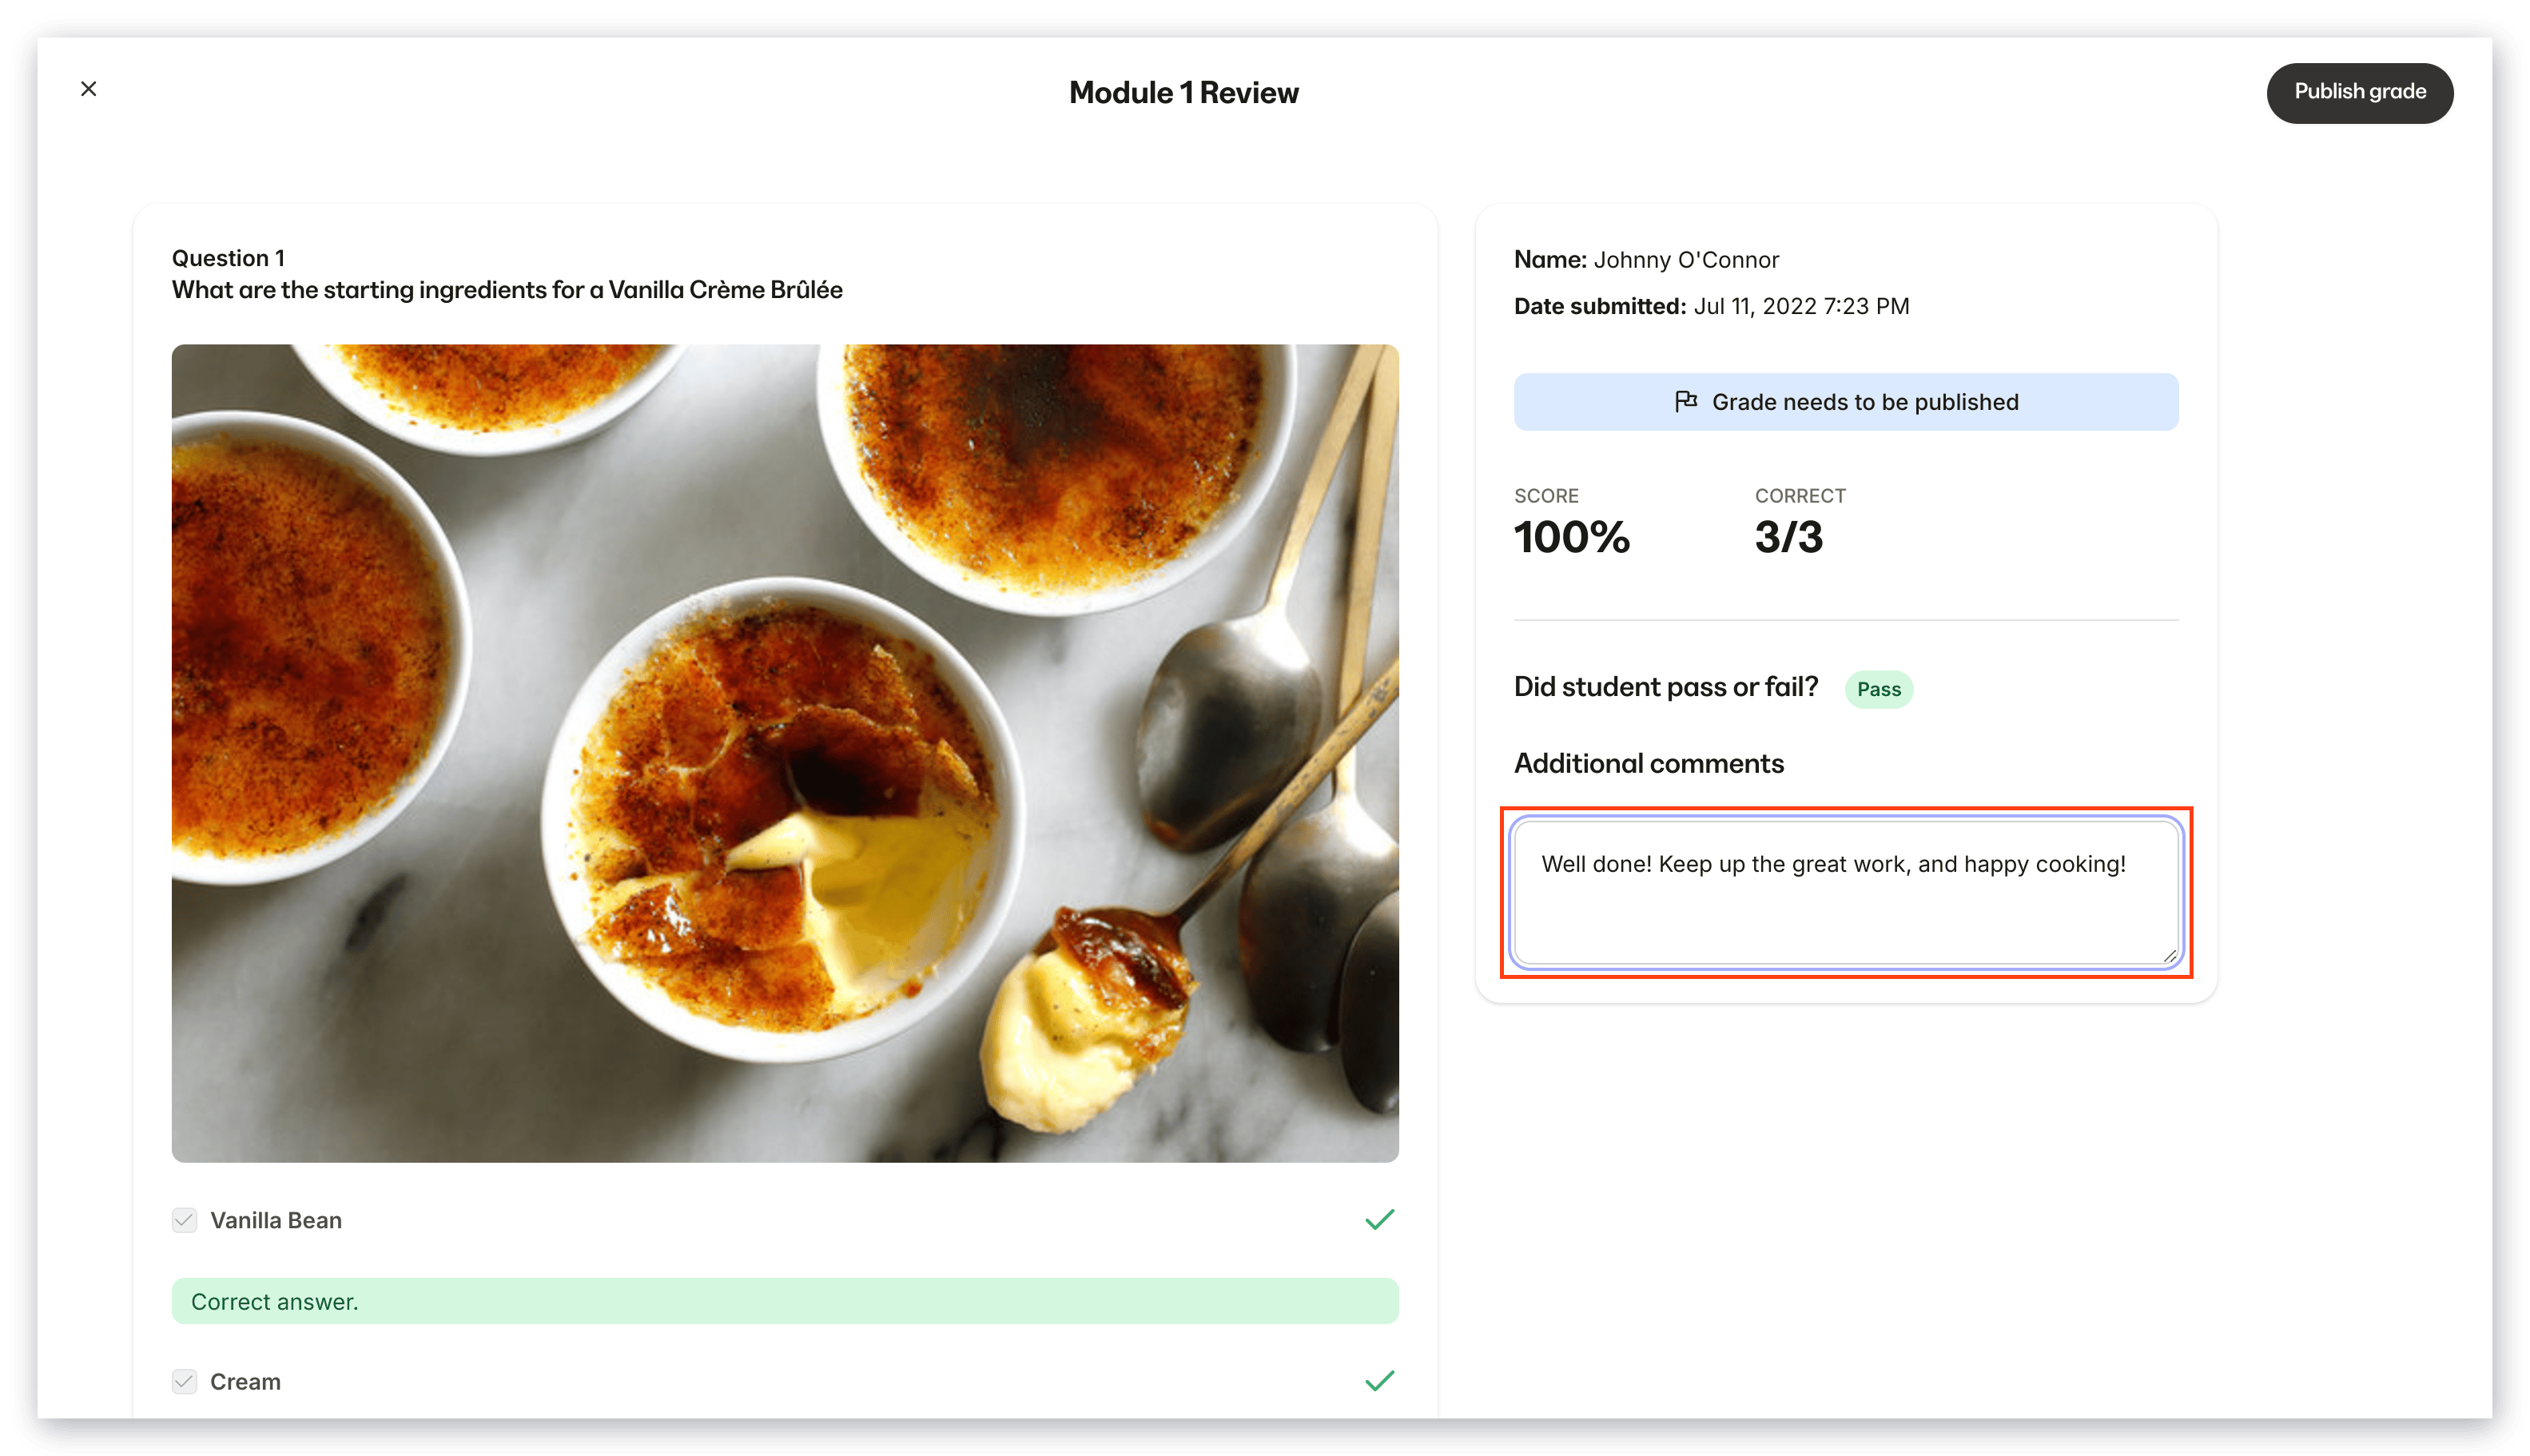 3. Click **Publish grade** to share the results with your customer
### Export quiz results to CSV
1. Go to [Products > Courses](https://app.kajabi.com/admin/last_site/courses) and click on your course
2. Open the **Quiz** you wish to view results for
3. Click **Results**
4. On the Results page, click **Export Results** in the upper right corner
3. Click **Publish grade** to share the results with your customer
### Export quiz results to CSV
1. Go to [Products > Courses](https://app.kajabi.com/admin/last_site/courses) and click on your course
2. Open the **Quiz** you wish to view results for
3. Click **Results**
4. On the Results page, click **Export Results** in the upper right corner
 5. When the export has finished, you will receive the CSV file in your email inbox
### How results look for customers
Your customers can view their results by clicking on the quiz in your course. Depending on your email notification settings, they can also receive a link to review their results.
While viewing the quiz in your course, customers also have the option to retake their quiz at any time.
Customers will only be able to view results for the latest quiz they've submitted.
5. When the export has finished, you will receive the CSV file in your email inbox
### How results look for customers
Your customers can view their results by clicking on the quiz in your course. Depending on your email notification settings, they can also receive a link to review their results.
While viewing the quiz in your course, customers also have the option to retake their quiz at any time.
Customers will only be able to view results for the latest quiz they've submitted.
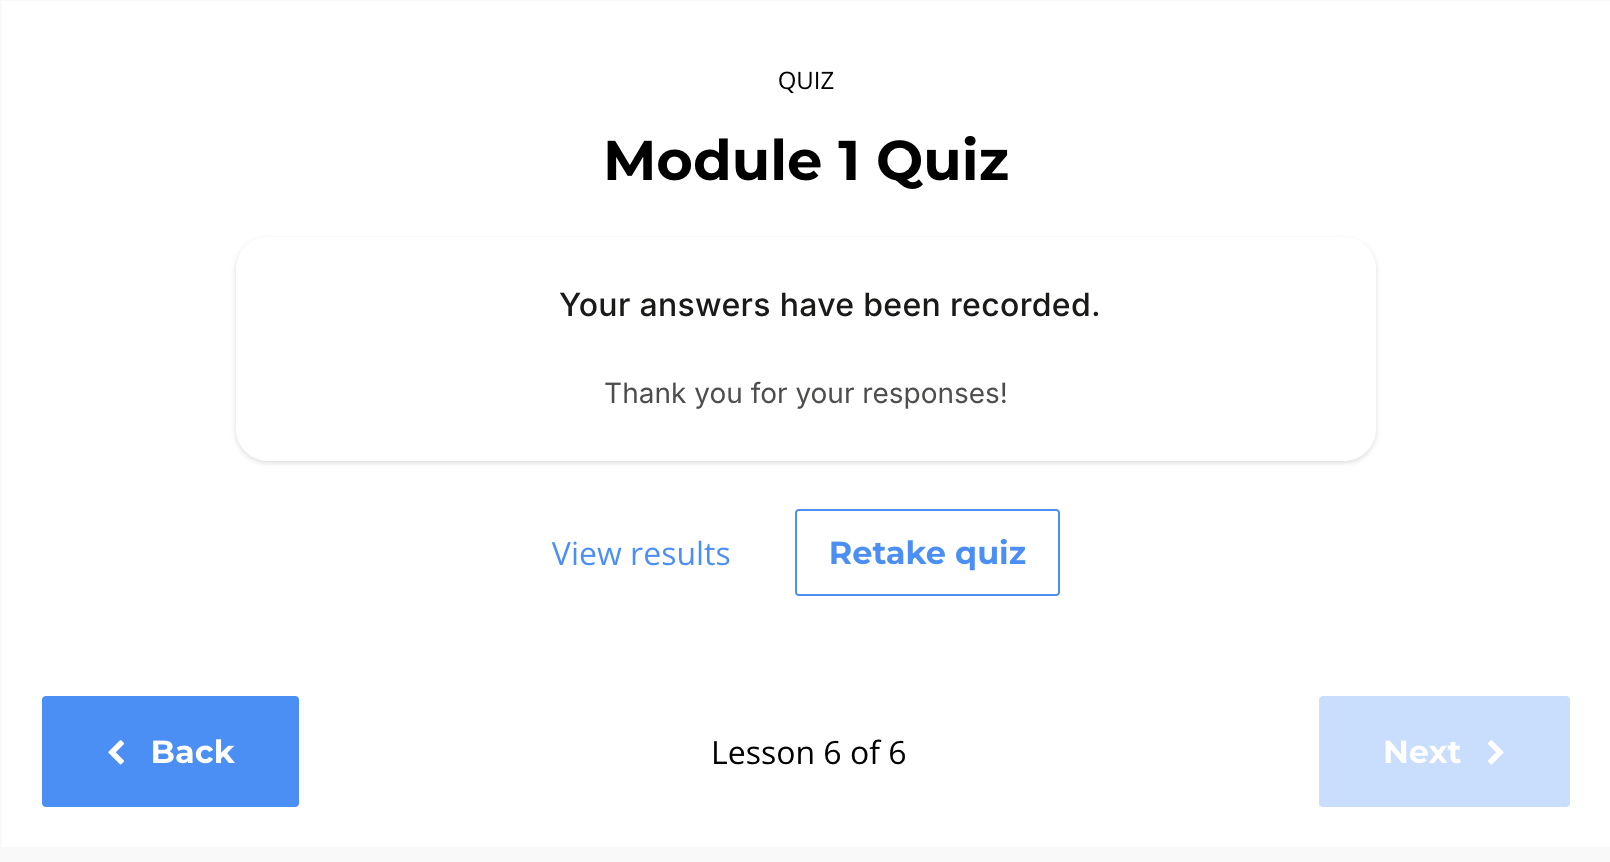
If results are not yet available, customers will see a message saying "Your answers have been recorded."
 ## Set a status for a quiz
1. Go to [Products > Courses](https://app.kajabi.com/admin/last_site/courses) and click on your course
2. Open a **Quiz**
3. In the **Status** section, select a status:
* **Draft:** Hidden from customers
* **Published:** Visible to customers
**Note:** You can't drip or lock quizzes. As a workaround, you could create a module with just one quiz, and set the drip or lock status on the module.
## Import a quiz
1. Go to [Products > Courses](https://app.kajabi.com/admin/last_site/courses) and click on your course
2. Click **Add content** next to the module or submodule you'd like this to be in
3. Choose **Import from another course**
4. Choose the course, module, and quiz
* You can also import a quiz from the same course
5. Click **Import**
6. Click **Got it**
## Preview a quiz
1. Go to [Products > Courses](https://app.kajabi.com/admin/last_site/courses) and click on your course
2. Open the **Quiz** you wish to preview
3. Click the **Preview** button
**Note:** There will not be results available for quizzes you submit while in preview mode. However, you could create a test contact, grant an offer containing your course, and take the quiz with that test account to receive test results.
## Delete a quiz
1. Go to [Products > Courses](https://app.kajabi.com/admin/last_site/courses) and click on your course
2. On your course outline, hover your mouse over the **Quiz** you want to delete
3. Click the **Delete quiz** button
4. Click **Delete Quiz**
## Set a status for a quiz
1. Go to [Products > Courses](https://app.kajabi.com/admin/last_site/courses) and click on your course
2. Open a **Quiz**
3. In the **Status** section, select a status:
* **Draft:** Hidden from customers
* **Published:** Visible to customers
**Note:** You can't drip or lock quizzes. As a workaround, you could create a module with just one quiz, and set the drip or lock status on the module.
## Import a quiz
1. Go to [Products > Courses](https://app.kajabi.com/admin/last_site/courses) and click on your course
2. Click **Add content** next to the module or submodule you'd like this to be in
3. Choose **Import from another course**
4. Choose the course, module, and quiz
* You can also import a quiz from the same course
5. Click **Import**
6. Click **Got it**
## Preview a quiz
1. Go to [Products > Courses](https://app.kajabi.com/admin/last_site/courses) and click on your course
2. Open the **Quiz** you wish to preview
3. Click the **Preview** button
**Note:** There will not be results available for quizzes you submit while in preview mode. However, you could create a test contact, grant an offer containing your course, and take the quiz with that test account to receive test results.
## Delete a quiz
1. Go to [Products > Courses](https://app.kajabi.com/admin/last_site/courses) and click on your course
2. On your course outline, hover your mouse over the **Quiz** you want to delete
3. Click the **Delete quiz** button
4. Click **Delete Quiz**