> ## Documentation Index
> Fetch the complete documentation index at: https://help.kajabi.com/llms.txt
> Use this file to discover all available pages before exploring further.
# Courses overview
> Create and manage Courses to teach customers through visual and written content.
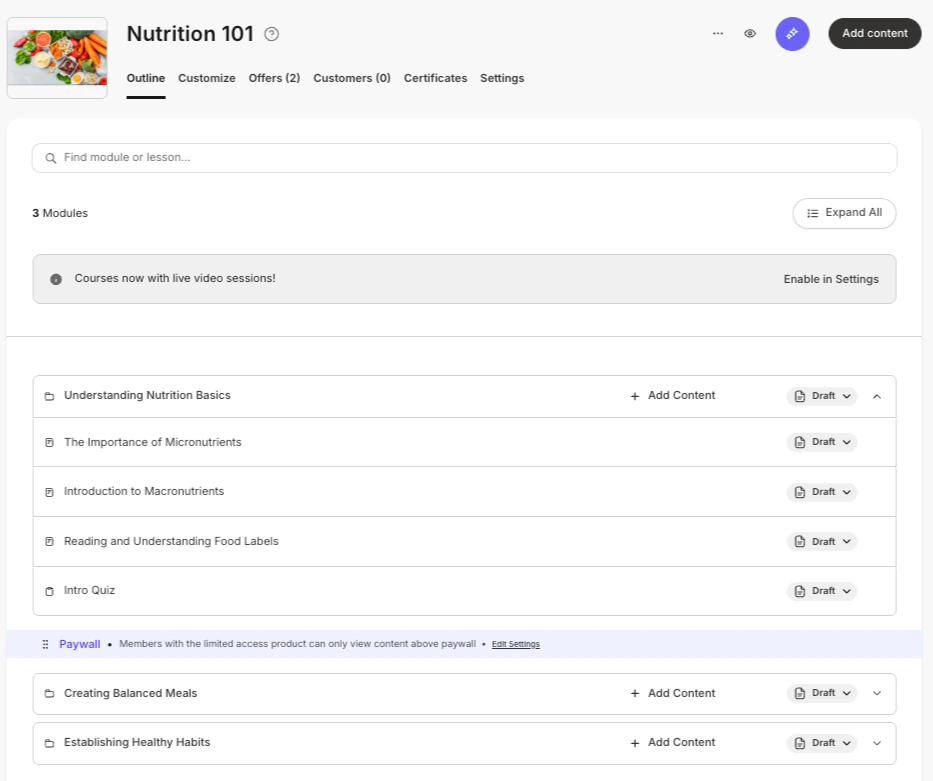
A **Course** allows you to teach your customers through visual and written content. Each course can be made up of [lessons](/articles/products/courses/create-a-lesson) and [quizzes](/articles/products/courses/course-quizzes). Each lesson may include:
* Media (video, audio)
* Written content
* Downloadable files
Lessons and quizzes live inside [modules](/articles/products/courses/course-modules) and submodules. Think of these like categories and subcategories to help you organize your course.
 ## Additional features
Kajabi offers many additional features for your courses, including:
* [Paywalls](/articles/products/courses/create-a-course-paywall)
* [Certificates](/articles/products/courses/course-completion-certificates)
* [Comments](/articles/products/courses/how-to-manage-course-comments)
* [Drip content over time](/articles/products/courses/schedule-and-drip-content-in-courses)
* [Live rooms](/articles/products/courses/how-to-go-live-in-your-course-product)
* [Connect a community](/articles/products/courses/how-to-embed-a-community-channel-in-your-course)
* [Cofounder](/articles/cofounder/cofounder-overview)
Your customers can view courses on your website, the [Kajabi mobile app](/articles/mobile-apps/kajabi-app/downloading-logging-in-to-the-kajabi-mobile-app), or your [branded mobile app](/articles/mobile-apps/branded-app/kajabi-branded-app-overview).
## Create a course
## Additional features
Kajabi offers many additional features for your courses, including:
* [Paywalls](/articles/products/courses/create-a-course-paywall)
* [Certificates](/articles/products/courses/course-completion-certificates)
* [Comments](/articles/products/courses/how-to-manage-course-comments)
* [Drip content over time](/articles/products/courses/schedule-and-drip-content-in-courses)
* [Live rooms](/articles/products/courses/how-to-go-live-in-your-course-product)
* [Connect a community](/articles/products/courses/how-to-embed-a-community-channel-in-your-course)
* [Cofounder](/articles/cofounder/cofounder-overview)
Your customers can view courses on your website, the [Kajabi mobile app](/articles/mobile-apps/kajabi-app/downloading-logging-in-to-the-kajabi-mobile-app), or your [branded mobile app](/articles/mobile-apps/branded-app/kajabi-branded-app-overview).
## Create a course
 1. From the Dashboard, open [Products > Courses](https://app.kajabi.com/admin/last_site/courses).
2. Click **Get Started** or +**New course**.
3. Choose a **Course type** - **Evergreen** or [**Cohorts**.](/articles/products/courses/how-to-create-a-cohort-based-course) A **Cohort Course** enables students to progress through material together in cohort groups, following a predetermined schedule.
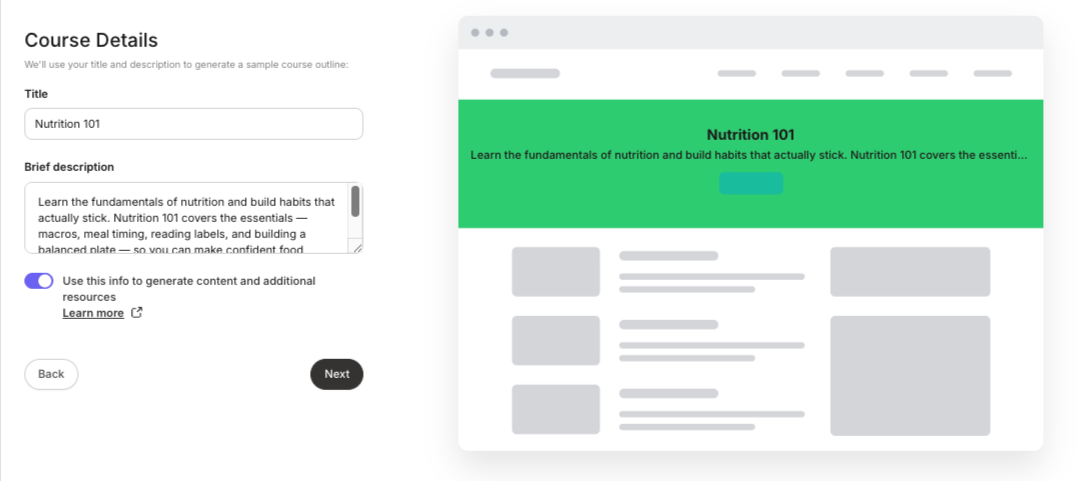
4. For Evergreen, enter a **Title** and brief **Description** (700 characters max).
5. For Cohorts - Select **Start from scratch** or **Import existing course**.
* Start from scratch - Enter a **Title**, a brief **Description** (700 characters max), and a **Start date**.
* Import existing course - **Select a course** (Evergreen) and enter a **Cohorts start date**.
6. If the toggle **Use this info to generate content and additional resources** is enabled, AI will automatically generate modules and lessons for your course.
* A Landing Page, Form, and Email Broadcast will also be created that you can use to promote your course. You can customize all of this content later.
7. Click **Next**.
8. Choose a **Primary color**, **Accent color**, and optionally upload a **Thumbnail image**. Click **Next**. If you customize colors, these will be added to your default Premier theme and Momentum, if you decide to install it. You can change these later.
### Create an Offer
The next step in the Course creation process is to create an offer so customers may purchase it. You can also do this later under **Sales** > [Pricing](/articles/sales/offers/create-an-offer). To skip creating an offer, click **Skip for now**.
9. Choose a **Pricing type**, Free or Paid.
10. Toggle whether or not you would like to **Use a paywall for this course**. This enables limited Course access to let your member experience the value before purchasing the entire Course.\\
1. From the Dashboard, open [Products > Courses](https://app.kajabi.com/admin/last_site/courses).
2. Click **Get Started** or +**New course**.
3. Choose a **Course type** - **Evergreen** or [**Cohorts**.](/articles/products/courses/how-to-create-a-cohort-based-course) A **Cohort Course** enables students to progress through material together in cohort groups, following a predetermined schedule.
4. For Evergreen, enter a **Title** and brief **Description** (700 characters max).
5. For Cohorts - Select **Start from scratch** or **Import existing course**.
* Start from scratch - Enter a **Title**, a brief **Description** (700 characters max), and a **Start date**.
* Import existing course - **Select a course** (Evergreen) and enter a **Cohorts start date**.
6. If the toggle **Use this info to generate content and additional resources** is enabled, AI will automatically generate modules and lessons for your course.
* A Landing Page, Form, and Email Broadcast will also be created that you can use to promote your course. You can customize all of this content later.
7. Click **Next**.
8. Choose a **Primary color**, **Accent color**, and optionally upload a **Thumbnail image**. Click **Next**. If you customize colors, these will be added to your default Premier theme and Momentum, if you decide to install it. You can change these later.
### Create an Offer
The next step in the Course creation process is to create an offer so customers may purchase it. You can also do this later under **Sales** > [Pricing](/articles/sales/offers/create-an-offer). To skip creating an offer, click **Skip for now**.
9. Choose a **Pricing type**, Free or Paid.
10. Toggle whether or not you would like to **Use a paywall for this course**. This enables limited Course access to let your member experience the value before purchasing the entire Course.\\
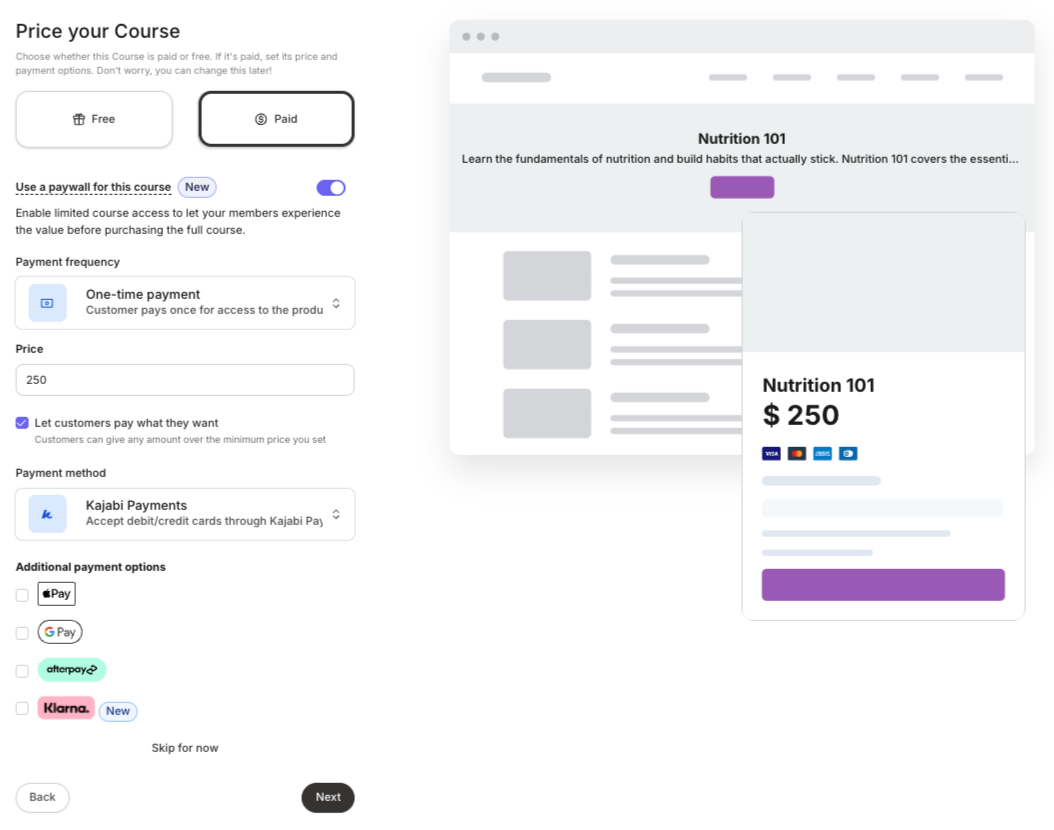 11. For **Paid,** choose a **Payment frequency**:
* **One-time payment** - Customer pays once for access to the product
* **Payment plan** - Require weekly, monthly, or yearly payments
* **Subscription** - Bill customers on weekly or monthly intervals
12. If the Course is paid, enter a **Price.**
* If the Course is a **One-time payment**, toggle if you want to **Let customers pay what they want**. This means customers can give any amount over the minimum price you set.
* If the Course is offered as a **Subscription**, enter the **Billing interval**.
* For a **Payment plan**, enter the **Number of payments** required and a **Billing interval**.
13. Then, select a **Payment method** - [Kajabi Payments](/articles/sales/kajabi-payments/kajabi-payments-overview), and any **Additional payment options**, or None.
14. Click **Next**.
15. If you elected to use AI , it will then automatically generate modules and lessons for your Course.
**Notes:** Your Course Title, Description, and Thumbnail image will be displayed in your customer's member library.\
\
Courses are not SCORM compliant.
## Edit a course
1. From the Dashboard, open [Products, then Courses](https://app.kajabi.com/admin/last_site/courses).
2. Click a **Course Title**, or click the **more options (...) menu** `...` and select **Edit Details.**
11. For **Paid,** choose a **Payment frequency**:
* **One-time payment** - Customer pays once for access to the product
* **Payment plan** - Require weekly, monthly, or yearly payments
* **Subscription** - Bill customers on weekly or monthly intervals
12. If the Course is paid, enter a **Price.**
* If the Course is a **One-time payment**, toggle if you want to **Let customers pay what they want**. This means customers can give any amount over the minimum price you set.
* If the Course is offered as a **Subscription**, enter the **Billing interval**.
* For a **Payment plan**, enter the **Number of payments** required and a **Billing interval**.
13. Then, select a **Payment method** - [Kajabi Payments](/articles/sales/kajabi-payments/kajabi-payments-overview), and any **Additional payment options**, or None.
14. Click **Next**.
15. If you elected to use AI , it will then automatically generate modules and lessons for your Course.
**Notes:** Your Course Title, Description, and Thumbnail image will be displayed in your customer's member library.\
\
Courses are not SCORM compliant.
## Edit a course
1. From the Dashboard, open [Products, then Courses](https://app.kajabi.com/admin/last_site/courses).
2. Click a **Course Title**, or click the **more options (...) menu** `...` and select **Edit Details.**
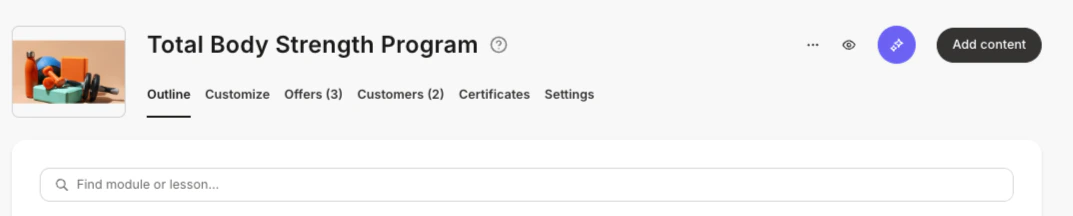 From the **Course Outline** page, you can:
* **Add and manage content** - Click **+ Add Content** to add modules, submodules, lessons, and quizzes
* **Publish**, **Schedule**, **Drip**, or **Lock** modules and lesson using the **Status** menu
* **Preview** - Click the **eye icon** to see your course on desktop or mobile
* Click **Settings** to edit **Course Details**, add a **Paywall**, add a **Live Room**, enable a Community for the **Course**, and enable **Comments**
* Click **Customize** to edit the Course theme and change the look and feel
* Click **Certificates** to configure certifications for the Course
* Click **Offers** to add the Course to additional Offers
## Change how the Course displays
1. From the **Course Outline**, click the **Customize** tab.
2. Hover over the installed template and click **Customize**, or click the **more options (...) menu** on the template and select **Customize**.
3. At the top of the page, there is a dropdown menu that lists each of the pages that make up your Course display. Each may be edited independently.
From the **Course Outline** page, you can:
* **Add and manage content** - Click **+ Add Content** to add modules, submodules, lessons, and quizzes
* **Publish**, **Schedule**, **Drip**, or **Lock** modules and lesson using the **Status** menu
* **Preview** - Click the **eye icon** to see your course on desktop or mobile
* Click **Settings** to edit **Course Details**, add a **Paywall**, add a **Live Room**, enable a Community for the **Course**, and enable **Comments**
* Click **Customize** to edit the Course theme and change the look and feel
* Click **Certificates** to configure certifications for the Course
* Click **Offers** to add the Course to additional Offers
## Change how the Course displays
1. From the **Course Outline**, click the **Customize** tab.
2. Hover over the installed template and click **Customize**, or click the **more options (...) menu** on the template and select **Customize**.
3. At the top of the page, there is a dropdown menu that lists each of the pages that make up your Course display. Each may be edited independently.
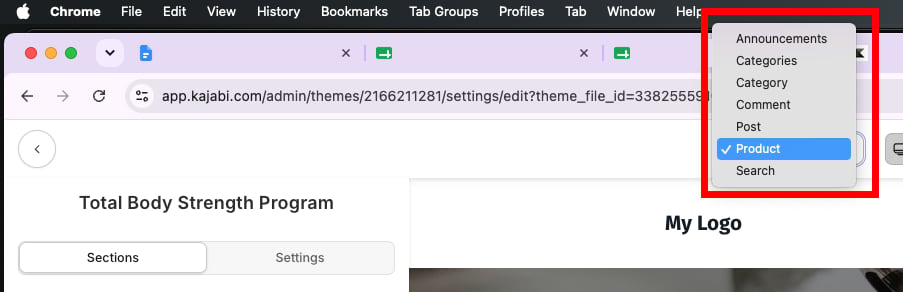 * **Product** - The main Course page
* **Announcements** - Course announcement display
* **Categories** - The section holding all Modules
* **Category** - A single Module page
* **Post** - An individual Lesson page
* **Comments** - Lesson-level comments display
* **Search** - Search bar display
**Note:** The terms currently listed in the top dropdown menu are older Kajabi app terms. Refer to the list above to determine which page you are editing.
4. To make edits, click a **Section** in the left navigation or click directly on the web page block.
5. Click **Save** on each page you edit to apply changes.
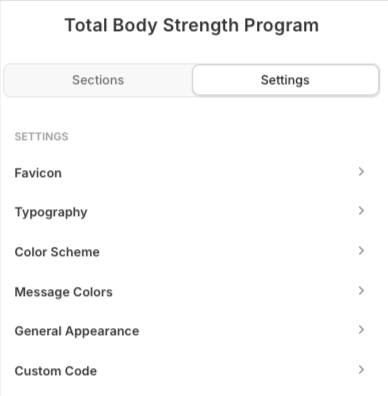
6. Make global changes to the Course display using the **Settings** tab in the left navigation, like fonts, font and background colors, column width, and more.
* **Product** - The main Course page
* **Announcements** - Course announcement display
* **Categories** - The section holding all Modules
* **Category** - A single Module page
* **Post** - An individual Lesson page
* **Comments** - Lesson-level comments display
* **Search** - Search bar display
**Note:** The terms currently listed in the top dropdown menu are older Kajabi app terms. Refer to the list above to determine which page you are editing.
4. To make edits, click a **Section** in the left navigation or click directly on the web page block.
5. Click **Save** on each page you edit to apply changes.
6. Make global changes to the Course display using the **Settings** tab in the left navigation, like fonts, font and background colors, column width, and more.
 ## Duplicate a Course
1. From the Dashboard, open [Products > Courses](https://app.kajabi.com/admin/last_site/courses).
2. Click the **more options (...) menu** `...` next to the Course, and select **Duplicate**.
3. If you have multiple sites, choose the **Site** to add the Course to.
**Notes:**
* If you're unable to duplicate a Course, you may have reached your product limit. You can [view your plan usage](/articles/account-settings/billing/manage-your-subscription), [upgrade to a plan](/articles/account-settings/billing/manage-your-subscription), or [increase your product limit](/articles/account-settings/billing/manage-your-subscription).
* Duplicating a Course does not add your customers to your duplicated Course - only your content is duplicated. Also, if you have an assessment attached to a Course, the assessment will not be duplicated.
* At this time, you are not able to duplicate a [Cohort Course](/articles/products/courses/how-to-create-a-cohort-based-course). You can duplicate an Evergreen Course.
## Delete a course
1. From the Dashboard, open [Products > Courses](https://app.kajabi.com/admin/last_site/courses).
2. Click the **more options (...) menu** next to the Course.
3. Click **Delete**.
4. Confirm by clicking **Delete** again.
## FAQs
### **What types of online courses can I create with Kajabi?**
Kajabi supports two course formats: Evergreen Courses (self-paced, available to students as soon as they purchase) and Cohort Courses (scheduled groups that progress through material together, with live video sessions). Each Course can include video, audio, written lessons, quizzes, and downloadable files organized into modules and submodules.
### **Can students access my course on their phone?**
Yes. Students can access your course on your Kajabi website, the Kajabi mobile app, or your own branded mobile app — all from their phone or tablet.
### **Can I drip course content over time instead of releasing everything at once?**
Yes. Kajabi lets you schedule or drip modules and lessons so content becomes available on a specific date or a set number of days after purchase — ideal for structured programs or challenges.
### **Can I issue completion certificates to students?**
Yes. Kajabi can automatically send a certificate to students when they complete a course. You can configure certificate settings from the course editor.
### **Is there a limit to how many videos or lessons I can add?**
There is no cap on the number of lessons. Individual video file uploads have a maximum size limit, and Kajabi stores media on its servers. You can upload as much course content as your business needs.
### **Can I offer a free preview of my course before students buy?**
Yes. Kajabi's Paywall feature lets you give prospective students a sneak peek at course content while keeping the full course behind a purchase — a great way to convert interested leads.
### **Does Kajabi use AI to help me build my course?**
Yes. When creating a Course, you can enable AI to automatically generate a course outline with modules and lessons based on your topic. Kajabi's Cofounder assistant can also help you build course content, landing pages, and marketing emails as you go.
### **Can I add quizzes or assessments to my course?**
Yes. Kajabi supports course quizzes that you can place at any point in your curriculum to test student understanding and reinforce learning.
### **Is Kajabi SCORM compliant?**
No. Kajabi Courses are not SCORM compliant at this time. If SCORM or xAPI compliance is a requirement for your use case, Kajabi may not be the right fit for that specific need.
### **Can I prevent students from downloading my course videos and files?**
Yes. Kajabi's course content is protected by default. Videos hosted on Kajabi are view-only inside the platform and cannot be downloaded by students unless you explicitly enable that option. Attached files in lessons are downloadable by design, so if you prefer to keep files locked, deliver that content as video or written text instead.
## Duplicate a Course
1. From the Dashboard, open [Products > Courses](https://app.kajabi.com/admin/last_site/courses).
2. Click the **more options (...) menu** `...` next to the Course, and select **Duplicate**.
3. If you have multiple sites, choose the **Site** to add the Course to.
**Notes:**
* If you're unable to duplicate a Course, you may have reached your product limit. You can [view your plan usage](/articles/account-settings/billing/manage-your-subscription), [upgrade to a plan](/articles/account-settings/billing/manage-your-subscription), or [increase your product limit](/articles/account-settings/billing/manage-your-subscription).
* Duplicating a Course does not add your customers to your duplicated Course - only your content is duplicated. Also, if you have an assessment attached to a Course, the assessment will not be duplicated.
* At this time, you are not able to duplicate a [Cohort Course](/articles/products/courses/how-to-create-a-cohort-based-course). You can duplicate an Evergreen Course.
## Delete a course
1. From the Dashboard, open [Products > Courses](https://app.kajabi.com/admin/last_site/courses).
2. Click the **more options (...) menu** next to the Course.
3. Click **Delete**.
4. Confirm by clicking **Delete** again.
## FAQs
### **What types of online courses can I create with Kajabi?**
Kajabi supports two course formats: Evergreen Courses (self-paced, available to students as soon as they purchase) and Cohort Courses (scheduled groups that progress through material together, with live video sessions). Each Course can include video, audio, written lessons, quizzes, and downloadable files organized into modules and submodules.
### **Can students access my course on their phone?**
Yes. Students can access your course on your Kajabi website, the Kajabi mobile app, or your own branded mobile app — all from their phone or tablet.
### **Can I drip course content over time instead of releasing everything at once?**
Yes. Kajabi lets you schedule or drip modules and lessons so content becomes available on a specific date or a set number of days after purchase — ideal for structured programs or challenges.
### **Can I issue completion certificates to students?**
Yes. Kajabi can automatically send a certificate to students when they complete a course. You can configure certificate settings from the course editor.
### **Is there a limit to how many videos or lessons I can add?**
There is no cap on the number of lessons. Individual video file uploads have a maximum size limit, and Kajabi stores media on its servers. You can upload as much course content as your business needs.
### **Can I offer a free preview of my course before students buy?**
Yes. Kajabi's Paywall feature lets you give prospective students a sneak peek at course content while keeping the full course behind a purchase — a great way to convert interested leads.
### **Does Kajabi use AI to help me build my course?**
Yes. When creating a Course, you can enable AI to automatically generate a course outline with modules and lessons based on your topic. Kajabi's Cofounder assistant can also help you build course content, landing pages, and marketing emails as you go.
### **Can I add quizzes or assessments to my course?**
Yes. Kajabi supports course quizzes that you can place at any point in your curriculum to test student understanding and reinforce learning.
### **Is Kajabi SCORM compliant?**
No. Kajabi Courses are not SCORM compliant at this time. If SCORM or xAPI compliance is a requirement for your use case, Kajabi may not be the right fit for that specific need.
### **Can I prevent students from downloading my course videos and files?**
Yes. Kajabi's course content is protected by default. Videos hosted on Kajabi are view-only inside the platform and cannot be downloaded by students unless you explicitly enable that option. Attached files in lessons are downloadable by design, so if you prefer to keep files locked, deliver that content as video or written text instead.