> ## Documentation Index
> Fetch the complete documentation index at: https://help.kajabi.com/llms.txt
> Use this file to discover all available pages before exploring further.
# Schedule Live Video sessions for a Cohort Course
> Engage with students in real time by scheduling Live Sessions using Kajabi Live Video or a custom location.
You can schedule Live Sessions for a Cohort Course to engage with students in real time using either Kajabi Live Video or a custom session location.
**Note:** Cohort Courses are only available with the Growth and Pro Plans. Check out [kajabi.com/pricing](https://kajabi.com/pricing) for more details.
## Add a Live Session to the cohort outline
1. Select **Products** from the Dashboard.
2. Then, select **Courses**.
3. Click to open the **Cohort Course**.
4. Then, click the Title of the specific cohort you want to edit.
5. Click **+ Add Content** next to the module where you want to add a Live Session.
6. Select **Live Session** as the content type.
7. A modal popup will appear. Select the module, enter a **Title**, and click **Create Live Session**.
## Schedule a Live Session
1. Click the **Title** of the Live Session to open it for editing. (Or, click the yellow **Not scheduled** button and select **Edit lesson session**.)
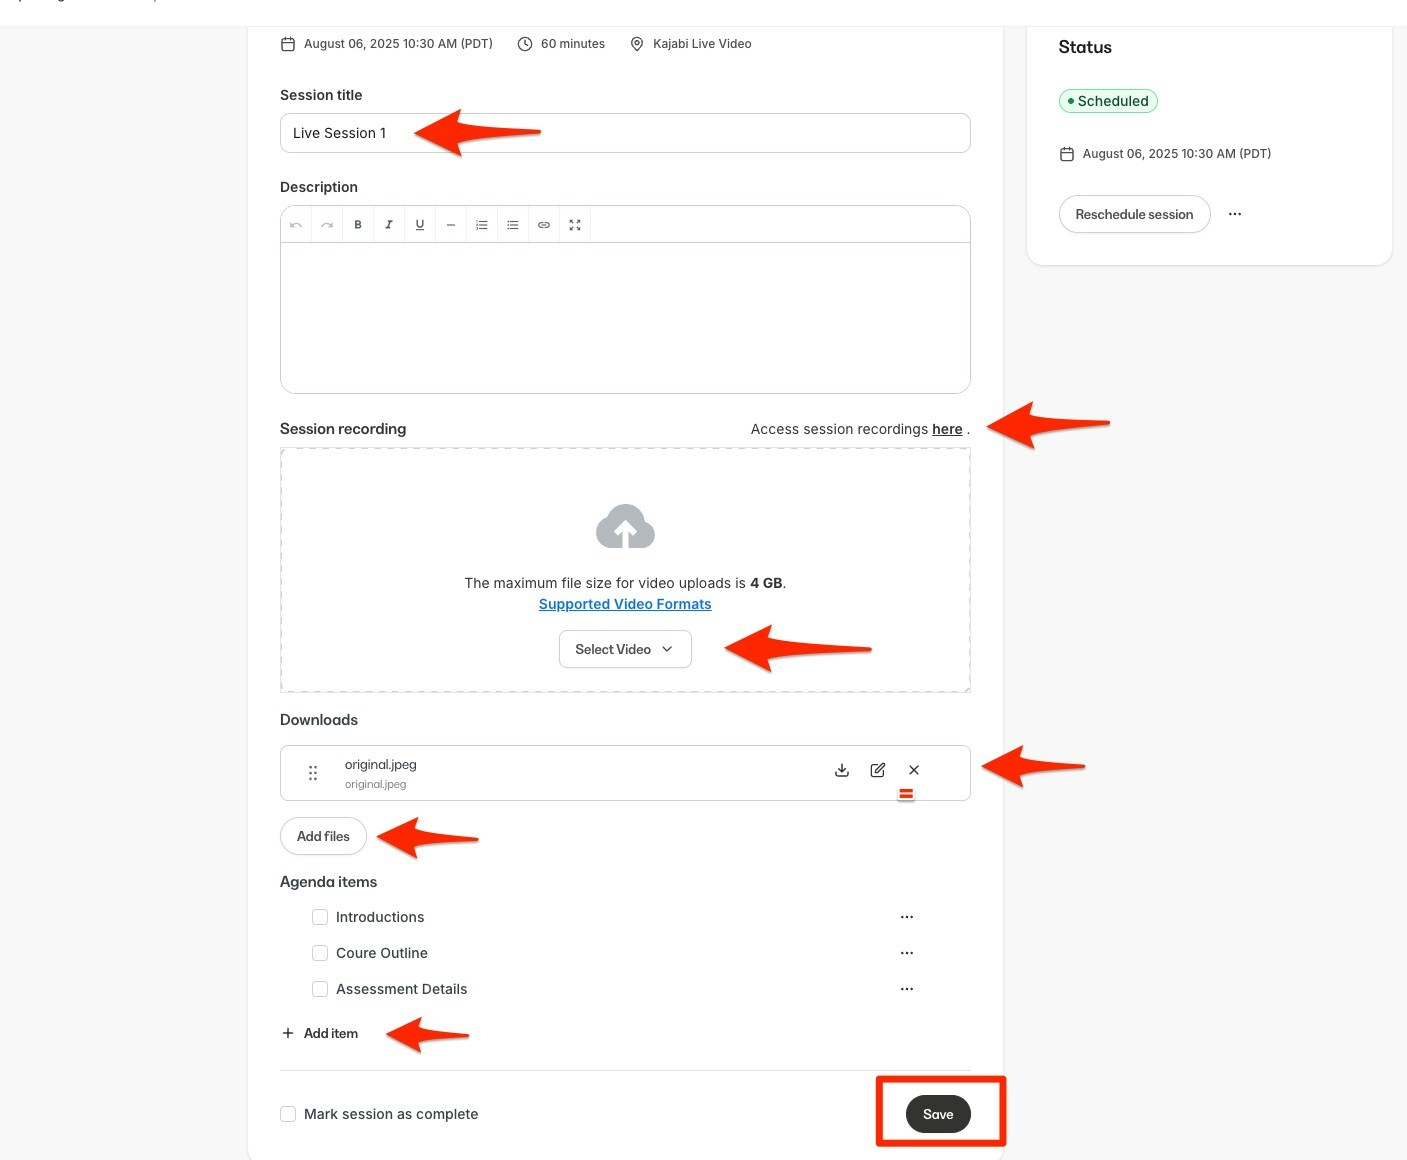
2. Update **Session title** and **Description** as desired, and optionally upload any downloadable resources you'd like to include.
3. (Optional) Add any **Agenda items** to discuss during the live session. These items will be viewable by your students.
4. Click **Save** to apply your changes.
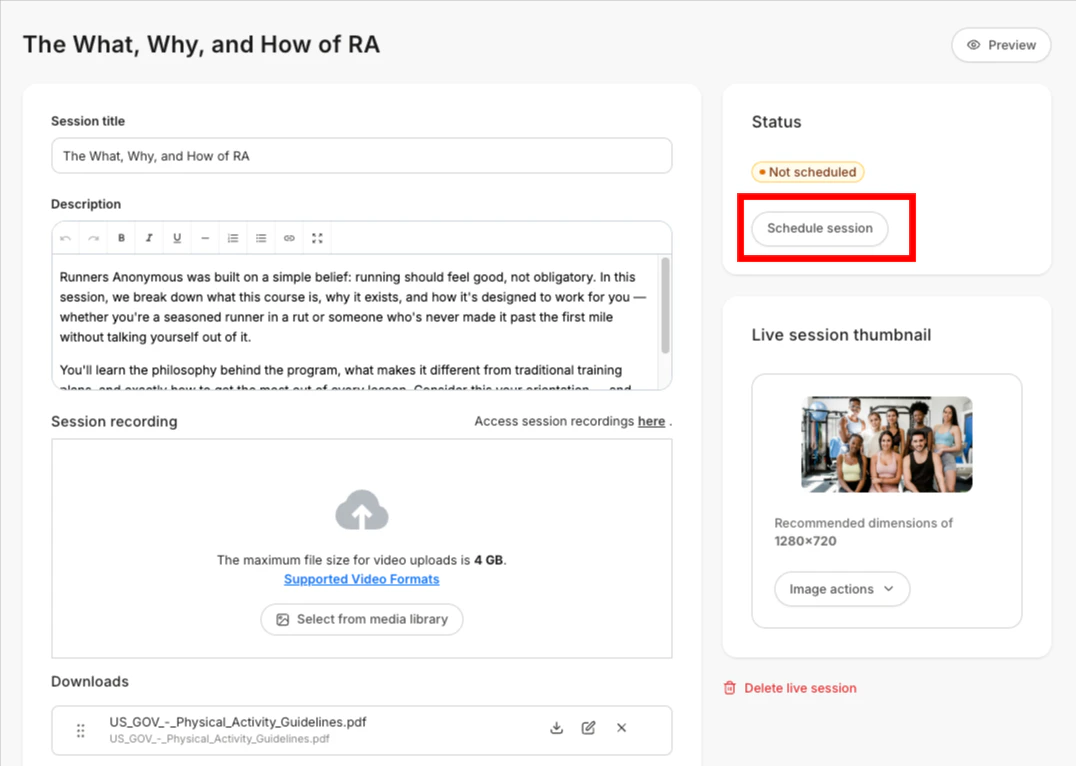
5. Next, go to the top right of the page and click **Schedule session**:
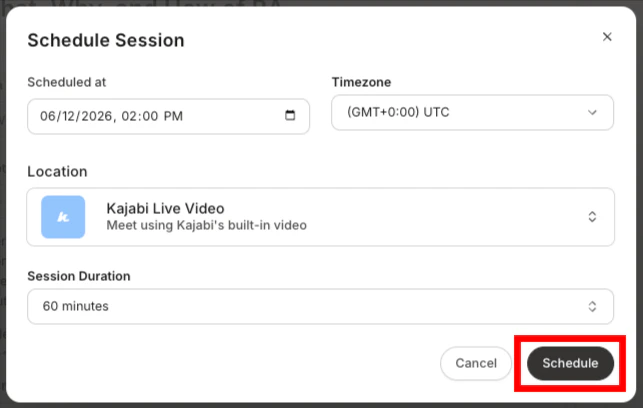
 6. Select the **Date, Time**, and **Timezone** for your session.
7. Input the **Location** for your session (either Kajabi Live Video or a custom location).
**Note:** If you choose a custom location, students will see the URL or Description entered for it on the Live Session page in the Course.
8. Finally, choose your **Session Duration** and click **Schedule**:
6. Select the **Date, Time**, and **Timezone** for your session.
7. Input the **Location** for your session (either Kajabi Live Video or a custom location).
**Note:** If you choose a custom location, students will see the URL or Description entered for it on the Live Session page in the Course.
8. Finally, choose your **Session Duration** and click **Schedule**:
 \
A notification email announcing the scheduled session is then sent to all students who've opted into email notifications.
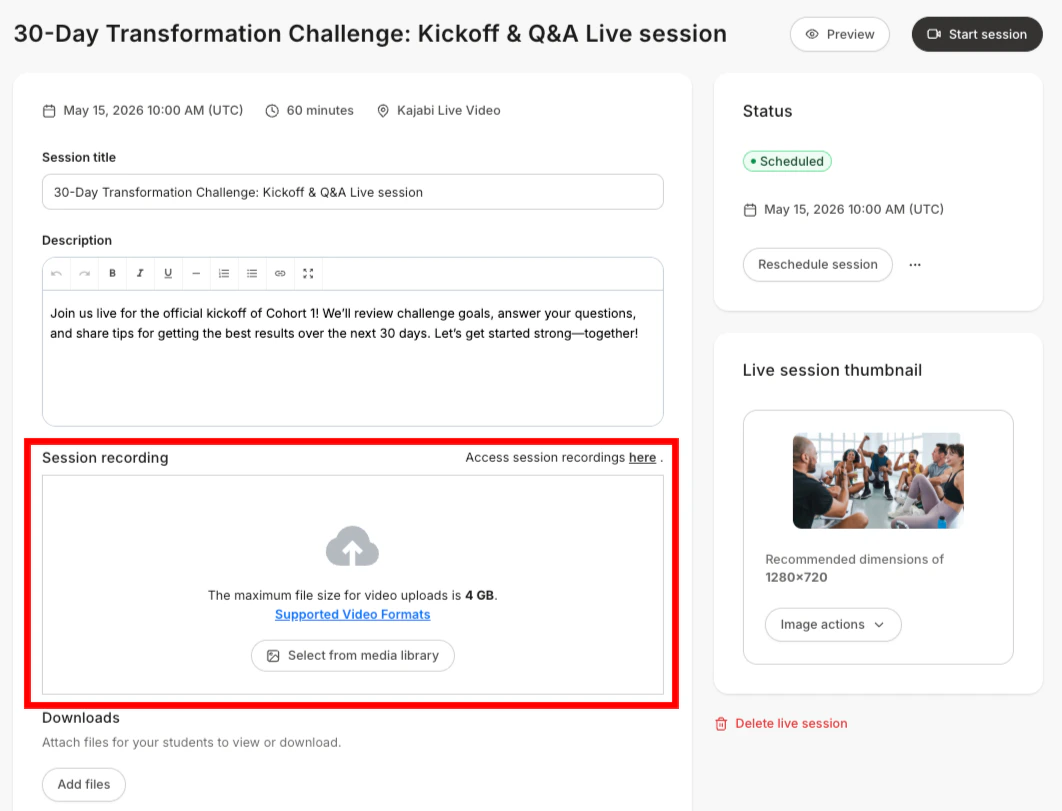
**Note:** To add a video recording of the session after it has taken place, use the **Session recording** video file uploader.
## Set Live Sessions to automatically record
If you wish for your cohort Live Sessions to automatically be recorded and uploaded to that session once the session has been completed:
1. Select **Products** from the Dashboard.
2. Then, select **Courses**.
3. Click the **Title** to open the Cohort Course.
4. Select **Settings**.
5. Under Live Sessions, toggle **Automatically upload recordings to your live session page** to **ON**.
6. Click **Save** to apply changes.
## Edit, reschedule, or cancel a Live Session
### Edit a Live Session
Change the Session Title and Description, upload a session recording, add a resource for students to download, or mark the session complete.
**To edit a Live Session:**
1. Click the **Title** of the Live Session to open it for editing. (Or, click the **Scheduled/Not scheduled** button and select **Edit lesson session**.)
2. Update the session **Title** and **Description**, upload the session recording, update downloadable resources, and/or mark the session complete as desired.
3. Click **Save**:
\
A notification email announcing the scheduled session is then sent to all students who've opted into email notifications.
**Note:** To add a video recording of the session after it has taken place, use the **Session recording** video file uploader.
## Set Live Sessions to automatically record
If you wish for your cohort Live Sessions to automatically be recorded and uploaded to that session once the session has been completed:
1. Select **Products** from the Dashboard.
2. Then, select **Courses**.
3. Click the **Title** to open the Cohort Course.
4. Select **Settings**.
5. Under Live Sessions, toggle **Automatically upload recordings to your live session page** to **ON**.
6. Click **Save** to apply changes.
## Edit, reschedule, or cancel a Live Session
### Edit a Live Session
Change the Session Title and Description, upload a session recording, add a resource for students to download, or mark the session complete.
**To edit a Live Session:**
1. Click the **Title** of the Live Session to open it for editing. (Or, click the **Scheduled/Not scheduled** button and select **Edit lesson session**.)
2. Update the session **Title** and **Description**, upload the session recording, update downloadable resources, and/or mark the session complete as desired.
3. Click **Save**:
 ### Reschedule or cancel a Live Session
Need to reschedule or cancel a session you've already scheduled? Simply follow the steps below.
**To reschedule a Live Session:**
1. Click the **Title** of the Live Session to open it for editing. (Or, click the green **Scheduled** button and select **Edit lesson session**.)
2. Near the top right corner of the page, click **Reschedule session**.
3. Enter a new date, time, and/or time zone for your session.
4. Confirm or update your session location and duration, and click **Schedule**:
### Reschedule or cancel a Live Session
Need to reschedule or cancel a session you've already scheduled? Simply follow the steps below.
**To reschedule a Live Session:**
1. Click the **Title** of the Live Session to open it for editing. (Or, click the green **Scheduled** button and select **Edit lesson session**.)
2. Near the top right corner of the page, click **Reschedule session**.
3. Enter a new date, time, and/or time zone for your session.
4. Confirm or update your session location and duration, and click **Schedule**:
A notification email announcing the new session time will be sent to all students who've opted into email notifications.
**To cancel a Live Session you've scheduled:**
1. Click the **Title** of the Live Session to open it for editing. (Or, click the green **Scheduled** button and select **Edit lesson session**.)
2. Click **…** to the right of the "Reschedule session" button.
3. Select **Cancel session**.
4. A popup modal will appear. Click **Cancel session** to confirm:
A notification email announcing the session cancellation will be sent to all students who've opted into email notifications.
## Delete a Live Session
To delete a Live Session you've created:
1. Click the status button (**Scheduled** or **Not scheduled**) to the right of your session.
2. Select **Delete live session**.
3. A popup modal will appear. Click **Delete Live Session** to confirm:
## Start a Live Session
**Note:** If you chose a custom session location off Kajabi, you won't see the button to start a Live Session on the Kajabi Live Session page. You'll need to go to the custom location to start the session.
To start a Live Session with Kajabi Live Video:
1. Click the **Title** of the Live Session to open it. (Or, click the green **Scheduled** button and select **Edit lesson session**.)
2. Near the top right corner of the page, click **Start session**. The Kajabi Live Video launcher will open in a new browser tab.
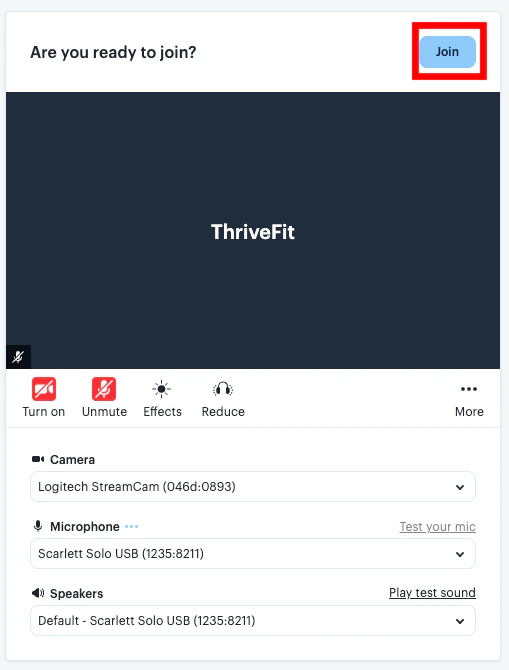
3. Verify that all camera and microphone settings are correct.
4. Click **Join** to start your session and enter the live video room:
 A notification email announcing the start of the session is sent to all students who've opted into email notifications, and they'll also be notified when the session ends.
Be sure to notify students if you're recording the session. If you're using Kajabi Live Video, you can conveniently download session recordings in the Live Session editor afterward and then upload them to the Course:
A notification email announcing the start of the session is sent to all students who've opted into email notifications, and they'll also be notified when the session ends.
Be sure to notify students if you're recording the session. If you're using Kajabi Live Video, you can conveniently download session recordings in the Live Session editor afterward and then upload them to the Course:
 ## How students join a Live Session
Students join a Live Session via the **Live Session page** inside the Course. They can open this page by clicking on the **Title** of the Live Session in the Course outline.
If you're hosting your session with **Kajabi Live Video**, students simply click the **Join session** button to join a Live Session you've started:
## How students join a Live Session
Students join a Live Session via the **Live Session page** inside the Course. They can open this page by clicking on the **Title** of the Live Session in the Course outline.
If you're hosting your session with **Kajabi Live Video**, students simply click the **Join session** button to join a Live Session you've started:
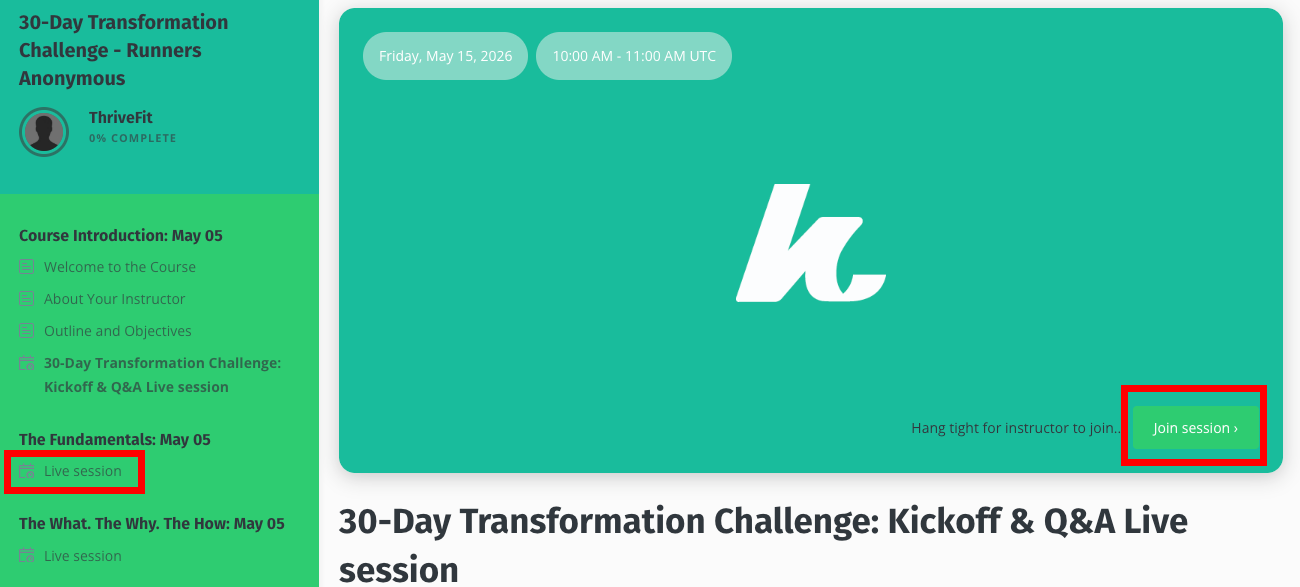 If using a custom session location instead of Kajabi Live Video, students see the **Location URL** or **Description** entered in the Live Session **Settings** instead of a "Join" button.
**Tip:** Learn more about [how to customize Kajabi Live Video settings](../../products/coaching/how-to-create-a-live-video-session#h_01G1RA4AX7Z920BA76CCQN5XDS).
If using a custom session location instead of Kajabi Live Video, students see the **Location URL** or **Description** entered in the Live Session **Settings** instead of a "Join" button.
**Tip:** Learn more about [how to customize Kajabi Live Video settings](../../products/coaching/how-to-create-a-live-video-session#h_01G1RA4AX7Z920BA76CCQN5XDS).