> ## Documentation Index
> Fetch the complete documentation index at: https://help.kajabi.com/llms.txt
> Use this file to discover all available pages before exploring further.
# Create and publish Podcasts
> Create, import, edit, manage, and publish Podcast episodes
**Podcasts** let you share conversations and expertise with your audience in an accessible, on-demand format. Use Kajabi to create, manage, and publish your Podcast — all from one platform.
Learn how to [Import an existing Podcast into Kajabi](/articles/products/podcasts/importing-an-existing-podcast-onto-kajabi).
## Create a Podcast
1. Open the **Products** tab from the Dashboard
2. Select **Podcasts**
3. Click **Get Started**
4. Make sure Podcast is selected as the Product type, and click **Get Started** again
### Import an existing Podcast
If you already have a published Podcast, importing is a quick way to bring your content onto Kajabi.
**Note:** To import your Podcast to Kajabi, you must have an RSS feed link provided by a distributor such as [Libsyn](https://libsyn.com/).
1. Select **Import a podcast** and click **Continue**
2. Follow the prompt by pasting your RSS feed link and click **Continue**
3. Confirm your podcast details are correct and click **Save and Finish**
4. Kajabi will then import and organize your Podcast
### Create a Podcast from scratch
1. Select **Create a new podcast**, and click **Continue**
2. Enter your Title and Host information, and a Description
3. Choose if you would like to make your podcast **Public** or **Private**:
* **Public Podcasts** are accessible to everyone
* **Private Podcasts** will be private to only those who have purchased or been granted an Offer connected to your podcast product
4. Next, select a **Language** and **Category** for your podcast
5. Then choose if you want your podcast to display in episodic or serial order:
* **Episodic** will order your podcast episodes starting with the most recent episode at the top of the list
* **Serial** will order your podcast episodes from oldest to newest, organized by season
6. Click **Continue**
7. Finally, customize your podcast's appearance by selecting a **Primary** and **Accent color** and uploading a thumbnail **image**
8. Click **Save and Finish** to create your podcast
### Preview the Podcast page
Your Podcast page will automatically generate with a URL in the format of: [https://domain.com/podcasts/your-podcast-name](https://domain.com/podcasts/your-podcast-name).
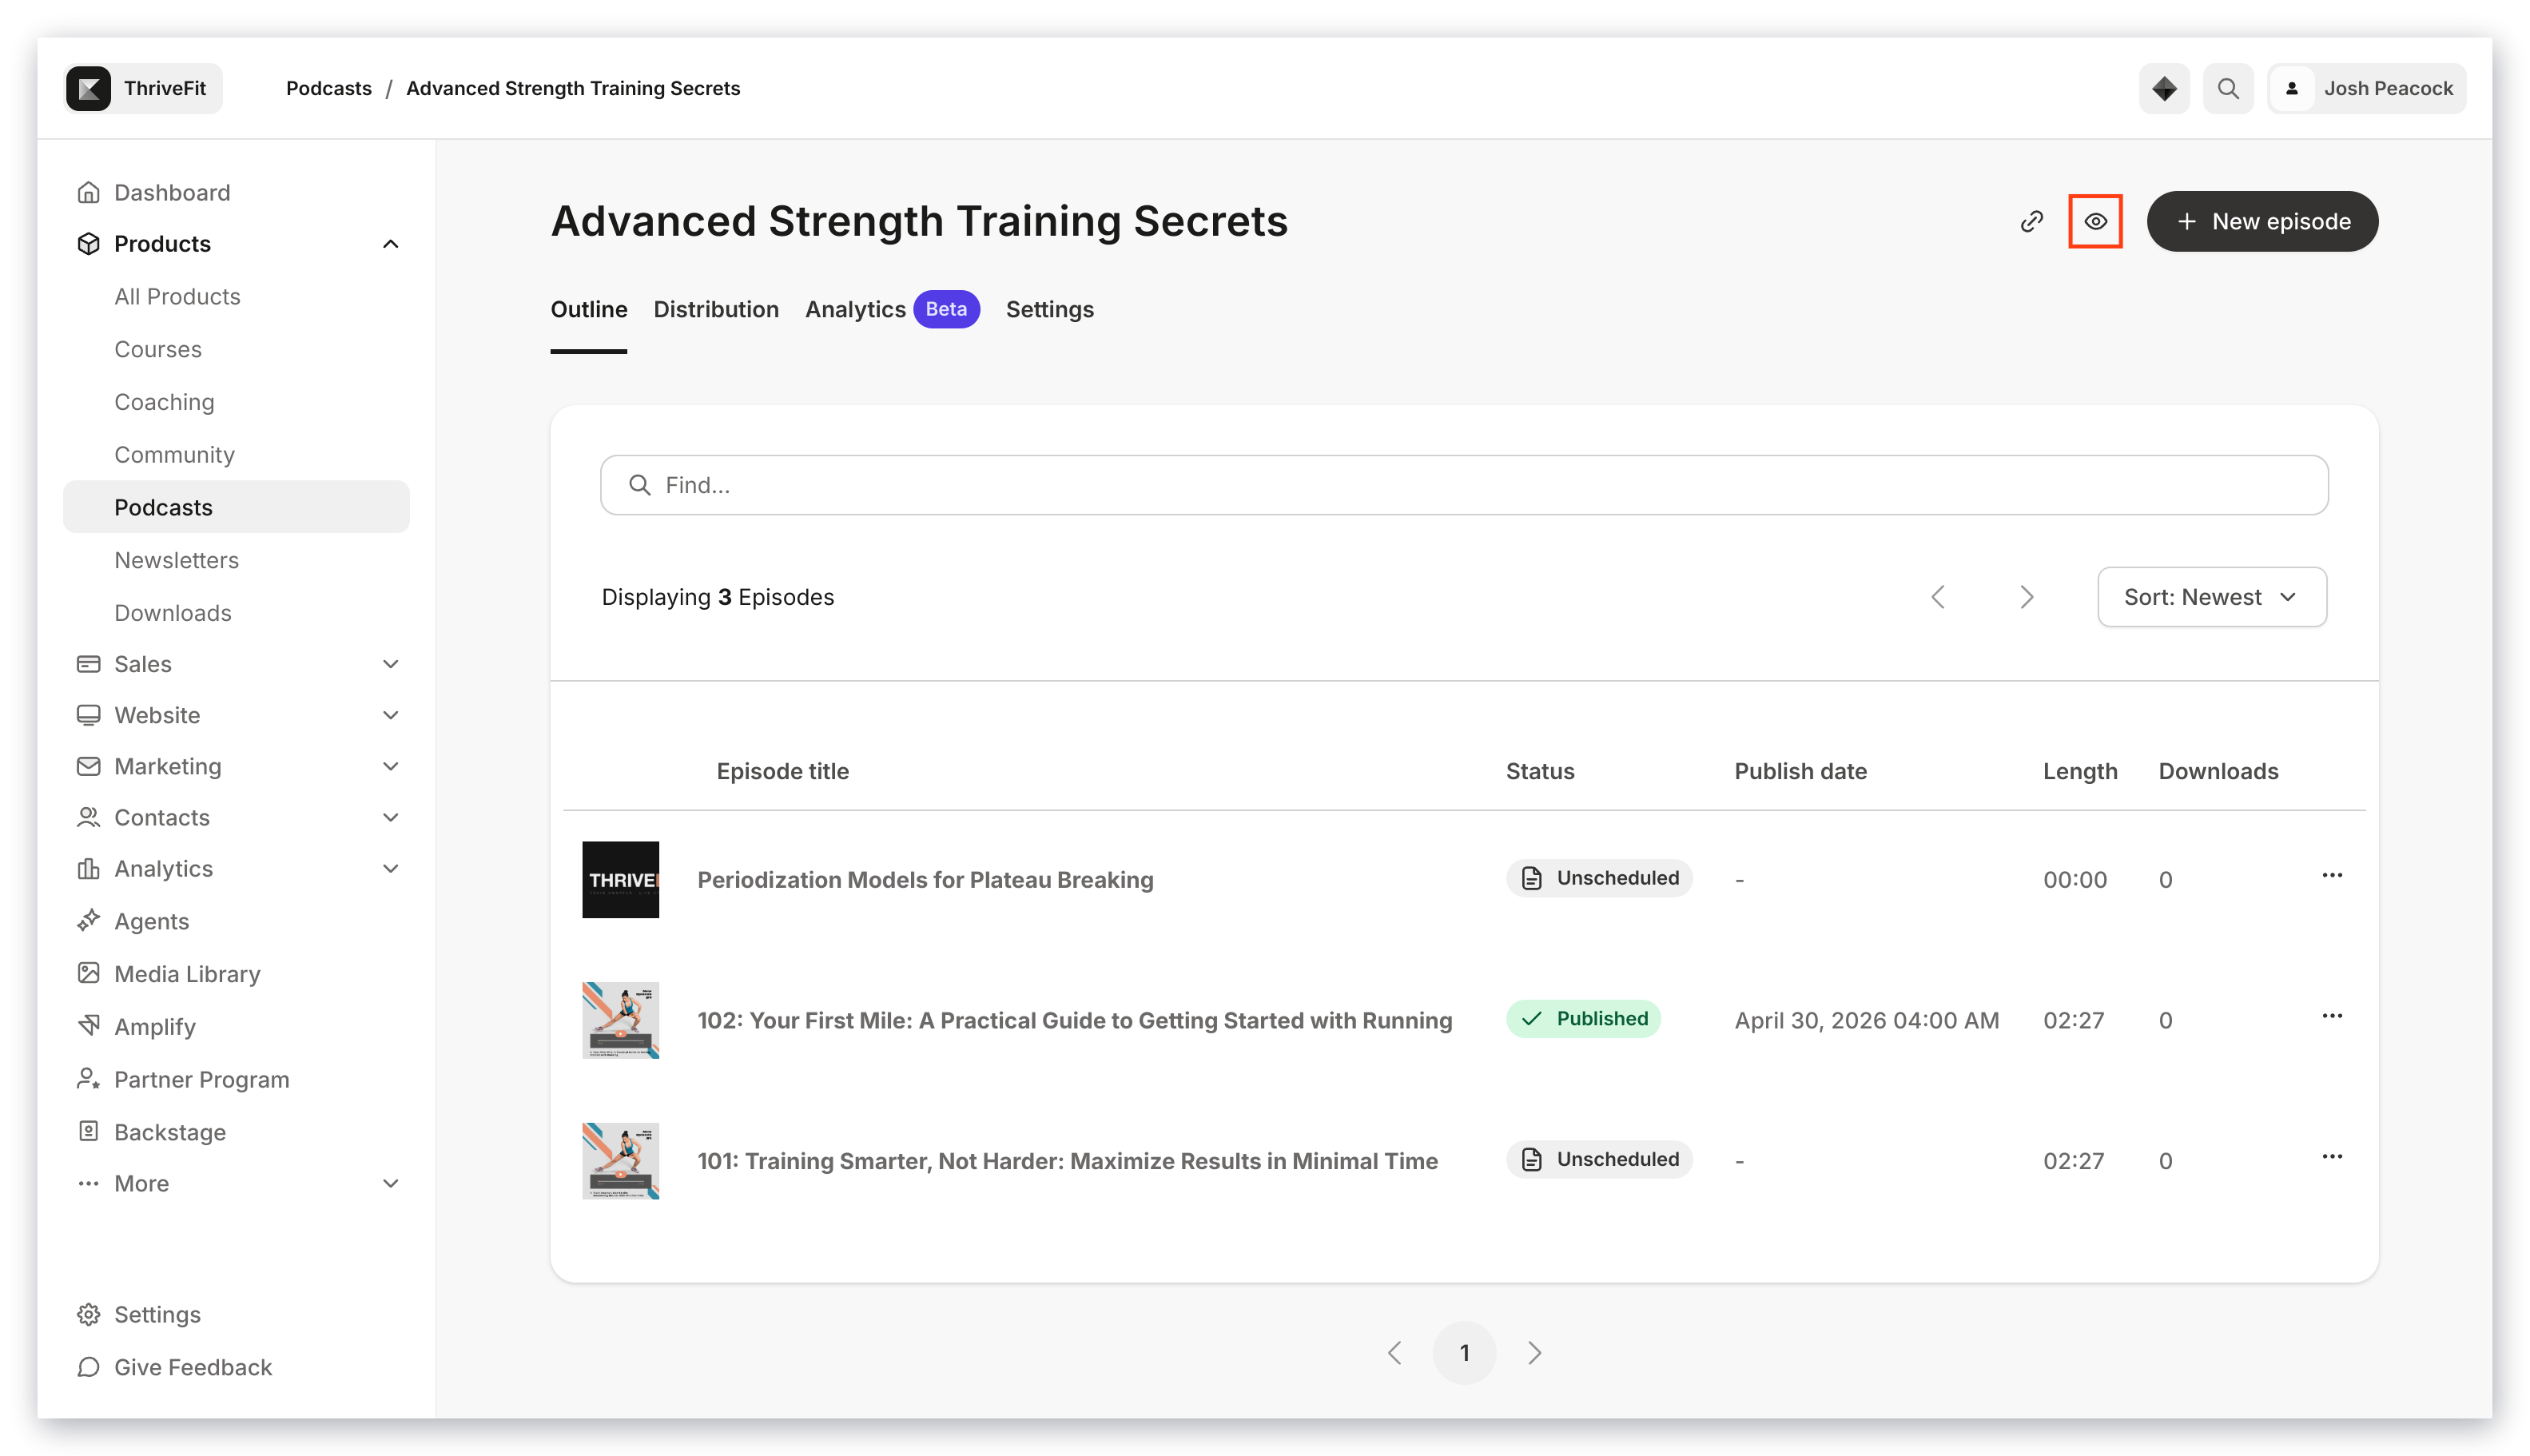
Preview your Podcast page and your page URL by clicking the **Preview** icon at the top right of the Podcast Editor:
 ## Edit Podcast details
1. Click the **Settings** tab in the top menu of your Podcast page.
The following details can be edited:
* Title
* Host
* Owner Email
* Copyright
* Language
* Description
* Thumbnail Image
* Select if the Podcast contains explicit content
* Disable episodes from being downloaded
### Podcast categories
In the podcast categories section, select up to three categories that best fit the description of your Podcast content. Selecting multiple categories will help with discoverability.
### Page customization
In the Page customization section, you can select **Primary** and **Accent** colors to customize the look of your Podcast page to better match your branding.
**Primary Color** applies to the audio player and page buttons.
**Accent Color** applies to the header background:
## Edit Podcast details
1. Click the **Settings** tab in the top menu of your Podcast page.
The following details can be edited:
* Title
* Host
* Owner Email
* Copyright
* Language
* Description
* Thumbnail Image
* Select if the Podcast contains explicit content
* Disable episodes from being downloaded
### Podcast categories
In the podcast categories section, select up to three categories that best fit the description of your Podcast content. Selecting multiple categories will help with discoverability.
### Page customization
In the Page customization section, you can select **Primary** and **Accent** colors to customize the look of your Podcast page to better match your branding.
**Primary Color** applies to the audio player and page buttons.
**Accent Color** applies to the header background:
**Tip:** Click the eyeball icon in the upper right to **preview** your podcast page from the perspective of your audience.
## Create an episode
1. Click **New Episode** in the upper right of your podcast page
2. Next, follow the prompt:
* Give your episode a **Title**
* Select the episode **Type** (Episode, Bonus, or Trailer)
* Optionally add the episode to a season or create a new season
* Add a description of the episode for the **Show notes**
* Upload your **Audio** file
* Finally, indicate if your Episode contains explicit content
3. Click **Add episode**
When you create a new episode, the publication status will default to *Unscheduled*.
### Publish an episode
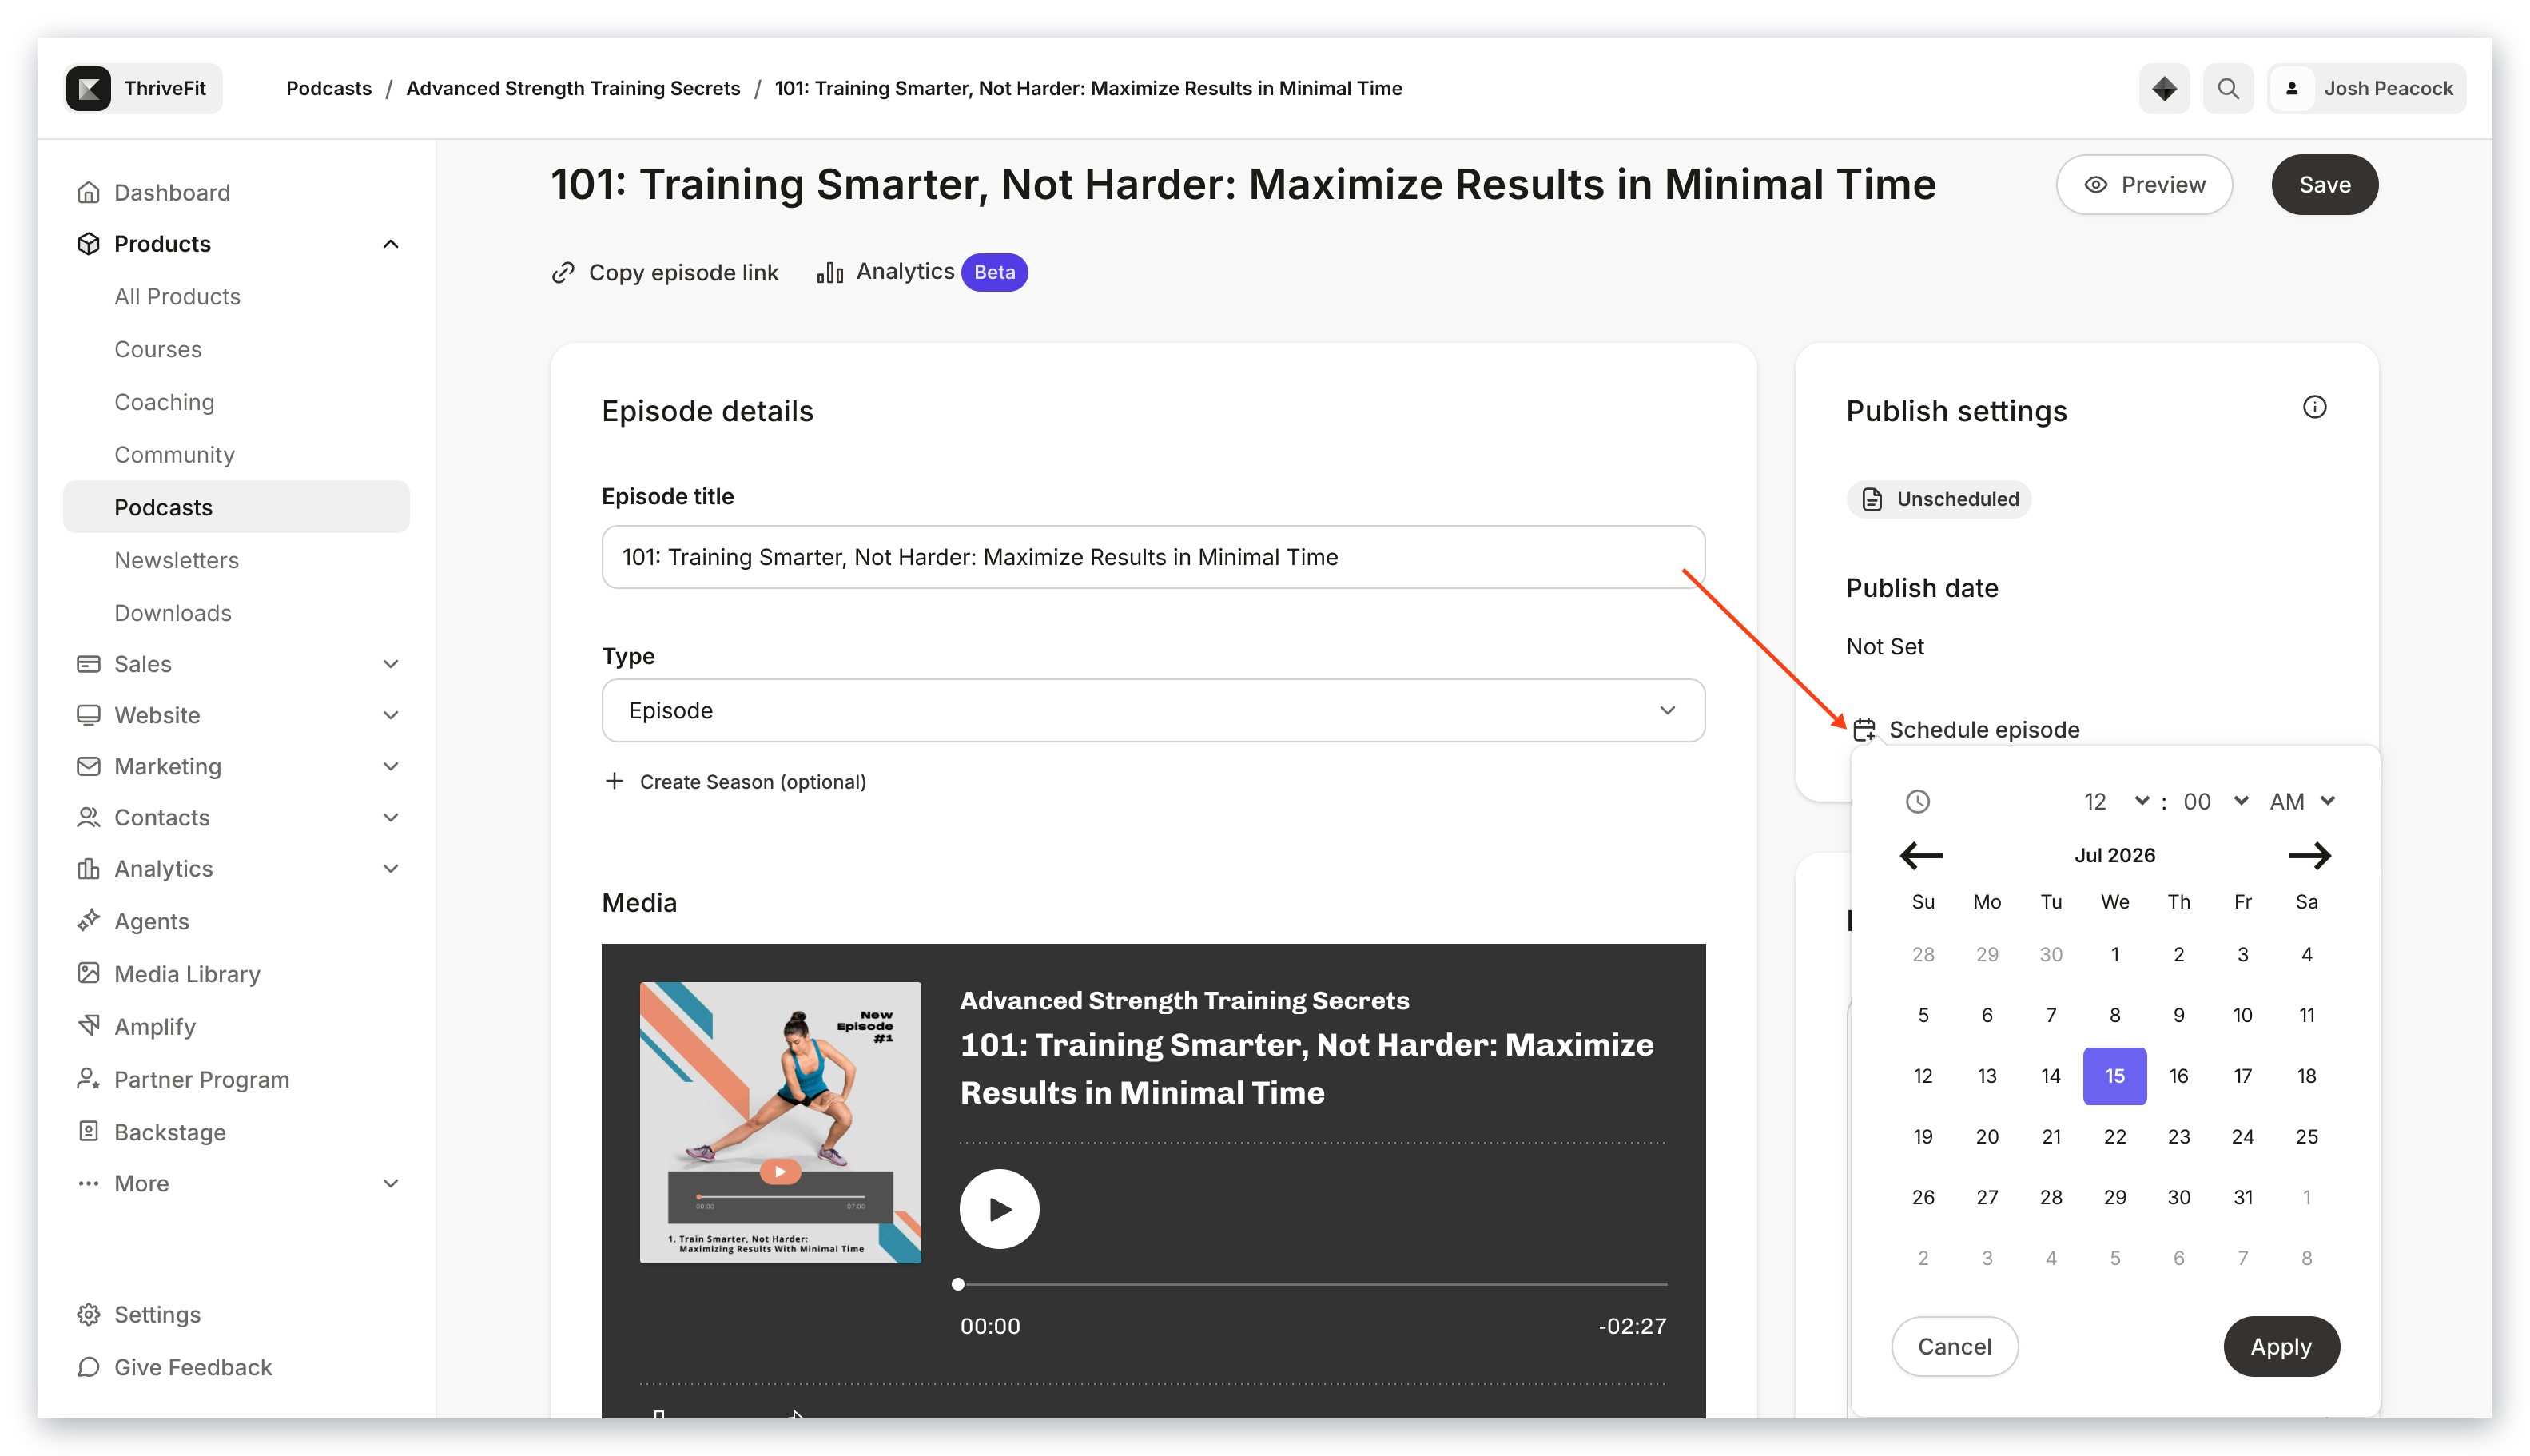
1. Click the episode title to open it for editing
2. Locate the **Publish settings** on the right side of the editor
3. Click **Schedule episode** to select a publication date and time
 ## View analytics
To view your Podcast analytics:
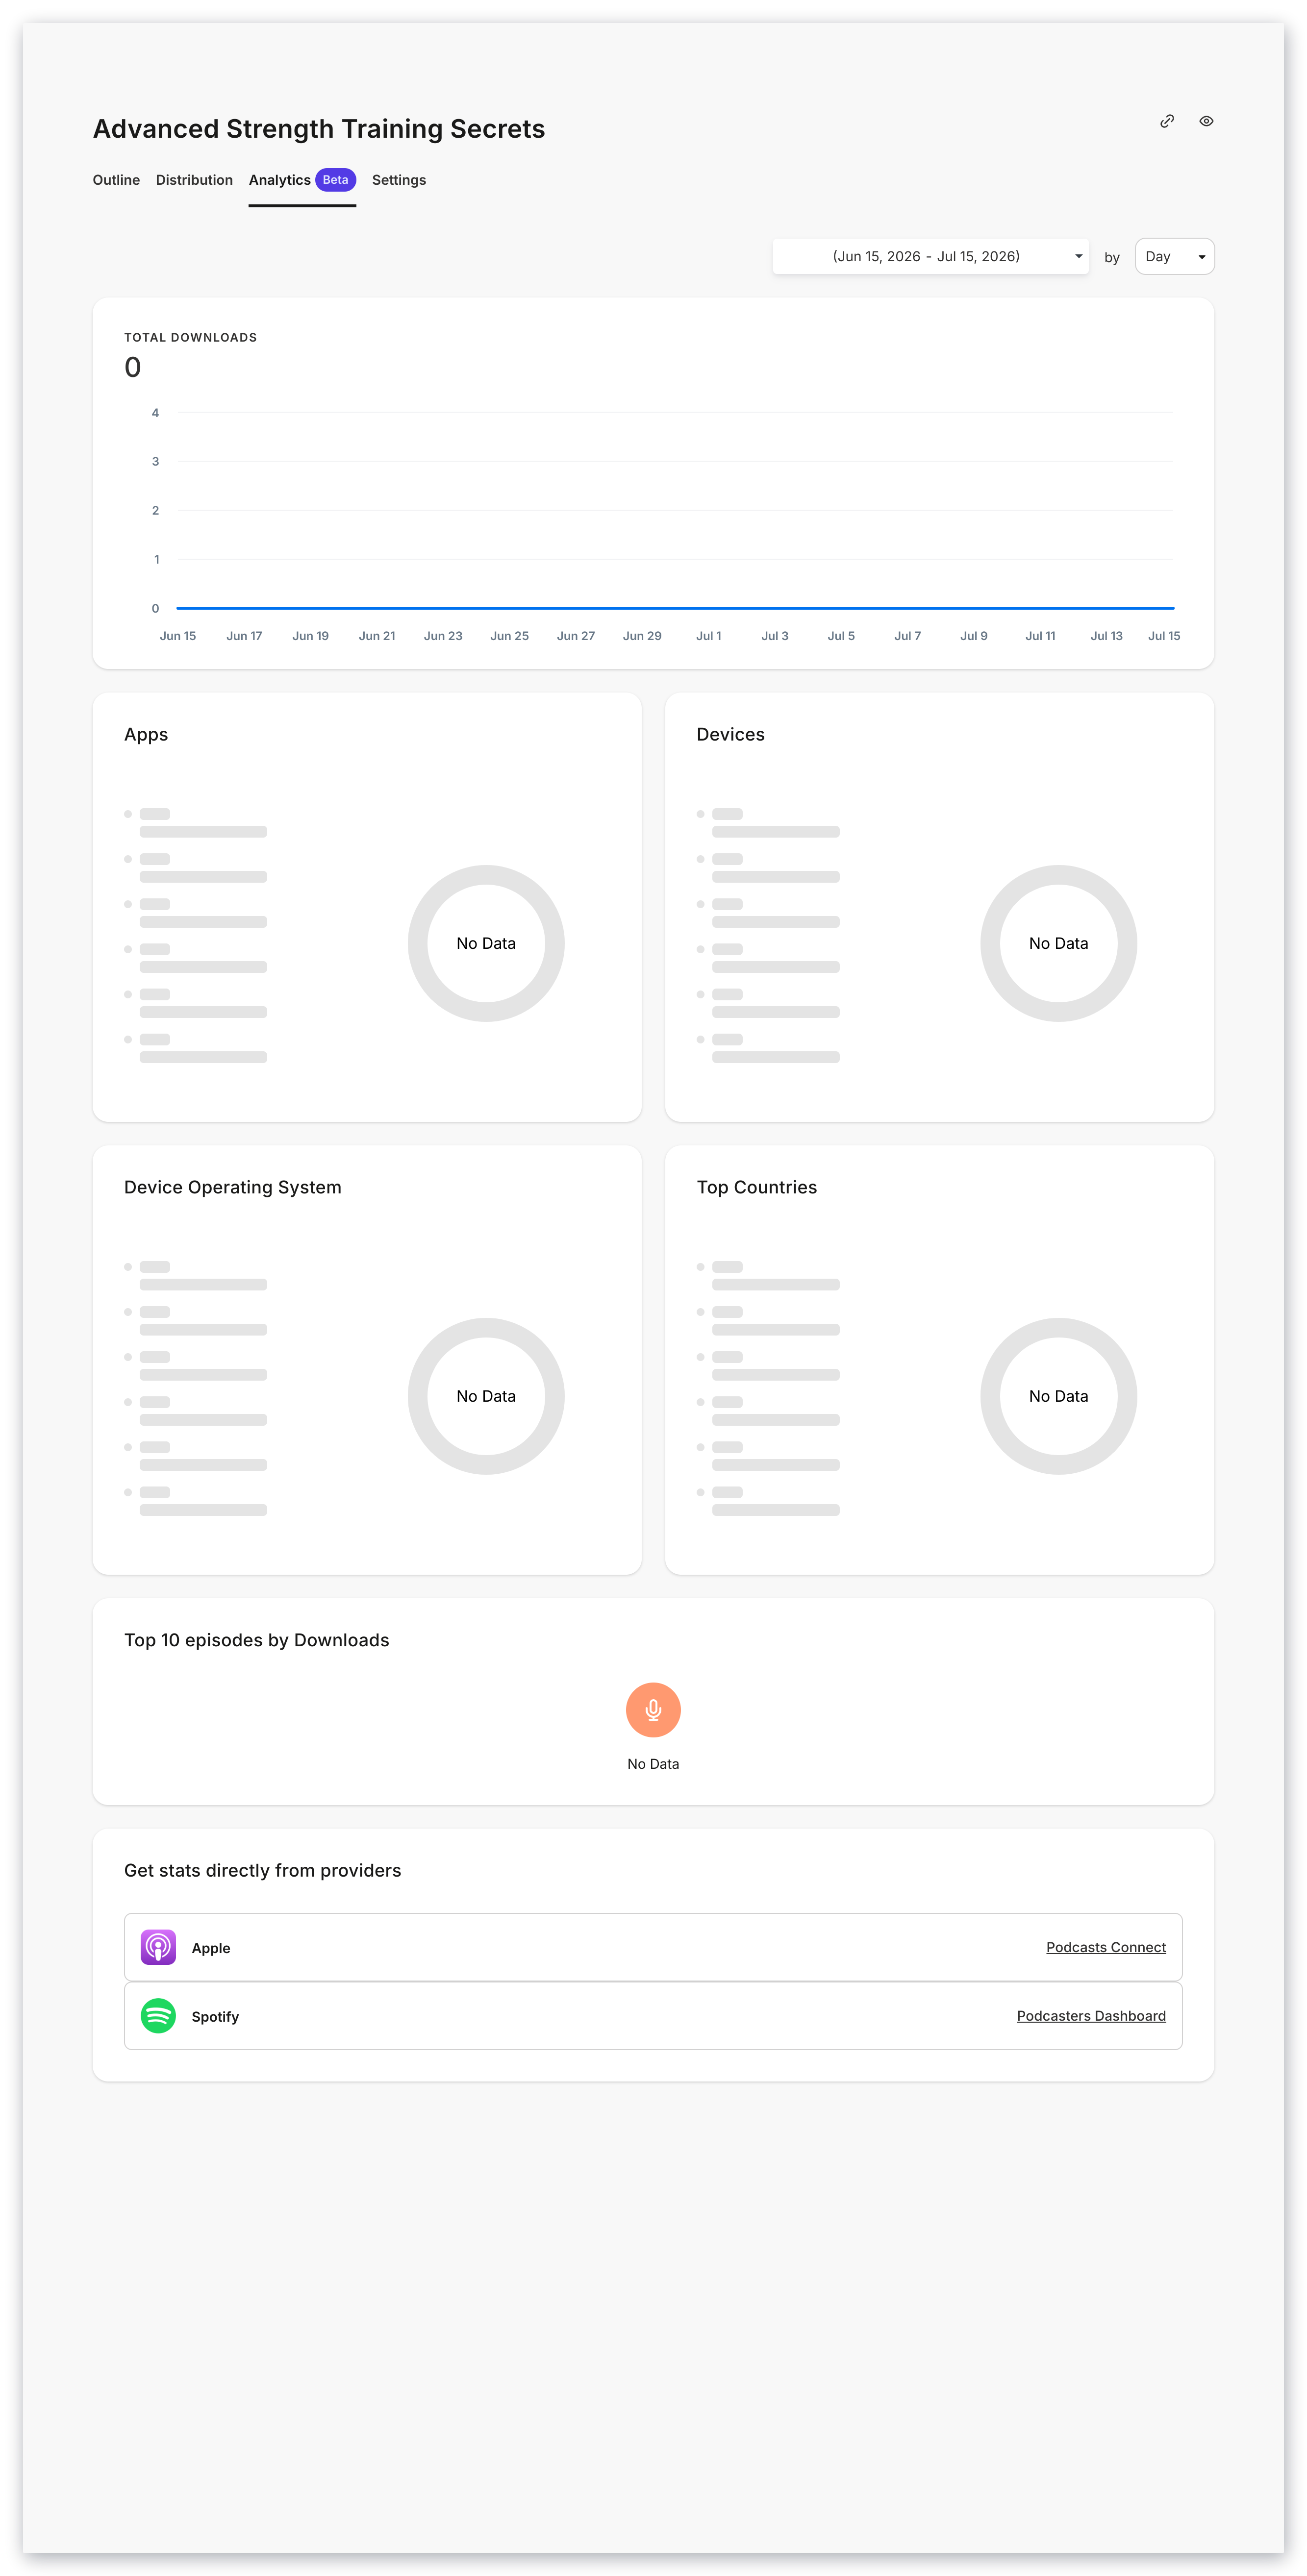
1. Click the **Analytics** tab from the top menu of your Podcast page
The Podcast Analytics tab will display data for:
* Total **Downloads**
* The **Apps** being used to stream your Podcast episodes
* The **Devices** used to stream your episodes
* Which **Device Operating Systems** are being used
* **Top Countries** for your Downloads
* The **Top Ten episodes** by Downloads
## View analytics
To view your Podcast analytics:
1. Click the **Analytics** tab from the top menu of your Podcast page
The Podcast Analytics tab will display data for:
* Total **Downloads**
* The **Apps** being used to stream your Podcast episodes
* The **Devices** used to stream your episodes
* Which **Device Operating Systems** are being used
* **Top Countries** for your Downloads
* The **Top Ten episodes** by Downloads
 ## Distribution
Once you have published your first Podcast episode, you can set up the distribution of your Podcast to different directories.
1. Click **Distribution** in the top menu of the Podcasts page
Here, you will find your Podcast RSS feed URL, which is a link that contains a summary of updates from your website.
To set up the distribution of your podcasts with different directories, you will need to provide the RSS feed link displayed here.
Because each directory has its own unique process for connection, Kajabi has provided the instructions for Apple Podcasts and Spotify. Follow the in-app instructions to connect to these directories:
## Distribution
Once you have published your first Podcast episode, you can set up the distribution of your Podcast to different directories.
1. Click **Distribution** in the top menu of the Podcasts page
Here, you will find your Podcast RSS feed URL, which is a link that contains a summary of updates from your website.
To set up the distribution of your podcasts with different directories, you will need to provide the RSS feed link displayed here.
Because each directory has its own unique process for connection, Kajabi has provided the instructions for Apple Podcasts and Spotify. Follow the in-app instructions to connect to these directories:
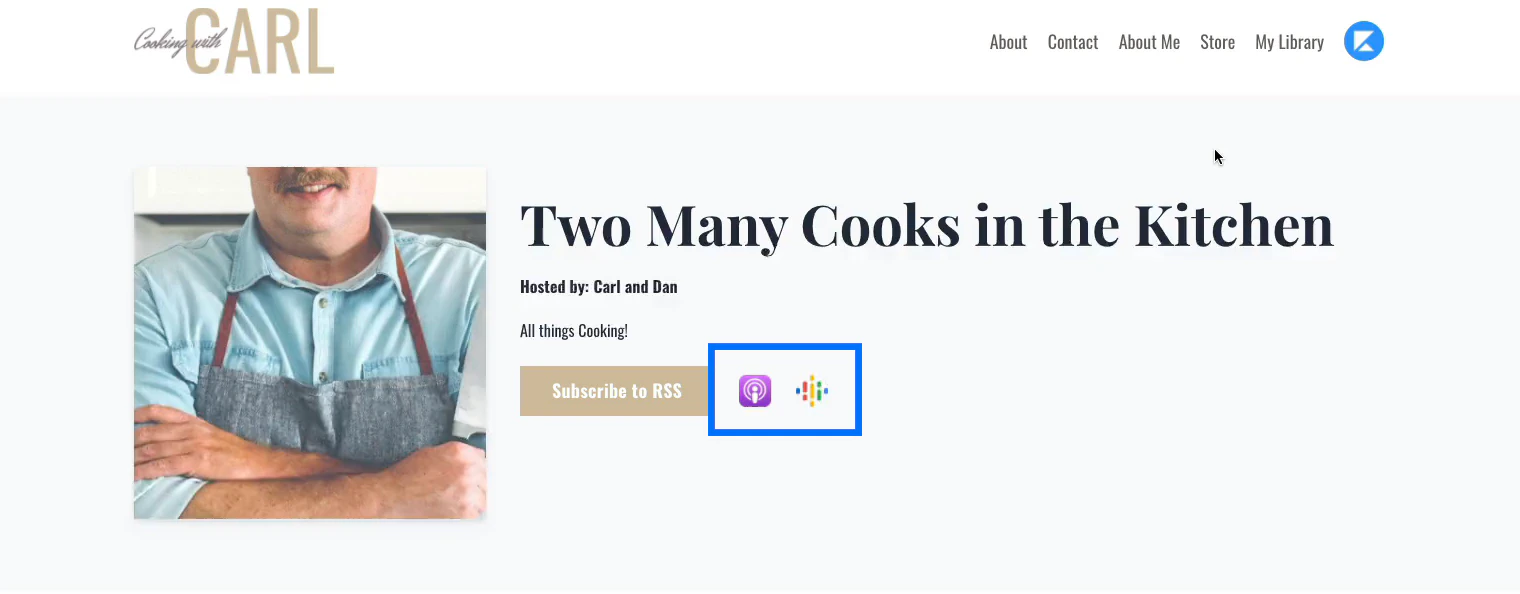
Once you have successfully connected, Kajabi will then automatically add an icon link on your podcast page, allowing your customers to access your podcast via the directory:
 Most other Podcast platforms pull from these three major platforms, which means that your podcast will most likely be available on any platform of your choosing.
**Note:** The process of updating your Podcasts in a distribution location is the responsibility of each third-party platform. Therefore, your Podcasts will be made available according to the standards set by the third-party platform used and can take a few hours to populate.
**Note:** Deleting a Podcast from your Kajabi account may not automatically delete it from third-party platforms where you've distributed it. Learn more about [removing a Podcast from third-party platforms](/articles/products/podcasts/how-to-remove-your-podcast-from-third-party-platforms).
## Offers
For your private Podcasts to be purchased or granted, they must first be connected to an [**Offer**](/articles/sales/offers/offers-overview).
### Connect a Podcast to an Offer
1. Open the **Sales** tab from the Dashboard
2. Select the **Pricing** tab
3. Click **+New Offer**
4. Enter an **Offer title** and choose one or more private Podcast(s) to include in the Offer.
5. Select **Free** as the **pricing plan**, or select another plan type and enter a **Price** and **Currency**.
6. Then, choose **payment providers**.
7. Click **Next**.
8. Choose a **solid button background** color, and if desired, customize the **checkout button text**.
9. Toggle **Checkout fields** to appear, and determine whether a **Service agreement** is required.
10. Click **Save and Finish**.
Most other Podcast platforms pull from these three major platforms, which means that your podcast will most likely be available on any platform of your choosing.
**Note:** The process of updating your Podcasts in a distribution location is the responsibility of each third-party platform. Therefore, your Podcasts will be made available according to the standards set by the third-party platform used and can take a few hours to populate.
**Note:** Deleting a Podcast from your Kajabi account may not automatically delete it from third-party platforms where you've distributed it. Learn more about [removing a Podcast from third-party platforms](/articles/products/podcasts/how-to-remove-your-podcast-from-third-party-platforms).
## Offers
For your private Podcasts to be purchased or granted, they must first be connected to an [**Offer**](/articles/sales/offers/offers-overview).
### Connect a Podcast to an Offer
1. Open the **Sales** tab from the Dashboard
2. Select the **Pricing** tab
3. Click **+New Offer**
4. Enter an **Offer title** and choose one or more private Podcast(s) to include in the Offer.
5. Select **Free** as the **pricing plan**, or select another plan type and enter a **Price** and **Currency**.
6. Then, choose **payment providers**.
7. Click **Next**.
8. Choose a **solid button background** color, and if desired, customize the **checkout button text**.
9. Toggle **Checkout fields** to appear, and determine whether a **Service agreement** is required.
10. Click **Save and Finish**.
## Subscribers
Podcast Subscribers are the customers who have purchased or have been granted your Product. When you click the **Subscribers** tab on the Podcast Product Page, you will be taken to a custom segment in your Contacts tab:
Follow the guide to learn more about managing your segmented contacts in the [**Contacts tab**](https://kajabi.wistia.com/medias/fgqfv9t0xq).