> ## Documentation Index
> Fetch the complete documentation index at: https://help.kajabi.com/llms.txt
> Use this file to discover all available pages before exploring further.
# Manage a Sales Agent
> Edit a Sales Agent, keep its Offer details current, monitor performance, and troubleshoot issues.
**Beta:** This feature is currently in Beta. Future entitlements and pricing are subject to change.
## **Enable or disable a Sales Agent**
In the **Expert Agents** list, each row has an **Enabled / Disabled** dropdown in the Enabled column. Switching to **Disabled** automatically hides the Agent from all Landing Pages. This acts as an easy kill switch without having to remove the Agent's theme block from every page. All message and chat history is preserved.
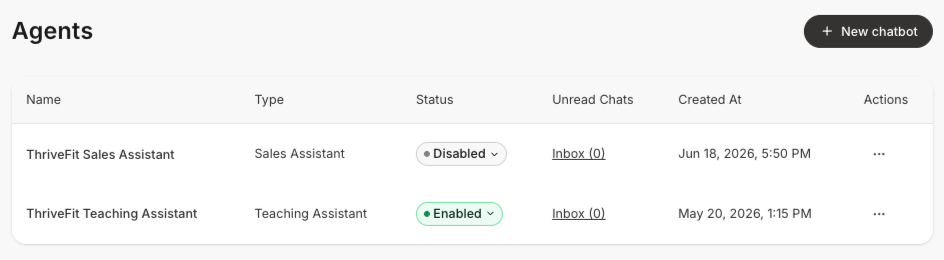 Switch back to **Enabled** to resume responses.
**Note:** Visitors who already have the chat open when you disable an Agent may need to refresh the page before they see the change.
## **Edit a Sales Agent**
1. From the Dashboard, click **Agents**.
2. Click the **more options (...) menu** on the Sales Agent's row or click the Agent **Name** to open the Sales Assistant overview page, then click the **more options (...) menu**.
3. Choose **Edit**.
Switch back to **Enabled** to resume responses.
**Note:** Visitors who already have the chat open when you disable an Agent may need to refresh the page before they see the change.
## **Edit a Sales Agent**
1. From the Dashboard, click **Agents**.
2. Click the **more options (...) menu** on the Sales Agent's row or click the Agent **Name** to open the Sales Assistant overview page, then click the **more options (...) menu**.
3. Choose **Edit**. .png?fit=max&auto=format&n=smWY9W4hXXSW9BJS&q=85&s=89adb1cf679fbb65ed18559b36672420) 4. The **Edit chatbot** modal opens with your current settings.
5. Update any field and click **Submit**. A message confirms **Chatbot successfully updated**.
**Note:** You can change the linked Offer or Landing Page at any time.
## Collect leads from conversations
Turn visitors into leads by having your **Sales Agent** ask for their email during a conversation. When a visitor shares their email, Kajabi saves it to your Contacts so you can follow up or kick off an automation.
4. The **Edit chatbot** modal opens with your current settings.
5. Update any field and click **Submit**. A message confirms **Chatbot successfully updated**.
**Note:** You can change the linked Offer or Landing Page at any time.
## Collect leads from conversations
Turn visitors into leads by having your **Sales Agent** ask for their email during a conversation. When a visitor shares their email, Kajabi saves it to your Contacts so you can follow up or kick off an automation.
 **Turn on lead capture:**
1. Edit your Sales Agent and go to the **Contact collection settings** section.
2. Turn on the **Collect email address** toggle.
3. In the **Default message** field, edit the wording your agent uses to ask for an email so it matches your brand voice. The default is: “I'd love to send you more details — mind sharing your email?”
4. Use the **Ask for email after** dropdown to choose when the Agent asks: after 3, 5, or 8 messages.
5. **Save** your changes.
### What happens to captured emails
When a visitor shares their email, Kajabi saves it as a Contact. You can then use the captured lead as a trigger in an [Automation](/articles/marketing/automations/automations-overview) to tag the contact, send an email, enroll them in a sequence, or notify your team.
**Note**: Your Agent asks for an email address only. It does not collect names, phone numbers, or other details.
## **Delete a Sales Agent**
1. From the **Agents** list, click the **more options (...) menu** on the Sales Agent's row and choose **Delete**.
2. In the **Delete chatbot?** confirmation modal, check the box labeled **Yes, I would like to delete this chatbot.**
3. Click **Delete**.
**Warning:** Deleting a Sales Agent is permanent and cannot be undone. All conversations and analytics for that Agent are removed.
## **View analytics**
To view analytics, click the Sales Agent's **Name** in the **Agents** list to open the overview page.
**Turn on lead capture:**
1. Edit your Sales Agent and go to the **Contact collection settings** section.
2. Turn on the **Collect email address** toggle.
3. In the **Default message** field, edit the wording your agent uses to ask for an email so it matches your brand voice. The default is: “I'd love to send you more details — mind sharing your email?”
4. Use the **Ask for email after** dropdown to choose when the Agent asks: after 3, 5, or 8 messages.
5. **Save** your changes.
### What happens to captured emails
When a visitor shares their email, Kajabi saves it as a Contact. You can then use the captured lead as a trigger in an [Automation](/articles/marketing/automations/automations-overview) to tag the contact, send an email, enroll them in a sequence, or notify your team.
**Note**: Your Agent asks for an email address only. It does not collect names, phone numbers, or other details.
## **Delete a Sales Agent**
1. From the **Agents** list, click the **more options (...) menu** on the Sales Agent's row and choose **Delete**.
2. In the **Delete chatbot?** confirmation modal, check the box labeled **Yes, I would like to delete this chatbot.**
3. Click **Delete**.
**Warning:** Deleting a Sales Agent is permanent and cannot be undone. All conversations and analytics for that Agent are removed.
## **View analytics**
To view analytics, click the Sales Agent's **Name** in the **Agents** list to open the overview page.
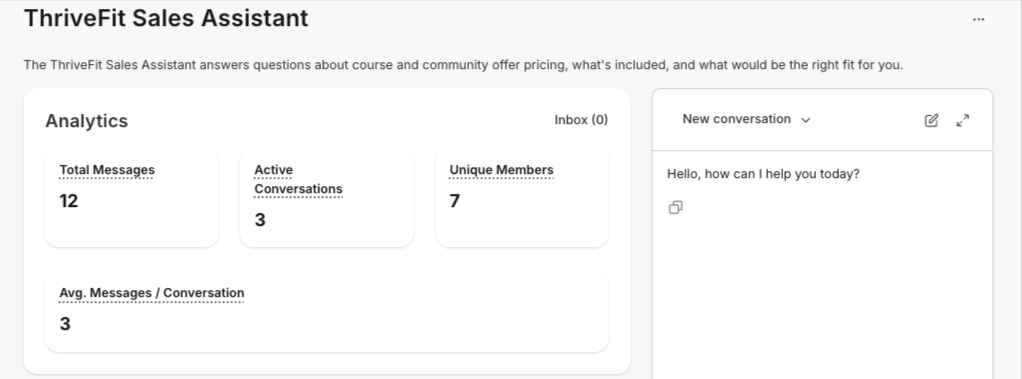 * **Total Messages** — The total number of messages the Sales Agent has received
* **Active Conversations** — The total number of active conversations
* **Unique Members** — How many individual people have chatted with your Sales Agent
* **Avg. Messages / Conversations** — The average number of messages per conversation
## **Monitor conversations in Universal Inbox**
Every Sales Agent conversation automatically appears in [Universal Inbox](/articles/marketing/universal-inbox-comment-to-dm/universal-inbox-comment-to-dm). Sales Agent conversations are grouped in their own sub-channel so you can focus on pre-purchase activity separately from Teaching Assistant conversations.
Each conversation row shows a Sales badge to distinguish it from other agent types at a glance.
### **Filter to Sales Agent conversations**
1. From the Dashboard, navigate to the **Marketing** tab and click into **Universal Inbox**.
2. Click into the dropdown menu under **All channels** and select **Sales Agent**
To see all agent conversations together, select the top-level Agents channel instead.
### **Take over a conversation**
You can step into a live conversation and reply directly. The visitor stays in the same chat thread and the Agent goes silent for the rest of the session.
1. Open the conversation in **Universal Inbox**.
2. Click **Take Over**.
3. Type your reply and send. The Agent will no longer respond to this conversation.
4. When you are ready to have the Agent take back over, click **Release** and the Agent will respond to any future messages in that conversation.
**Note:** Takeover is manual. The Sales Agent does not automatically escalate to you. Conversations with high-intent signals may surface higher in the inbox list.
### **Review a visitor's full conversation history**
When you view a Contact’s profile, you will see their entire conversation history with Expert Agents under **Lifecycle**.
From the Lifecycle page, you can select **Expert Agent Chat** from the **Filter by event type** dropdown.
* **Total Messages** — The total number of messages the Sales Agent has received
* **Active Conversations** — The total number of active conversations
* **Unique Members** — How many individual people have chatted with your Sales Agent
* **Avg. Messages / Conversations** — The average number of messages per conversation
## **Monitor conversations in Universal Inbox**
Every Sales Agent conversation automatically appears in [Universal Inbox](/articles/marketing/universal-inbox-comment-to-dm/universal-inbox-comment-to-dm). Sales Agent conversations are grouped in their own sub-channel so you can focus on pre-purchase activity separately from Teaching Assistant conversations.
Each conversation row shows a Sales badge to distinguish it from other agent types at a glance.
### **Filter to Sales Agent conversations**
1. From the Dashboard, navigate to the **Marketing** tab and click into **Universal Inbox**.
2. Click into the dropdown menu under **All channels** and select **Sales Agent**
To see all agent conversations together, select the top-level Agents channel instead.
### **Take over a conversation**
You can step into a live conversation and reply directly. The visitor stays in the same chat thread and the Agent goes silent for the rest of the session.
1. Open the conversation in **Universal Inbox**.
2. Click **Take Over**.
3. Type your reply and send. The Agent will no longer respond to this conversation.
4. When you are ready to have the Agent take back over, click **Release** and the Agent will respond to any future messages in that conversation.
**Note:** Takeover is manual. The Sales Agent does not automatically escalate to you. Conversations with high-intent signals may surface higher in the inbox list.
### **Review a visitor's full conversation history**
When you view a Contact’s profile, you will see their entire conversation history with Expert Agents under **Lifecycle**.
From the Lifecycle page, you can select **Expert Agent Chat** from the **Filter by event type** dropdown.
 ## **Troubleshooting**
### **My Offer details aren't showing up in responses**
* Confirm the correct Offer or Landing Page is linked on the Agent in **Edit chatbot**
* Confirm the Agent's status is **Active**, not **Setting up...** or **Needs attention**
* Confirm the Offer and its associated content are published
### **A visitor says they can see the chat but it won't respond**
* Confirm the Agent's status in the list is **Enabled**, not **Disabled**
* If the Agent was recently disabled, ask the visitor to refresh their browser
* Check whether the Agent entered the **Needs attention** state. If so, contact support.
### **The chat block doesn't appear on a Landing Page**
* Confirm the block was added in the Theme Editor and the page was published
* Confirm the page's theme is on a version that supports Expert Agent blocks
* If the block was removed from the theme but the Agent is still enabled, the Agent won't appear — verify the block is still present in the page's sections
## **Troubleshooting**
### **My Offer details aren't showing up in responses**
* Confirm the correct Offer or Landing Page is linked on the Agent in **Edit chatbot**
* Confirm the Agent's status is **Active**, not **Setting up...** or **Needs attention**
* Confirm the Offer and its associated content are published
### **A visitor says they can see the chat but it won't respond**
* Confirm the Agent's status in the list is **Enabled**, not **Disabled**
* If the Agent was recently disabled, ask the visitor to refresh their browser
* Check whether the Agent entered the **Needs attention** state. If so, contact support.
### **The chat block doesn't appear on a Landing Page**
* Confirm the block was added in the Theme Editor and the page was published
* Confirm the page's theme is on a version that supports Expert Agent blocks
* If the block was removed from the theme but the Agent is still enabled, the Agent won't appear — verify the block is still present in the page's sections