> ## Documentation Index
> Fetch the complete documentation index at: https://help.kajabi.com/llms.txt
> Use this file to discover all available pages before exploring further.
# Set up a Teaching Assistant
> Configure an Expert Agent that answers member questions using your Product content.
**Beta:** This feature is currently in Beta. Future entitlements and pricing are subject to change.
[Request access](https://form.typeform.com/to/WhqDs0w5) and help us shape the feature by sharing your use case.
A **Teaching Assistant** is the first type of **Expert Agent** — an AI chat experience that lives inside a Product and answers member questions using the Lessons, transcripts, and Community posts they already have access to. The Agent speaks in the third person about your expertise ("Based on what Coach Sarah teaches in Module 3..."), never claims to be you, and refers members back to you for deeper engagement.
Setting up a Teaching Assistant takes a few minutes. You choose which Products supply the Agent's knowledge, customize a name and welcome message, and place the chat experience inside a member page using the Theme Editor.
Each member only sees responses sourced from content their Product membership grants them access to. A member enrolled in Course A but not Course B never sees answers drawn from Course B.
## Before you begin
* You need at least one published Product (Course, Coaching Program, or Community) with content the Assistant can learn from.
* Video content must have captions. If a Product's videos aren't yet captioned, the Assistant setup flow will show you the AI credit cost to caption them and let you proceed.
* AI credits are required for video transcription. Check your remaining balance in your **Account settings** before starting.
* The chat block is added through the Theme Editor, so the Products you plan to attach the Assistant to should be on an up-to-date theme.
**Note**: Builder 2.0 is required when adding an Expert Agent to a Page or Product. [Learn how to upgrade here](https://help.kajabi.com/articles/website/pages/whats-new-with-builder-20#how-to-upgrade).
**Note:**
Agents only work on the latest Encore and Premier site themes, and Premier and Momentum product themes: Encore Site 2.14.7, Encore Landing Page 2.14.7, Encore Offer 2.14.7, Encore Offer Upsell 2.14.7, Premier site 6.5.2, Premier Product 7.10.3, Momentum Product >=7.1.3 and above. Third-party templates can be updated to work with Agents.
## Create a Teaching Assistant
### Open the Expert Agents area
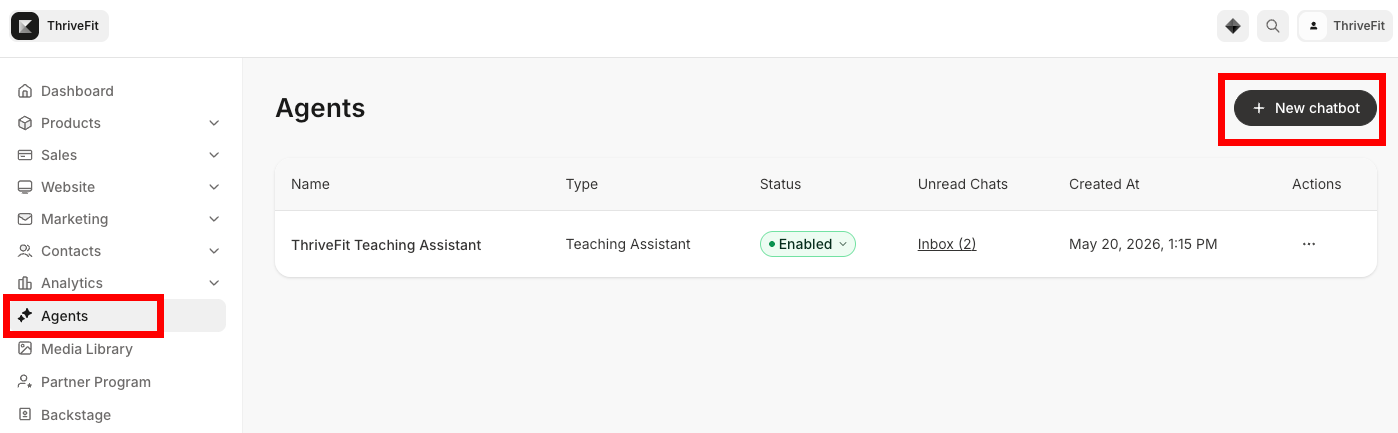
1. From the Dashboard, click **Agents**.
2. If you haven't created any Agents yet, you'll see the **AI Teaching Assistant** empty state with a **Get started** button. Click **Get started**.
3. If you already have Agents listed, click **+ New chatbot** in the top right:
 ### Choose a template
The **Create chatbot** wizard opens to the **Choose a template** step.
1. Select the **Teaching Assistant** template.
2. Click **Next**.
**Note: Teaching Assistant** is the only template available right now. Additional Expert Agent types — including a Sales Agent — are planned for a future release.
### Configure an Assistant
### Choose a template
The **Create chatbot** wizard opens to the **Choose a template** step.
1. Select the **Teaching Assistant** template.
2. Click **Next**.
**Note: Teaching Assistant** is the only template available right now. Additional Expert Agent types — including a Sales Agent — are planned for a future release.
### Configure an Assistant
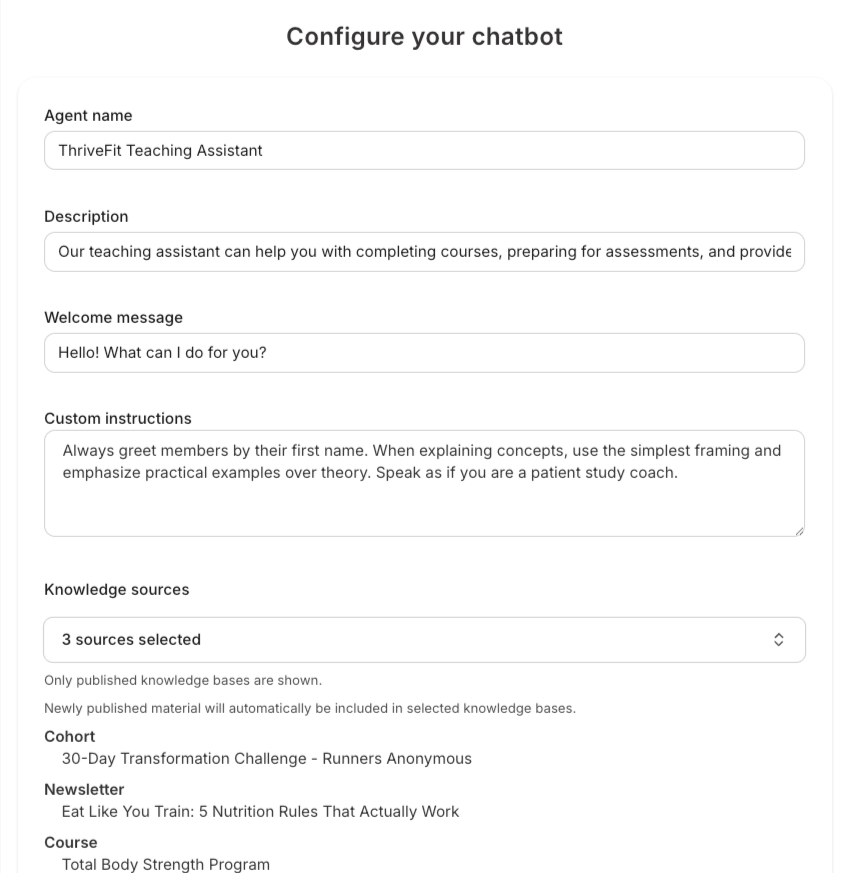 1. In the **Configure your chatbot** step, fill in the following fields:
* **Agent name** *(required)* — The name members see at the top of the chat. Example placeholder: *e.g. Support Assistant*.
* **Description** *(optional)* — A short internal description of what this Agent does. Members do not see this.
* **Welcome message** *(optional)* — The first message shown to a member when they open the chat. Example placeholder: *e.g. Hi! How can I help you today?*
* **Products** *(required)* — Select one or more Products the Agent should draw knowledge from. Members will only receive answers from content their Product membership grants them access to.
* **Custom instructions** *(optional)* — Allow you to give the Agent personality and focus, and what shapes its communication style.
**Custom instructions work well for:**
* Language — "Always respond in Spanish"
* Subject emphasis/Focus — “When explaining concepts, prefer the simplest framing” or "Emphasize practical examples over theory"
* Tone — “Adopt an upbeat, motivational tone”. The agent by default is supportive, friendly, and concise. These instructions nudge from that baseline.
* Persona framing — “Speak as if you’re a patient study coach”
**What custom instructions can and cannot do:**
* Only answers from your published materials — it won't supplement with general knowledge or the web
* Always provides citations and won't fabricate quotes or sources
* Does not give medical, legal, financial, or other professional advice beyond what your materials teach
* Does not perform account actions (cancel, refund, change settings)
* Refuses off-topic questions, even when asked repeatedly
**Instructions that may conflict with built-in behavior:**
* Greeting members or asking a clarifying question before answering will be inconsistent — the agent is designed to lead with the answer first
* Asking for very formal language will only partly take effect — the agent's baseline is friendly and conversational.
* Setting a welcome message and then also providing custom instructions about a specific welcome message
**Tip:** Keep your welcome message short and warm. It sets the tone for every conversation and is the first thing members see when they open the chat.
2. When you finish, click **Submit**. A **Chatbot successfully created** message appears and you're returned to the list.
## Choose which content your Agent uses
When you add a **Knowledge source** during setup, you can pick exactly which parts of it your Agent learns from instead of including the whole source. This works for both **Teaching Assistants** and **Sales Agents**.
1. In the **Knowledge sources** section, select the **gear icon** next to a source (**Customize resources**, or **Customize channels** for a Community) to open it.
1. In the **Configure your chatbot** step, fill in the following fields:
* **Agent name** *(required)* — The name members see at the top of the chat. Example placeholder: *e.g. Support Assistant*.
* **Description** *(optional)* — A short internal description of what this Agent does. Members do not see this.
* **Welcome message** *(optional)* — The first message shown to a member when they open the chat. Example placeholder: *e.g. Hi! How can I help you today?*
* **Products** *(required)* — Select one or more Products the Agent should draw knowledge from. Members will only receive answers from content their Product membership grants them access to.
* **Custom instructions** *(optional)* — Allow you to give the Agent personality and focus, and what shapes its communication style.
**Custom instructions work well for:**
* Language — "Always respond in Spanish"
* Subject emphasis/Focus — “When explaining concepts, prefer the simplest framing” or "Emphasize practical examples over theory"
* Tone — “Adopt an upbeat, motivational tone”. The agent by default is supportive, friendly, and concise. These instructions nudge from that baseline.
* Persona framing — “Speak as if you’re a patient study coach”
**What custom instructions can and cannot do:**
* Only answers from your published materials — it won't supplement with general knowledge or the web
* Always provides citations and won't fabricate quotes or sources
* Does not give medical, legal, financial, or other professional advice beyond what your materials teach
* Does not perform account actions (cancel, refund, change settings)
* Refuses off-topic questions, even when asked repeatedly
**Instructions that may conflict with built-in behavior:**
* Greeting members or asking a clarifying question before answering will be inconsistent — the agent is designed to lead with the answer first
* Asking for very formal language will only partly take effect — the agent's baseline is friendly and conversational.
* Setting a welcome message and then also providing custom instructions about a specific welcome message
**Tip:** Keep your welcome message short and warm. It sets the tone for every conversation and is the first thing members see when they open the chat.
2. When you finish, click **Submit**. A **Chatbot successfully created** message appears and you're returned to the list.
## Choose which content your Agent uses
When you add a **Knowledge source** during setup, you can pick exactly which parts of it your Agent learns from instead of including the whole source. This works for both **Teaching Assistants** and **Sales Agents**.
1. In the **Knowledge sources** section, select the **gear icon** next to a source (**Customize resources**, or **Customize channels** for a Community) to open it. .png?fit=max&auto=format&n=S7Xrgq4JuBUp-VKD&q=85&s=8ae71198a2ff175cd3d4acc3dd847f3a) 2. From there you can include or exclude individual pieces of content:
* In a Course, choose specific Modules, Submodules, and Lessons, and within a Lesson, include the Lesson text, the video transcript, or specific downloads
* In a Community, choose specific Channels
3. Use **Select all** or **Deselect all** to start from a full or empty list, then choose **Save selection**. A **Customized** label appears on any source where you have turned something off.
2. From there you can include or exclude individual pieces of content:
* In a Course, choose specific Modules, Submodules, and Lessons, and within a Lesson, include the Lesson text, the video transcript, or specific downloads
* In a Community, choose specific Channels
3. Use **Select all** or **Deselect all** to start from a full or empty list, then choose **Save selection**. A **Customized** label appears on any source where you have turned something off.
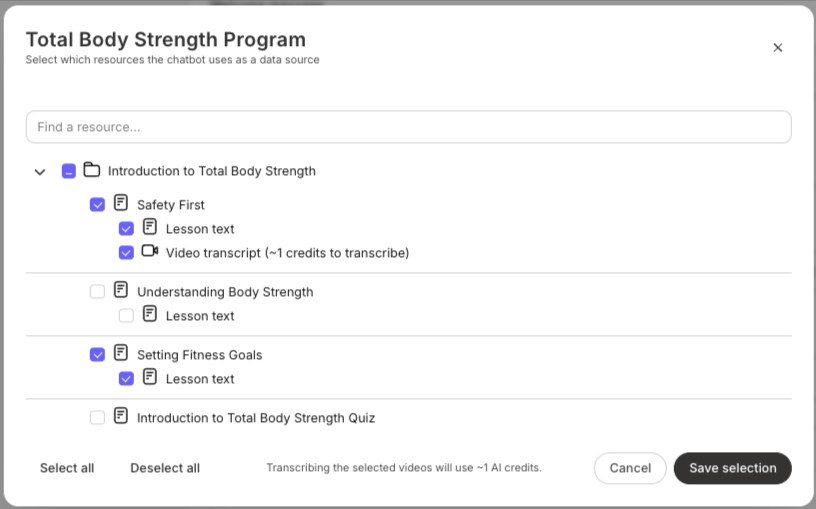 **Note**: Newly published material is automatically included in the sources you select, so you only need to turn off content you want to leave out.
**Tip**: Selecting a video that has not been transcribed yet will utilize AI credits. The selection window shows an estimate before you save.
## Connect Products and prepare content
When you save a Teaching Assistant, the Assistant begins ingesting content from each Product you selected. The list page shows a status badge for each Agent:
* **Active** — Content has finished processing and the Assistant is ready to respond
* **Setting up... \[percent]%** — Content is still being ingested
* **Disabled** — The Assistant has been turned off and won't respond to members
* **Needs attention** — Something went wrong during setup; review the Agent and contact support if needed
### Handle videos that need captions
If any selected Product contains videos without captions, the form surfaces the AI credit cost to caption them before you save. Captions are required because the Assistant reads transcripts — not the raw audio or video file — to answer questions.
You can either:
* Click through to approve the caption credit cost and proceed with setup. The Assistant begins ingesting once captions are generated.
* Cancel, caption the videos manually in the [Media Library](https://help.kajabi.com/articles/media-library/media-library-overview) first, and return to setup.
**Important:** The Assistant will not answer questions about a video that doesn’t have captions. If you skip captioning, that video's content is invisible to the Agent even though it's in the Product.
## Add an Assistant to a member page
Creating an Assistant turns it on, but members can't reach it until you place it on a page using the **Theme Editor**.
**Note**: Builder 2.0 is required when adding an Expert Agent to a Page or Product. Learn how to upgrade [here](https://help.kajabi.com/articles/website/pages/whats-new-with-builder-20#how-to-upgrade).
**Note:**
**Note**: Newly published material is automatically included in the sources you select, so you only need to turn off content you want to leave out.
**Tip**: Selecting a video that has not been transcribed yet will utilize AI credits. The selection window shows an estimate before you save.
## Connect Products and prepare content
When you save a Teaching Assistant, the Assistant begins ingesting content from each Product you selected. The list page shows a status badge for each Agent:
* **Active** — Content has finished processing and the Assistant is ready to respond
* **Setting up... \[percent]%** — Content is still being ingested
* **Disabled** — The Assistant has been turned off and won't respond to members
* **Needs attention** — Something went wrong during setup; review the Agent and contact support if needed
### Handle videos that need captions
If any selected Product contains videos without captions, the form surfaces the AI credit cost to caption them before you save. Captions are required because the Assistant reads transcripts — not the raw audio or video file — to answer questions.
You can either:
* Click through to approve the caption credit cost and proceed with setup. The Assistant begins ingesting once captions are generated.
* Cancel, caption the videos manually in the [Media Library](https://help.kajabi.com/articles/media-library/media-library-overview) first, and return to setup.
**Important:** The Assistant will not answer questions about a video that doesn’t have captions. If you skip captioning, that video's content is invisible to the Agent even though it's in the Product.
## Add an Assistant to a member page
Creating an Assistant turns it on, but members can't reach it until you place it on a page using the **Theme Editor**.
**Note**: Builder 2.0 is required when adding an Expert Agent to a Page or Product. Learn how to upgrade [here](https://help.kajabi.com/articles/website/pages/whats-new-with-builder-20#how-to-upgrade).
**Note:**
Only themes built on the latest Premier or Momentum Course themes are currently supported, and you must upgrade those themes to the latest version in order to see the **Agent** content block.
Additionally, if your member library is built with Encore, make sure the page is updated to the latest version before adding a Teaching Assistant. The Assistant will not appear on older page versions.
### Floating chat button
A **floating chat button** is a small circular button that floats in the corner of every page where it's placed. Clicking it opens the chat in a panel. Use this for an always-available Assistant that doesn't take up page real estate.
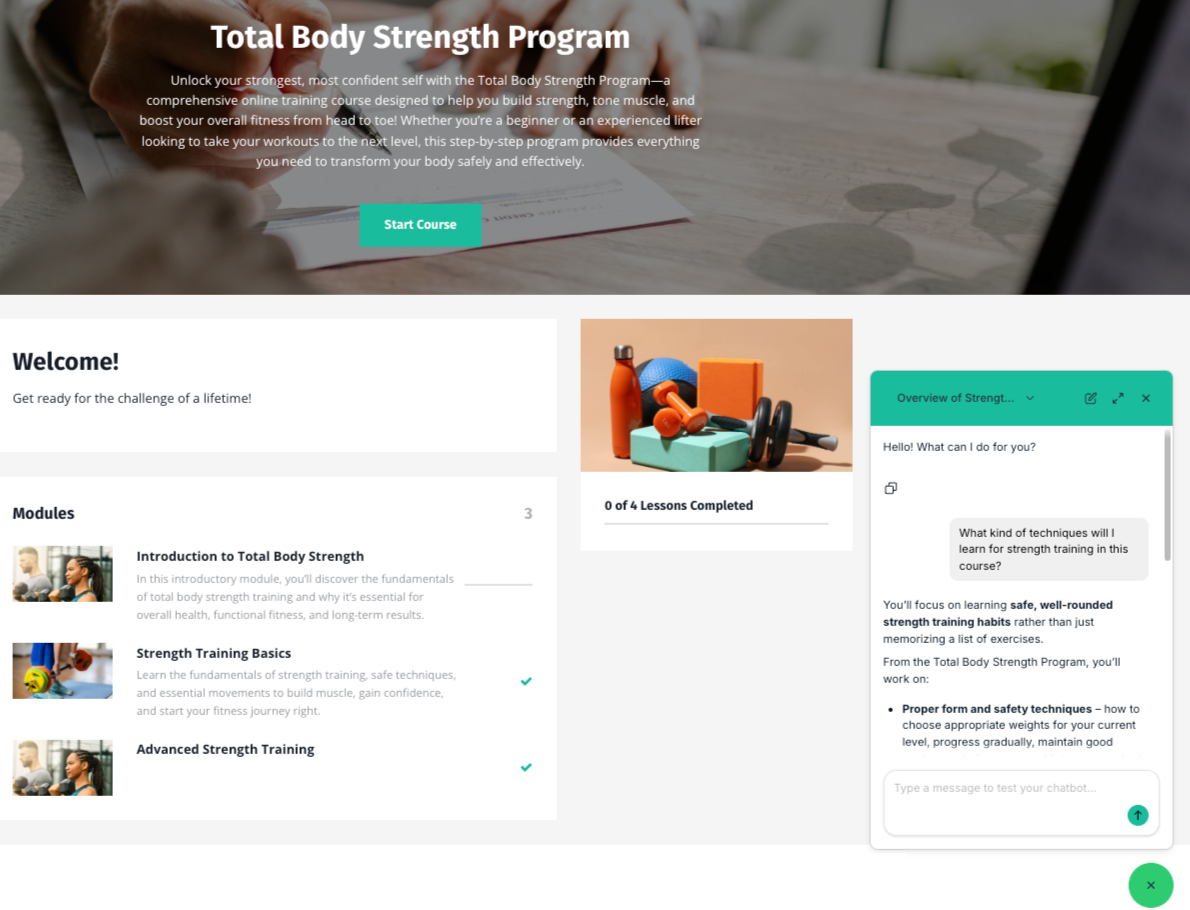 1. From the Dashboard, click **Website** > **Landing Pages** (or open the Product whose pages you want to edit).
2. Open the page in the **Theme Editor**.
3. Click **+ Add section** and choose the **Agent floating button** block.
4. In the block settings, select the Teaching Assistant you created.
5. Save and publish the page.
### Embedded chat block
An **embedded chat block (Agent)** is an inline chat panel that lives directly inside a page section. Use this when you want the Assistant to be visually prominent — for example, on a Lesson page where members can ask questions as they learn.
1. From the Dashboard, click **Website** > **Landing Pages** (or open the Product whose pages you want to edit).
2. Open the page in the **Theme Editor**.
3. Click **+ Add section** and choose the **Agent floating button** block.
4. In the block settings, select the Teaching Assistant you created.
5. Save and publish the page.
### Embedded chat block
An **embedded chat block (Agent)** is an inline chat panel that lives directly inside a page section. Use this when you want the Assistant to be visually prominent — for example, on a Lesson page where members can ask questions as they learn.
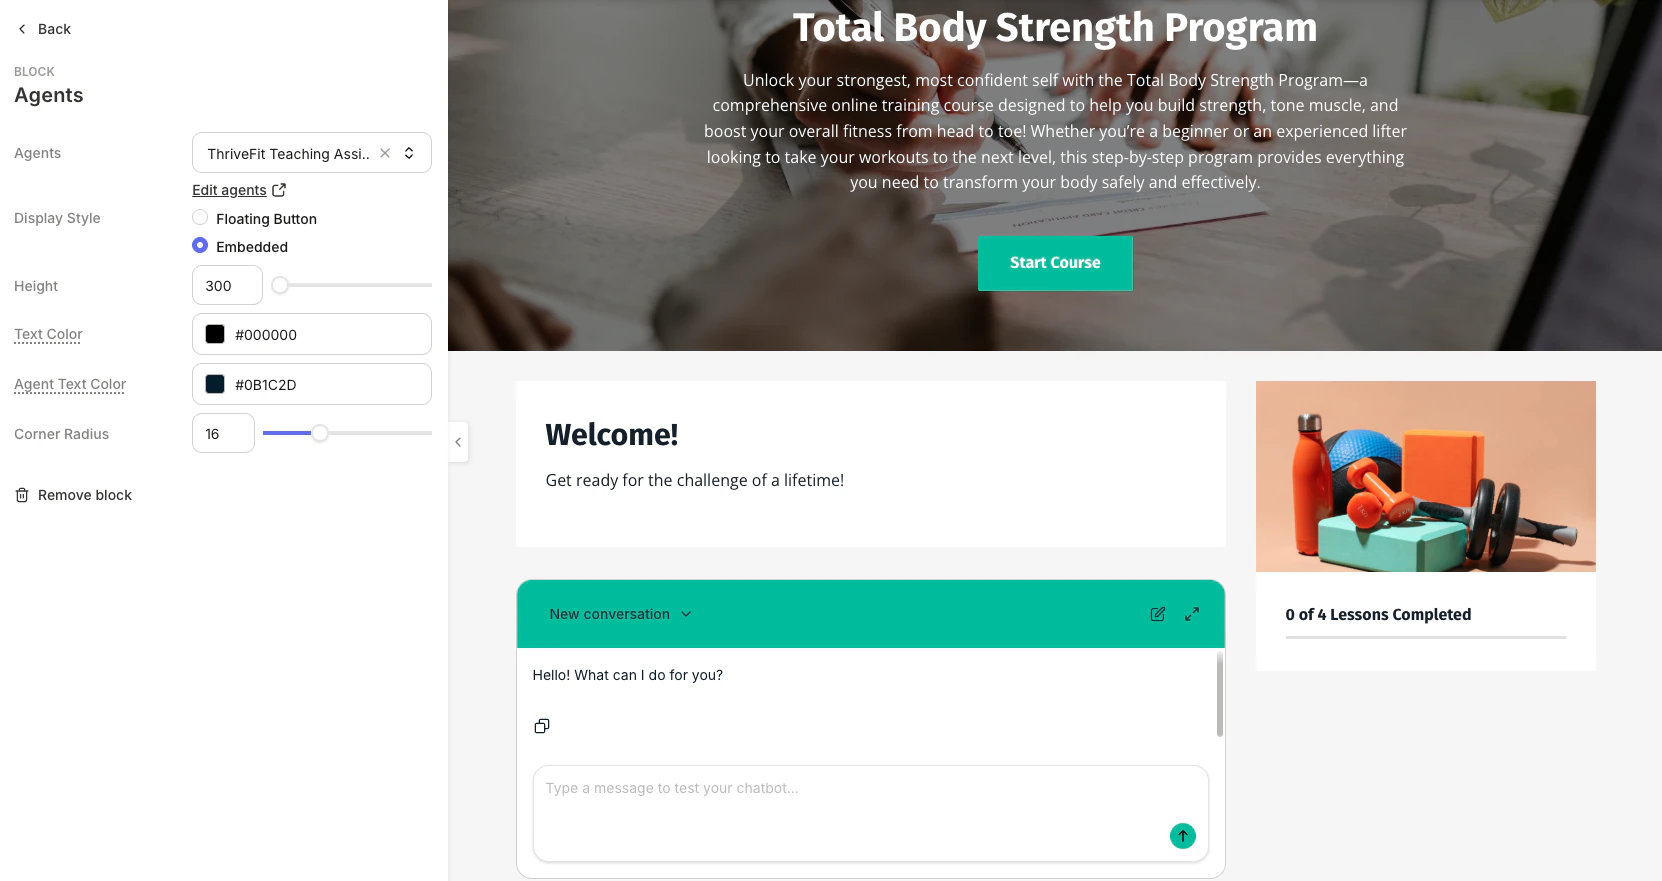 The Agent block is available in the following places within Course Themes:
* **Premier Course Theme**: Product - Product Side Bar; Post - Post Side bar, Post Body
* **Momentum Course Theme**: Product - Dashboard Body, Dashboard Sidebar; Post - Dedicated Agent section
1. Open the page in the **Theme Editor**.
2. Click **+ Add section** and choose the embedded **Agent** block.
3. Select the **Teaching Assistant** in the block settings.
4. Save and publish the page.
**Note:** The embedded Agent block needs enough vertical space to render the chat comfortably. The Theme Editor will enforce a minimum height when the block is placed.
## Member ratings for Agent responses
Turn on **Response ratings** to show a thumbs up and thumbs down under each of your Agent's replies. Members select one to tell you whether a response was helpful, so you can see where your Agent performs well and where it needs better content or instructions.
**Note**: Response ratings are on by default for Teaching Assistants.
### Turn on response ratings
1. Edit your Agent and find the **Response ratings** toggle.
2. Turn it on to show **👍** and **👎** buttons under your Agent's replies.
3. **Save** your changes.
The Agent block is available in the following places within Course Themes:
* **Premier Course Theme**: Product - Product Side Bar; Post - Post Side bar, Post Body
* **Momentum Course Theme**: Product - Dashboard Body, Dashboard Sidebar; Post - Dedicated Agent section
1. Open the page in the **Theme Editor**.
2. Click **+ Add section** and choose the embedded **Agent** block.
3. Select the **Teaching Assistant** in the block settings.
4. Save and publish the page.
**Note:** The embedded Agent block needs enough vertical space to render the chat comfortably. The Theme Editor will enforce a minimum height when the block is placed.
## Member ratings for Agent responses
Turn on **Response ratings** to show a thumbs up and thumbs down under each of your Agent's replies. Members select one to tell you whether a response was helpful, so you can see where your Agent performs well and where it needs better content or instructions.
**Note**: Response ratings are on by default for Teaching Assistants.
### Turn on response ratings
1. Edit your Agent and find the **Response ratings** toggle.
2. Turn it on to show **👍** and **👎** buttons under your Agent's replies.
3. **Save** your changes.
 ### See how members rated responses
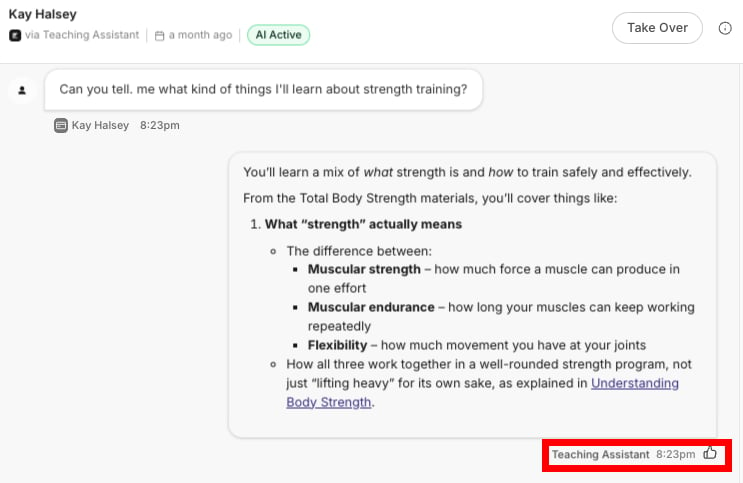
Open a conversation in your [Inbox](/articles/marketing/universal-inbox-comment-to-dm/universal-inbox-comment-to-dm) to see which replies members marked **Helpful** or **Unhelpful**. Ratings appear next to each agent reply.
### See how members rated responses
Open a conversation in your [Inbox](/articles/marketing/universal-inbox-comment-to-dm/universal-inbox-comment-to-dm) to see which replies members marked **Helpful** or **Unhelpful**. Ratings appear next to each agent reply.
 ## FAQs
### Can a Teaching Assistant answer questions about Community posts?
Yes. When a Community is part of a Product the Assistant covers, Community posts in that Community are ingested alongside Lessons and other content. Members only see answers from Communities they have access to.
#### Can the Teaching Assistant be placed on or trained on Member Pages?
Yes, a Teaching Assistant can be placed on Member Pages using the floating chat button or embedded chat block via the Theme Editor. However, the Assistant's knowledge is sourced only from the Products you select during setup, specifically Lessons, video transcripts, Community posts, and downloads. The content of Member Pages themselves is not ingested as a knowledge source.
### Can the Assistant be used outside a member-only experience?
No. Teaching Assistants are designed for members who are already inside a Product they have access to. A separate Expert Agent type — the Sales Agent — is planned for non-member contexts in a future release.
### Can I test my agent's responses?
Yes, navigate to the Agents tab, and click on your agent in the table. This should take you to the agent's page with a chat window that you can use to preview how the agent works, without having to leave the admin.
### What language does the Assistant respond in?
The Assistant responds in the language a member writes in, and pulls from your content in whatever language it was originally captioned or written in. You do not need to configure language separately, however, you can add a system prompt override if you want the chatbot to only respond in a single language.
### Can a member talk to the Assistant by voice?
No. Teaching Assistants are text-only at launch.
### Does the Assistant remember past conversations with the same member?
Yes and no. Conversation history is preserved per chat, so the Assistant can pick up where it left off in a particular chat, but it does not remember history across separate conversations for the same member.
### Can a Teaching Assistant be embedded on a non-Kajabi website?
No. Teaching Assistants render only on Kajabi-hosted pages.
### How are messages billed?
At launch, there is no per-message charge for member conversations. You pay for video transcription through the AI credits system. Future messaging costs may apply as usage data informs pricing — any change will be announced before it takes effect.
## FAQs
### Can a Teaching Assistant answer questions about Community posts?
Yes. When a Community is part of a Product the Assistant covers, Community posts in that Community are ingested alongside Lessons and other content. Members only see answers from Communities they have access to.
#### Can the Teaching Assistant be placed on or trained on Member Pages?
Yes, a Teaching Assistant can be placed on Member Pages using the floating chat button or embedded chat block via the Theme Editor. However, the Assistant's knowledge is sourced only from the Products you select during setup, specifically Lessons, video transcripts, Community posts, and downloads. The content of Member Pages themselves is not ingested as a knowledge source.
### Can the Assistant be used outside a member-only experience?
No. Teaching Assistants are designed for members who are already inside a Product they have access to. A separate Expert Agent type — the Sales Agent — is planned for non-member contexts in a future release.
### Can I test my agent's responses?
Yes, navigate to the Agents tab, and click on your agent in the table. This should take you to the agent's page with a chat window that you can use to preview how the agent works, without having to leave the admin.
### What language does the Assistant respond in?
The Assistant responds in the language a member writes in, and pulls from your content in whatever language it was originally captioned or written in. You do not need to configure language separately, however, you can add a system prompt override if you want the chatbot to only respond in a single language.
### Can a member talk to the Assistant by voice?
No. Teaching Assistants are text-only at launch.
### Does the Assistant remember past conversations with the same member?
Yes and no. Conversation history is preserved per chat, so the Assistant can pick up where it left off in a particular chat, but it does not remember history across separate conversations for the same member.
### Can a Teaching Assistant be embedded on a non-Kajabi website?
No. Teaching Assistants render only on Kajabi-hosted pages.
### How are messages billed?
At launch, there is no per-message charge for member conversations. You pay for video transcription through the AI credits system. Future messaging costs may apply as usage data informs pricing — any change will be announced before it takes effect.