> ## Documentation Index
> Fetch the complete documentation index at: https://help.kajabi.com/llms.txt
> Use this file to discover all available pages before exploring further.
# Add order bumps to an offer
**Order bumps** are optional add-ons a customer can include in their purchase directly from the checkout page. Each bump appears alongside the primary offer at checkout, letting customers add it to their order with a single click before submitting payment.
## **Before you begin**
Order bumps are available on all offers. To add up to six order bumps to a single offer, your offer must meet additional requirements. See Multiple order bumps below for details.
## **Add or remove an order bump**
1. From your dashboard, navigate to **Sales** > **Offers** and open the offer you want to edit.
2. Select **Settings**.
3. Scroll to the **Order bumps** section.
4. Click **Add an order bump** and search for the offer you want to add as a bump.
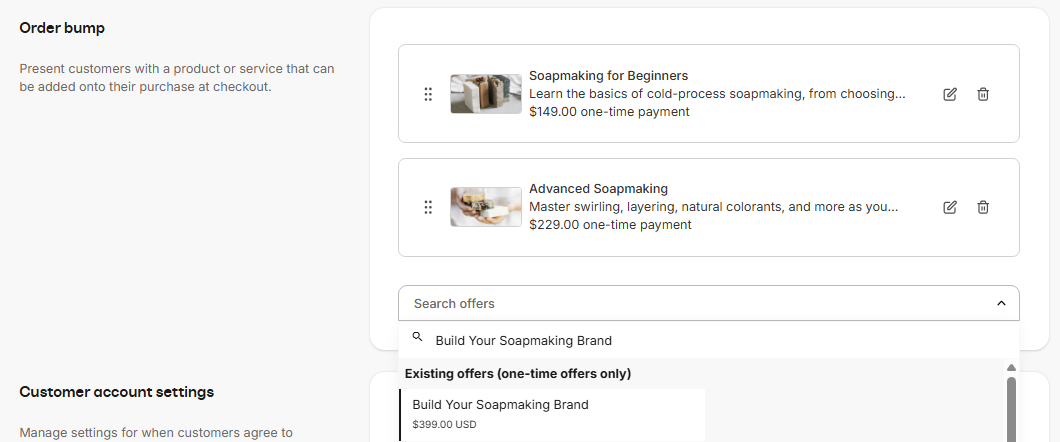 5. To customize how the bump appears at checkout, click the pencil icon to edit its **Title**, override or expand the **Description**, and change the **Image**. These fields are pre-filled from the selected offer but can be overridden.
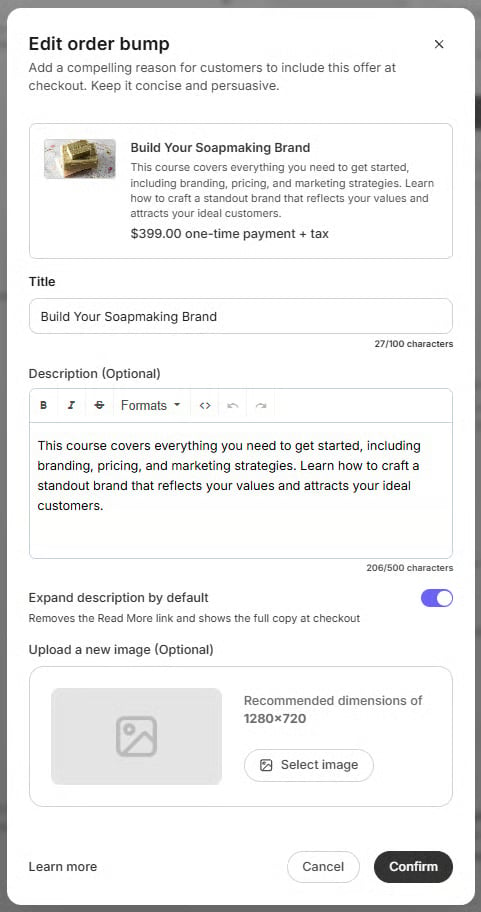 6. Click **Confirm** to save.
To remove a bump, click the trash icon on the bump row and confirm. This only removes it from this offer's checkout, the underlying offer is not deleted.
## **Multiple order bumps**
With [**Enhanced Checkout**](https://help.kajabi.com/articles/sales/checkout/enhanced-checkout-overview), you can add up to six order bumps to a single offer. Each bump appears as a selectable card in the checkout summary, and customers can choose any combination before paying.
6. Click **Confirm** to save.
To remove a bump, click the trash icon on the bump row and confirm. This only removes it from this offer's checkout, the underlying offer is not deleted.
## **Multiple order bumps**
With [**Enhanced Checkout**](https://help.kajabi.com/articles/sales/checkout/enhanced-checkout-overview), you can add up to six order bumps to a single offer. Each bump appears as a selectable card in the checkout summary, and customers can choose any combination before paying.
.png?fit=max&auto=format&n=aybVP8ozAZZ_XXgD&q=85&s=999274a14bdb2cada286a38988894ab4) When the customer submits, the primary offer and any selected bumps are processed in a single transaction. The customer receives access to the products associated with each item they purchased.
### **Reorder bumps**
Drag and drop bumps to change the order they appear at checkout. The first bump in the list is also the one displayed on legacy checkouts that do not support multiple bumps.
### **Requirements for multiple order bumps**
To support more than one order bump, the primary offer must:
* Use [**Enhanced Checkout**](https://help.kajabi.com/articles/sales/checkout/enhanced-checkout-overview)
* Be a **paid, one-time payment** offer. Subscriptions, payment plans, and free offers support only one order bump at this time.
* Have **no pricing options**
Each additional bump offer must also:
* Be a **one-time payment** type
* Have **no pricing options**
* Use the **same currency** as the primary offer
The first bump has slightly more flexibility when it is the only bump on an offer: it can be a subscription or recurring offer. Once you add a second bump, the first must also be a one-time payment offer.
## **How multiple order bumps affect Webhooks**
With multiple order bumps, one-time primary offers and one-time order bumps are now grouped into a single payment transaction, rather than each being charged as a separate transaction. Customers see the full price in one place at checkout and are charged a single amount, which helps improve authorization rates and reduce payment processing costs since the fixed per-transaction fee is only applied once.
If your workflows rely on the Payment Succeeded or Purchase Created webhooks through a Zapier integration or other, review the changes below to ensure your automations continue to work as expected.
For more information, see [Webhook Changes with the Introduction of Multiple Order Bumps](https://help.kajabi.com/articles/api-integrations/webhooks/webhook-changes).
### **Payment Succeeded / New Payment**
Previously, each offer in a checkout, including the primary offer and any order bump, was charged as its own separate transaction, and each transaction fired its own **Payment Succeeded** event.
Now, **all one-time** items in the checkout are grouped into a single transaction, so only one **Payment Succeeded** event fires per checkout, regardless of how many one-time bumps were selected.
The offer fields in that event, including offer ID, title, and pricing type, will contain comma-separated values when the order includes more than one offer.
If your workflow references any of those offer fields, you may need to update it to handle comma-separated values where you previously received a single value.
### **Purchase Created / New Purchase**
The **Purchase Created** webhook still fires **once per offer purchased**, the same behavior as before. If a customer's order includes the primary offer and two bumps, you receive **three separate events**.
What has changed is the **transaction amount fields**. Each event now reflects the **total value of the entire order**, not the price of the individual offer in that event. Each event also includes an offer-level amount specific to that offer.
**Important:** If you use this webhook to track revenue, for example by summing `amount_paid` across records, switch to using the offer-level amounts to avoid overcounting in the event that a transaction contains multiple items. The transaction amounts and the `amount_paid` field reflects the full order total and will cause overcounting if summed across the multiple events that fire for the same transaction.
**Example:** A customer purchases a \$50 primary offer and two \$20 order bumps. Total transaction: \$90. You receive three **Purchase Created** events. All three share the same `transaction_id` and the same `amount_paid` of \$90. The offer’s `total_amount` on each event reflects that individual offer's price: \$50, \$20, and \$20 respectively.
## **Tax calculation for order bumps**
Tax is calculated individually per bump, not as a lump sum. Each selected bump's tax appears as its own line item in the order summary and updates in real time as bumps are added or removed. All bumps follow the primary offer's tax settings, including whether tax is inclusive or exclusive.
**Important:** If the primary offer is not taxable, any bump offers that are taxable will be hidden from the checkout and will not appear to customers.
## **FAQs**
### **Do coupons apply to order bumps?**
Coupons apply to the primary offer only.
### **How does affiliate tracking work with order bumps?**
The entire checkout, including all selected bumps, is attributed to a single affiliate based on the referral link the customer used. Commission is determined per offer, not per checkout. An affiliate earns commission on a bump only if that specific bump offer or primary offer has affiliate commission enabled.
### **Does this work with Pop-up Checkout?**
Multiple order bumps are supported on [**Enhanced Checkout**](https://help.kajabi.com/articles/sales/checkout/enhanced-checkout-overview) only. Pop-up checkout supports a single order bump only.
### **What happens if a bump uses a different currency than my primary offer?**
Bumps that do not match the primary offer's currency are automatically hidden at checkout. If a bump is not showing up, check that the bump offer's currency matches the primary offer.
### **Can I use multiple order bumps on a subscription or payment plan offer?**
Not at this time. The primary offer must be a paid, one-time payment to support more than one bump. You can still add a single order bump to subscription or payment plan offers.
### **What if my primary offer is not taxable but a bump is?**
Taxable bumps are hidden from the checkout when the primary offer is not taxable. They will not appear to customers, and no error is shown. To resolve this, either enable tax on the primary offer or remove the tax configuration from the bump offer.
### **Are order bumps available for gift purchases?**
No. Order bumps are not displayed when a customer is making a gift purchase.
When the customer submits, the primary offer and any selected bumps are processed in a single transaction. The customer receives access to the products associated with each item they purchased.
### **Reorder bumps**
Drag and drop bumps to change the order they appear at checkout. The first bump in the list is also the one displayed on legacy checkouts that do not support multiple bumps.
### **Requirements for multiple order bumps**
To support more than one order bump, the primary offer must:
* Use [**Enhanced Checkout**](https://help.kajabi.com/articles/sales/checkout/enhanced-checkout-overview)
* Be a **paid, one-time payment** offer. Subscriptions, payment plans, and free offers support only one order bump at this time.
* Have **no pricing options**
Each additional bump offer must also:
* Be a **one-time payment** type
* Have **no pricing options**
* Use the **same currency** as the primary offer
The first bump has slightly more flexibility when it is the only bump on an offer: it can be a subscription or recurring offer. Once you add a second bump, the first must also be a one-time payment offer.
## **How multiple order bumps affect Webhooks**
With multiple order bumps, one-time primary offers and one-time order bumps are now grouped into a single payment transaction, rather than each being charged as a separate transaction. Customers see the full price in one place at checkout and are charged a single amount, which helps improve authorization rates and reduce payment processing costs since the fixed per-transaction fee is only applied once.
If your workflows rely on the Payment Succeeded or Purchase Created webhooks through a Zapier integration or other, review the changes below to ensure your automations continue to work as expected.
For more information, see [Webhook Changes with the Introduction of Multiple Order Bumps](https://help.kajabi.com/articles/api-integrations/webhooks/webhook-changes).
### **Payment Succeeded / New Payment**
Previously, each offer in a checkout, including the primary offer and any order bump, was charged as its own separate transaction, and each transaction fired its own **Payment Succeeded** event.
Now, **all one-time** items in the checkout are grouped into a single transaction, so only one **Payment Succeeded** event fires per checkout, regardless of how many one-time bumps were selected.
The offer fields in that event, including offer ID, title, and pricing type, will contain comma-separated values when the order includes more than one offer.
If your workflow references any of those offer fields, you may need to update it to handle comma-separated values where you previously received a single value.
### **Purchase Created / New Purchase**
The **Purchase Created** webhook still fires **once per offer purchased**, the same behavior as before. If a customer's order includes the primary offer and two bumps, you receive **three separate events**.
What has changed is the **transaction amount fields**. Each event now reflects the **total value of the entire order**, not the price of the individual offer in that event. Each event also includes an offer-level amount specific to that offer.
**Important:** If you use this webhook to track revenue, for example by summing `amount_paid` across records, switch to using the offer-level amounts to avoid overcounting in the event that a transaction contains multiple items. The transaction amounts and the `amount_paid` field reflects the full order total and will cause overcounting if summed across the multiple events that fire for the same transaction.
**Example:** A customer purchases a \$50 primary offer and two \$20 order bumps. Total transaction: \$90. You receive three **Purchase Created** events. All three share the same `transaction_id` and the same `amount_paid` of \$90. The offer’s `total_amount` on each event reflects that individual offer's price: \$50, \$20, and \$20 respectively.
## **Tax calculation for order bumps**
Tax is calculated individually per bump, not as a lump sum. Each selected bump's tax appears as its own line item in the order summary and updates in real time as bumps are added or removed. All bumps follow the primary offer's tax settings, including whether tax is inclusive or exclusive.
**Important:** If the primary offer is not taxable, any bump offers that are taxable will be hidden from the checkout and will not appear to customers.
## **FAQs**
### **Do coupons apply to order bumps?**
Coupons apply to the primary offer only.
### **How does affiliate tracking work with order bumps?**
The entire checkout, including all selected bumps, is attributed to a single affiliate based on the referral link the customer used. Commission is determined per offer, not per checkout. An affiliate earns commission on a bump only if that specific bump offer or primary offer has affiliate commission enabled.
### **Does this work with Pop-up Checkout?**
Multiple order bumps are supported on [**Enhanced Checkout**](https://help.kajabi.com/articles/sales/checkout/enhanced-checkout-overview) only. Pop-up checkout supports a single order bump only.
### **What happens if a bump uses a different currency than my primary offer?**
Bumps that do not match the primary offer's currency are automatically hidden at checkout. If a bump is not showing up, check that the bump offer's currency matches the primary offer.
### **Can I use multiple order bumps on a subscription or payment plan offer?**
Not at this time. The primary offer must be a paid, one-time payment to support more than one bump. You can still add a single order bump to subscription or payment plan offers.
### **What if my primary offer is not taxable but a bump is?**
Taxable bumps are hidden from the checkout when the primary offer is not taxable. They will not appear to customers, and no error is shown. To resolve this, either enable tax on the primary offer or remove the tax configuration from the bump offer.
### **Are order bumps available for gift purchases?**
No. Order bumps are not displayed when a customer is making a gift purchase.