> ## Documentation Index
> Fetch the complete documentation index at: https://help.kajabi.com/llms.txt
> Use this file to discover all available pages before exploring further.
# Integrate QuickBooks Online with Kajabi Payments
> Connect Kajabi Payments with QuickBooks Online using QuickBooks Sync by Acodei to track your business income and expenses.
**Note:** This feature may be subject to an additional cost outside of your base Kajabi plan fee.
## Overview
Integrating Kajabi Payments with QuickBooks Online helps you track your business income and expenses automatically. Using QuickBooks Sync by Acodei, your transaction data syncs seamlessly between platforms.
## QuickBooks Online and QuickBooks Sync by Acodei
QuickBooks Online is a powerful accounting software that helps all types of businesses track income and expenses anytime, on any device.
QuickBooks Sync by Acodei automatically imports your Kajabi Payments transaction data into QuickBooks Online so you can easily reconcile your transaction data and know where your business stands.
**Note:** Syncing transaction data from Kajabi to QuickBooks is only available with Kajabi Payments. [Learn how to onboard to Kajabi Payments](/articles/sales/kajabi-payments/kajabi-payments-overview).
## Imported data from Kajabi Payments
Once integrated, Kajabi Payments will pass your payout information to QuickBooks Online via QuickBooks Sync by Acodei, including the following details:
* Fees
* Payouts
* Transaction amount
* Offer Internal Title
* Offer ID
* Customer name (if provided)
* Customer email (if provided)
* Customer address information (address, state, zip, country) (if provided)
* Offer Quantity
* Sales Tax Amount
* Sales Tax Name
* Sales Tax Rates
* Order ID (for [Cart](../checkout/kajabi-cart-overview) transactions)
## Install QuickBooks Sync by Acodei
Before starting your QuickBooks integration, make sure you have an active [QuickBooks Online](https://quickbooks.intuit.com/online/) account and you've fully onboarded to [Kajabi Payments](/articles/sales/kajabi-payments/kajabi-payments-overview). Then, begin the integration process by installing the QuickBooks Sync by Acodei app in your Kajabi Payment Integrations Settings.
**Note:** QuickBooks Sync by Acodei is a subscription software app. You can sync up to 30 transactions per month from Kajabi to QuickBooks for free using QuickBooks Sync by Acodei. Upgrade to a higher subscription tier to sync a larger number of transactions.
To install the QuickBooks Sync by Acodei app:
1. Select **Settings** from the lower left corner of your Kajabi dashboard
2. Select **Payment Settings**
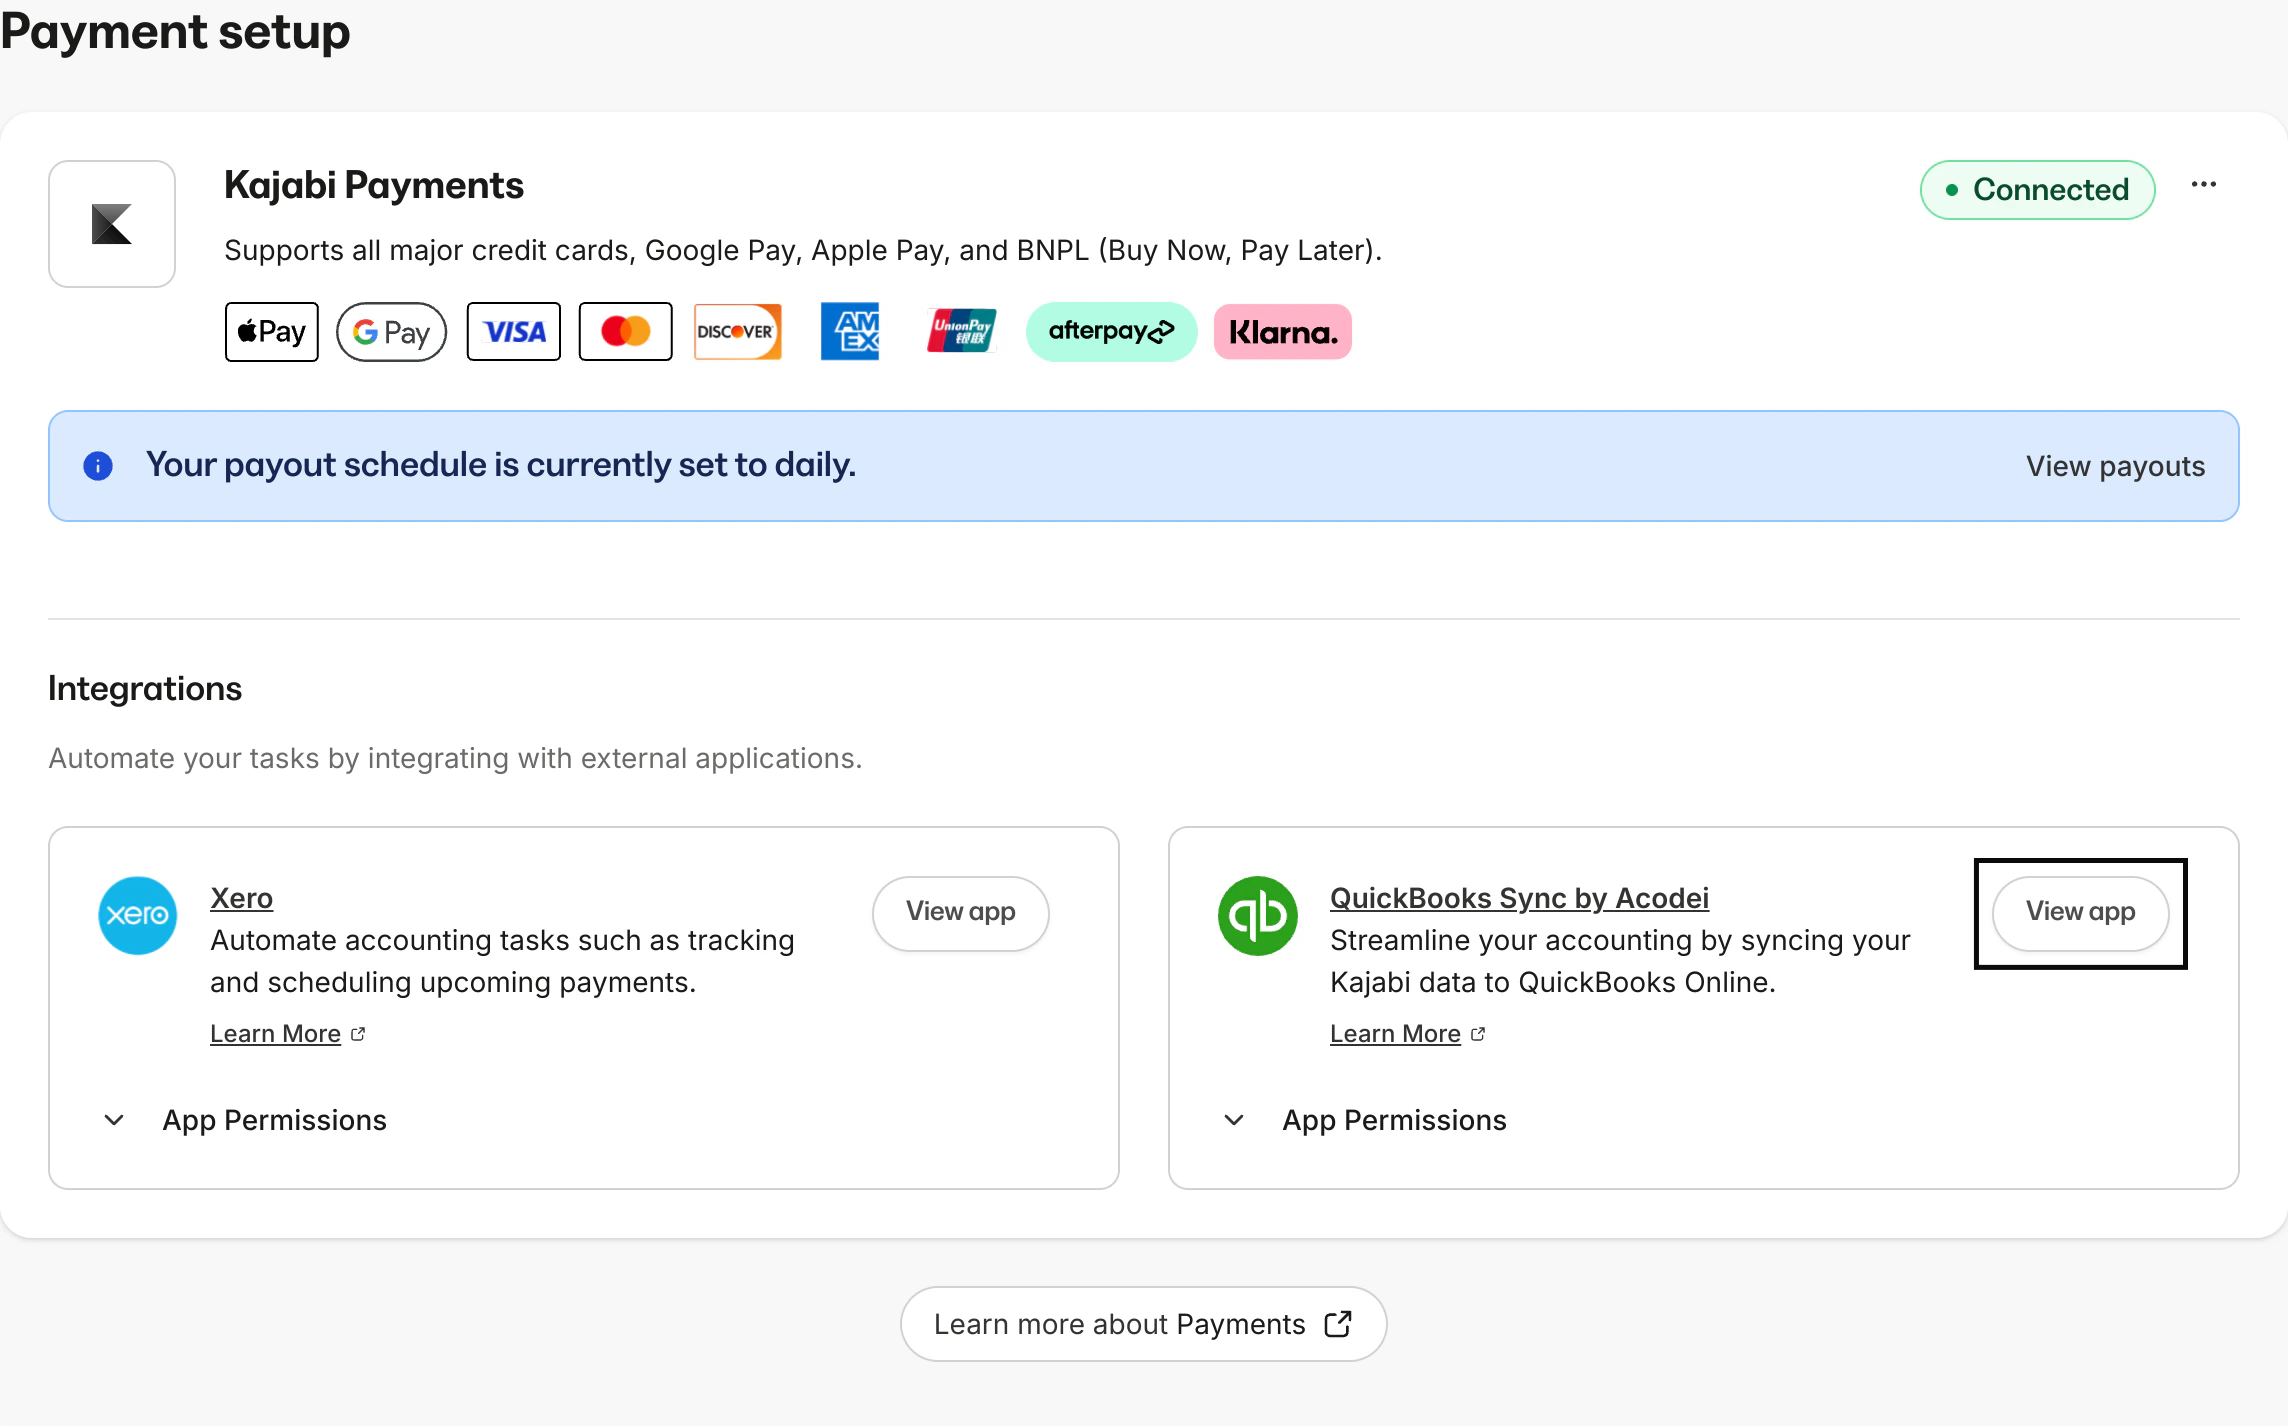
3. Navigate to **QuickBooks Sync by Acodei** and click **View app**
4. At the top right corner of the next screen, click **Install app**
5. A modal popup will appear. Review the app permissions and click **Install**
## Connect your Kajabi account to QuickBooks
Once you've installed the QuickBooks Sync by Acodei app, use the app to connect your Kajabi account and your QuickBooks account.
To integrate QuickBooks Online with Kajabi Payments:
1. After installing the app, you'll be directed to a QuickBooks Sync welcome screen. On the welcome screen, click **Start onboarding**
2. Click **Connect to QuickBooks**
3. When prompted, enter your Intuit/QuickBooks User ID and Password
4. Click **Connect** on the next screen to confirm
## Complete the integration onboarding process
After connecting your accounts, set up your integration of QuickBooks Online with Kajabi Payments via the in-app onboarding process.
To integrate QuickBooks Online with Kajabi Payments:
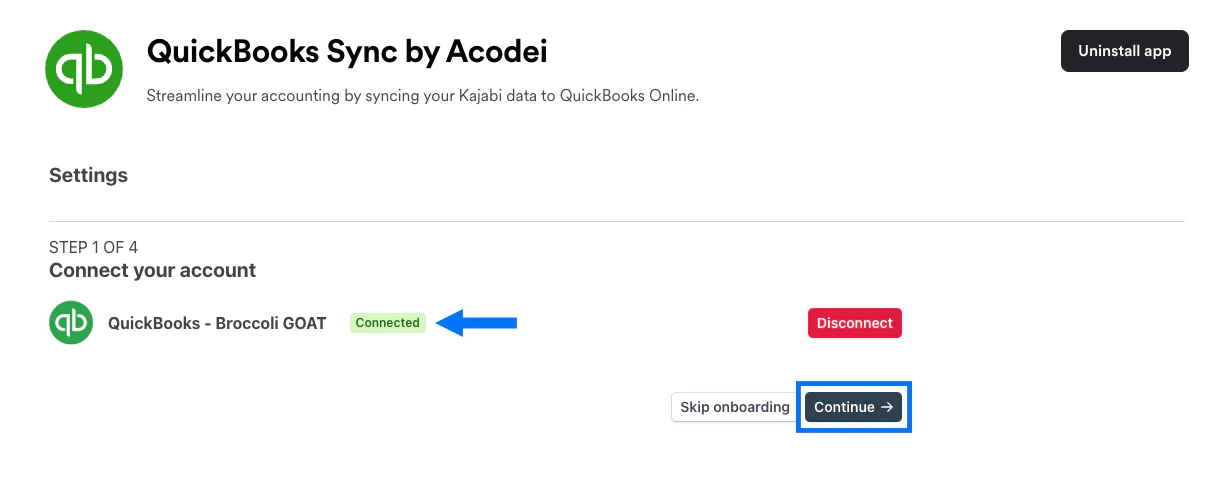
1. Confirm that you see a green "Connected" label next to your account name and click **Continue**
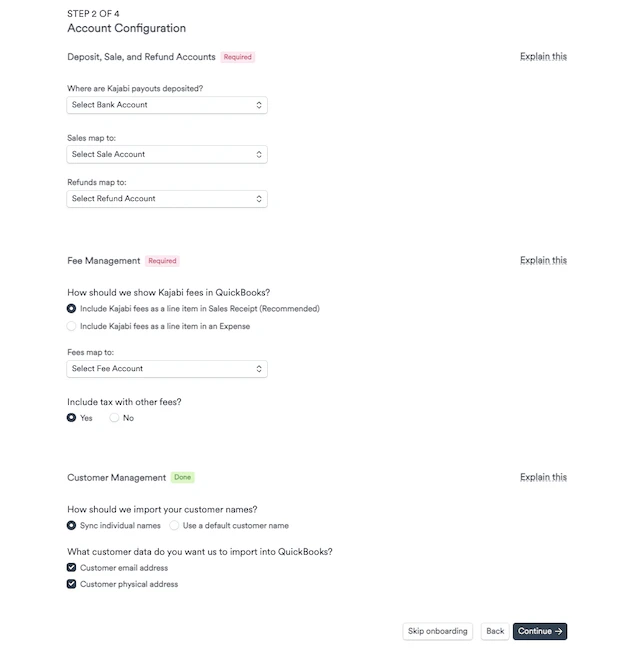
 2. Select a **deposit account** for your Kajabi payouts. This is typically a checking account
3. Select which accounts from your Chart of Accounts you want to **map your sales and refunds** to. Acodei will create products in QuickBooks tied to these accounts
4. Choose whether to **show Kajabi fees** in QuickBooks as a line item in a sales receipt or an expense
5. Select which fee account you'd like to **map Kajabi fees** to and choose if you want to include tax with other fees. Acodei will create a product in QuickBooks aligned to your fee management account
6. Choose whether to **import your customer names** into QuickBooks by syncing individual names or by using a default customer name
7. Choose if you want to import your customers' **email address and/or physical address data** into QuickBooks
8. Click **Continue** at the bottom of the page
2. Select a **deposit account** for your Kajabi payouts. This is typically a checking account
3. Select which accounts from your Chart of Accounts you want to **map your sales and refunds** to. Acodei will create products in QuickBooks tied to these accounts
4. Choose whether to **show Kajabi fees** in QuickBooks as a line item in a sales receipt or an expense
5. Select which fee account you'd like to **map Kajabi fees** to and choose if you want to include tax with other fees. Acodei will create a product in QuickBooks aligned to your fee management account
6. Choose whether to **import your customer names** into QuickBooks by syncing individual names or by using a default customer name
7. Choose if you want to import your customers' **email address and/or physical address data** into QuickBooks
8. Click **Continue** at the bottom of the page
 9. Acodei will verify that your account configuration is working by performing a **test sync** pulling three recent transactions from Kajabi into QuickBooks. Confirm the data looks correct in QuickBooks
For additional assistance with QuickBooks Sync by Acodei subscription plans or other app issues/inquiries, contact [support@acodei.com](mailto:support@acodei.com).
## View and update QuickBooks Sync by Acodei settings
Once you've installed QuickBooks Sync by Acodei, access the app anytime in your Kajabi Settings to view or update your information.
To open the QuickBooks Sync by Acodei app:
1. Select **Settings** from the lower left corner of your Kajabi dashboard
2. Select **Payment Settings**
3. Navigate to **QuickBooks Sync by Acodei** and click `…` at the top right corner of the tile
4. Select **View app**
9. Acodei will verify that your account configuration is working by performing a **test sync** pulling three recent transactions from Kajabi into QuickBooks. Confirm the data looks correct in QuickBooks
For additional assistance with QuickBooks Sync by Acodei subscription plans or other app issues/inquiries, contact [support@acodei.com](mailto:support@acodei.com).
## View and update QuickBooks Sync by Acodei settings
Once you've installed QuickBooks Sync by Acodei, access the app anytime in your Kajabi Settings to view or update your information.
To open the QuickBooks Sync by Acodei app:
1. Select **Settings** from the lower left corner of your Kajabi dashboard
2. Select **Payment Settings**
3. Navigate to **QuickBooks Sync by Acodei** and click `…` at the top right corner of the tile
4. Select **View app**
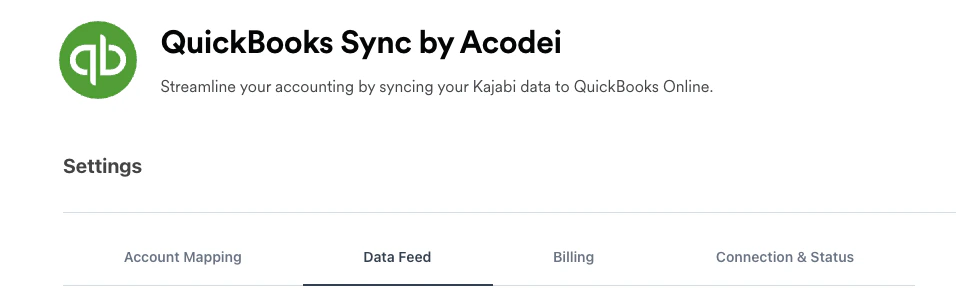
 Click the tabs in your account settings menu to view or update the Account Mapping info you added during onboarding, view a Data Feed of your sales, refunds, and payouts, view or manage your Billing info, or view your Connection & Status:
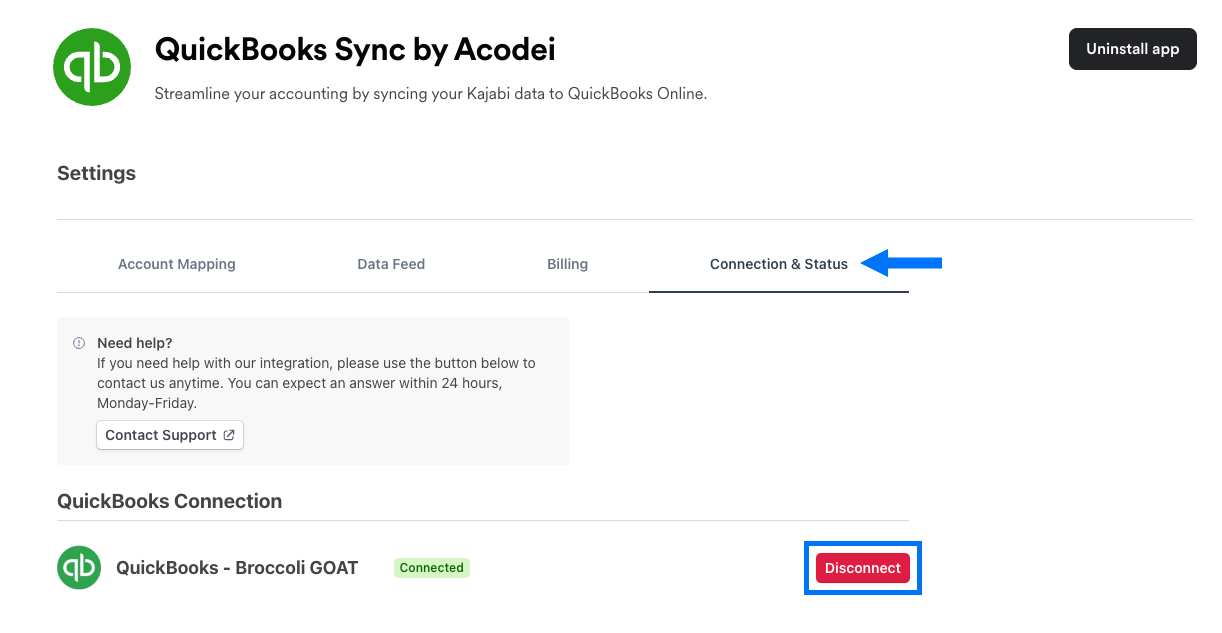
 ### Disconnect your QuickBooks account
On the Connection & Status tab, click **Disconnect** to disconnect your QuickBooks account and stop syncing data from Kajabi:
### Disconnect your QuickBooks account
On the Connection & Status tab, click **Disconnect** to disconnect your QuickBooks account and stop syncing data from Kajabi:
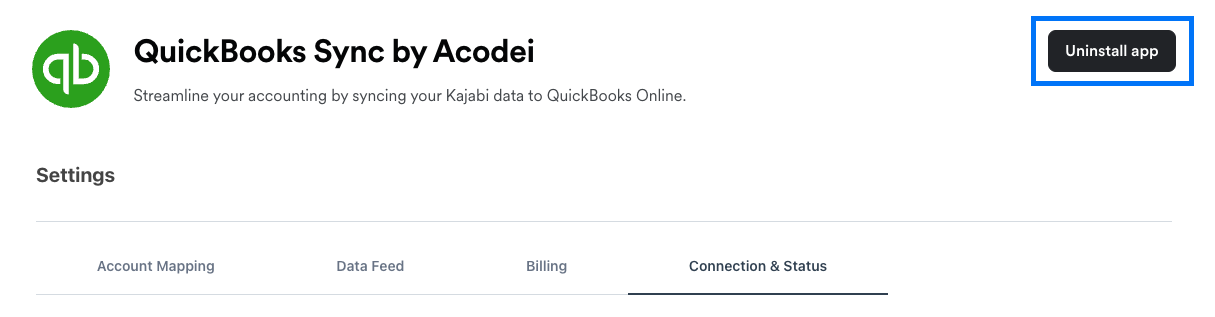
 ### Uninstall QuickBooks Sync by Acodei
Click **Uninstall app** at the top right corner of your settings page to uninstall the QuickBooks Sync by Acodei app from your Kajabi account:
### Uninstall QuickBooks Sync by Acodei
Click **Uninstall app** at the top right corner of your settings page to uninstall the QuickBooks Sync by Acodei app from your Kajabi account:
 ## FAQs
### Does it cost extra to use QuickBooks Online and QuickBooks Sync by Acodei?
QuickBooks, Kajabi, and Acodei are independent software providers. Your subscriptions to QuickBooks Online and QuickBooks Sync by Acodei are completely separate from your Kajabi subscription and you'll pay any applicable subscription fees to each provider independently.
### Can I integrate QuickBooks Desktop with Kajabi?
No, QuickBooks Desktop cannot be integrated with Kajabi at this time. Only the QuickBooks Online product is supported by the integration.
### Is it possible to use a single QuickBooks Online account for multiple Kajabi sites?
Yes. QuickBooks Online supports usage across all your Kajabi sites. Just be sure to integrate each site individually with your QuickBooks Online account.
### Resolve a missing QuickBooks Online integration option
In order to connect your QuickBooks Online account, you must have Kajabi Payments fully set up in your account. [Learn how to onboard to Kajabi Payments](/articles/sales/kajabi-payments/kajabi-payments-overview).
### How often does QuickBooks receive my transaction information?
The integration instantly synchronizes every sale, refund, and payout in real time.
## FAQs
### Does it cost extra to use QuickBooks Online and QuickBooks Sync by Acodei?
QuickBooks, Kajabi, and Acodei are independent software providers. Your subscriptions to QuickBooks Online and QuickBooks Sync by Acodei are completely separate from your Kajabi subscription and you'll pay any applicable subscription fees to each provider independently.
### Can I integrate QuickBooks Desktop with Kajabi?
No, QuickBooks Desktop cannot be integrated with Kajabi at this time. Only the QuickBooks Online product is supported by the integration.
### Is it possible to use a single QuickBooks Online account for multiple Kajabi sites?
Yes. QuickBooks Online supports usage across all your Kajabi sites. Just be sure to integrate each site individually with your QuickBooks Online account.
### Resolve a missing QuickBooks Online integration option
In order to connect your QuickBooks Online account, you must have Kajabi Payments fully set up in your account. [Learn how to onboard to Kajabi Payments](/articles/sales/kajabi-payments/kajabi-payments-overview).
### How often does QuickBooks receive my transaction information?
The integration instantly synchronizes every sale, refund, and payout in real time.