> ## Documentation Index
> Fetch the complete documentation index at: https://help.kajabi.com/llms.txt
> Use this file to discover all available pages before exploring further.
# Create a lead generation landing page
> Quickly begin building an email list of prospective customers for your business.
## Overview
Use Kajabi's Lead Generation Landing Page Wizard to quickly and easily capture the email addresses of potential customers, even if you haven't yet built a Course or a Website.
The Wizard helps you generate a single web page with an embedded Contact Form. Use the Form to capture your page visitors' email addresses to build your email list and market your products.
***
## Create a lead generation landing page
Build your Lead Generation Landing Page in as little as a few minutes with the Landing Page Wizard in Kajabi.
**Tip:**
Have your business Logo image file handy. You'll need to upload it in Step 1.
### To open the Landing Page wizard
If you've never created a Landing Page before:
1. Select the **Website** tab from your Dashboard.
2. Select either **Website Pages** or **Landing Pages**.
3. Choose **Landing** as your Page type from the top navigation menu.
4. Click **Get Started** to launch the Wizard.
Or click **Browse templates** and select the **Lead generation page creator**:
If you've created a Landing Page before:
1. Select the **Website** tab from your Dashboard.
2. Choose **Landing** as your Page type.
3. Click **+ New Landing Page**.
4. Select the **Lead generation page creator**:
Next, follow the prompts in the Wizard to build your Landing Page. After you make a change, the preview will automatically update.
### Step 1: Customize your page
1. Click **Pick File** to upload a business **Logo** to display at the top of the Page.
(Note: If you've uploaded a Logo in your [Site Branding Settings](https://help.kajabi.com/hc/en-us/articles/360037850453), it may already appear on the template. Click "Replace file" to choose another image.)
2. (Optional) Customize your **Button color** and **Background color** by clicking on the color pickers and selecting or inputting your desired colors.
Use the color picker sliders to create a custom color, or input a Hex code or RGBA color values.
3. (Optional) Select a **Font** from the dropdown menu and customize your **Font color** by clicking on the color picker and selecting or inputting your desired color.
If you select a dark Background color, we automatically update the Font color to white to make it readable against the dark background. To edit the Font color, change your Background color to a lighter color.
4. Click **Continue**:
### Step 2: Write content for your page
1. Create a page **Headline** and **Supporting copy** encouraging people to sign up for your email list.
You can either input your own copy or use Cofounder to help.
2. (Optional) Click **Generate content for your page** to open Cofounder.
Input a detailed **Topic** for your marketing copy and click **Generate**.
Edit the generated Headline and Supporting copy as desired and click **Apply**.
(Or click **Try again** to generate a new set of copy).
3. Click **Continue**:
**Tip:**
Not sure about your copy? You'll be able to refine it again later as many times as you like. Learn more about [how to use Cofounder](/articles/cofounder/cofounder-overview) to help you generate a great first draft of your marketing copy.
### Step 3: Set up your social links
1. Optionally add any or all of the following social media profile links to your Landing Page:
* Facebook
* Instagram
* Twitter
* YouTube
* LinkedIn
* TikTok
 ### When you've finished building your Landing Page
1. Toggle on the **Show preview only** setting at the top right to preview a larger image of your page.
2. (Optional) Click **Go back** if you'd like to return to a previous step in the Landing Page Wizard and make any changes.
3. Click **Finish** to create your Landing Page:
### When you've finished building your Landing Page
1. Toggle on the **Show preview only** setting at the top right to preview a larger image of your page.
2. (Optional) Click **Go back** if you'd like to return to a previous step in the Landing Page Wizard and make any changes.
3. Click **Finish** to create your Landing Page:
 ***
### Share your page
Once you've generated your Landing Page, share it with your audience to begin capturing leads.
1. Click **Copy Link** in the completion pop-up modal to share your Page on your social media channels. You can also click the icons to share your Page directly to Facebook, Twitter, or LinkedIn:
***
### Share your page
Once you've generated your Landing Page, share it with your audience to begin capturing leads.
1. Click **Copy Link** in the completion pop-up modal to share your Page on your social media channels. You can also click the icons to share your Page directly to Facebook, Twitter, or LinkedIn:
 2. Or copy your Page link at any time by navigating to Website > Pages > Landing and clicking the **Copy URL** icon next to your Landing Page:
 If you've already built a business Website, you can also add a link to your Landing Page from your other site pages or your site navigation menu. Learn more about [how to connect a Landing Page to your Website](../../website/pages/how-to-connect-your-landing-pages-to-your-website).
***
## Edit your page and form details
Customize the settings for your Landing Page and Contact Form to best fit your business needs.
### Page details
Conveniently edit your Page URL, SEO settings, and other Page details by clicking **Edit URL slug** in the completion pop-up modal:
If you've already built a business Website, you can also add a link to your Landing Page from your other site pages or your site navigation menu. Learn more about [how to connect a Landing Page to your Website](../../website/pages/how-to-connect-your-landing-pages-to-your-website).
***
## Edit your page and form details
Customize the settings for your Landing Page and Contact Form to best fit your business needs.
### Page details
Conveniently edit your Page URL, SEO settings, and other Page details by clicking **Edit URL slug** in the completion pop-up modal:
 Or edit your Page details at any time by navigating to Website > Pages > Landing, clicking the … dropdown menu next to your Landing Page and selecting **Edit details**:
 Learn more about [how to customize your Page details](../../website/pages/customize-your-page-details).
**Tip:**
Looking to go back later to change your written copy or Page design? Navigate to Website > Pages > Landing and click either your Page Title or the Customize icon to open your Landing Page in the Page Builder for editing.
### Form details
Immediately customize your opt-in settings, Form fields, after-submission settings, and other Form details by clicking **View form details** in the completion pop-up modal:
Learn more about [how to customize your Page details](../../website/pages/customize-your-page-details).
**Tip:**
Looking to go back later to change your written copy or Page design? Navigate to Website > Pages > Landing and click either your Page Title or the Customize icon to open your Landing Page in the Page Builder for editing.
### Form details
Immediately customize your opt-in settings, Form fields, after-submission settings, and other Form details by clicking **View form details** in the completion pop-up modal:
 Or edit your Form details and view your Form submissions at any time by navigating to Marketing > Forms and clicking the **Edit** and **Submissions** icons next to your Form:
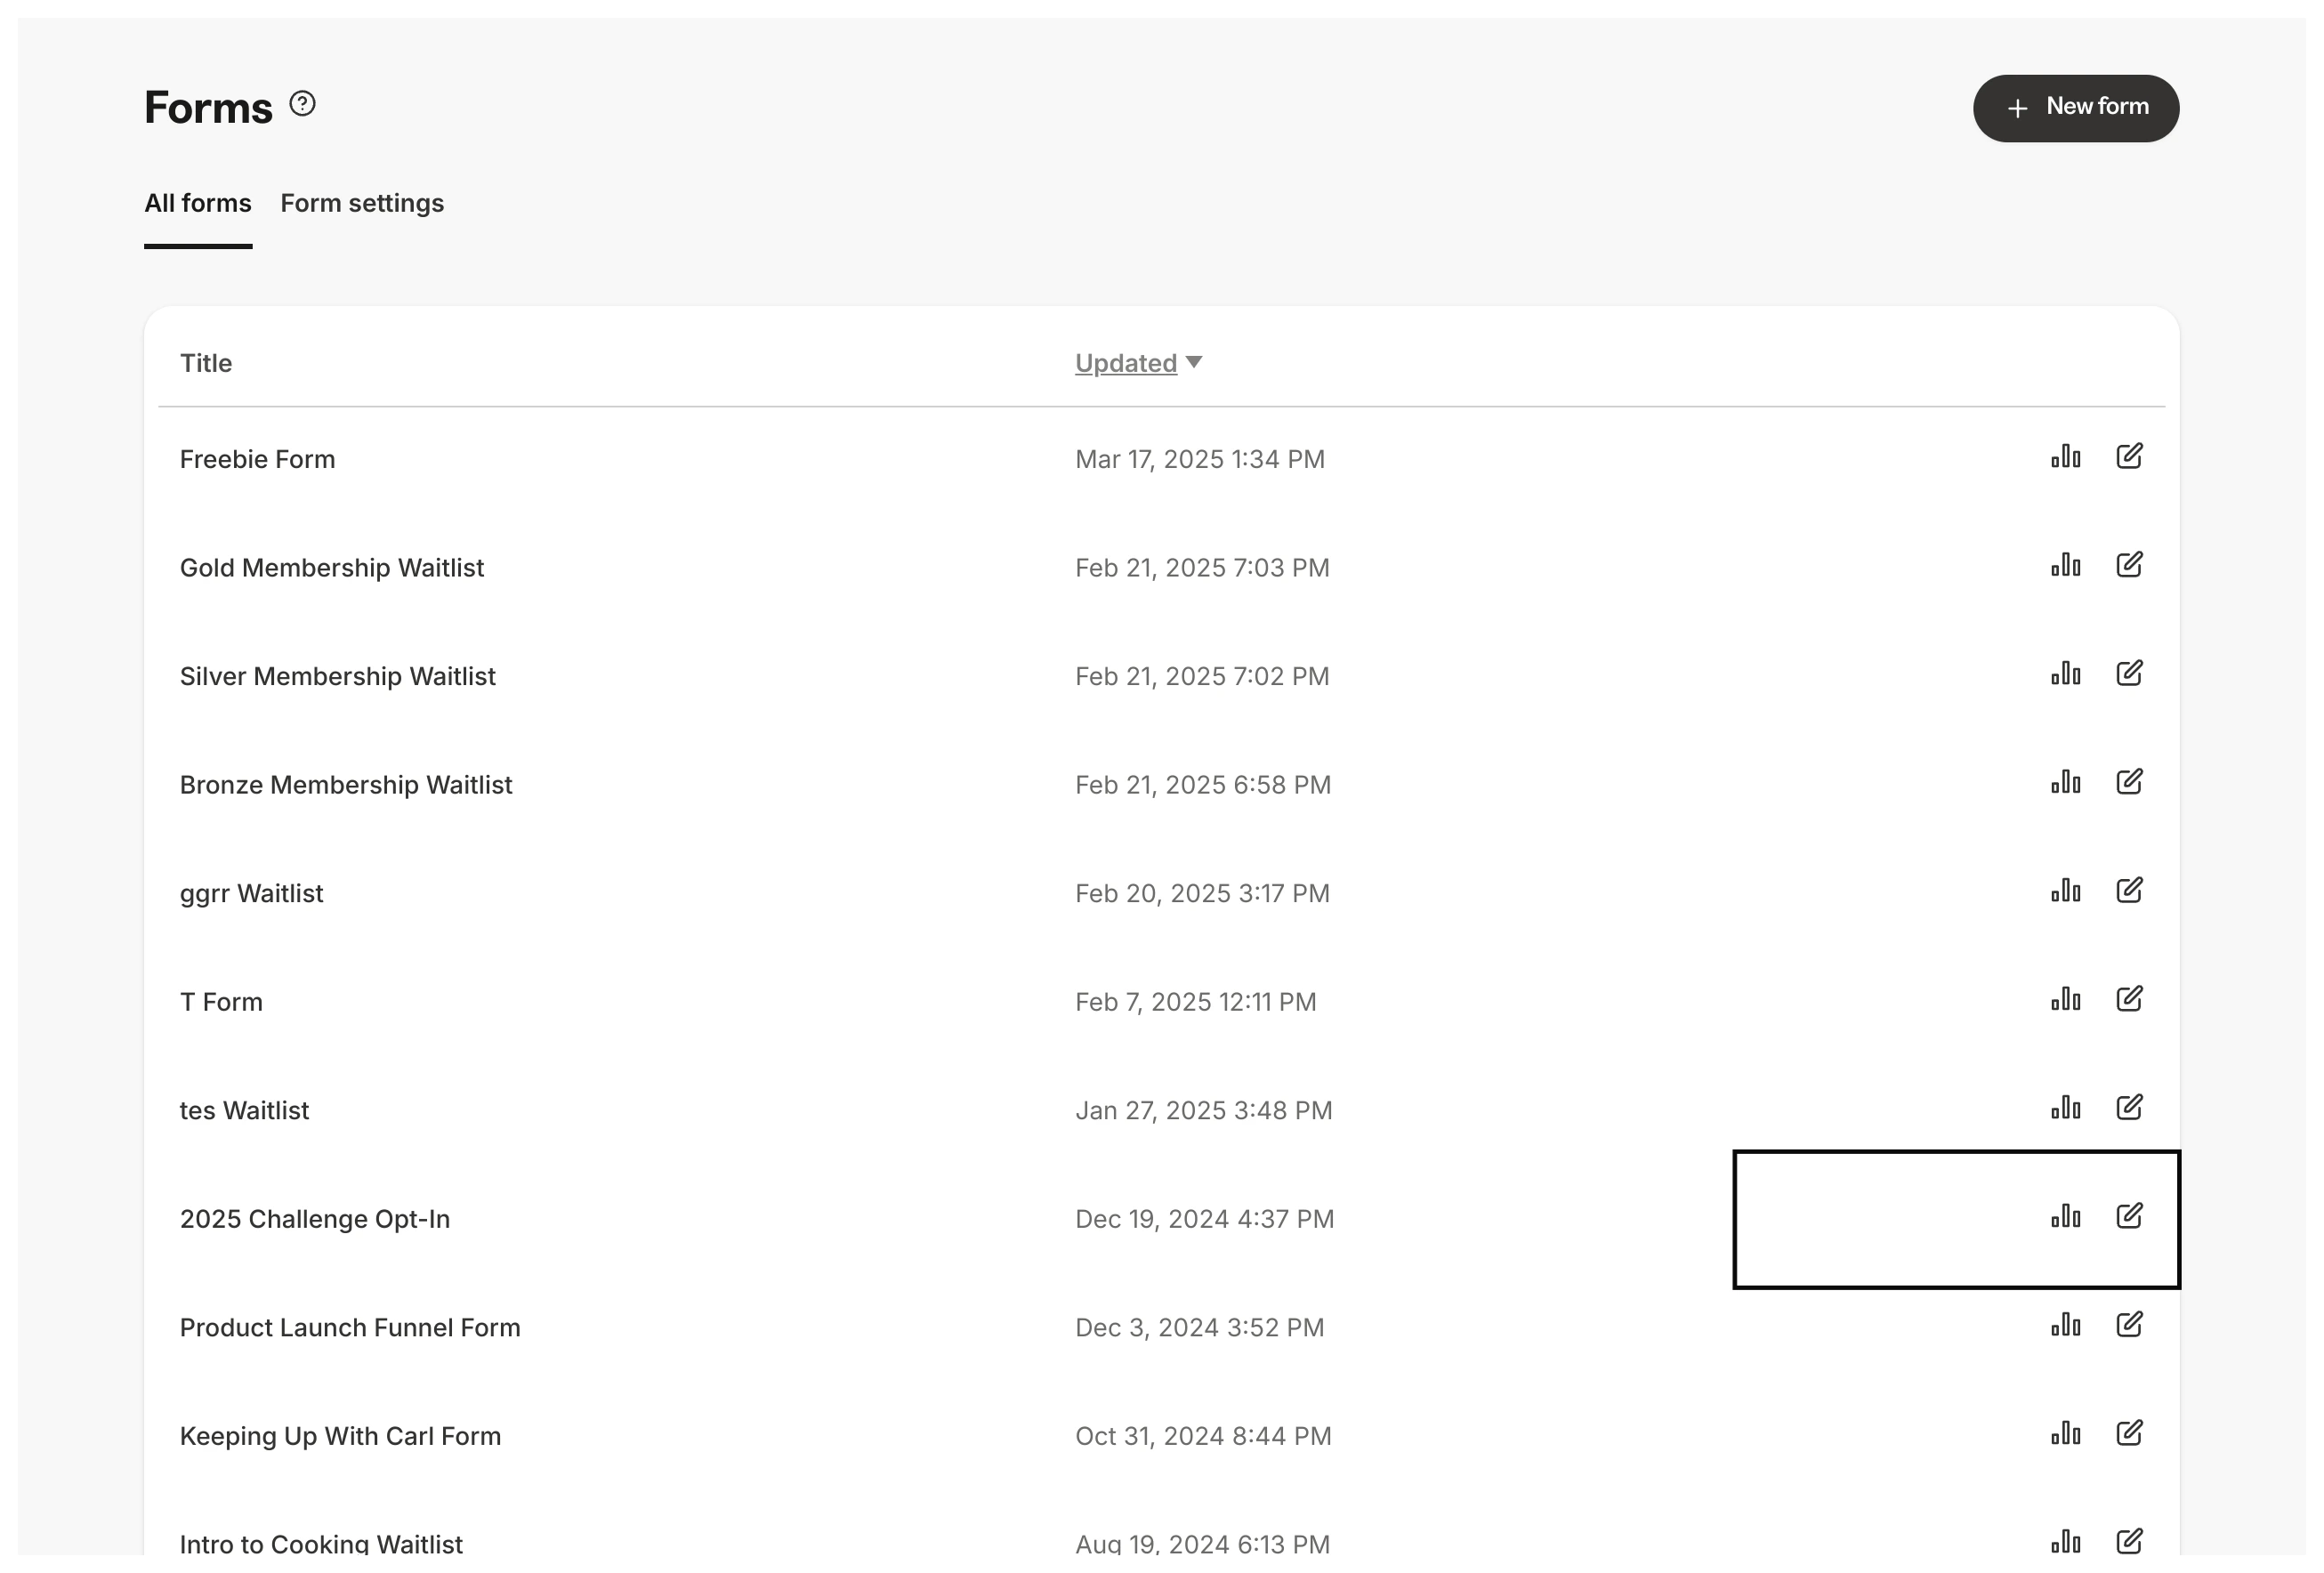 Learn more about [how to customize your Form](../../marketing/forms/create-and-build-your-form) and [how to view Form submissions](../../marketing/forms/how-to-view-form-submissions).
***
## Offer a lead magnet or freebie
Give your contacts a sample of your content by providing a downloadable file in your landing page.
### To add a downloadable file in your landing page
1. Open the **Website** tab from the Dashboard.
2. Select **Landing Pages.**
3. Open the page editor for your landing. [Learn more](../../website/pages/how-to-get-to-the-page-editor)
4. From the sidebar, click **Opt-in Form**.
5. Then, open the **Form** block.
6. Set up the action triggered after the Form is submitted from the page by locating the **Thank You Page** dropdown.
7. Select **Download a File**.
8. Click **Pick File**.
9. Follow the on-screen prompts to upload your downloadable file.
10. Click **Save** to keep your changes:
Learn more about [how to customize your Form](../../marketing/forms/create-and-build-your-form) and [how to view Form submissions](../../marketing/forms/how-to-view-form-submissions).
***
## Offer a lead magnet or freebie
Give your contacts a sample of your content by providing a downloadable file in your landing page.
### To add a downloadable file in your landing page
1. Open the **Website** tab from the Dashboard.
2. Select **Landing Pages.**
3. Open the page editor for your landing. [Learn more](../../website/pages/how-to-get-to-the-page-editor)
4. From the sidebar, click **Opt-in Form**.
5. Then, open the **Form** block.
6. Set up the action triggered after the Form is submitted from the page by locating the **Thank You Page** dropdown.
7. Select **Download a File**.
8. Click **Pick File**.
9. Follow the on-screen prompts to upload your downloadable file.
10. Click **Save** to keep your changes:
By including a downloadable file in your landing page, your leads will be able to download your freebie after signing up.
[Learn more tips](https://kajabi.com/blog/27-actionable-tips-to-create-an-effective-lead-magnet) to create a lead magnet or freebie [and additional ways](../../sales/offers/how-to-send-a-pdf-to-a-customer-after-a-purchase) to send a lead magnet or freebie to a customer.