> ## Documentation Index
> Fetch the complete documentation index at: https://help.kajabi.com/llms.txt
> Use this file to discover all available pages before exploring further.
# Add a form to a page
> Learn to add a Form to your pages built with Kajabi to grow your list.
**Note:** This guide refers to the latest page editor available with the Website Builder and Kajabi Pages. If you are using the Premier Legacy Templates, please refer to the guide [here](/articles/website/pages/how-to-add-a-form-to-your-page-with-premier).
***
## What is a form?
On Kajabi, Forms can be used to perform various actions, including:
* Subscribing someone to an [email sequence](../../marketing/email-campaigns/create-an-email-sequence)
* [Granting an offer](../../sales/offers/how-to-grant-an-offer)
* Registering a person to an [event](../../marketing/events/event-overview)
* [Segmenting](../../contacts/manage-your-contacts/segment-your-contacts) subscribers based on which forms they have filled out
Adding a Form Block to your page will display your selected Form on your page. Try adding a Form to your page that fits your business vision.
[Learn to create and customize Forms with Kajabi](../../marketing/forms/create-and-build-your-form)
***
## Adding a form block
* Open the **Website** tab from the Dashboard
* Select either **Website Pages** or **Landing Pages**
* Open the page editor for your Page. [Learn more](/articles/website/pages/how-to-get-to-the-page-editor)
* Click the Section you want to edit or [create a new Section](/articles/website/pages/add-sections-to-your-pages)
* In the sidebar, click **Add Content**
* From the list, select **Form**
* Your newly created Form Block will generate at the bottom of the Section
* Select your Form from the dropdown to populate in the Block. Don't have a Form? [Learn to build a Form](../../marketing/forms/create-and-build-your-form)
* Click **Save** to keep your changes:
***
## Customizing your form block
In a Form Block, configure the [Block Width](/articles/website/pages/how-to-customize-the-block-width), select the Form used, configure the Thank You Page, edit the Text, add a Disclaimer to your Form, and customize the Form Block Settings.
### Select the form
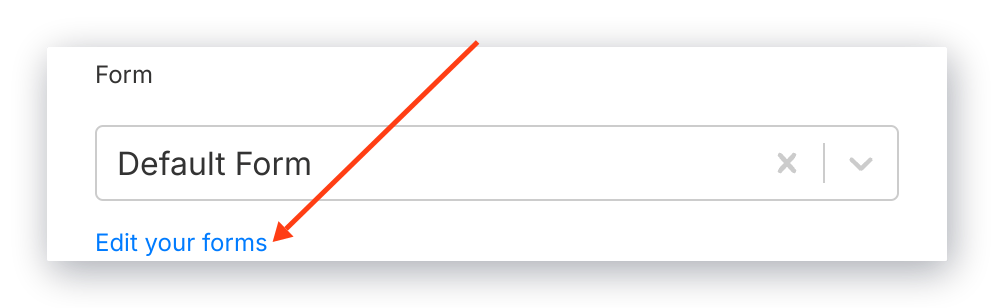
To select a Form from the dropdown, you must first [create a Form](../../marketing/forms/create-and-build-your-form) in your Marketing tab.
Click **Edit Forms** to edit and create a Form:
 ### Thank you page
Set up the the action triggered after the Form is submitted from the page:
* Go to a Landing Page
* Go to a Checkout Page
* Download a File
* Go to a URL (be sure to use the full URL - for example, [https://kajabi.com/](https://kajabi.com/))
**Note:** Leave this blank to send your Form Submitters to the [standard website Thank You Page](/articles/website/pages/how-to-build-your-thank-you-page) or to the specified Thank You Page set up in the [After Submissions settings](../../marketing/forms/how-to-use-the-after-submission-settings-in-forms) of the Form Editor. Selecting the Thank You Page from this dropdown will override the standard website Thank You Page and the After Submission Form settings Thank You Page.
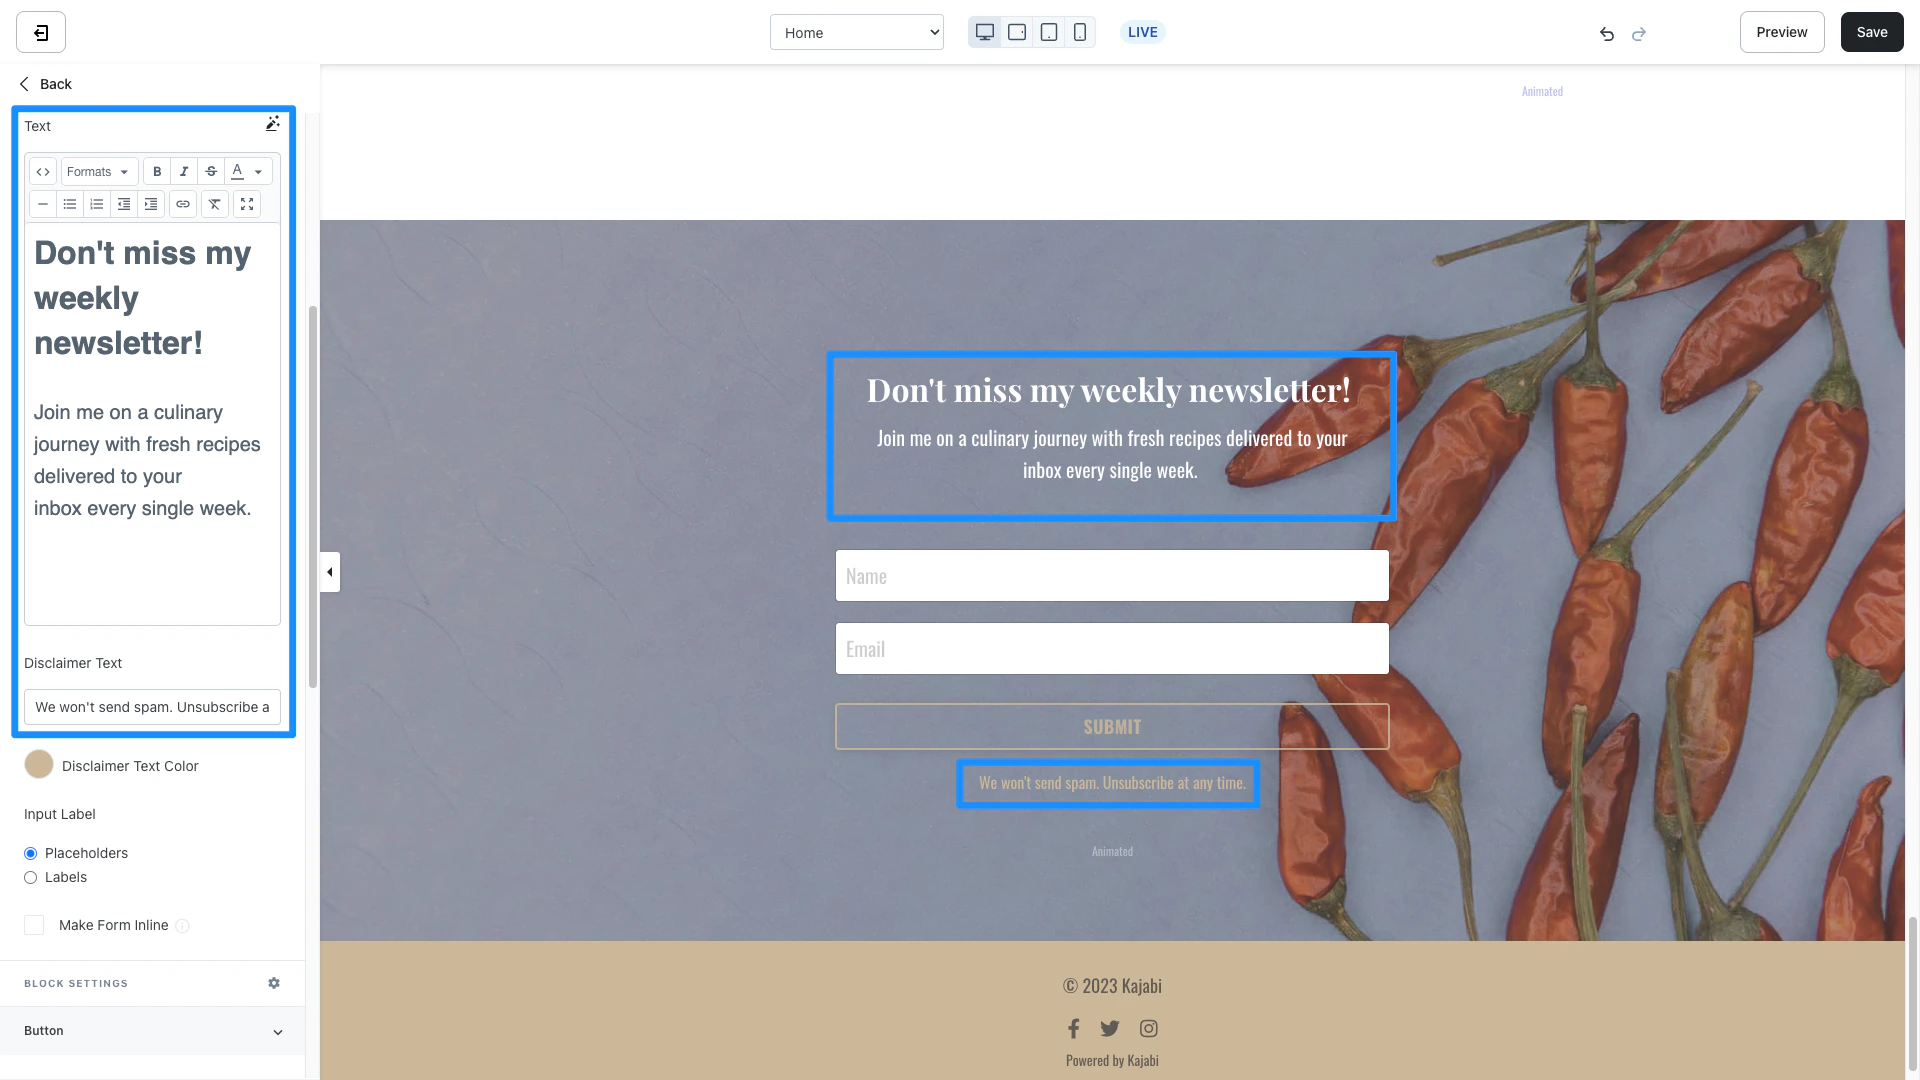
### Text
Customize your message above the Form fields by editing the Text in the Block. Here, you can enter your custom Text and replace "Join the Newsletter" on your Form when adding your Form to a Block on your page:
### Thank you page
Set up the the action triggered after the Form is submitted from the page:
* Go to a Landing Page
* Go to a Checkout Page
* Download a File
* Go to a URL (be sure to use the full URL - for example, [https://kajabi.com/](https://kajabi.com/))
**Note:** Leave this blank to send your Form Submitters to the [standard website Thank You Page](/articles/website/pages/how-to-build-your-thank-you-page) or to the specified Thank You Page set up in the [After Submissions settings](../../marketing/forms/how-to-use-the-after-submission-settings-in-forms) of the Form Editor. Selecting the Thank You Page from this dropdown will override the standard website Thank You Page and the After Submission Form settings Thank You Page.
### Text
Customize your message above the Form fields by editing the Text in the Block. Here, you can enter your custom Text and replace "Join the Newsletter" on your Form when adding your Form to a Block on your page:
 **Tip:** [Utilize the Text Editor](../../marketing/email-campaigns/can-i-make-the-text-box-larger-when-editing) to easily add your text content to your Form Block.
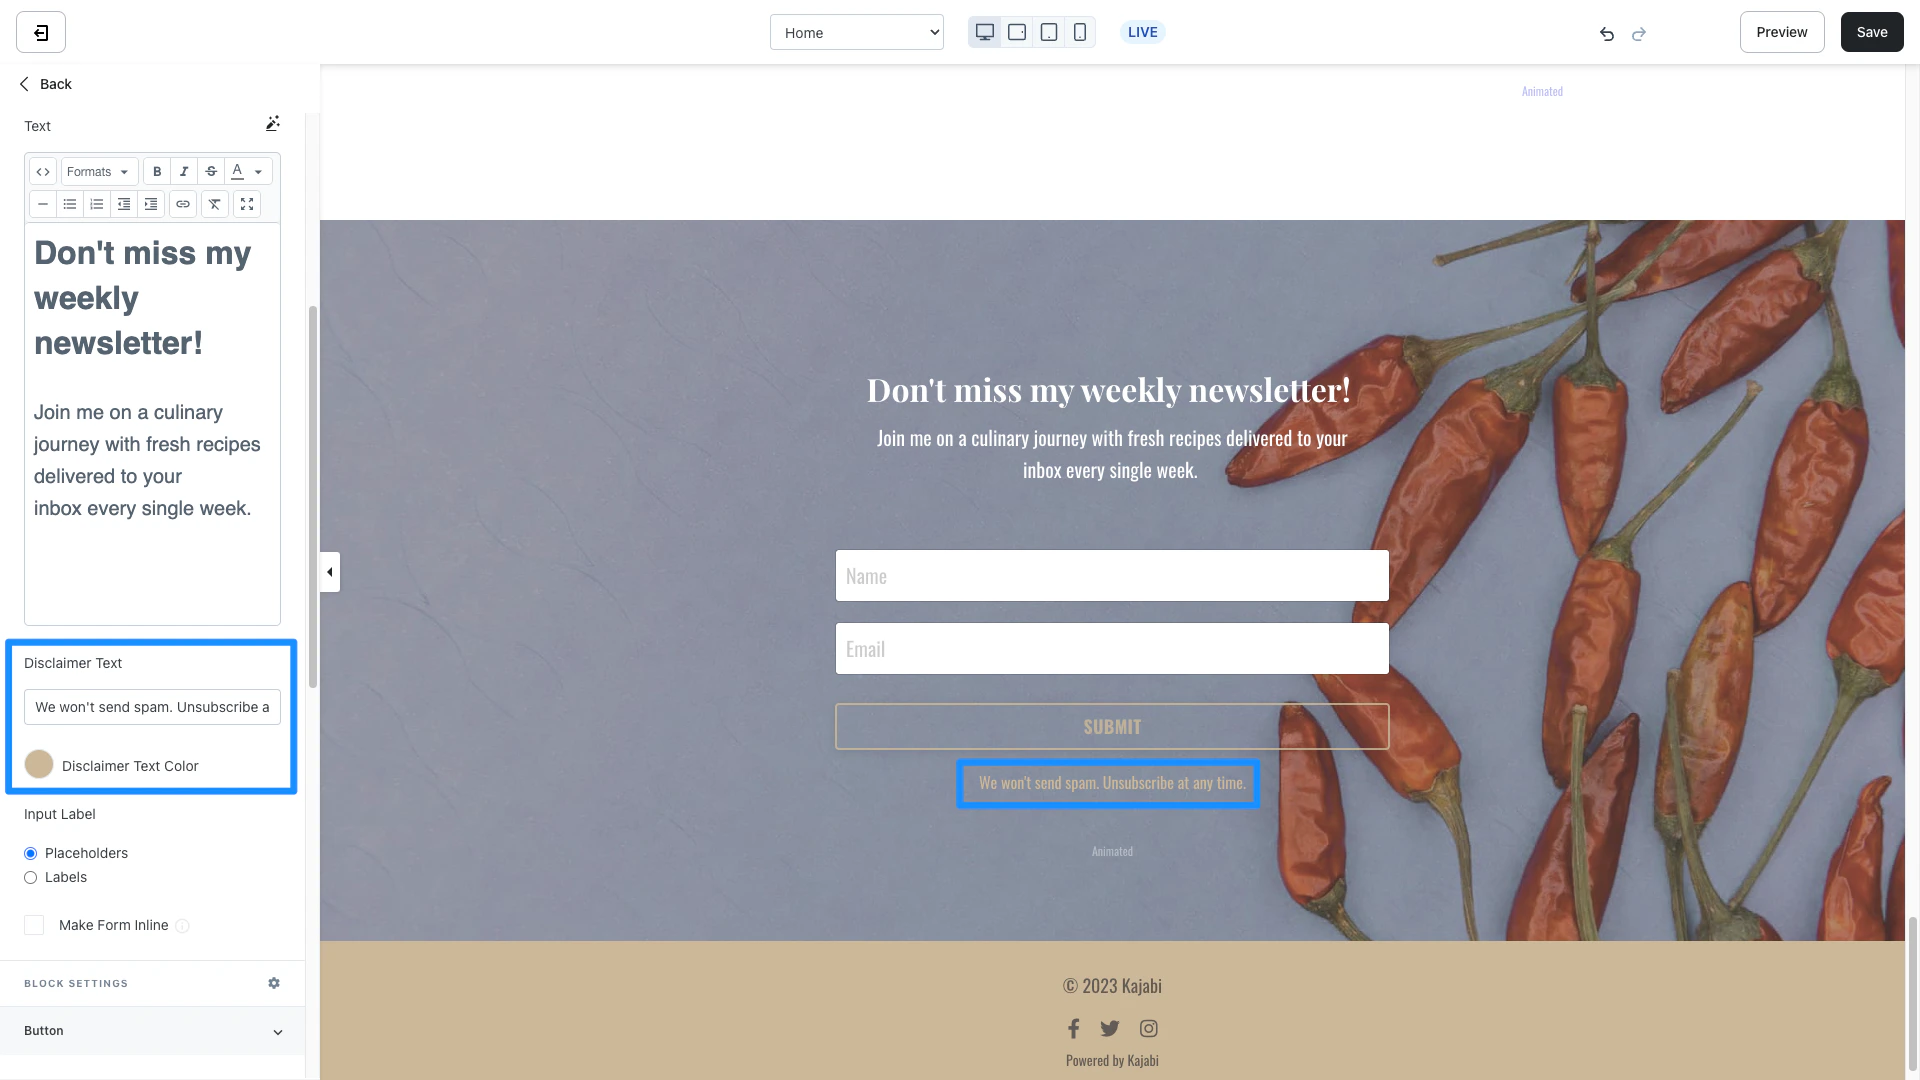
### Disclaimer text
Under GDPR, a contact must be informed that their data will be stored and used by a company when they're submitting it.
The Disclaimer Text feature helps you add clear and plain language to inform your visitors that submitting the Form will subscribe them to your Marketing Emails. This feature ultimately helps you on your path to GDPR compliance. Learn more about [GDPR and data collection](../../marketing/email-campaigns/how-kajabi-helps-you-with-privacy-regulations).
**Tip:** [Utilize the Text Editor](../../marketing/email-campaigns/can-i-make-the-text-box-larger-when-editing) to easily add your text content to your Form Block.
### Disclaimer text
Under GDPR, a contact must be informed that their data will be stored and used by a company when they're submitting it.
The Disclaimer Text feature helps you add clear and plain language to inform your visitors that submitting the Form will subscribe them to your Marketing Emails. This feature ultimately helps you on your path to GDPR compliance. Learn more about [GDPR and data collection](../../marketing/email-campaigns/how-kajabi-helps-you-with-privacy-regulations).
 *Disclaimer: Kajabi and any of its employees, contractors, or attorneys participating in providing the information contained in this Article or elsewhere on our website expressly disclaim any warranty.*
***
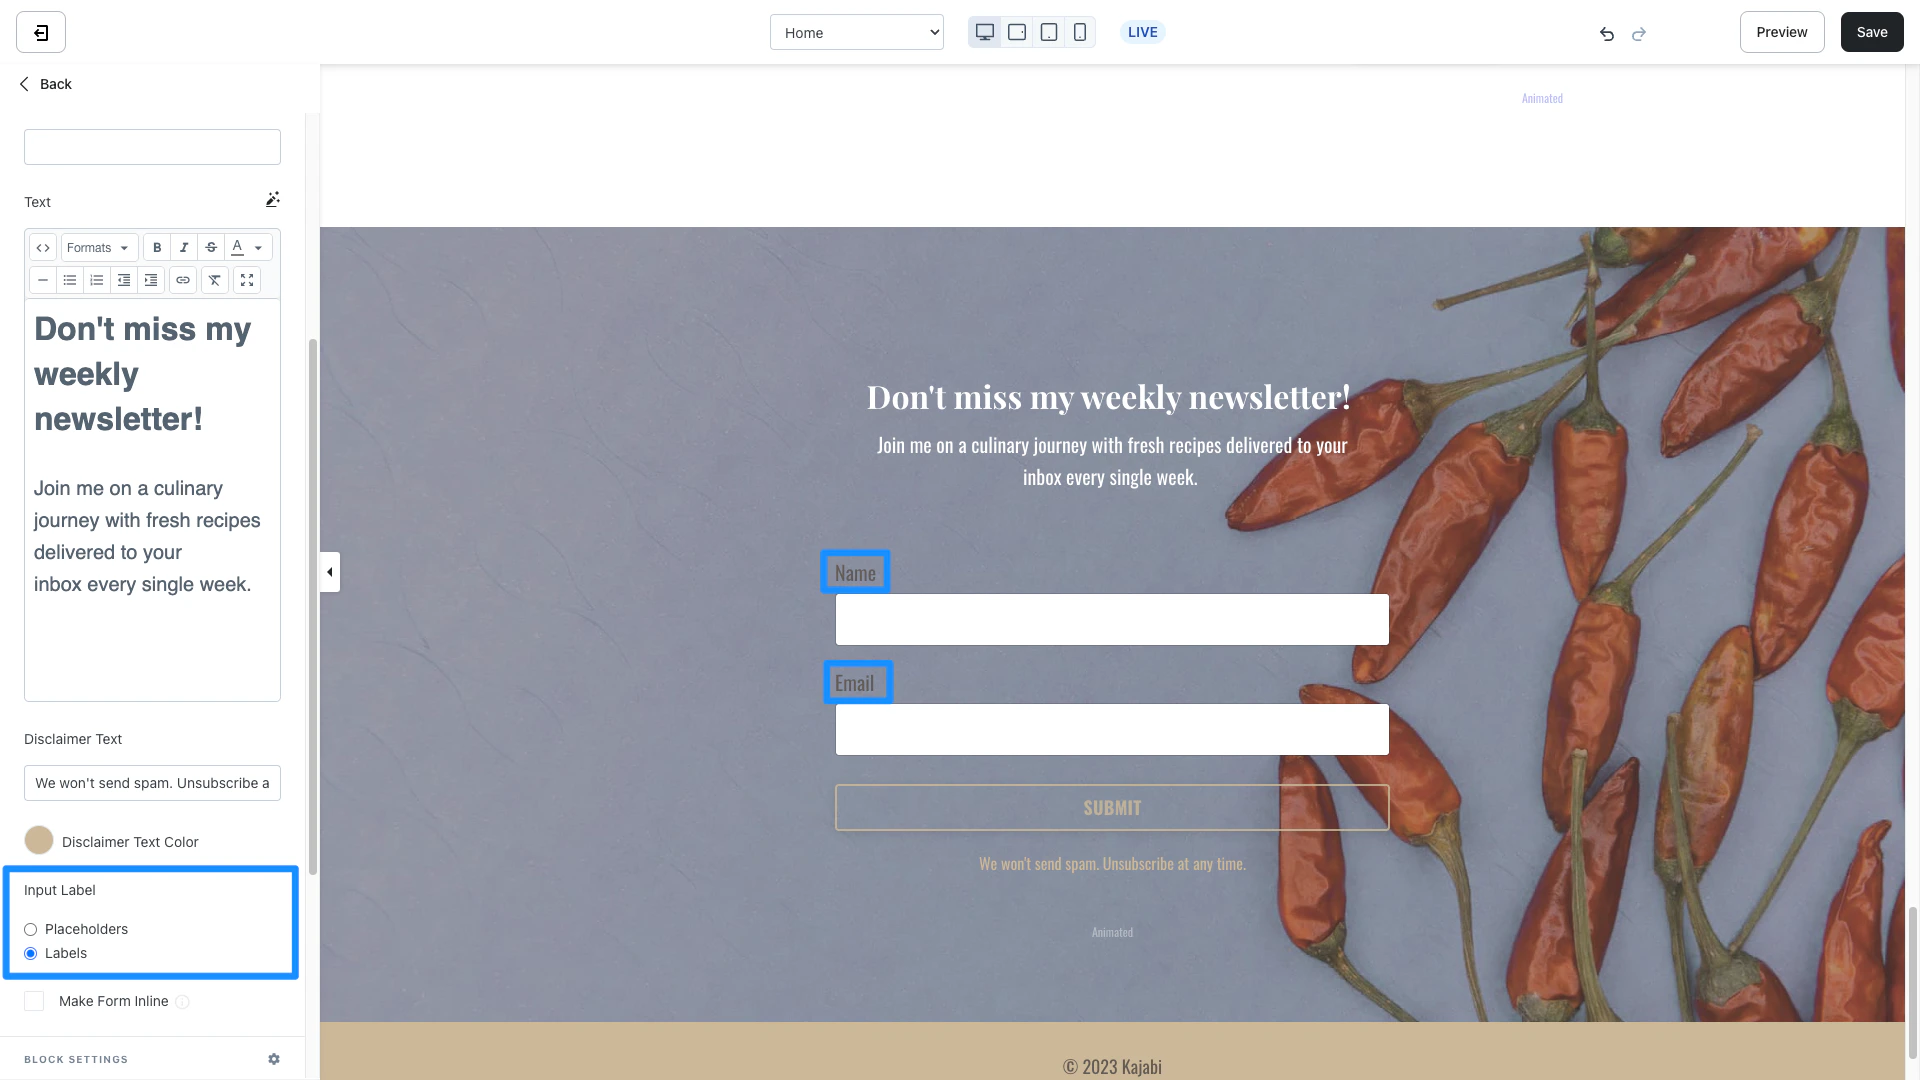
## Input label
Choose to display **Placeholder** text inside your Form fields:
*Disclaimer: Kajabi and any of its employees, contractors, or attorneys participating in providing the information contained in this Article or elsewhere on our website expressly disclaim any warranty.*
***
## Input label
Choose to display **Placeholder** text inside your Form fields:
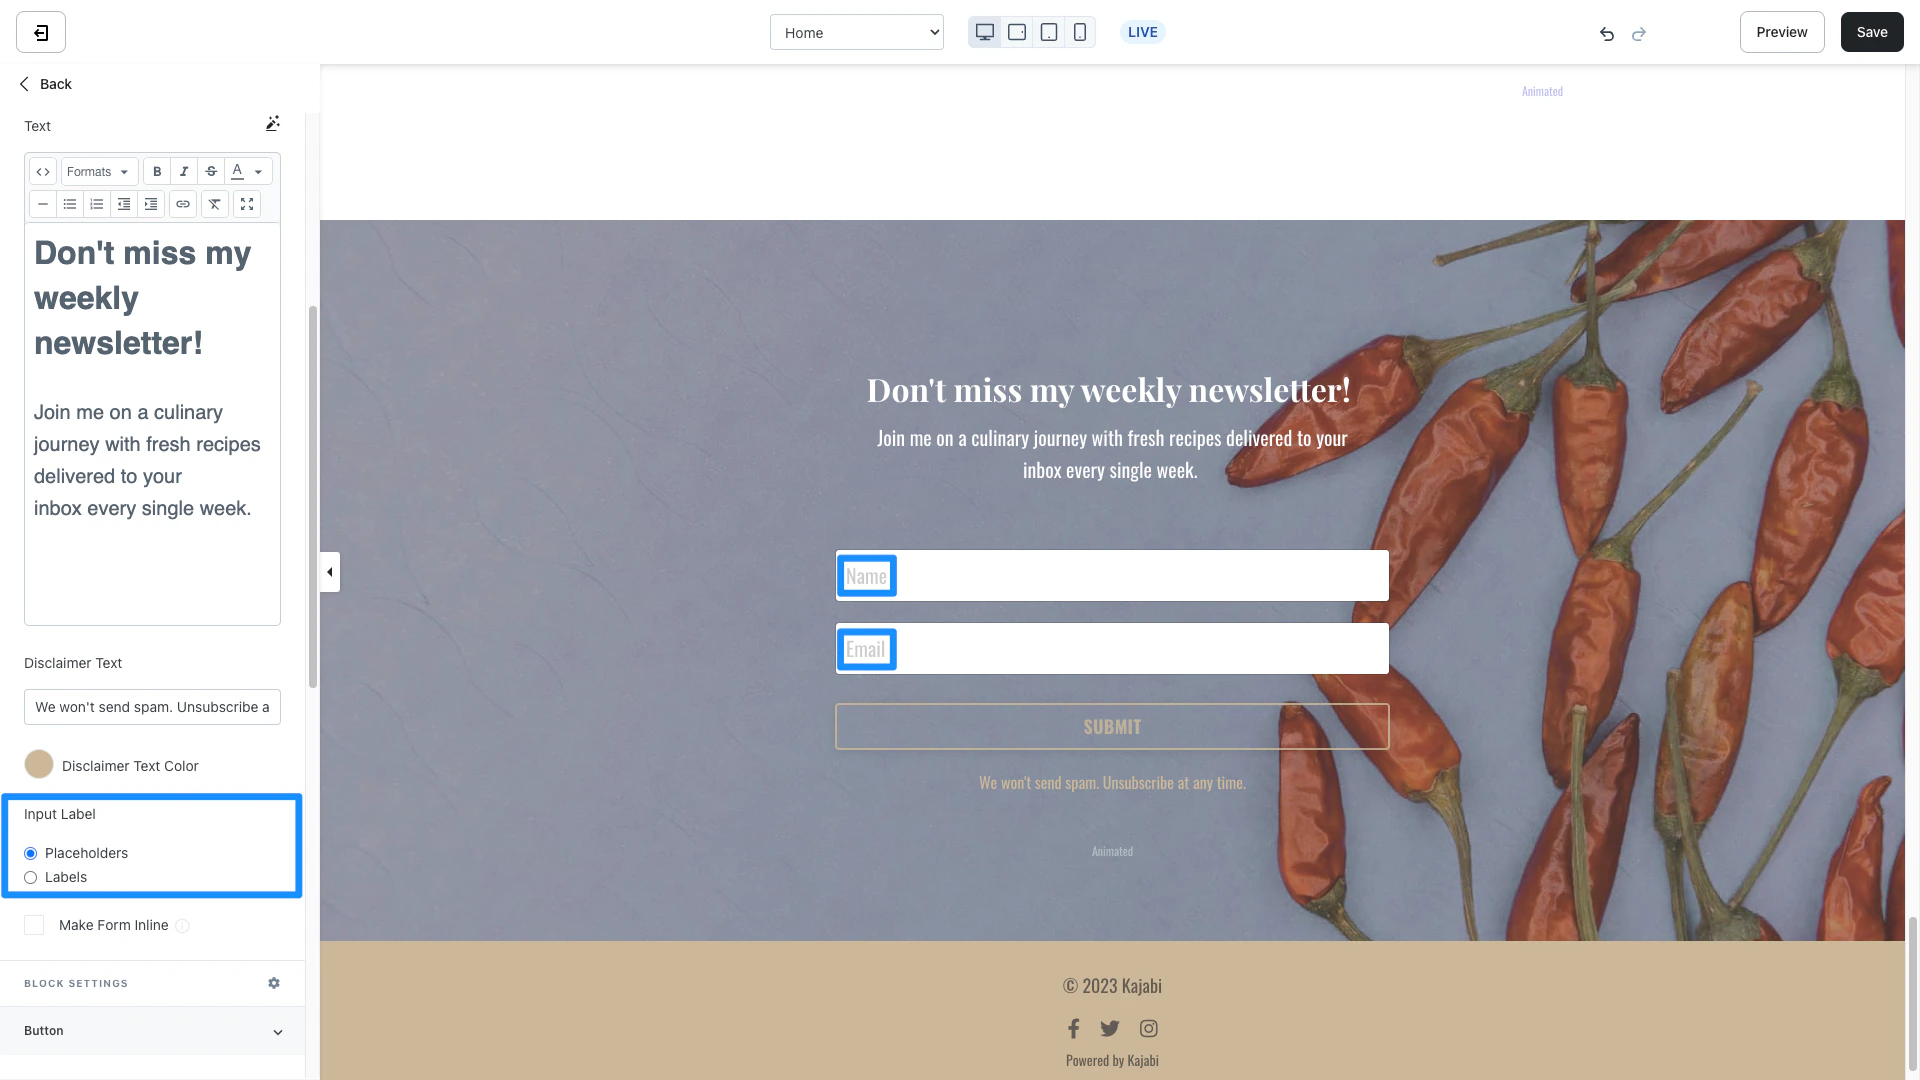 Choose to display **Labels** above each Form field:
 ### Make form inline
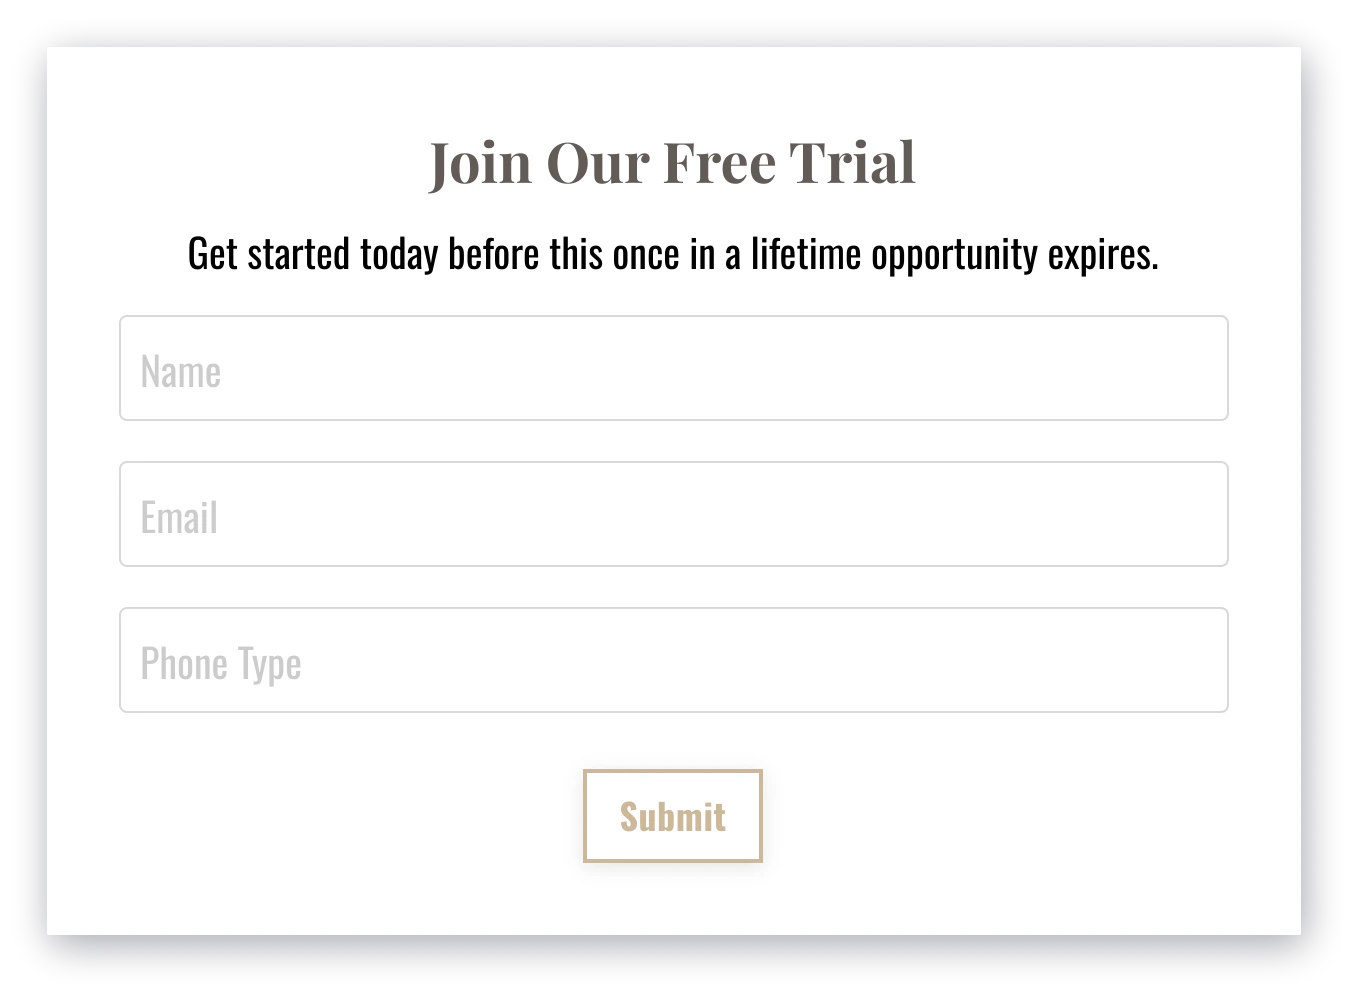
Check **Make Form Inline** to give the form a horizontal layout on larger devices:
### Make form inline
Check **Make Form Inline** to give the form a horizontal layout on larger devices:
 ***
## Block settings
To adjust the look and feel of the Block, configure your Block Settings by customizing the:
* Button
* [Background](/articles/website/pages/customizing-block-background-settings)
* [Desktop and Mobile Layout](/articles/website/pages/customizing-block-layout-settings)
* [Animations](/articles/website/pages/customizing-block-animations)
* [Time Reveal](/articles/website/pages/customizing-time-reveal-settings)
### Button
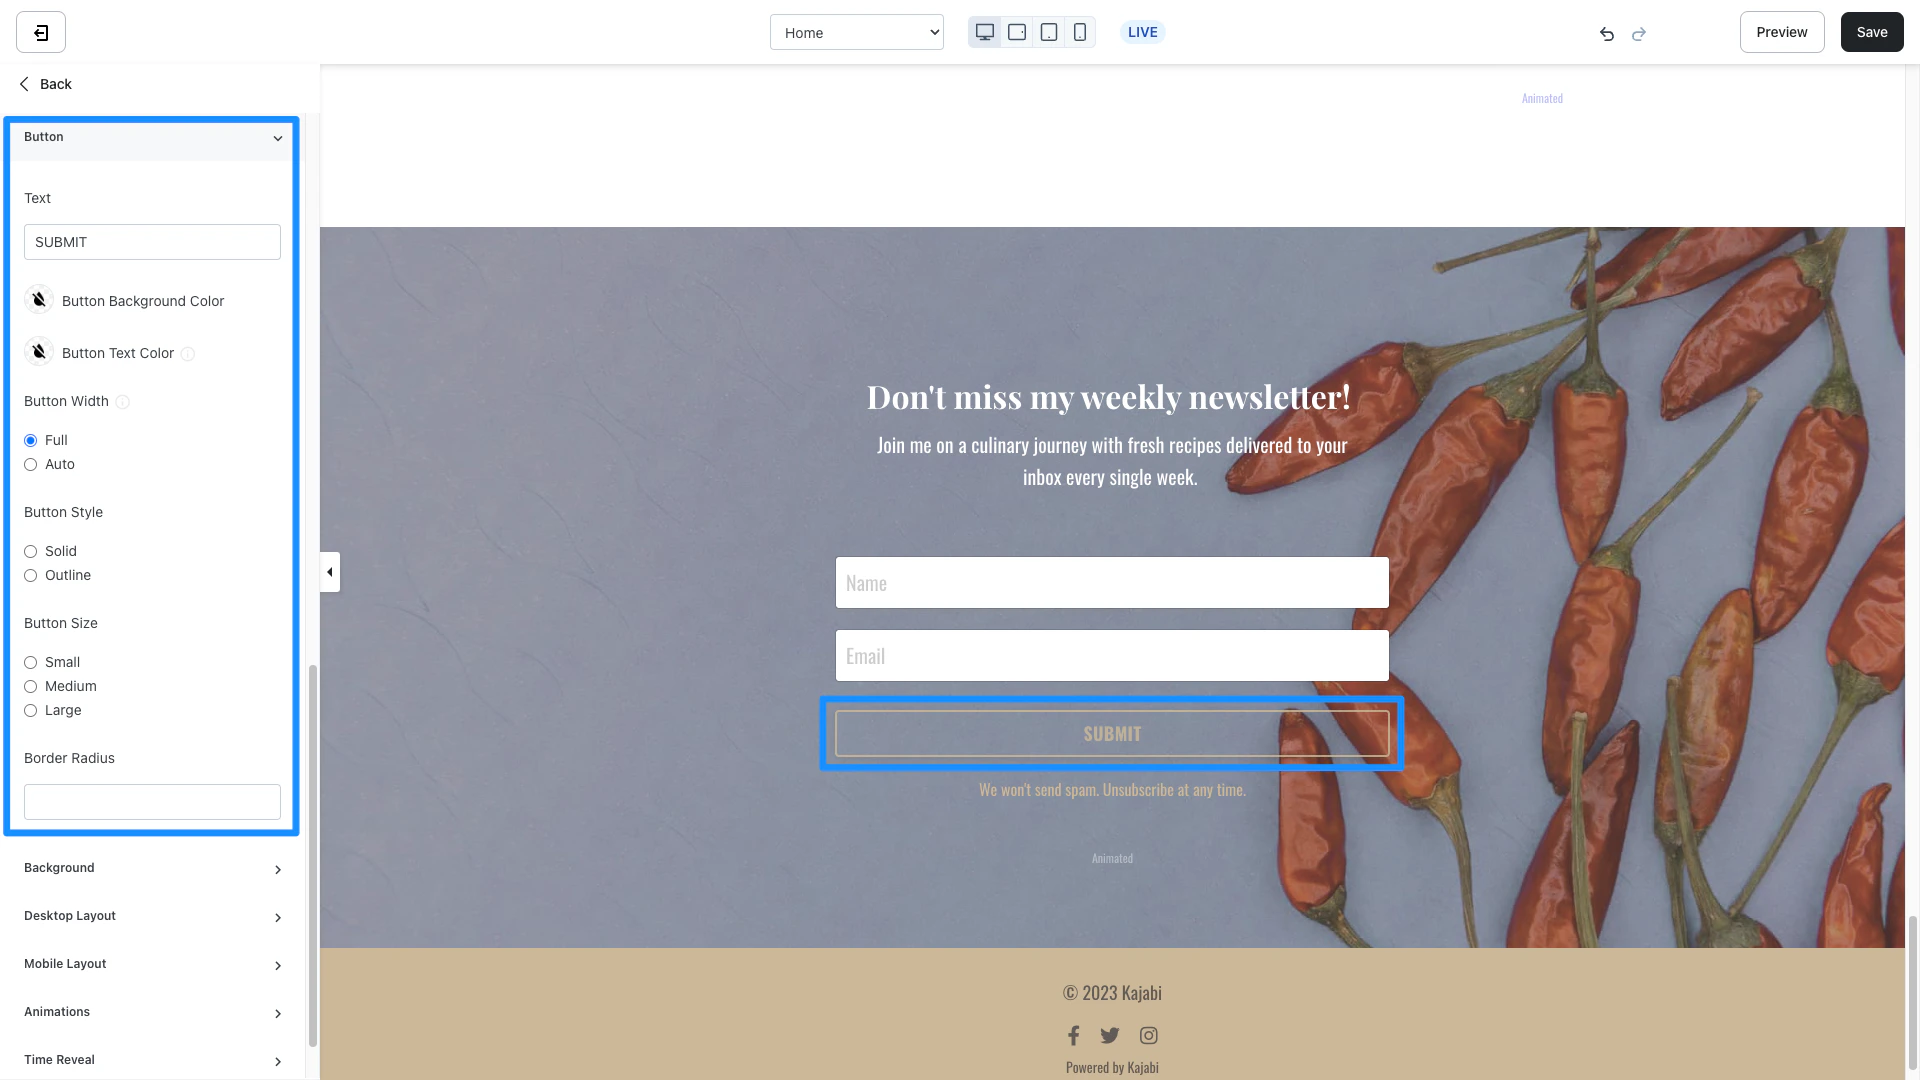
Similar to the [Call to Action Block Settings](/articles/website/pages/how-to-add-a-call-to-action-block-to-your-website-page-and-landing-page#customizing-your-call-to-action-block), customize the appearance of your Form Submission Button by editing the text, background color, text color, width, style, size, and radius.
Form button:
***
## Block settings
To adjust the look and feel of the Block, configure your Block Settings by customizing the:
* Button
* [Background](/articles/website/pages/customizing-block-background-settings)
* [Desktop and Mobile Layout](/articles/website/pages/customizing-block-layout-settings)
* [Animations](/articles/website/pages/customizing-block-animations)
* [Time Reveal](/articles/website/pages/customizing-time-reveal-settings)
### Button
Similar to the [Call to Action Block Settings](/articles/website/pages/how-to-add-a-call-to-action-block-to-your-website-page-and-landing-page#customizing-your-call-to-action-block), customize the appearance of your Form Submission Button by editing the text, background color, text color, width, style, size, and radius.
Form button:
 #### Button background color
Click the **Button background color** to select a color from your site color palette.
If you prefer to use a custom color, click the color wheel and then either enter your RGB color code or use the sliders to choose your color.
* The **square box** allows you to adjust the brightness and saturation of your color
* The **horizontal rainbow bar** allows you to select the hue
* The **horizontal gradient bar** allows you to select the opacity of your color
#### Button text color
Complement your Button Background Color with a different Button Text Color.
**Note:** The Button Text Color is for [solid buttons](/articles/website/pages/how-to-add-a-call-to-action-block-to-your-website-page-and-landing-page) only.
Click the **Button Text Color** to select a color from your site color palette.
If you prefer to use a custom color, click the color wheel and then either enter your RGB color code or use the sliders to choose your color.
* The **vertical bar** allows you to select the hue
* The **square box** allows you to adjust the brightness
* The **horizontal bar** allows you to select the opacity of your color
#### Button width
Adjust the width of your Button:
* Full: fill the width of the button area
* Auto: automatically adjust the width to fit the text
#### Button style
Change the style of the Button to display:
* Solid colored button
* Outline of your Button Background Color
#### Button size
Adjust the size of your Call to Action Button:
* Small
* Medium
* Large
Changing the size of your Call to Action will change both the button background and text size.
#### Border radius
Customize your Call to Action Border to appear more rounded or squared.
#### Button background color
Click the **Button background color** to select a color from your site color palette.
If you prefer to use a custom color, click the color wheel and then either enter your RGB color code or use the sliders to choose your color.
* The **square box** allows you to adjust the brightness and saturation of your color
* The **horizontal rainbow bar** allows you to select the hue
* The **horizontal gradient bar** allows you to select the opacity of your color
#### Button text color
Complement your Button Background Color with a different Button Text Color.
**Note:** The Button Text Color is for [solid buttons](/articles/website/pages/how-to-add-a-call-to-action-block-to-your-website-page-and-landing-page) only.
Click the **Button Text Color** to select a color from your site color palette.
If you prefer to use a custom color, click the color wheel and then either enter your RGB color code or use the sliders to choose your color.
* The **vertical bar** allows you to select the hue
* The **square box** allows you to adjust the brightness
* The **horizontal bar** allows you to select the opacity of your color
#### Button width
Adjust the width of your Button:
* Full: fill the width of the button area
* Auto: automatically adjust the width to fit the text
#### Button style
Change the style of the Button to display:
* Solid colored button
* Outline of your Button Background Color
#### Button size
Adjust the size of your Call to Action Button:
* Small
* Medium
* Large
Changing the size of your Call to Action will change both the button background and text size.
#### Border radius
Customize your Call to Action Border to appear more rounded or squared.