> ## Documentation Index
> Fetch the complete documentation index at: https://help.kajabi.com/llms.txt
> Use this file to discover all available pages before exploring further.
# Add an event to a page
> Learn to add an Event Block to your pages built with Kajabi.
**Note:** This guide refers to the latest page template available with the Website Builder and Kajabi Pages. If you are using the Premier Legacy Templates, please refer to the guide [here](/articles/website/pages/how-to-add-an-event-to-your-page-with-premier).
***
## What is an event?
In Kajabi, the term "Event" is used to represent a date and time surrounded by automated actions and emails.
Events in Kajabi can be used to build anticipation around a physical or virtual event, product launch, special offers, and more.
Create an Event to begin designing various automated actions around a specific date and time as you scale your business.
Learn more about [Events in Kajabi](../../marketing/events/event-overview).
***
## Adding an event block
* Open the **Website** tab from the Dashboard.
* Select the **Pages** tab.
* Open the page editor for your Page. [Learn more](/articles/website/pages/how-to-get-to-the-page-editor)
* Click the Section you want to edit or [create a new Section](/articles/website/pages/add-sections-to-your-pages).
* In the sidebar, click **Add Content**.
* From the list, select **Event**.
* Your newly created Event Block will generate at the bottom of the Section.
* Select an existing Event to display in the Block.
* Click **Save** to keep your changes:
Want to create a new page for your Event? [Learn more](/articles/website/pages/how-to-add-pages-to-your-website)
***
## Customizing your event block
In an Event Block, customize the [Block Width](/articles/website/pages/how-to-customize-the-block-width), select the Event displayed, customize the Event Title and Description, and change the look and feel of your Block by adjusting the Event Block Settings.
### Select the event
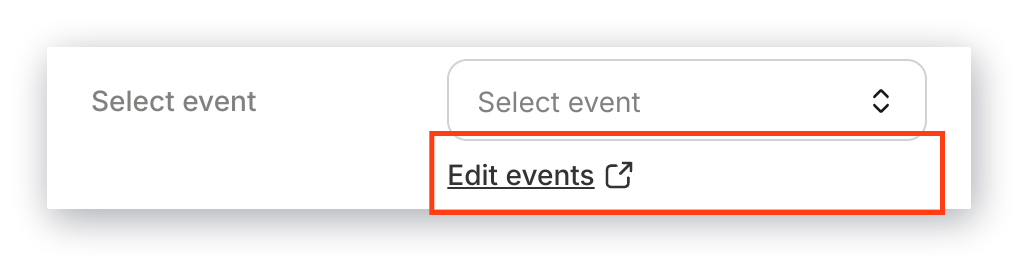
To select an Event from the dropdown, you must first create an event in your Marketing tab.
* In the Event Block Editor, navigate to the Event dropdown.
* Click **Edit your Events** directly below the Event dropdown:
 Learn more about [Events in Kajabi](../../marketing/events/event-overview) for details.
### Edit the event title and description
Enter your desired text for the Event Title and Event Description:
Learn more about [Events in Kajabi](../../marketing/events/event-overview) for details.
### Edit the event title and description
Enter your desired text for the Event Title and Event Description:
 ***
## Block settings
To adjust the look and feel of the Block, configure your Block Settings by customizing the:
* [Call to Action](/articles/website/pages/how-to-add-a-call-to-action-block-to-your-website-page-and-landing-page#customizing-your-call-to-action-block) to change the button
* Typography
* Language
* [Background](/articles/website/pages/customizing-block-background-settings)
* [Desktop and Mobile Layout](/articles/website/pages/customizing-block-layout-settings)
* [Animations](/articles/website/pages/customizing-block-animations)
* [Time Reveal](/articles/website/pages/customizing-time-reveal-settings)
### Typography
#### Title size (desktop & mobile)
Adjust the Font Size for your Event Title when viewed on Desktop and Mobile devices.
#### Title color
Select your Title Color to match your brand.
Clicking **Title Color** will open your site color palette.
If you prefer to use a custom color, click the color wheel and then either enter your RGB color code or use the sliders to choose your color.
* The **square box** allows you to adjust the brightness and saturation of your color.
* The **horizontal rainbow bar** allows you to select the hue.
* The **horizontal gradient bar** allows you to select the opacity of your color.
#### Description color
Clicking **Description Color** will open your site color palette.
If you prefer to use a custom color, click the color wheel and then either enter your RGB color code or use the sliders to choose your color similar to Title Color.
#### Date size (desktop & mobile)
Adjust the Font Size for the Event Date when viewed on Desktop and Mobile devices.
#### Date color
Clicking **Date Color** will open your site color palette.
If you prefer to use a custom color, click the color wheel and then either enter your RGB color code or use the sliders to choose your color similar to Title Color.
### Language
Customize your Language Block Settings to change the:
* Date Format
* Display or Hide the Year
* Display or Hide the Time
* Display or Hide the Timezone
Edit your Event information in the [Event Editor](../../marketing/events/how-to-create-an-event) located under the Marketing tab.
***
## Block settings
To adjust the look and feel of the Block, configure your Block Settings by customizing the:
* [Call to Action](/articles/website/pages/how-to-add-a-call-to-action-block-to-your-website-page-and-landing-page#customizing-your-call-to-action-block) to change the button
* Typography
* Language
* [Background](/articles/website/pages/customizing-block-background-settings)
* [Desktop and Mobile Layout](/articles/website/pages/customizing-block-layout-settings)
* [Animations](/articles/website/pages/customizing-block-animations)
* [Time Reveal](/articles/website/pages/customizing-time-reveal-settings)
### Typography
#### Title size (desktop & mobile)
Adjust the Font Size for your Event Title when viewed on Desktop and Mobile devices.
#### Title color
Select your Title Color to match your brand.
Clicking **Title Color** will open your site color palette.
If you prefer to use a custom color, click the color wheel and then either enter your RGB color code or use the sliders to choose your color.
* The **square box** allows you to adjust the brightness and saturation of your color.
* The **horizontal rainbow bar** allows you to select the hue.
* The **horizontal gradient bar** allows you to select the opacity of your color.
#### Description color
Clicking **Description Color** will open your site color palette.
If you prefer to use a custom color, click the color wheel and then either enter your RGB color code or use the sliders to choose your color similar to Title Color.
#### Date size (desktop & mobile)
Adjust the Font Size for the Event Date when viewed on Desktop and Mobile devices.
#### Date color
Clicking **Date Color** will open your site color palette.
If you prefer to use a custom color, click the color wheel and then either enter your RGB color code or use the sliders to choose your color similar to Title Color.
### Language
Customize your Language Block Settings to change the:
* Date Format
* Display or Hide the Year
* Display or Hide the Time
* Display or Hide the Timezone
Edit your Event information in the [Event Editor](../../marketing/events/how-to-create-an-event) located under the Marketing tab.