> ## Documentation Index
> Fetch the complete documentation index at: https://help.kajabi.com/llms.txt
> Use this file to discover all available pages before exploring further.
# Add pricing options to a page with Premier
> Learn to add a Pricing Options Section to showcase your Products, Services, Pricing Options, and more in your landing pages built with the Legacy Template, Premier.
**Note:** This article refers to the Premier Legacy Templates, which may be outdated. If you are using the Kajabi Pages Templates, please refer to the updated guide [here](/articles/website/pages/how-to-add-pricing-cards-to-your-page).
***
## Adding pricing options
* Open the **Website** tab from the Dashboard.
* Click **Pages**.
* Select the page you wish to customize or [create a new page](/articles/website/pages/how-to-create-a-new-page-with-premier).
* Click **Customize** to open the template editor.
* Click **+ Add Section** from the sidebar.
* Select **Pricing Options**.
* Click **Add**.
* Your newly created Section will generate at the bottom of the page.
* Click **Save** to keep your changes:
***
## Customizing your pricing option section
### Heading and subheading
Customize the message displayed above your Pricing Options.
### Section appearance
Configure your Section Appearance to change the Background and Text Color, select the Text Alignment, and change the Spacing of the Section.
### Add pricing option
Add more Pricing Option cards by scrolling to the bottom of the sidebar editor and selecting **Add Pricing Option.**
***
## Customizing your pricing options
Customizing each Pricing Option Block by editing the:
* Title
* Price
* Frequency
* Text Content (typically the features included with the specific pricing option)
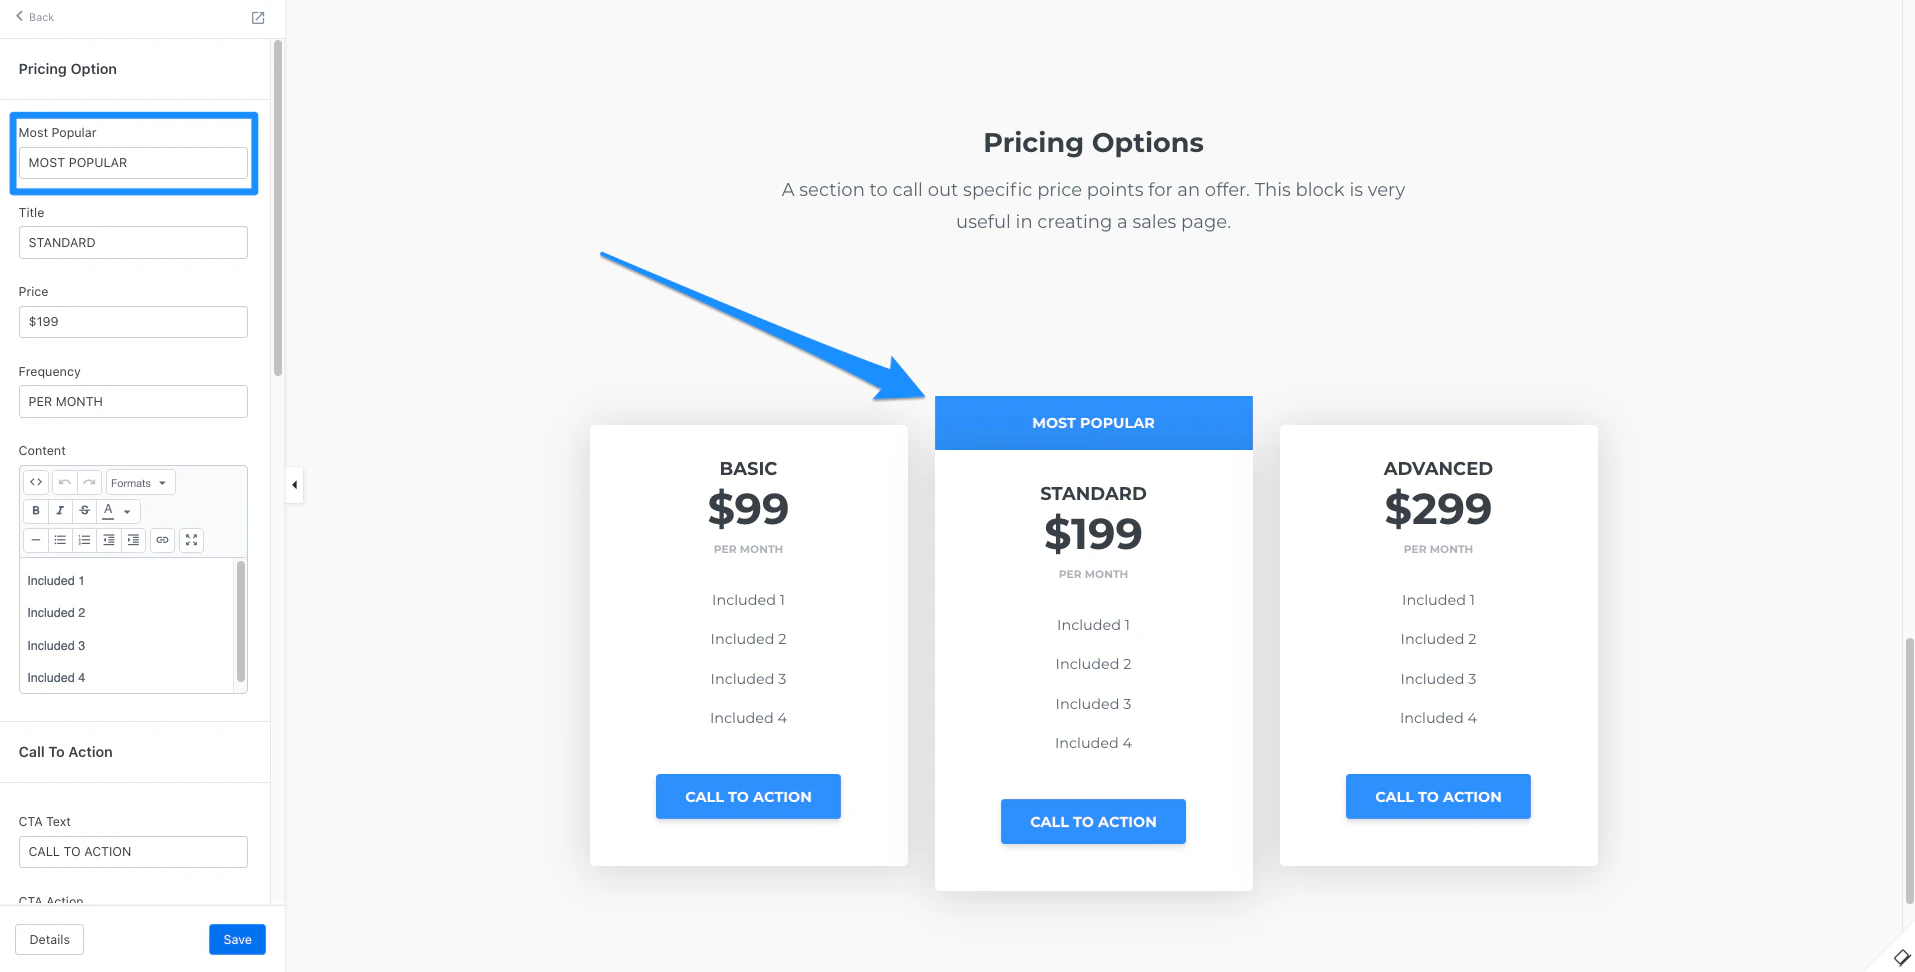
### Most popular
Select your Most Popular Pricing Option to make it stand out to your customers:
 ### Call to action
Include a Call to Action button for each Pricing Option for your customers to:
* Go to a Landing Page
* Go to a Checkout Page
* Download a File
* Go to a URL
* Open two step optin popup
* Go to a section on the page
The Call to Action gives you the flexibility to connect your Pricing Options to various locations, whether that be a Sales Page, third-party checkout pages, or more.
**Note:** When using the **Go to a URL** action, be sure to enter a full URL (e.g., [https://kajabi.com/](https://kajabi.com/)).
Open in New Window: Choose to open the Offer Checkout Page in a new window/tab when clicked by selecting **Open In New Window**.
Customize the appearance of your Call to Action with:
* CTA Style
* CTA Size
* Button Width
* Button Color
* Button Text Color
Learn to use a [Call to Action](/articles/website/pages/how-to-use-a-call-to-action-in-your-page-with-premier) with Premier.
### Time reveal
The Time Reveal Settings reveal your Call to Action (CTA) button in the Feature Block a specified amount of time (Offset) after an Event occurs.
To set up a Time Reveal for your CTA button in the Feature Block:
* Select an Event
* Enter your Offset value
* Specify the Offset Time Period in seconds, minutes, hours, or days
### Block appearance
Customize your overall Block appearance by selecting your colors:
* Background Color
* Text Color
* Accent Color
* Popular Color
Each color overrides the default color determined by the Primary Color in your [Page Color Scheme](/articles/website/pages/how-to-customize-your-fonts-and-colors-in-your-premier-page-settings).
### Call to action
Include a Call to Action button for each Pricing Option for your customers to:
* Go to a Landing Page
* Go to a Checkout Page
* Download a File
* Go to a URL
* Open two step optin popup
* Go to a section on the page
The Call to Action gives you the flexibility to connect your Pricing Options to various locations, whether that be a Sales Page, third-party checkout pages, or more.
**Note:** When using the **Go to a URL** action, be sure to enter a full URL (e.g., [https://kajabi.com/](https://kajabi.com/)).
Open in New Window: Choose to open the Offer Checkout Page in a new window/tab when clicked by selecting **Open In New Window**.
Customize the appearance of your Call to Action with:
* CTA Style
* CTA Size
* Button Width
* Button Color
* Button Text Color
Learn to use a [Call to Action](/articles/website/pages/how-to-use-a-call-to-action-in-your-page-with-premier) with Premier.
### Time reveal
The Time Reveal Settings reveal your Call to Action (CTA) button in the Feature Block a specified amount of time (Offset) after an Event occurs.
To set up a Time Reveal for your CTA button in the Feature Block:
* Select an Event
* Enter your Offset value
* Specify the Offset Time Period in seconds, minutes, hours, or days
### Block appearance
Customize your overall Block appearance by selecting your colors:
* Background Color
* Text Color
* Accent Color
* Popular Color
Each color overrides the default color determined by the Primary Color in your [Page Color Scheme](/articles/website/pages/how-to-customize-your-fonts-and-colors-in-your-premier-page-settings).