

Overview
Kajabi offers many native fonts with the page builder. However, Kajabi also gives you the ability to use custom fonts with Google fonts or a licensed font file to design a uniquely branded page. Regardless of your Kajabi plan, the Page Builder lets you add custom fonts to your page without accessing the code editor.Note: Completion of the steps in this guide requires working with HTML and CSS code. If you aren’t familiar with HTML and CSS, we recommend consulting with a web design professional regarding the addition of embed code to your Kajabi site.Keep in mind that OTF files are not supported by Kajabi and cannot be uploaded.
Note: If you are using the Legacy builder, Premier, custom fonts will require access to the code editor.
Cascading Style Sheets (CSS)
CSS is a style sheet language that is used to selectively style your HTML elements. For example, you can select a specific paragraph text within your page and change the color to green with CSS. The CSS Code Editor, available with the Page Builder, lets you update your HTML style elements to change the fonts on your page.Headings and heading tags
The element tags for font Heading sizes are H1, H2, H3, H4, H5, H6. Understanding Heading tags and how to change them on your Kajabi page prepares you with the necessary knowledge for adding custom fonts to your page.
Add a custom font for headings
Note: If you are using the Legacy builder, Premier, adding custom fonts will require access to the code editor.
How to select your heading tag
Kajabi uses standard Heading tags to define your Heading text. When adding your custom font to your page, you’ll need to define the specific Heading tag that will take on the custom font style. By defining a specific Heading tag, you can simply update that Heading tag throughout your page after adding your custom font to the Page Settings CSS.To view and assign the Heading tag you wish to apply your custom font to:
- Open the Website tab from your Dashboard.
- Click Pages.
- Click into the page you wish to edit.
- Select the Text block containing the text you wish to add your custom font to.
- Highlight the specific text in the text editor.
- Then, click Formats from the text editor options.
- Select Headings.
- Select the Heading tag you wish to use for your custom font.
- Click Save to keep and apply your changes:
How to add your custom font
With Kajabi’s page builder, you can use Google Fonts or a licensed font file to add your custom font to your selected Heading tag. If you wish to add a Google Font to your page, click here to learn more about using Google Fonts on your page.Note: OTF files are not supported by Kajabi and cannot be uploaded onto your site.
Licensed font file
Follow the steps below to use your licensed font file on your page built with Kajabi. In this example, we will customize our Heading 3 text. If you’ve purchased a font file and you have the license to use it, then you can use a .ttf, .woff, .woff2, or .eot font file type on Kajabi.How to upload your licensed font file to your newly created page:
- First, create an assets page in your Kajabi landing page folder so you can reference it directly from Kajabi.
- Open your Assets page and add a Call to Action block.
- Write the name of your font file in the Button text (e.g., Cameliya.ttf).
- Then, select Download a file for the Button action.
- Upload your font file.
- Then, click Save:
How to add your licensed font file to your page
To add your licensed font file to your page, you will need to add custom code to your site with Kajabi’s Page Builder. If you are familiar with adding Google Fonts to your page, you will notice that the code used to add your licensed font file is similar to the code used for your Google Font.Note: When you input the sample code below, replace FontName, FONTFILENAME, and XXXXXX with the real name of your font file (examples: Arial, Helvetica, Garamond, etc.).
TTF code
If you are using a TrueType font file, the following code will be added to your page:EOT code
If you are using an Embedded OpenType font file, replace the source line from the code above to contain the following information:WOFF2 code
If you are using a WOFF2 font file, replace the source line from the code above to contain the following information:- Copy the link address from your Call to Action button:
- Right-click your Call to Action button from your newly created Assets page.
- Then, copy the link address:
- Now that you have copied the font file use the appropriate code based on your font file type (.ttf, .eot, .woff2) and paste it into the code provided above.
Note: When you input the sample code below, replace FontName, FONTFILENAME, and the sample URL with the real name of your font file (examples: Arial, Helvetica, Garamond, etc.) and your real source URL.For example, if you have a .ttf file, add your font file link address within the parentheses to define your source address (‘FONTFILENAME.ttf’):
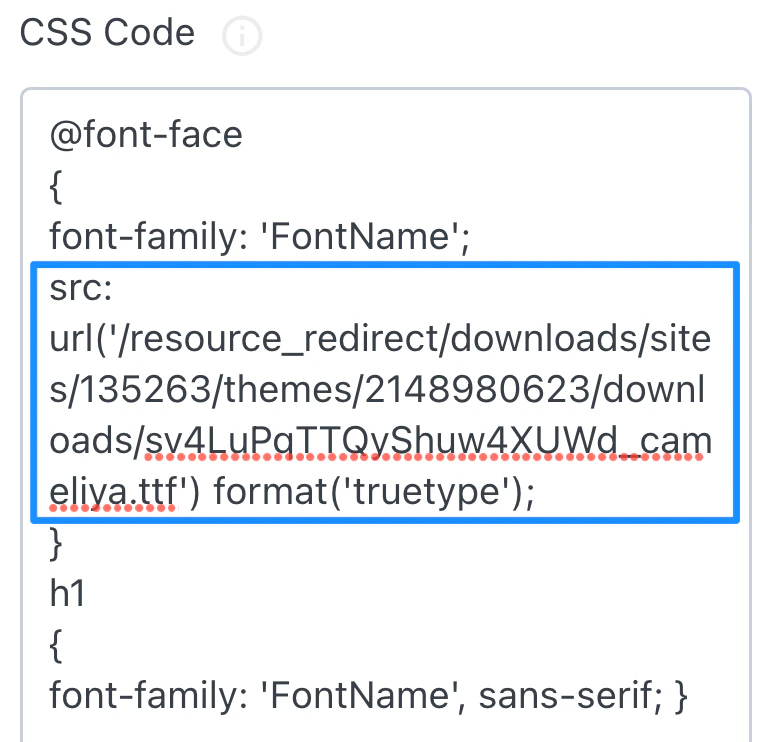
Note: Ensure that your custom font displays on all web browsers with or without a custom domain connected to your site by removing the domain from the source url
src: url in your code.By default, your link will include your Kajabi subdomain in the source url, but this may not accurately display your custom font if you have connected a custom domain to your site. Refer to the image above to create the correct custom code for your font.- If your font file is an .eot file type, use the EOT font format code:
- After adding your font file’s link address to your custom font code, navigate back to the landing page where you want to add your custom font.
To add the custom code:
- In your page editor, open Settings.
- Click Custom code.
- Then, add your copied custom code containing your font file code into the CSS code field.
- Be sure to click Save to apply and view your custom font.
- After adding your font file to your Assets page, preview the page.
Custom font for the entire website
Create a consistent brand with your custom font by adding it to every new page created on your website. Use your Site Settings to apply code to your entire website. By using the custom font code created earlier, you can add it to your Settings rather than to an individual page.Then, add your custom font to your Site Settings:
- Open the Settings tab from your Dashboard.
- Click Site Details.
- Then, navigate to Page Scripts.
- In the Header Page Scripts field, add your custom font code
- Add Style tags to your code. First, the opening style tag
<style>above your custom font code, and then the closing style tag</style>directly below your custom font code.
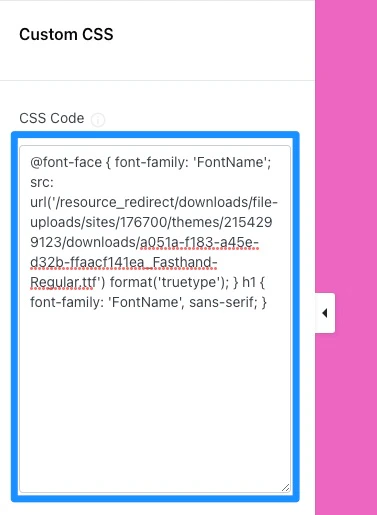
Note: When you input the sample code below, replace FontName and the sample URL with the real name of your font file (examples: Arial, Helvetica, Garamond, etc.) and your real source URL.For example:
- Then, click Save to apply your custom font to new pages created on your site:
Note: If your existing pages do not contain your defined heading (in this case, our Heading 3 text), then the font will not load onto your page.Be sure to include the defined Heading tag for your custom font code in your website and landing pages to add your custom font to your pages:
src: url in the code with your font file URL. For this example, our source URL is the following: