

Beta: This feature is being released in phases to ensure stability across all accounts. If you do not see this setting the feature has not been made available to your account yet. Check back at a later time to try the new experience.
- Publishers monetize their email list by featuring sponsored content from other experts inside their Email Broadcasts. Publishers set their own pricing and keep 80% of every deal.
- Sponsors pay to feature their Products inside other experts’ Email Broadcasts to reach new, engaged audiences.
Set up a Publisher profile
Publishers earn revenue by including a Sponsored block inside an Email Broadcast. To get started, you will need:- An active Kajabi account with at least one connected site
- At least 100 email list subscribers on the site you want to connect. Sponsors are looking for engaged audiences, so this minimum helps ensure your profile is competitive
- A business location in a country where Stripe supports payouts. This currently includes the United States, United Kingdom, Canada, European Union countries, Iceland, Liechtenstein, Switzerland, and Norway. Publishers based in other countries can’t connect Stripe to receive payouts yet
Open Amplify and choose the Publisher role
- Navigate to Amplify from your Kajabi dashboard.
- Choose Publisher on the role selection screen.
Connect a Kajabi site
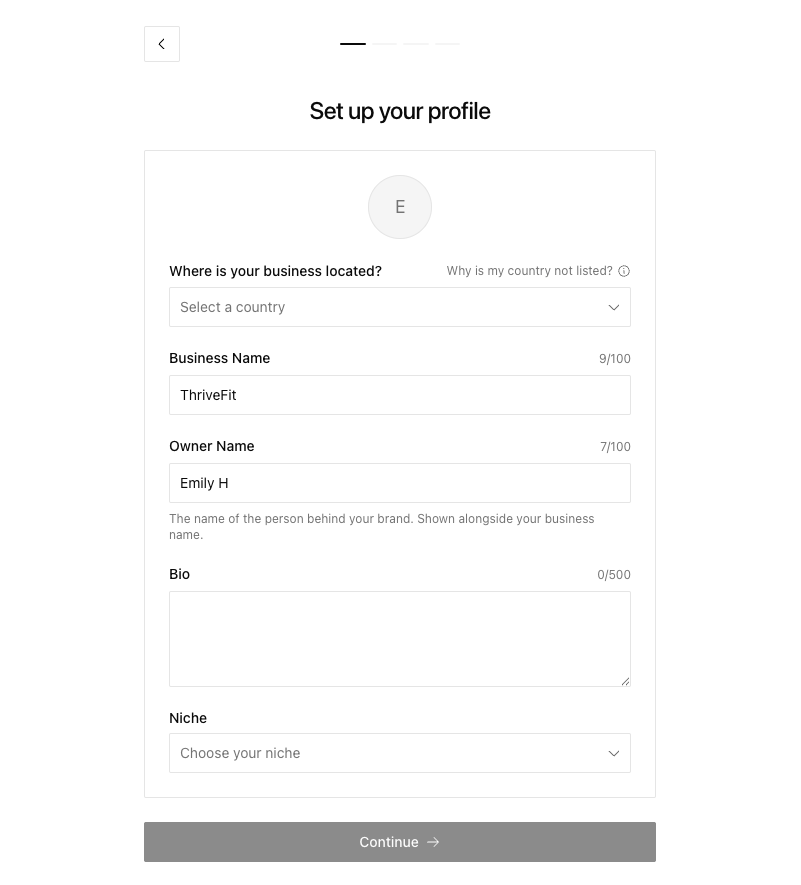
If you have multiple Kajabi sites, choose the site whose audience you’d like to monetize. Amplify uses this site’s brand, bio, and Email Broadcast history to pre-fill your profile and recommend pricing. Pick the site whose audience is the best fit for sponsorships, usually your largest or most engaged list. You can create a separate Publisher profile for each site later.Fill out the Publisher profile
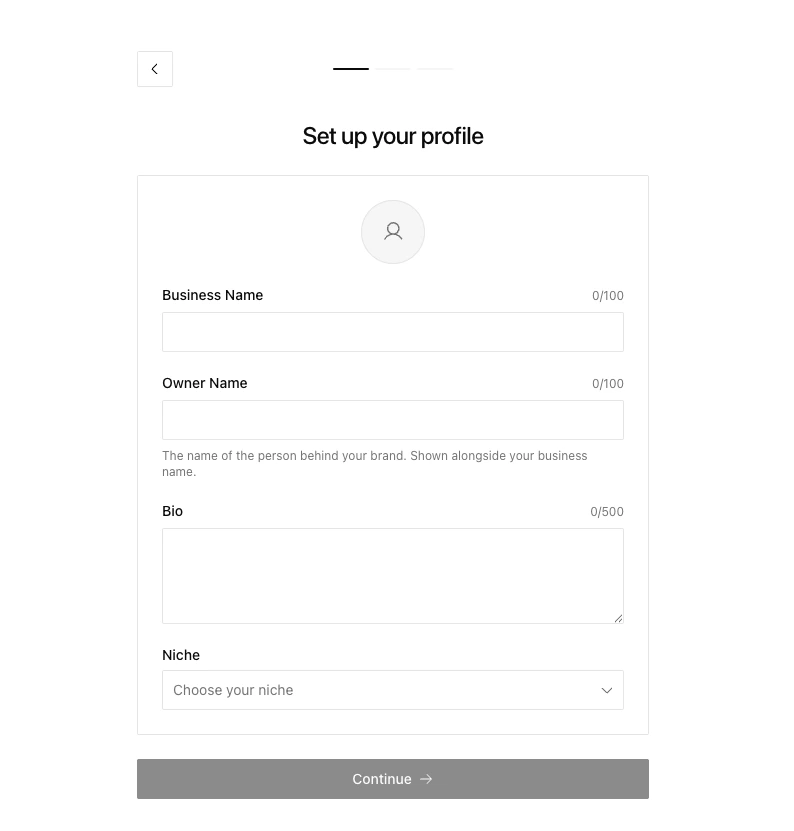
This is what Sponsors see when deciding whether to send you a promotion request.- Business Name (pre-filled): The name of your brand or business. Edit if you’d like it to read differently to potential Sponsors.
- Owner Name (pre-filled): Your name. Sponsors often want to know who’s behind the brand.
- Bio (pre-filled): A short description of who you are and what your audience cares about. Strong bios mention your niche, your audience’s interests, and what makes your list valuable.
- Niche: Choose the category that best describes your audience (e.g. Health & Fitness, Business & Marketing). This is how Sponsors filter the directory, so accuracy is key — your profile will only surface to Sponsors browsing that category.
Set pricing
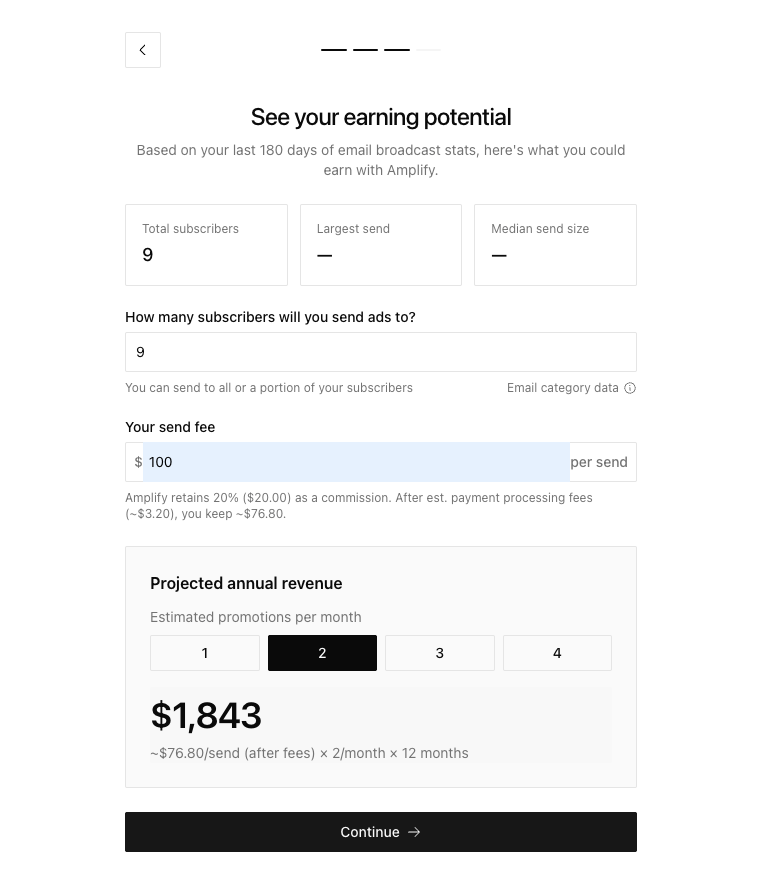
Sponsors compare your fee against your audience size and engagement when deciding whether to send a request. Amplify pulls in the following stats from your last 180 days of Email Broadcasts (for sends delivered to 100+ subscribers):- Total subscribers
- Largest send size
- Median send size
- Email Broadcast count
- How many subscribers will you send ads to? The size of the audience that will receive a Sponsored block. This cannot exceed your actual subscriber count. Most Publishers send to their full list, but if you want to reserve sponsorships for a subset (e.g. only your most engaged segment), set a lower number.
- Your send fee: The amount you charge per sponsored send. You set the price — Sponsors decide whether to send a request.
- Recommended fee: Amplify suggests a fee based on your audience size, your click-through rate at that audience size, industry-standard conversion rates, and a target return for the Sponsor.
Note: This is only a recommendation. You know your audience best — set your fee at, above, or below the recommendation as you see fit. Charging more is fine if your audience converts well; charging less can help you build a track record quickly.
Review and create the Publisher profile
Preview your Publisher profile exactly as it appears to Sponsors. If anything looks off, scroll back to adjust. When you’re happy with it, click Create Profile & Continue to Home.Note: Amplify takes a 20% commission fee on each completed promotion. Publishers keep 80%.
Connect a Stripe account
You can browse the directory immediately, but you cannot accept a promotion request until your Stripe account is connected.- Go to Settings > Account.
- Find the Stripe Account card.
- Follow the prompts to complete Stripe Connect onboarding. Stripe collects your banking info directly — Kajabi never sees it.
- Review the connection status on the card, including whether charges and payouts are enabled.
Important: Until Stripe is connected, you cannot accept or approve promotion requests, even if a Sponsor has sent one. Connect Stripe early so you don’t lose deals while you’re setting things up.
Note: Payouts are issued through Stripe 14 days after the promotion is sent.
Set up a Sponsor profile
Sponsors pay to promote their Products inside other experts’ Email Broadcasts. To get started, you will need:- An active Kajabi account
- Your ad copy: a headline, body, and destination URL
- A budget in mind for what you’re willing to pay per sponsored send
Open Amplify and choose the Sponsor role
- Navigate to Amplify from your Kajabi dashboard.
- Choose Sponsor on the role selection screen.
Fill out the Sponsor profile
Your Sponsor profile is what Publishers see when deciding whether to accept your promotion request. You can optionally import details from one of your Kajabi sites or fill everything in manually.- Business Name: The name of the brand or Product you’re promoting.
- Owner Name: Your name. Publishers often want to know who’s behind the campaign.
- Bio: A short description of who you are and what you offer. The strongest bios make it clear what your Product does and who it’s for.
- Niche: Choose the category that best describes your business. Publishers use the niche to identify Sponsors whose offerings are a good match for their audience.
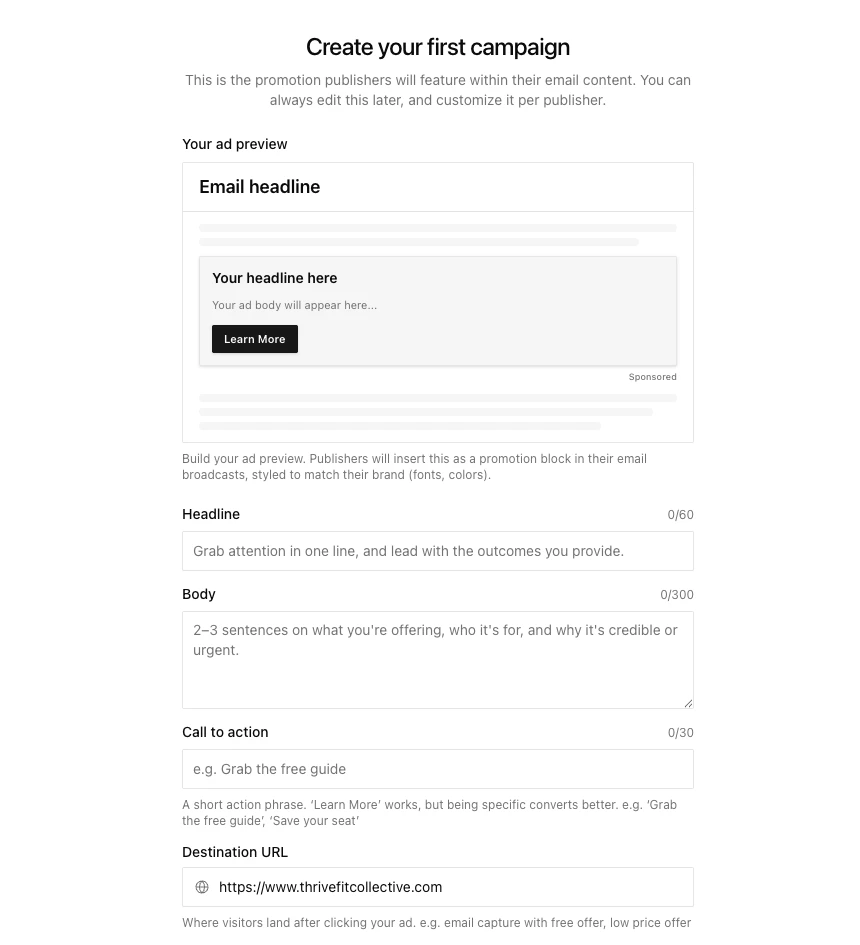
Create an ad campaign
This is the actual ad copy that will appear inside Publishers’ emails. You’ll see a live preview as you fill it in.- Headline: The main attention-grabber. Lead with the outcome you provide — “Build a profitable course in 30 days” outperforms “Welcome to our course platform.”
- Body: 2–3 sentences describing what you’re offering, who it’s for, and why it’s credible or urgent.
- Call to action: The text on the button (defaults to “Learn More”). Specific CTAs convert better (e.g. “Save your free seat,” “Watch the full system.”)
- Destination URL: Where readers go when they click. Use a page that matches the promise of your headline.
- Max budget per send: The most you’re willing to pay for a single sponsored send. Amplify uses this to recommend Publishers in your price range, but you can still send a request to any Publisher regardless of price.
Review and create the Sponsor profile
Preview your Sponsor profile and ad exactly as they’ll appear to Publishers. When you’re ready, click Create Profile & Continue to Home.Note: Sponsors don’t need to connect Stripe. When a promotion is approved, Kajabi sends you an invoice to pay through Stripe Checkout.
Activation checklist
Once your profile is live, you will see an activation checklist on the home page that walks you through the actions that lead to your first published promotion. The checklist sits between the metric cards and Recent Activity, and disappears permanently once every step is complete. Most profiles start with these four steps:- Complete profile: Add a Bio, profile photo, and at least one social link. Click Go to Settings → to jump to your profile settings.
- Save your favorites: Browse the directory and save at least one profile to mark this step complete.
- Send first request: Pick an expert and send a promotion request.
- Run first promotion: For Publishers: agree on the copy, add the Sponsored block to your email, and earn revenue. For Sponsors: agree on the copy, pay the invoice, and grow your reach.
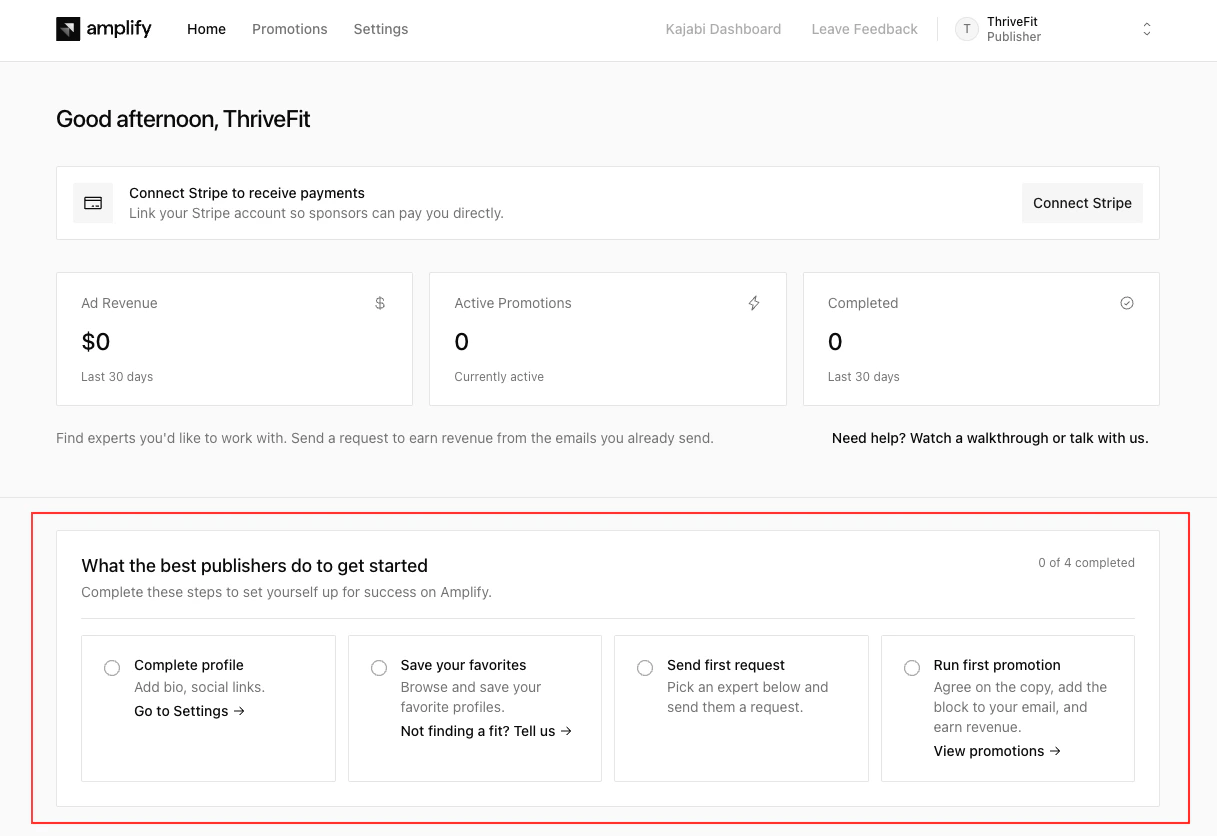
Note: Steps can be completed in any order. There is no enforced sequence.
Note: The checklist cannot be dismissed manually. It only disappears once all steps are complete.
Manage settings
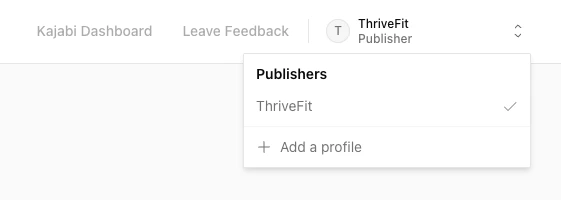
Publishers and Sponsors can update their profile and campaign information at any time from the Settings tab. Website and social media links are pulled in automatically from your site’s brand settings, but can be updated anytime in Settings. These appear on your profile so other experts can learn more about you and confirm you’re a good fit.Switch between profiles
If you’ve created both a Publisher and a Sponsor profile, use the profile switcher dropdown in the top right corner of the Amplify dashboard to toggle between them.Add an additional profile
You can run multiple profiles from the same account:- One Publisher profile per Kajabi site in your account.
- Multiple Sponsor profiles, one for each Product or business you want to promote, including Products you don’t manage through Kajabi.
- Click on your profile name in the top right corner of the Amplify dashboard and click + Add a profile.
- Choose Publisher or Sponsor.
- Walk through the matching setup flow above.
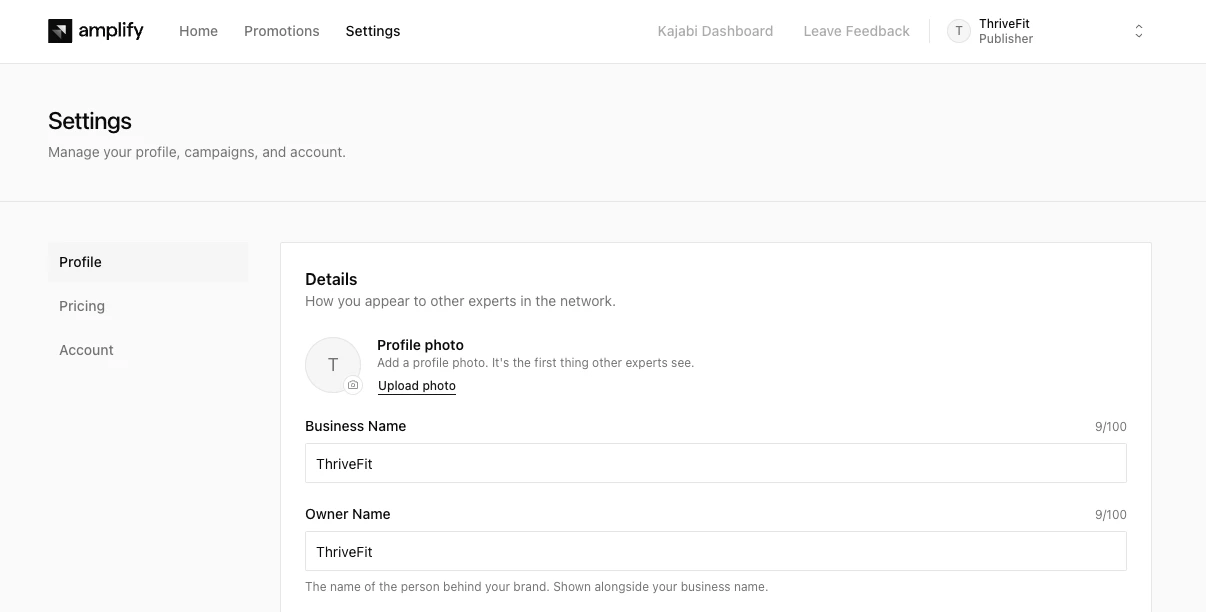
Add a Profile photo
A Profile photo replaces the default initial-letter avatar everywhere your profile appears. Photos are optional but help your profile feel more personal to other experts.- Go to Settings > Profile.
- Select Upload photo under Profile photo.
- Choose a photo from your computer.
- Save your changes.
Add a Joined year label
A Joined [year] label automatically appears on your profile, showing the year you first created your Kajabi account. This acts as a trust signal for other experts — newer experts won’t appear suspicious, and longer-tenured experts get credit for their history with Kajabi.Note: If a Sponsor profile is not tied to a Kajabi site, no Joined label appears.
Earn profile badges
The Amplify team awards badges to high-performing Publisher profiles based on engagement and pricing data. Only one badge displays at a time. Badges are recalculated daily based on each Publisher’s Email Broadcast data. Hover over a badge in the directory to see its description. The current badges are:- High engagement: This Publisher’s audience clicks at a rate well above average for their audience size.
- Good engagement: This Publisher’s audience shows solid, consistent click-through rates for their audience size.
- Good value: This Publisher is competitively priced relative to their audience size and engagement level.