Beta: This feature is currently in Beta. Future entitlements and pricing are subject to change.
Before you begin
- You need at least one published Offer or Landing Page for the Sales Agent to represent.
- The Agent block is added through the Theme Editor, so the Landing Page you plan to attach the Agent to should be on an up-to-date theme.
Note: Builder 2.0 is required when adding an Expert Agent to a Page or Product. Learn how to upgrade here.Note:
Agents only work on the latest Encore and Premier site themes, and Premier and Momentum product themes: Encore Site 2.14.7, Encore Landing Page 2.14.7, Encore Offer 2.14.7, Encore Offer Upsell 2.14.7, Premier site 6.5.2, Premier Product 7.10.3, Momentum Product >=7.1.3 and above. Third-party templates can be updated to work with Agents.
Create a Sales Agent
Open the Expert Agents area
- From the Dashboard, click Agents.
- If you already have Agents listed, click + New chatbot in the top right.

- If you haven’t created any Agents yet, click Get started from the empty state.
Choose a template
The Create chatbot wizard opens to the Choose a template step.- Select the Sales Assistant template.
- Click Next.
Configure a Sales Agent
- In the Configure your chatbot step, fill in the following fields:
- Agent name (required) — The name prospects see at the top of the chat
- Description (optional) — A short internal description. Prospects do not see this
- Welcome message (optional) — The first message shown when a visitor opens the chat
- Knowledge sources (required) — Link the Sales Agent to the Offer(s) or Landing Page(s) it represents so the Agent knows which Offer it’s selling and what details it can reference
- Custom instructions (optional) — Give the Agent personality and focus, and shape how it communicates

- Language — “Always respond in Spanish”
- Emphasis — “Lead with the transformation, then the price”
- Tone — “Adopt a warm, encouraging tone”. The Agent is supportive, friendly, and concise by default; these instructions nudge from that baseline
- Persona framing — “Speak as a knowledgeable member of the team”
- Answers from your Offer details, product descriptions, and pricing — it won’t invent products or pricing you haven’t published
- Speaks as a representative of your business, never claims to be you
- Does not give medical, legal, financial, or other professional advice
- Does not perform account actions (purchase on a buyer’s behalf, refund, change settings)
- Refuses off-topic questions, even when asked repeatedly
- When you finish, click Submit. A Chatbot successfully created message appears and you’re returned to the list.
Choose which content your Agent uses
When you add a Knowledge source during setup, you can pick exactly which parts of it your Agent learns from instead of including the whole source. This works for both Teaching Assistants and Sales Agents.- In the Knowledge sources section, select the gear icon next to a source (Customize resources, or Customize channels for a Community) to open it.
.png?fit=max&auto=format&n=S7Xrgq4JuBUp-VKD&q=85&s=8ae71198a2ff175cd3d4acc3dd847f3a)
- From there you can include or exclude individual pieces of content:
- In a Course, choose specific Modules, Submodules, and Lessons, and within a Lesson, include the Lesson text, the video transcript, or specific downloads
- In a Community, choose specific Channels
- Use Select all or Deselect all to start from a full or empty list, then choose Save selection. A Customized label appears on any source where you have turned something off.

Note: Newly published material is automatically included in the sources you select, so you only need to turn off content you want to leave out.
Add a Sales Agent to a Landing Page
Creating a Sales Agent turns it on, but prospects can’t reach it until you place it on a page using the Theme Editor.Floating chat button
A floating chat button is a small circular button that floats in the corner of every page where it’s placed. Clicking it opens the chat in a panel. Use this for an always-available Agent that doesn’t take up page real estate.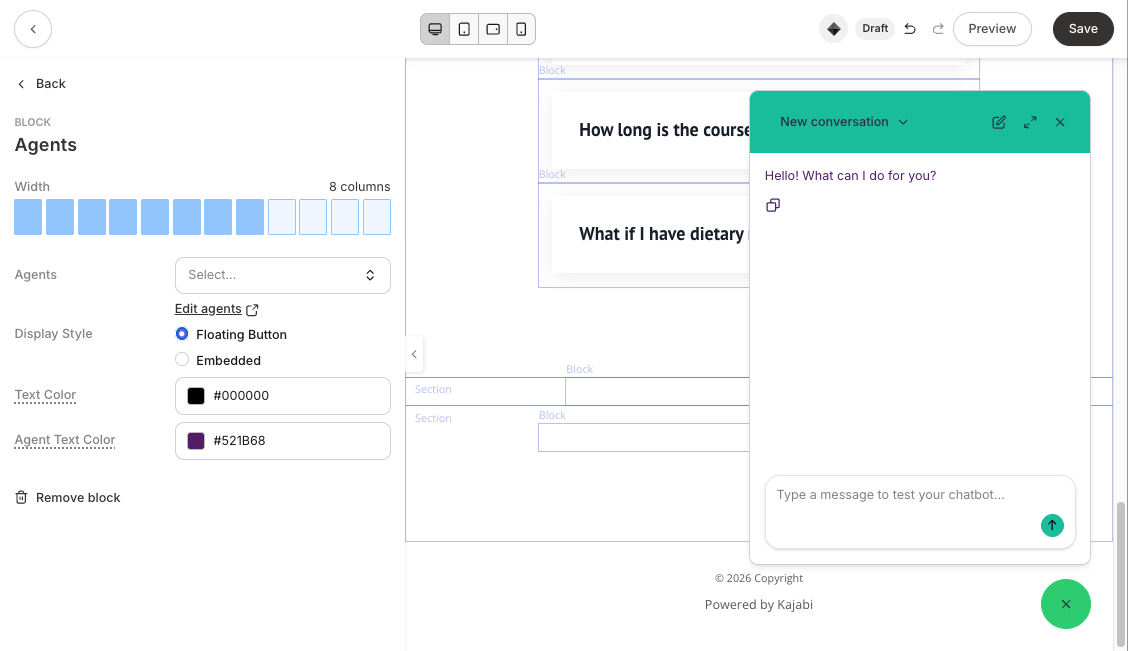
- From the Dashboard, click Website, then Landing Pages, and select the page you want to edit.
- Open the page in the Theme Editor.
- Click + Add section and select Agents at the end of the list. Click Add.
- Select the Sales Agent under Agents.
- Select Floating button, and choose a Text Color and Agent Text Color.
- Click Save.
- Publish the page by clicking the more options (…) menu to the right of the Landing Page and select Edit Details.
.png?fit=max&auto=format&n=smWY9W4hXXSW9BJS&q=85&s=1fc872990053192623039b69d875cb02)
- In the Page visibility section, select Publish.
- Click Save in the lower right corner to apply your changes.
- After publishing, you can also return to the page to configure more color and layout attributes, including Agent Icon Color and Window Frame Color.
Embedded chat block
An embedded chat block (Agent) is an inline chat panel that lives directly inside a page section. Use this when you want the Agent to be visually prominent — for example, alongside your Offer details on a Sales Page.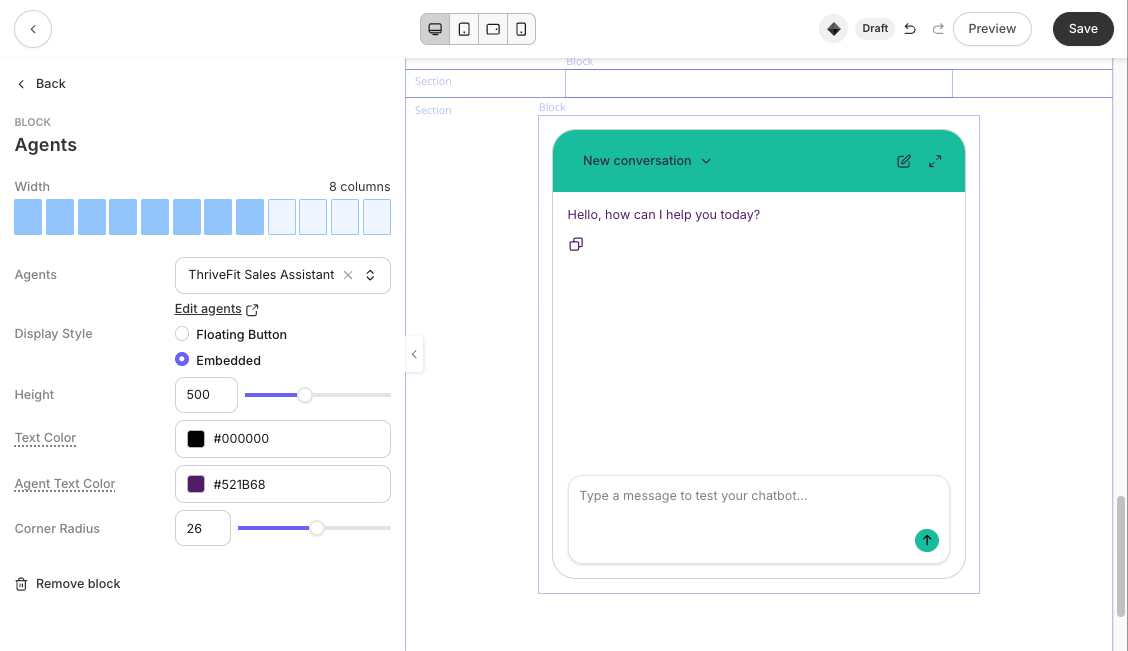
- In the Theme Editor for your Landing Page, click + Add section and select Agents at the end of the list. Click Add.
- Select the Sales Agent under Agents.
- Select Embedded, and configure a block Height and Corner Radius to round the block corners if desired.
- Choose a Text Color and Agent Text Color.
- Click Save and publish the page as described above.
- Once it’s published, you can return to the Agent block in the page and edit the Window Frame Color.
Note: The embedded Agent block needs enough vertical space to render the chat comfortably. The Theme Editor enforces a minimum height when the block is placed.
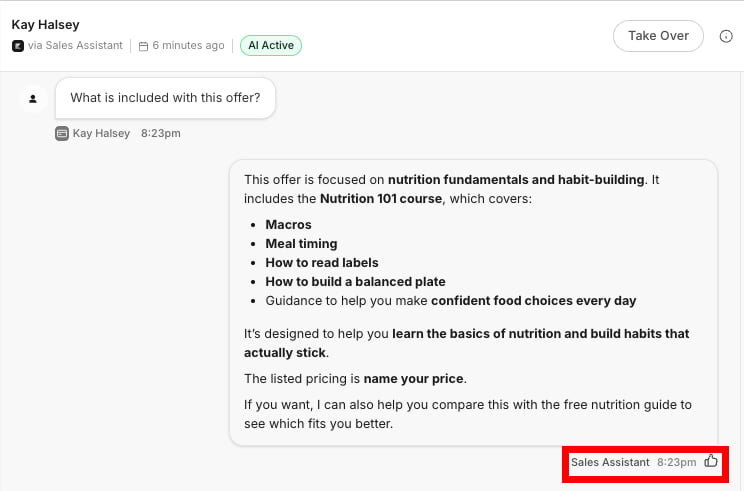
Member ratings for Agent responses
Turn on Response ratings to show a thumbs up and thumbs down under each of your Agent’s replies. Members select one to tell you whether a response was helpful, so you can see where your Agent performs well and where it needs better content or instructions.Note: Response ratings are off by default for Sales Agents. Turn them on when you want feedback.
Turn on response ratings
- Edit your Agent and find the Response ratings toggle.
- Turn it on to show 👍 and 👎 buttons under your Agent’s replies.
- Save your changes.

See how members rated responses
Open a conversation in your Inbox to see which replies members marked Helpful or Unhelpful. Ratings appear next to each agent reply.